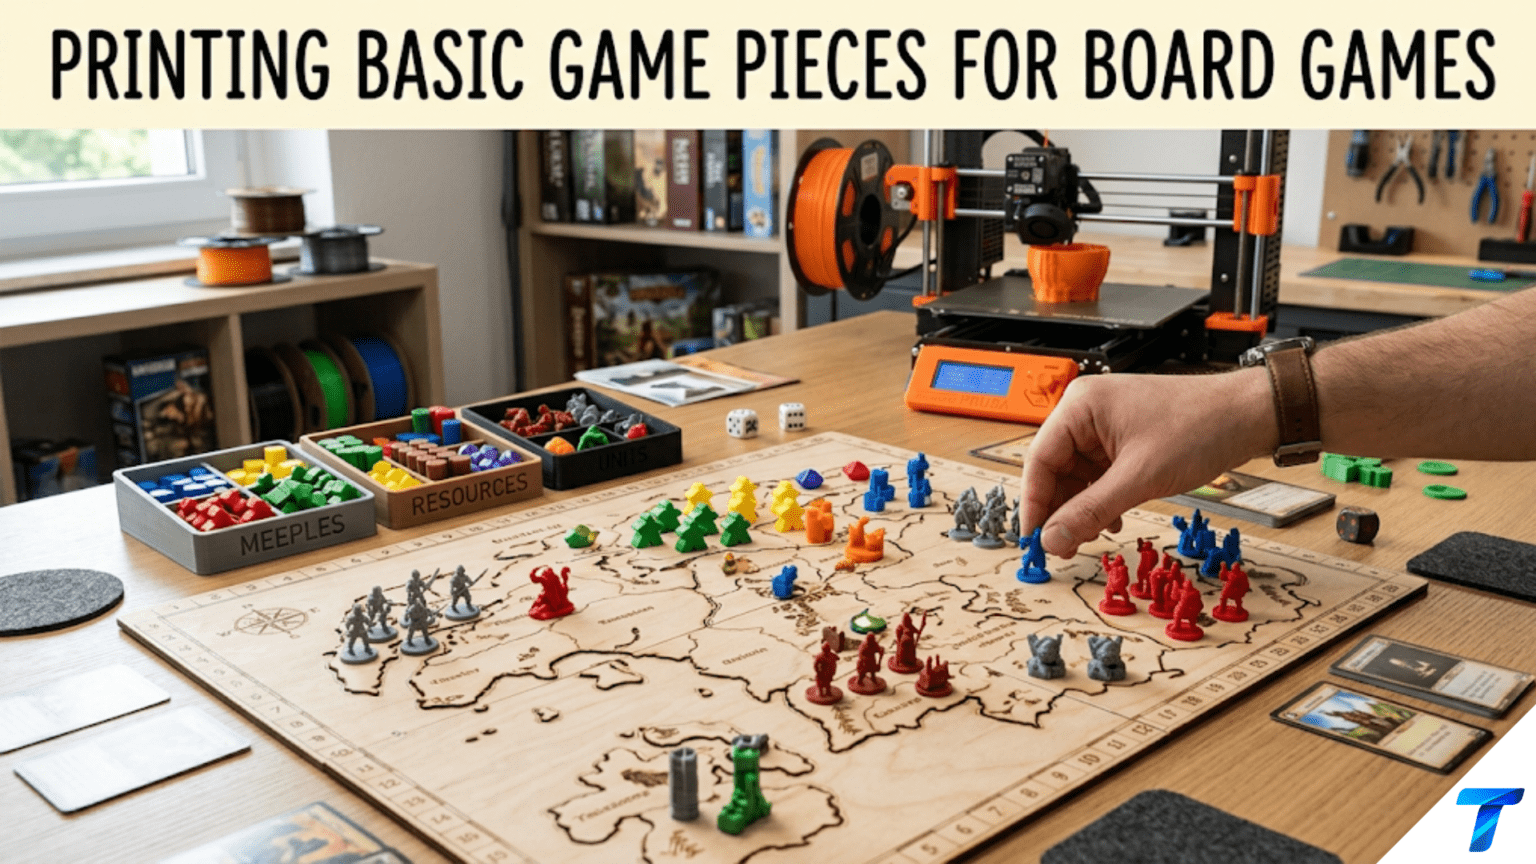
3D printed board game pieces are custom-designed tokens, pawns, dice, tiles, markers, and other game components produced on a home FDM printer — either to replace missing pieces from existing games, upgrade standard cardboard components to three-dimensional plastic, or create entirely new game elements for custom or homebrewed games. Game piece printing is an ideal beginner project because the components are small, print quickly, introduce batch printing techniques, and produce results that genuinely improve the gaming experience for the whole household.
Introduction: The Games That Deserve Better Pieces
Every dedicated board gamer has experienced both versions of the same problem. The first: a beloved game has lost one of its pieces — a token here, a pawn there — and the game sits unplayable or played with a stand-in that breaks the immersion every time it’s handled. The second: a game comes with perfectly functional but utterly generic cardboard tokens or wooden cubes that do the job mechanically but contribute nothing to the experience, when the game’s theme and art direction suggest that better components would transform the game from a puzzle into an event.
3D printing solves both versions of the problem with equal elegance. A single missing pawn, a specific token that the game no longer produces spare of, a custom replacement that matches the original perfectly — all printable in an afternoon. An upgrade set that transforms a game’s generic wooden cubes into themed, three-dimensional pieces that match the game’s aesthetic and make every component interaction more satisfying — also printable, with more design work but the same basic process.
Beyond the replacement and upgrade cases, there is a third application that opens up as your printing and design skills develop: creating components for original or homebrew games — the custom tabletop games that game designers create from scratch, or the house-rules variants and expansions that gaming groups develop for their favorite games. For this application, the printer becomes a game development tool.
Board game pieces are excellent beginner projects for several reasons that extend beyond the immediate utility. They are small (most pieces are 10–40mm in major dimensions), so they print quickly and use minimal material. They must be produced in sets — a board game needs 4–6 identical pawns, 30 identical tokens, a set of dice — which teaches batch printing and consistency. They are handled frequently and by multiple people, introducing real-world durability requirements. And the painted finishing that brings game pieces to life introduces miniature-painting adjacent techniques that are genuinely satisfying to learn.
This guide covers the full spectrum of game piece printing: the major types of game components worth printing, design approaches and dimensions for each, material selection for handled game pieces, slicer settings for small batch printing, painting and finishing for maximum visual impact, and a range of creative game component projects organized by skill level.
Types of Game Pieces Worth Printing
1. Pawns and Player Tokens
The classic pawn — a small humanoid figure or abstract shape that represents a player’s position on the board. Standard commercial pawns are typically 25–35mm tall with a base diameter of 15–20mm.
Design categories:
- Classic pawn shape: The iconic mushroom or cone-on-disc form familiar from Monopoly and countless other games. Simple geometry, fast to print, immediately recognizable.
- Meeple: The humanoid figure popularized by Carcassonne — a stylized person silhouette on a flat base. Print flat (standing upright with the widest face on the bed) for best detail.
- Custom character pawns: Pawns that match a specific game’s theme — spaceship silhouettes for a space game, castle towers for a medieval game, vehicles for a racing game.
- Numbered or colored pawns: Identical pawn shapes printed in different colors for player differentiation, or with numbers embossed for additional identification.
Minimum dimensions for reliable printing:
- Pawn height: 20mm minimum (shorter is possible but increasingly fragile)
- Base diameter: 15mm minimum for stability
- Thinnest feature: 1.5mm minimum for structural elements
2. Tokens and Markers
Flat or low-profile pieces used to track game state — resource tokens, victory point markers, damage counters, influence markers. These are among the most commonly lost game components and the most frequently requested replacement prints.
Design approach: The most useful token design is a simple cylinder (15–25mm diameter, 3–5mm thick) with an embossed or debossed identifier on the face — a number, symbol, icon, or resource image. The flat coin-like form stacks well, handles easily, and communicates clearly.
Two-color tokens: For maximum visual clarity, print the token body in one color and use the contrast painting technique (from Articles 76 and 81) to fill the debossed identifier with a contrasting color — gold text on black, white symbol on red, etc.
Thickness considerations: Tokens under 2mm are fragile and difficult to pick up from flat surfaces. 3–4mm is the practical minimum for comfortable handling. Stacking tokens (for tracking quantities) benefit from a consistent height per unit.
3. Dice
Custom dice are one of the most popular game printing projects. Standard dice have standardized face arrangements that must be followed for fair use — but the form, size, and aesthetic can be customized freely.
Standard die face arrangements:
- D6 (six-sided): Opposite faces sum to 7: 1 opposite 6, 2 opposite 5, 3 opposite 4. This convention is universal and must be followed for a die to be “standard.”
- D4, D8, D10, D12, D20: Each has standardized face arrangements from the tabletop RPG tradition. These are available as free STL files from the community with correct face arrangements already built in.
Dimensional requirements for dice:
- Size: Standard D6 is 16mm per side. Smaller dice (12mm) are harder to pick up; larger (20mm+) feel satisfying but take more material.
- Edge rounding: Dice must have rounded edges and corners to roll fairly. Sharp-edged dice land more often on faces than edges and roll biased results. A 1–2mm edge radius is the minimum for acceptable roll fairness.
- Face numbering: Pips (dots) at 0.5–1mm deep are sufficient for clear identification. Number faces (1, 2, 3…) or custom symbols work equally well.
Print quality for dice: Dice require more attention to print quality than most game pieces because:
- Visual symmetry across all six faces affects perceived fairness
- Any surface protrusion or deformity changes the die’s rolling behavior
- The dimensional accuracy must be good enough that the die doesn’t favor any face due to mass distribution
Print dice at 100% infill or as close to solid as practical — any hollow sections would create uneven mass distribution that biases the roll. Use 0.15mm layer height for clean number/pip geometry.
4. Tiles and Cards
Printed tiles serve several game functions:
- Terrain tiles: Hexagonal or square tiles representing different terrain types in map-building games. These are flat, simple to print, and can be color-coded by type.
- Token tiles: Larger markers (40–60mm) that are too big to be called tokens but serve the same tracking function.
- Card standees: Small bases with slots that accept cards, allowing cards to stand upright on the board for visibility.
Hex tile design: The hexagon is the standard shape for modern tile-based games. A standard small hex tile is 25–35mm across flats (the flat-to-flat width) and 3–5mm thick. A larger terrain hex is 50–75mm across flats.
5. Miniatures
Character miniatures — the small sculpted figures used in miniature games like Warhammer, Dungeons & Dragons, and Descent — are the most complex and most artistically demanding game piece printing application. These are beyond the scope of this beginner article’s focus, but it’s worth acknowledging that FDM printing of miniatures (versus resin SLA printing, which is more common for miniatures) has improved significantly and is increasingly viable for basic miniature forms.
For FDM miniature printing, use 0.1mm or 0.12mm layer height, a 0.25mm or 0.4mm nozzle, and expect to invest in both print settings optimization and painting skill development to achieve results that do justice to the original sculpts.
6. Score Trackers and Game Organizers
Not game pieces per se, but game-adjacent prints that enhance the playing experience:
Score track markers: Small clips or pegs that slide along a printed score track, replacing the cardboard track and cardboard markers in many games.
Player board holders: Stands that prop player boards upright at a visible angle, rather than lying flat on the table.
Card holders/trays: Organizers that sort and display decks by type within the game box or on the table during play.
First Player Tokens: A distinctive decorative token (crown, star, special piece) that marks the first player each round — printed as a three-dimensional decorative object rather than a flat cardboard marker.
Design Principles for Game Pieces
The Handleability Principle
Game pieces are handled constantly — picked up, placed, moved, stacked, handed from player to player, sorted through rapidly. Every design decision should be evaluated through the lens of handleability:
Can it be picked up quickly? A token that sits flush with the table surface and has no protrusion to grip creates frustration every time it needs to be picked up. Add a slight lip or rim to flat tokens — a 1mm raised rim around the edge makes the token significantly easier to grab.
Is it the right weight? Very light pieces feel cheap and insubstantial. Very heavy pieces are tiring to handle frequently. For most game pieces, the natural weight of PLA or PETG at standard infill (20–30%) produces a satisfying “solid but not heavy” feel.
Does it stack? For tokens that will be stacked in piles, flat tops and bottoms are essential. Any surface texture or decoration should be kept to the sides or upper face only, keeping the stacking surfaces flat.
Does it fit the hand ergonomically? Pawns and player pieces should feel comfortable to pick up and move. Avoid very thin protrusions that are finger-contact points — if someone is pinching a piece between two fingers to move it, the surfaces their fingers touch should be smooth and have adequate surface area.
The Visual Clarity Principle
Game pieces communicate information rapidly across a gaming table. Design for visual clarity at normal gaming distances (1–2 meters):
High contrast: Color-coded pieces in clearly distinct colors. Red and green are the most difficult color pair for colorblind players — also design for clarity using shape differentiation, not only color.
Clear identification: Numbers, symbols, and icons should be large enough to read at arm’s length. Embossed or debossed elements should be deep enough (0.8mm minimum) to create clear shadow contrast.
Consistent scale: All pieces of the same type should be identical in dimensions so they read as “the same thing” at a glance.
The Durability Principle
Board games are handled frequently and stored in boxes where pieces knock against each other. Design game pieces to survive:
Thin protrusions are fragile: Any element narrower than 2mm in any direction is a fragile point that will snap under normal handling stress. Either increase the minimum dimension or redesign to eliminate the thin feature.
PLA is brittle for game pieces: A pawn tip that extends to a point in PLA will snap off after enough handling. PETG is significantly more durable for any piece with protrusions or points. For children’s games especially, PETG’s better impact resistance is worth the slightly more demanding print settings.
Infill affects drop survival: A pawn that gets knocked off the table onto a hard floor will survive better with 30–40% infill than with 10% infill. Increased infill gives more material to absorb and distribute impact force.
Materials for Game Pieces
| Material | Appearance | Durability | Painting Suitability | Recommendation |
|---|---|---|---|---|
| Standard PLA | Good color range | Moderate | Good | Good for tokens and tiles; brittle for tall pawns |
| PETG | Good | Very good | Good | Recommended for pawns and frequently handled pieces |
| Matte PLA | Flat, refined | Moderate | Excellent | Best painting base; hides layer lines |
| Silk/Metallic PLA | Premium appearance | Moderate | Fair (paint adheres less) | Excellent for special tokens, first player markers |
| Resin (SLA) | Excellent detail | Moderate | Excellent | Better for miniatures; different printer required |
| Glow-in-dark PLA | Glows | Moderate | Specialty | Fun novelty for specific game themes |
Color Coding Strategy
For player color sets (4–6 sets of identical pieces in different colors), consider:
Pure saturated colors print best: Strong red, blue, green, yellow, black, white. Avoid muddy or mixed colors for player differentiation — pure colors are more visually distinct at gaming distances.
Standard player color convention: Red, Blue, Green, Yellow are the traditional four-player colors. Add Purple and Orange for five or six players. These color conventions are immediately intuitive to experienced gamers.
Consistent finish within a set: All pieces of one player’s color should be from the same filament spool to ensure color consistency. Different spools of nominally the same color can produce visually different shades.
Slicer Settings for Game Pieces
Game pieces require specific settings driven by their small scale and batch printing requirements.
| Setting | Pawns | Tokens/Tiles | Dice |
|---|---|---|---|
| Layer Height | 0.15mm | 0.2mm | 0.15mm |
| Print Speed | 35–45 mm/s | 40–50 mm/s | 30–40 mm/s |
| Outer Wall Speed | 20–25 mm/s | 25 mm/s | 18–22 mm/s |
| Perimeters/Walls | 3–4 | 3–4 | 4 |
| Infill | 30–40% | 20–25% | 100% (solid) |
| Top/Bottom Layers | 4–5 | 4 | 5 |
| Support | Minimize | None | None |
| Minimum Layer Time | 10 seconds | 8 seconds | 12 seconds |
| Cooling | 100% | 100% | 100% |
| Bed Adhesion | Brim (3mm) | Brim (3mm) | Brim (3mm) |
Batch Printing Game Piece Sets
Game pieces are naturally produced in sets — you need 6 identical pawns, 30 identical tokens, a set of 5 dice. Batch printing (printing multiple pieces simultaneously) is the efficient approach, but requires attention to a few specific settings:
Spacing for cooling: As discussed in Article 84, spacing small parts well apart on the build plate extends the effective time between layers for each piece. For very small game pieces (under 20mm), space them 30–40mm apart to allow adequate cooling between layers.
Minimum layer time: Set 8–12 seconds minimum per layer. This is the most important setting for preventing heat accumulation that ruins small game piece geometry.
Identical placement orientation: When printing a matched set (e.g., 6 identical pawns), place them all in the same orientation on the build plate. This ensures consistent layer line direction, consistent seam placement, and consistent aesthetic appearance across the set.
Single versus all-at-once printing: Slicers offer two modes for batch printing — “all at once” (complete each layer of all objects before moving to the next layer) and “one at a time” (complete each object entirely before starting the next). For small game pieces, “all at once” typically produces better results because the travel between objects provides cooling time. “One at a time” is faster in total but each object is printed in a single thermal exposure without the cooling benefit of traveling between objects.
Painting Game Pieces: The Skill That Elevates Everything
Unpainted printed game pieces are functional. Painted game pieces are beautiful. The difference is significant enough that painting is worth learning for any game piece application where aesthetics matter.
Painting Philosophy for Game Pieces
Game piece painting exists on a spectrum from minimal (a single base coat to unify the surface appearance) to elaborate (full multi-layer miniature painting with highlights, shading, and detailed features). For beginners, the most rewarding starting point is the middle of this spectrum: base coat plus one or two additional colors for key features.
Essential Materials for Game Piece Painting
- Plastic primer spray: 2–3 thin coats create an excellent paint adhesion surface and unify the print’s surface appearance. Gray or black primer works well for most game pieces.
- Acrylic craft paints: Cheap, water-based, fast-drying. Brands like Apple Barrel, Folk Art, and Americana are available at craft stores for $1–2 per bottle.
- Brushes: A medium flat brush for base coats, a small detail brush (size 1 or 0) for fine work.
- Matte sealant spray: Protect the paint and reduce sheen to a gaming-appropriate matte finish.
The Base Coat
The base coat is a single solid color applied over the primer to establish the piece’s primary color. Apply 2–3 thin coats rather than 1 thick coat — thin coats dry faster, adhere better, and don’t fill in the fine surface detail.
For player color tokens and pawns, the base coat is often the only paint needed — a solid, well-applied base coat in the player color produces a clean, professional result.
Washes and Shading
A wash (also called an ink wash or shade) is a very diluted dark paint applied over the base coat. It flows into recesses and low areas while the surface-tension effect keeps it off the raised areas, automatically creating depth and shadow that makes three-dimensional geometry much more visible.
To apply a wash:
- Mix dark paint (dark brown, black, or a matching dark tone) with water at 1:10–1:15 ratio
- Apply generously over the entire piece
- Allow to flow into recesses naturally — don’t brush it out
- Wipe excess from flat surfaces if needed
- Allow to dry completely before further painting
After a wash, a pawn’s folds, recesses, and features suddenly read much more clearly. The improvement from this single step is dramatic.
Dry Brushing Highlights
After a base coat and wash, dry brushing applies highlights to the raised surfaces:
- Load a brush with a lighter version of the base color (or pure white for the most dramatic highlight)
- Wipe most paint off on a paper towel until the brush is nearly dry
- Drag the brush lightly over raised surfaces — the paint catches on high points only
- The result: a highlighted effect that makes the piece appear three-dimensional even under flat lighting
The Three-Step Paint Job
For beginners, three steps produce impressive results on any game piece:
- Base coat in the primary color
- Wash with a diluted dark tone for shadow and depth
- Dry brush with a lighter tone for highlights
This sequence takes 20–30 minutes per set of 6 pieces (with drying time between steps) and produces results that look comparable to commercially painted game pieces.
Step-by-Step: Printing a Complete Player Pawn Set
Let’s walk through creating a set of 4 player pawns in player colors for a family board game.
Step 1: Find or Design the Pawn
Search Printables or Thingiverse for “board game pawn” and choose a design with:
- Clean, solid geometry (no overhangs requiring significant support)
- Adequate base size (15mm+ diameter)
- Positive user reviews mentioning print reliability
- Dimensions specified (height 25–35mm for standard games)
If designing your own: In Tinkercad, a classic pawn shape is simply a cylinder (20mm diameter, 5mm tall) with a sphere (14mm diameter) sitting on top, the sphere’s center positioned 2mm above the cylinder top surface, and a slight taper on the sphere’s top half creating the head form. More elaborate shapes can be added but this basic form is surprisingly elegant.
Step 2: Plan Your Color Set
Four colors: Red, Blue, Green, Yellow (standard four-player convention). Print 1 test pawn in your first color before committing to all 4 sets — verify dimensions and print quality before scaling up.
Step 3: Slice for Quality Batch Printing
For each batch of 4–6 identical pawns (one color at a time):
- Layer height: 0.15mm
- Outer wall speed: 20mm/s
- Minimum layer time: 10 seconds
- 100% cooling
- 35% Gyroid infill
- 4 perimeters
- 3mm brim
- Spacing: 35mm between pieces on the plate
Orientation: Stand the pawn upright with the base on the build plate. If the pawn has any overhanging features, check in layer preview for support requirements and redesign to eliminate them if possible.
Step 4: Print All Four Color Sets
Print one color batch, change filament, print the next. Four batches of 4–6 pawns each, approximately 45–60 minutes per batch at 0.15mm layer height.
Maintain careful filament changes — purge thoroughly between colors, especially transitioning from dark to light colors.
Step 5: Post-Process
- Remove brims
- Sand bases lightly with 220-grit for a clean, flat bottom surface
- Inspect for any fragile protrusions — reinforce with a drop of thin cyanoacrylate if needed
Step 6: Optional Painting
For painted pawns that look like a premium game component:
- Prime with 2 coats of gray primer spray
- Base coat with player color acrylic paint (2–3 thin coats)
- Apply dark wash for depth
- Optional: dry brush highlights with a lighter tone
- Seal with 2 coats of matte sealant spray
The finished painted pawns look indistinguishable from commercial game pieces and significantly better than standard wooden pawns.
Game Component Upgrade Projects
Replacing Cardboard Tokens with 3D Printed Pieces
Many games ship with cardboard tokens, punch-out discs, or wooden cubes as economic compromises in component production. These functional but uninspiring components are the most popular upgrade target in the board game 3D printing community.
Approach: Identify the games in your collection with the most-handled cardboard tokens. Search for “[game name] token upgrade 3D print” on Printables — many popular games have dedicated upgrade sets already designed and shared by the community. Download and print in appropriate colors.
Popular upgrade targets: Scythe (worker tokens, structure tokens), Wingspan (egg tokens, food tokens), Pandemic (disease cubes), Terraforming Mars (resource tokens), Ticket to Ride (train cars).
Custom Dice for Themed Games
Replacing a game’s standard numerical dice with themed dice that incorporate the game’s visual language. A space game’s dice might replace numbers with planets and spaceships. A fantasy game’s dice might use runes or magical symbols.
Design requirements: Custom symbol dice require designing each face’s symbol, ensuring the standard opposite-face arrangement is maintained, and verifying that symbols are readable as intended distinct values during play.
Player Board Organization Trays
Game insert trays that organize components within the game box — keeping each player’s components in their own tray, sorting card types, organizing small tokens by category. These significantly reduce setup and teardown time and prevent the “avalanche” effect when opening a box with unsorted components.
Missing Piece Replacements
Identifying and printing exact replacements for specific missing game pieces:
- Identify the exact piece by measuring a surviving identical piece (or finding the game’s component list online with dimensions)
- Search for “[game name] [piece name] replacement 3D print” — often someone has already designed it
- If not found, design a matching piece in Tinkercad using measurements of the surviving pieces as reference
- Print in a matching or compatible color
Creative Game Piece Projects
Custom First Player Token
A distinctive decorative three-dimensional object that marks the first player each round — a crown, a meeple king, a pointed hat, a magical staff. These replace the often-forgettable cardboard first player markers in many games with something that players notice and want to hold. Print in silk gold or a premium filament for maximum visual impact.
Themed Resource Markers
For games with abstract resource tokens (cubes, discs), replace them with themed three-dimensional representations. A city-building game’s “lumber” resource becomes a small printed log bundle. An agriculture game’s “grain” becomes a small wheat sheaf. These “flavor tokens” transform the game’s resource management from abstract cube-pushing into something more evocative.
Miniature Terrain Tiles
For games with map-building elements, printed three-dimensional terrain tiles — mountains with actual height, forests with tiny trees, cities with small building forms — replace flat illustrated tiles with physical geography that players can see across the table and physically interact with.
Card Sleeves and Box Inserts
While not game pieces per se, custom box inserts printed to perfectly organize a game’s components within its box are extremely popular in the board gaming community. A well-designed insert keeps all components sorted and immediately accessible, eliminates the setup cost of the “dump and sort” approach, and protects cards and components from damage during storage.
Troubleshooting Common Game Piece Issues
Batch of Identical Pawns Has Inconsistent Appearance
Cause: Different heat conditions between pieces in the same batch, different position on the build plate affecting cooling, seam placement varying between pieces.
Solution: Arrange all pieces identically on the build plate, at consistent spacing. Set seam position to “Sharpest Corner” and orient all pieces so the sharpest corner is in the same direction on all pieces. Ensure minimum layer time is set to equalize cooling across the batch.
Token Feels Flimsy or Lightweight
Cause: Low infill percentage; too few perimeters; material too lightweight for the visual impression being sought.
Solution: Increase infill to 30–40%. Increase perimeters to 4. For tokens specifically, a solid bottom section (3–4mm solid base) with lighter infill above gives the impression of weight without using excessive material.
Pawn Tips or Features Break During Normal Handling
Cause: PLA brittleness; features too thin (under 2mm); print orientation leaving features vulnerable.
Solution: Switch to PETG for pawns with any thin features or protrusions. Ensure no designed feature is thinner than 1.5mm. If breakage occurs at a layer boundary, check print orientation — redesign so the weakest dimension is not at the layer interface direction.
Painted Pieces Show Brush Strokes Under Lighting
Cause: Paint applied too thickly in single coats; brush strokes visible in dried paint; wrong paint consistency.
Solution: Thin paint to appropriate consistency (should flow smoothly from brush, not drag). Apply in multiple thin coats. After final paint layers, apply a light misting coat of matte sealant — this fills subtle brush texture and unifies the surface dramatically.
Custom Dice Roll Biased Results
Cause: Hollow interior creating uneven mass distribution; dimensional inaccuracy causing one face to be slightly larger; sharp edges catching the surface.
Solution: Print dice at 100% infill for uniform mass distribution. Check dimensional accuracy with calipers after printing — all faces should be within 0.3mm of their designed dimensions. Ensure edge radius is at least 1.5mm on all edges. Roll the die 50 times and record results to test distribution — a fair die should show each face approximately 8–9 times in 50 rolls.
Conclusion: Games Are Better When the Pieces Matter
There is a reason that premium board game editions command significant price premiums: the pieces matter. The difference between handling quality wooden pawns, painted miniatures, and silk-finish tokens versus cardboard cutouts and generic wooden cubes is the difference between playing a game and inhabiting one.
Your printer gives you access to the same upgrade in quality, but personalized in a way that premium editions cannot offer. The pawns in your specific player colors, sized for your specific family’s hands. The tokens that match the exact visual language of the game on your shelf. The missing piece that lets a beloved game finally be played again.
These are small objects — a few grams of filament each, a few minutes to print. But they make games more satisfying to set up, more immersive to play, and more joyful to share with the people you play with.
Print some tokens. Make some pawns. Upgrade the game that deserves better components.
Then play.