Installing Windows is an essential skill for anyone who uses a computer, whether for personal use, professional tasks, or even gaming. Understanding how to install Windows provides users with more control over their devices, allowing them to troubleshoot issues, upgrade to the latest version, or set up a new machine from scratch. While the installation process may seem intimidating for beginners, this step-by-step guide will break down the process into easy-to-follow instructions. By the end of this guide, you’ll be confident in installing Windows on your own.
This guide focuses on installing Windows 10 and Windows 11, the most widely used versions of Microsoft’s operating system. The process is similar across both versions, with some minor differences. We will cover everything from preparing your computer, downloading the necessary files, creating installation media, and finally, installing Windows on your machine.
Before You Begin: Preparation Checklist
Before diving into the installation process, it’s important to ensure you have everything prepared. Here’s a checklist of items and tasks to complete before installing Windows:
1. Check System Requirements
Make sure your computer meets the minimum system requirements for the version of Windows you are installing. For Windows 10 and Windows 11, here are the basic requirements:
- Processor: 1 GHz or faster, with support for PAE, NX, and SSE2 (for Windows 10); or a compatible 64-bit processor with 1 GHz clock speed or higher (for Windows 11).
- RAM: At least 4 GB (8 GB or more is recommended for better performance).
- Storage: 64 GB or more for Windows 11; 32 GB or more for Windows 10.
- Graphics Card: DirectX 12 compatible or later with WDDM 2.0 driver.
- Display: 720p resolution or higher.
- TPM (for Windows 11): Trusted Platform Module (TPM) version 2.0, a hardware-based security feature, is required.
It’s crucial to verify that your hardware can support the installation, particularly if you’re installing Windows 11, which has stricter requirements than Windows 10.
2. Back Up Your Data
Installing Windows typically involves formatting your hard drive, which will erase all existing data. To prevent data loss, back up all your important files and documents to an external hard drive or cloud storage service such as Google Drive, Dropbox, or OneDrive. If you’re performing a clean installation, you will be starting from a blank slate, so ensuring you have backups is critical.
3. Obtain a Valid Windows License
You will need a valid product key to activate Windows after installation. If you’re reinstalling Windows on a device that already has an activated version, you might not need a new key, as it may be stored in your device’s firmware. If you are installing Windows on a new machine, you’ll need to purchase a product key from Microsoft or an authorized reseller.
4. Create a Bootable USB Drive
To install Windows, you’ll need to create a bootable USB drive with the Windows installation files. A USB drive of at least 8 GB is required. Follow these steps to create a bootable USB:
- Download the Media Creation Tool from Microsoft’s official website (for Windows 10 or Windows 11).
- Insert your USB drive into the computer.
- Run the Media Creation Tool and select Create installation media (USB flash drive, DVD, or ISO file) for another PC.
- Choose the correct language, edition, and architecture (32-bit or 64-bit) of Windows.
- Select USB flash drive and choose your inserted USB drive.
- The tool will download the necessary files and make your USB drive bootable.
Once you’ve created your bootable USB, you’re ready to start the installation process.
5. Modify BIOS/UEFI Settings
Before you can boot from the USB drive, you’ll need to configure your computer’s BIOS or UEFI settings. This is where you’ll tell your computer to boot from the USB drive instead of the internal hard drive.
- Restart your computer and enter the BIOS or UEFI settings by pressing a specific key during startup (usually F2, F10, F12, or Del—the key varies depending on the manufacturer).
- Navigate to the Boot menu and adjust the boot order, setting the USB drive as the first boot device.
- Save your changes and exit the BIOS/UEFI.
Your computer will now boot from the USB drive, taking you to the Windows installation setup.
Starting the Installation Process
With your bootable USB drive ready and your BIOS/UEFI configured, you’re now set to begin the Windows installation process.
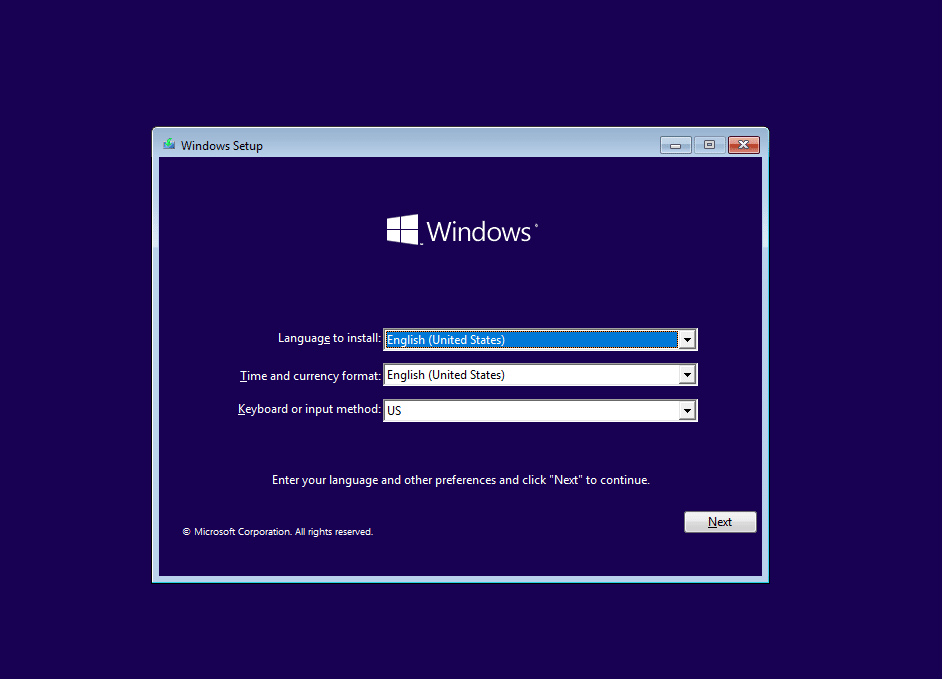
1. Boot from the USB Drive
After you’ve configured the BIOS/UEFI settings, your computer will automatically boot from the USB drive and launch the Windows Setup program. The first screen you see will ask you to select your language, time and currency format, and keyboard input method. Choose the appropriate options for your region and click Next.
2. Click Install Now
Next, you’ll be presented with the option to Install Now. Click the button to proceed with the installation.
3. Enter Your Product Key
If you have a product key, you’ll be prompted to enter it here. If you’re reinstalling Windows on a computer that already has an activated version, you can skip this step and enter the key later. Click Next to continue.
4. Choose Your Edition
Depending on your product key, you might be asked to choose which edition of Windows to install (e.g., Windows 10 Home, Windows 10 Pro, Windows 11 Home, or Windows 11 Pro). Select the edition that matches your product key and click Next.
5. Accept the License Agreement
Read through the Microsoft Software License Terms and check the box to accept the agreement. Click Next to proceed.
6. Select the Installation Type
You’ll now be asked to choose between two installation types:
- Upgrade: This option allows you to upgrade from an existing version of Windows while keeping your files, applications, and settings. This option is typically used when upgrading from a previous version of Windows (e.g., from Windows 10 to Windows 11).
- Custom (Clean Install): This option performs a clean installation of Windows. It deletes all data on the selected drive, so be sure you have backed up your important files. This is the recommended option for a fresh installation.
For this guide, we’ll focus on the Custom installation option.
7. Partition Your Hard Drive
Next, you’ll need to choose where to install Windows. You’ll see a list of available drives and partitions on your system. If you’re performing a clean install, it’s best to delete any existing partitions to ensure you’re starting fresh:
- Select each partition and click Delete (you may need to click Drive options (advanced) to access the delete option).
- Once all partitions have been deleted, you’ll have unallocated space. Select this unallocated space and click Next to install Windows on this drive.
Windows will automatically create the necessary partitions during installation.
8. Begin Installation
At this point, the installation process will begin. Windows will copy files, install features, and apply updates. This process can take anywhere from 15 to 30 minutes depending on the speed of your computer. Your machine will restart several times during this phase, so make sure to leave it powered on.
Post-Installation Setup
Once Windows has finished copying files and performing the initial installation steps, you’ll need to configure your system and personalize your settings. This post-installation setup is crucial for ensuring that your new Windows installation functions correctly and meets your preferences.
1. Initial Setup and Region Settings
After the installation files have been copied and your computer restarts, you’ll be greeted by a setup screen asking for your region and keyboard layout preferences. These settings ensure that Windows is configured for your location and language needs.
- Select your region (e.g., United States, United Kingdom, etc.).
- Choose your keyboard layout (e.g., US, UK, French, etc.). If you use multiple languages, you can add additional keyboard layouts at this stage by selecting Add layout.
Once you’ve made your selections, click Next to proceed.
2. Connect to a Network
In the next step, you’ll be prompted to connect to a network. If you’re connected via Ethernet, Windows will detect this automatically. If you’re using Wi-Fi, choose your Wi-Fi network from the list and enter your password.
Connecting to the internet at this point allows Windows to check for and download the latest updates during setup. However, if you don’t have access to the internet at this time, you can skip this step and set up the connection later through the network settings.
3. Set Up a Microsoft Account or Local Account
Windows gives you the option to set up your computer with either a Microsoft account or a local account. Each option has its pros and cons:
- Microsoft Account: A Microsoft account allows you to sync settings across multiple devices, access OneDrive for cloud storage, and download apps from the Microsoft Store. If you’re already using services like Outlook or Xbox Live, you’ll likely want to use your existing Microsoft account to set up your device.To set up a Microsoft account:
- Enter your email address and password associated with your Microsoft account.
- Follow the on-screen prompts to verify your identity and sign in.
- Local Account: If you prefer not to link your computer to a Microsoft account, you can opt for a local account instead. This option is useful if you want to keep your computer usage separate from the cloud or if you’re setting up a computer that won’t be connected to the internet regularly.To set up a local account:
- Select Offline account when prompted to sign in with a Microsoft account.
- Follow the on-screen prompts to create a username and password for your local account.
Once you’ve set up your preferred account, click Next to proceed.
4. Set Up Security and Privacy Settings
Windows will now guide you through a series of screens to configure your security and privacy settings. These options allow you to control how much personal data is shared with Microsoft and third-party apps, and how your system handles things like diagnostics, location services, and tailored ads.
- Diagnostics & Feedback: This setting allows you to control how much diagnostic data is sent to Microsoft. You can choose between Required diagnostics (minimal data) or Optional diagnostics (more detailed data to help improve Windows).
- Location Services: If you enable location services, apps like Maps and Weather can provide personalized results based on your location.
- Find My Device: This feature helps you locate your device if it’s lost or stolen. It’s especially useful for laptops.
- Tailored Experiences: This option allows Windows to use your diagnostic data to provide personalized tips and recommendations. You can choose to enable or disable it based on your preferences.
Review each option and make your selections based on your privacy preferences, then click Next.
5. Set Up Windows Hello (Optional)
If your computer has compatible hardware, Windows may prompt you to set up Windows Hello, a feature that allows you to sign in using biometrics such as facial recognition or a fingerprint scan. This adds an extra layer of security and convenience when logging into your device.
If you prefer not to use Windows Hello, you can skip this step and stick with your password or PIN for signing in.
6. Create a PIN for Easy Sign-In
Windows will now prompt you to create a PIN. A PIN is an additional sign-in method that provides a quicker way to access your device compared to a password. It’s a good idea to set up a PIN for convenience, and you can use it alongside your password for added flexibility.
To set up a PIN:
- Enter a 4-digit or longer numeric PIN.
- Confirm the PIN and click Next.
7. OneDrive Setup (Optional)
Windows will ask if you’d like to back up your files to OneDrive, Microsoft’s cloud storage service. This feature allows you to sync files across multiple devices and access them from anywhere. If you already use OneDrive or want to take advantage of cloud storage, you can choose to enable this option and sign in with your Microsoft account.
If you prefer not to use OneDrive, you can select Only save files to this PC to keep your files stored locally on your computer.
8. Installing Windows Updates
Once you’ve completed the initial setup, Windows will check for updates. If you’re connected to the internet, Windows will automatically download and install any available updates, including security patches and driver updates. This process ensures that your system is up-to-date and protected against the latest vulnerabilities.
Depending on the size of the updates and your internet connection, this process can take anywhere from a few minutes to an hour. Let the updates install and restart your computer when prompted.
Installing Device Drivers
After Windows is installed, you’ll need to ensure that all your hardware components—such as your graphics card, sound card, and network adapters—are functioning correctly. This requires installing the appropriate device drivers.
Windows will automatically attempt to detect and install drivers for most of your hardware during the setup process. However, it’s a good idea to manually check that all drivers are installed and up to date, especially for critical components like your graphics card and motherboard.
1. Check Device Manager
The Device Manager allows you to view and manage all the hardware components on your system. To open Device Manager:
- Right-click the Start button and select Device Manager.
- Look for any devices with a yellow warning triangle, which indicates that the driver is missing or outdated.
2. Install Missing or Updated Drivers
If you see any devices with missing drivers, you can:
- Use Windows Update to automatically find and install drivers.
- Visit the manufacturer’s website to download and install the latest drivers manually. This is especially important for graphics cards (NVIDIA, AMD), where updated drivers can significantly impact performance and compatibility with games and applications.
Once all drivers are installed and functioning correctly, your system should be ready for use.
Personalizing Your Windows Installation
Now that the installation is complete and your drivers are up to date, it’s time to personalize your Windows environment to suit your preferences. Windows offers several customization options to help you tailor the look and feel of your desktop.
1. Customize Your Desktop
- Change the wallpaper: Right-click on the desktop and select Personalize to change your wallpaper and theme.
- Adjust screen resolution: Go to Settings > System > Display to adjust the screen resolution and scale, ensuring that everything looks sharp and correctly sized on your display.
2. Install Essential Software
After setting up your system, it’s time to install essential software for your daily tasks. Here’s a list of common applications to consider:
- Web Browsers: If you prefer alternatives to Microsoft Edge, you can install Google Chrome, Mozilla Firefox, or Brave.
- Office Suites: Install Microsoft Office, LibreOffice, or Google Docs for productivity.
- Antivirus Software: Windows comes with Windows Defender built-in, but you can install additional antivirus software if needed.
- Media Players: VLC Media Player is a popular choice for playing audio and video files.
3. Set Up Additional Accounts
If you’re sharing your computer with other users, you can create additional user accounts:
- Go to Settings > Accounts > Family & other users.
- Click Add someone else to this PC and follow the prompts to set up a new user account.
Finalizing Your Windows Setup
Once you’ve completed the basic setup and personalization of your Windows installation, there are a few final tasks to perform to ensure your system is fully optimized and secure. This section will guide you through configuring additional settings, setting up automatic backups, and performing regular maintenance to keep your system running smoothly.
1. Configure Windows Updates for Automatic Maintenance
One of the most important tasks after installing Windows is ensuring that your system receives automatic updates. Windows updates provide critical security patches, bug fixes, and feature enhancements that keep your system running efficiently and securely.
To configure automatic updates:
- Open Settings and go to Update & Security.
- Click on Windows Update and select Advanced options.
- Ensure that Automatic updates are enabled. You can also choose to allow updates to install during inactive hours by configuring the Active Hours setting.
It’s a good idea to set a time when you’re not using the computer as your active hours to avoid any interruptions during work or gaming.
2. Enable System Restore
System Restore is a built-in feature in Windows that allows you to revert your system to a previous state in case something goes wrong after installing new software or drivers. By default, System Restore may not be enabled, so it’s important to turn it on to ensure you can recover your system in case of issues.
To enable System Restore:
- Open the Control Panel and search for System Restore.
- Click on Create a restore point and go to the System Protection tab.
- Select your system drive (usually C:) and click Configure.
- Choose Turn on system protection and adjust the amount of disk space allocated for restore points.
- Click Apply and then OK.
System Restore will now create restore points automatically before significant system changes, giving you the ability to revert to a working state if needed.
3. Set Up File Backup with OneDrive or External Drives
Backing up your data is an essential part of system maintenance, ensuring that you don’t lose important files if something happens to your computer. Windows offers several options for backing up your files, including OneDrive and File History.
- OneDrive Backup: If you signed in with a Microsoft account, you can use OneDrive to automatically back up your Documents, Pictures, and Desktop folders to the cloud. To check your backup settings:
- Open Settings > Update & Security > Backup.
- Choose Back up files to OneDrive and follow the instructions to enable cloud backups.
- File History Backup (External Drive): If you prefer to back up your files locally to an external drive:
- Connect an external hard drive or USB drive to your computer.
- Go to Settings > Update & Security > Backup and select Add a drive.
- Choose your external drive, and Windows will automatically back up your files using File History.
By regularly backing up your files, you protect yourself from data loss due to system crashes, hardware failure, or accidental deletion.
4. Configure Power and Sleep Settings
Optimizing your power settings can help extend battery life on laptops and improve performance on desktops. Windows offers a variety of power plans that allow you to strike a balance between performance and energy efficiency.
To configure power settings:
- Open Settings > System > Power & sleep.
- Adjust the Screen and Sleep settings to your preferences.
- For more detailed power management, click Additional power settings and choose between Balanced, Power Saver, or High Performance power plans.
You can also create a custom power plan to meet your specific needs, such as reducing screen brightness or turning off the display sooner to save battery life.
5. Install Additional Software and Drivers
At this stage, it’s important to make sure your system has all the necessary software and drivers to function properly. In addition to installing essential applications, like web browsers and office suites, you may need to install drivers for specific hardware, such as printers, scanners, or graphics cards.
- Graphics Drivers: For the best performance, especially for gaming or graphic design, make sure your GPU drivers are up to date. Visit the NVIDIA or AMD websites to download and install the latest drivers for your graphics card.
- Peripheral Drivers: If you’re using peripherals like printers, scanners, or external devices, check the manufacturer’s website for the latest drivers and software to ensure full compatibility with your new Windows installation.
Once all your drivers and software are installed, your system should be fully functional and ready for everyday use.
Common Troubleshooting Tips for Installation Issues
Even with careful preparation, you may encounter issues during or after the installation process. Here are some common problems and how to resolve them.
1. Windows Installation Stuck or Slow
If your Windows installation seems stuck or is taking an unusually long time, try the following steps:
- Ensure your USB installation media is properly created and not corrupted. If necessary, create a new bootable USB using the Media Creation Tool.
- Disconnect unnecessary external devices (e.g., printers, external hard drives, or USB hubs) as these can sometimes interfere with the installation process.
- Restart the installation and try again, making sure your system meets the minimum hardware requirements.
2. Missing Drivers After Installation
After installation, if certain hardware (e.g., network adapter, sound card) is not functioning correctly, you may need to install missing drivers:
- Open Device Manager to check for devices with missing or outdated drivers.
- Visit the manufacturer’s website for the latest driver downloads and install them manually.
- Use Windows Update to automatically search for driver updates.
3. Activation Issues
If Windows fails to activate after installation, check the following:
- Ensure you’ve entered the correct product key. If you purchased a digital copy of Windows, check your email for the product key, or if you upgraded from a previous version, activation may be automatic.
- If activation fails, contact Microsoft Support for assistance. They can help troubleshoot activation issues and guide you through the process.
4. Low Disk Space After Installation
If you find that your system has very little disk space after installation, you can free up space by:
- Running Disk Cleanup to remove temporary files, old installation files, or system restore points.
- Moving large files or unused programs to an external drive or cloud storage.
Maintaining Your Windows Installation for Long-Term Use
Keeping your Windows installation running smoothly requires regular maintenance. Here are a few essential tasks to perform regularly:
1. Update Windows Regularly
Windows updates provide critical security patches, bug fixes, and feature improvements. Ensure that automatic updates are enabled, and check for updates manually by going to Settings > Update & Security > Windows Update.
2. Run Antivirus Scans
Even though Windows includes Windows Defender, it’s important to run regular antivirus scans to detect and remove potential threats. If you prefer, you can install a third-party antivirus program for additional protection.
3. Defragment Your Hard Drive (HDD Only)
If you’re using a traditional hard drive (HDD), defragmenting can improve performance by optimizing file storage. Go to Settings > System > Storage and click Optimize Drives to schedule regular defragmentation. Note that this step is unnecessary for SSDs.
4. Clean Temporary Files
Use Disk Cleanup or third-party tools like CCleaner to regularly remove unnecessary temporary files and free up disk space.
By following this step-by-step guide, you’ve successfully installed Windows on your computer, configured essential settings, and ensured that your system is secure and optimized for daily use. Whether you’re setting up Windows 10 or Windows 11, the installation process is relatively straightforward, and with a little preparation, you can perform a clean installation or an upgrade with ease.
Remember to keep your system updated, backed up, and regularly maintained to ensure it runs smoothly for years to come. With these skills, you’re now empowered to take control of your own system, install new operating systems when needed, and troubleshoot basic issues.
Conclusion
By following this step-by-step guide, you’ve successfully installed Windows on your computer, configured essential settings, and ensured that your system is secure and optimized for daily use. Whether you’re setting up Windows 10 or Windows 11, the installation process is relatively straightforward, and with a little preparation, you can perform a clean installation or an upgrade with ease.
Remember to keep your system updated, backed up, and regularly maintained to ensure it runs smoothly for years to come. With these skills, you’re now empowered to take control of your own system, install new operating systems when needed, and troubleshoot basic issues.