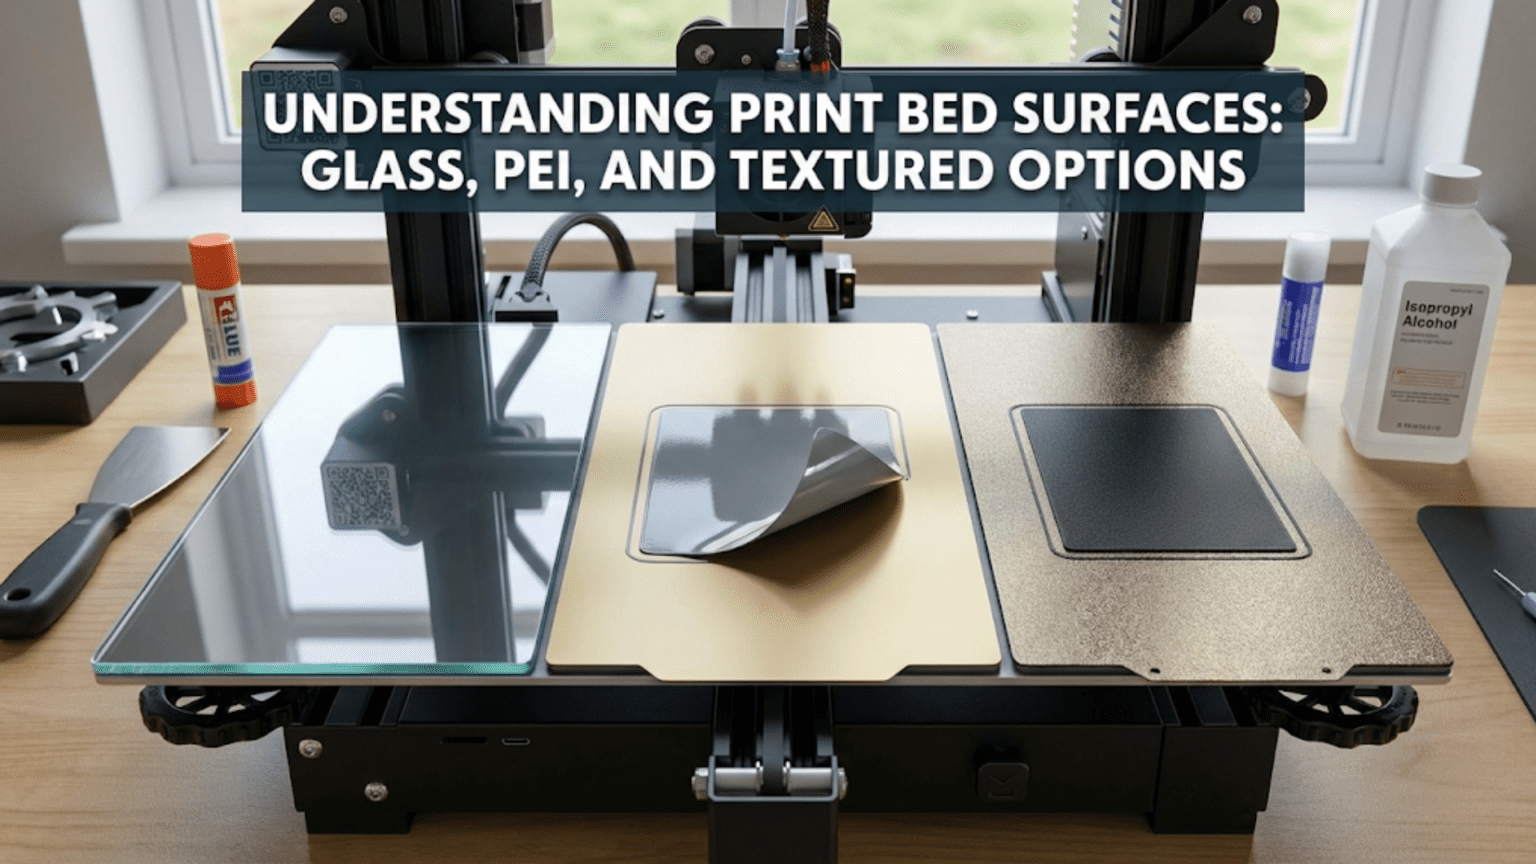
Print bed surfaces are specialized materials applied to or used as the top layer of a 3D printer’s build plate, engineered to provide optimal adhesion during printing while allowing easy part removal afterward. Common options include glass (flat and durable), PEI/polyetherimide (excellent adhesion without aids), powder-coated spring steel (removable and flexible), BuildTak (strong grip texture), and various specialty surfaces, each offering different balances of adhesion strength, durability, maintenance requirements, and compatibility with specific filament types.
Introduction
The surface where plastic meets metal—or glass, or PEI, or any number of other materials—determines whether your 3D print succeeds or fails. This seemingly simple top layer of your build plate has an outsized impact on printing outcomes. The right surface for your material means prints stick firmly during creation, release cleanly when finished, and develop attractive bottom layer finishes. The wrong surface leads to prints that won’t adhere, warp as they cool, or refuse to release without damaging the part or surface.
Yet surface selection often confuses beginners. Walk into any 3D printing discussion and you’ll encounter passionate advocates for different surfaces—glass purists who swear nothing else compares, PEI converts who claim it changed their printing life, and spring steel enthusiasts who wonder how they ever lived without removable beds. Each group has valid points because no single surface works optimally for every situation.
The confusion deepens because surface behavior depends heavily on context. A surface that works beautifully with PLA might fail miserably with ABS. Temperature, cleanliness, and even humidity affect performance. What works flawlessly in one person’s workshop might frustrate another user printing different materials in different conditions.
In this comprehensive guide, we’ll examine every major print surface type, understanding how each works, what makes them succeed or fail, which materials they suit best, and how to maintain them properly. You’ll learn the chemistry and physics behind adhesion, discover why some combinations work while others don’t, and gain the knowledge to choose the ideal surface for your specific printing needs.
The Science of Print Bed Adhesion
Before exploring specific surface types, understanding why prints stick—or don’t stick—helps you make informed decisions:
Surface Energy and Wetting
Adhesion fundamentally depends on surface energy—a measure of how readily a surface interacts with materials contacting it. High surface energy surfaces attract molecules strongly, encouraging liquids to spread across them (high wettability). Low surface energy surfaces repel molecules, causing liquids to bead up (low wettability).
When molten plastic exits your nozzle and contacts the build surface, it must wet the surface adequately to achieve adhesion. If the plastic beads up instead of spreading, adhesion will be poor. The surface energy of your build surface relative to the surface energy of the plastic determines this wetting behavior.
Most plastics used in 3D printing have moderate surface energies. Materials like PLA wet many surfaces reasonably well. Others like polypropylene have very low surface energies and resist wetting most surfaces, making them notoriously difficult to print.
Surface treatments can modify surface energy. Cleaning with isopropyl alcohol removes oils and contaminants that lower surface energy, improving adhesion. Some users apply adhesion promoters—materials that increase surface energy or provide chemical bonding with the plastic.
Mechanical Interlocking
Beyond chemical surface energy, mechanical interlocking contributes to adhesion. Textured surfaces contain microscopic peaks and valleys. When molten plastic flows into these valleys and solidifies, it locks mechanically into the texture.
Smooth surfaces like polished glass rely primarily on chemical surface energy for adhesion. Textured surfaces like powder-coated steel combine chemical adhesion with mechanical interlocking, often resulting in stronger overall grip.
The texture scale matters. Extremely fine texture (visible only under magnification) can improve adhesion without noticeably affecting the print’s bottom surface finish. Coarse texture creates strong mechanical interlocking but transfers the texture to the print, creating a rougher bottom layer.
Thermal Effects
Temperature profoundly affects adhesion through multiple mechanisms:
Plastic behavior: Most thermoplastics exhibit glass transition temperatures where they change from hard and brittle to soft and pliable. Keeping the bed above this transition temperature prevents the bottom layers from hardening fully, reducing thermal stress and warping tendency.
Surface energy changes: Surface energy typically increases with temperature. A warm surface often provides better wetting and adhesion than the same surface when cold.
Thermal expansion: As plastic cools, it shrinks. If the bottom layer is firmly stuck to a warm bed while upper layers cool and contract, internal stresses develop. These stresses try to lift corners and edges off the bed (warping). A heated bed minimizes the temperature gradient, reducing these stresses.
Release mechanism: Many surface materials exploit thermal effects for release. They grip prints firmly when warm but release them easily when cooled. The thermal contraction of the cooling plastic combined with different thermal expansion coefficients between plastic and surface creates a self-releasing effect.
Material-Specific Compatibility
Different plastics have different chemical compositions, surface energies, and thermal properties. This means no single surface works optimally for all materials:
PLA has relatively high surface energy and doesn’t require extreme bed temperatures. It works well with most surfaces, making it forgiving for beginners.
PETG bonds very strongly to some surfaces—sometimes too strongly. It can permanently fuse to PEI or glass if bed temperature is too high, damaging both print and surface.
ABS requires high bed temperatures (90-110°C) and benefits from surfaces that maintain adhesion at these temperatures while managing the significant thermal contraction this material exhibits.
TPU and flexible materials need surfaces that provide adequate grip without excessive bonding since these materials can stretch during removal, potentially tearing.
Nylon challenges most surfaces due to its tendency to warp dramatically and its moderate surface energy. It requires specialized surfaces or aggressive adhesion aids.
Understanding these material-specific behaviors helps you select appropriate surfaces for your typical filament choices.
Glass Print Surfaces
Glass represents one of the oldest and still popular build surface materials, offering distinct advantages and some notable limitations:
Plain Borosilicate Glass
Borosilicate glass—the type designed to handle thermal cycling without cracking—serves as an excellent print surface material.
Advantages:
Perfect flatness: Quality glass plates are extremely flat, typically within 0.1mm across their entire surface. This inherent flatness eliminates the waviness sometimes present in aluminum beds.
Durability: Glass lasts essentially forever with proper care. It won’t wear out, degrade, or need replacement unless physically broken.
Smooth finish: Prints develop perfectly smooth, glossy bottom surfaces that look professional and require no post-processing.
Easy cleaning: Most adhesives and plastic residue wipe away easily. Stubborn residue scrapes off with a razor blade without damaging the glass.
Low cost: Plain glass costs very little. Borosilicate glass costs more than window glass but remains affordable.
Disadvantages:
Requires adhesion aids: Plain glass doesn’t provide adequate natural adhesion for most materials. You need glue stick, hairspray, or other aids for reliable adhesion.
Clips needed: Glass sits atop the heated bed, requiring clips to hold it in place. These clips can interfere with prints near bed edges.
Slower heating: Glass conducts heat poorly compared to aluminum. Heat-up times are longer, and temperature uniformity may suffer.
Breakage risk: Dropped tools, aggressive print removal, or thermal shock can crack glass. While durable during normal use, glass is fragile when abused.
Release can be too good: PLA sometimes adheres weakly to plain glass even with adhesion aids, especially if the glass is very smooth and clean.
Application Best Practices
Using glass effectively requires attention to several factors:
Bed temperature: Most materials need heated beds with glass. PLA works at 50-60°C, PETG at 70-80°C, ABS at 100-110°C. The poor thermal conductivity means actual surface temperature may lag bed temperature settings by 5-10°C.
Adhesion aids: Apply thin, even coats of glue stick or spray hairspray. Too much creates thick layers that cause problems; too little provides inadequate adhesion. A light misting of hairspray or thin glue stick layer works best.
Cleaning: Between prints, wipe with isopropyl alcohol to remove oils and residue. Deep clean periodically with dish soap and water or glass cleaner. Stubborn adhesive buildup scrapes away with razor blades held at shallow angles.
Mounting: Use spring clips that allow glass expansion without creating stress. The glass should sit flat against the bed without rocking or gaps.
Textured Glass
Some manufacturers offer glass with one textured surface. This modification addresses plain glass’s adhesion challenges:
The textured side provides mechanical interlocking that improves adhesion without adhesion aids. PLA particularly benefits, sticking reliably to textured glass at appropriate temperatures.
The texture transfers to the print’s bottom layer, creating a matte, slightly rough finish instead of glossy smooth. Some users prefer this appearance, finding it more professional than the overly shiny finish from smooth glass.
Textured glass typically costs 2-3 times more than plain glass but eliminates adhesion aid hassle for many materials. It combines glass’s flatness and durability with improved adhesion characteristics.
Mirror Tiles
Standard mirror tiles from hardware stores provide an ultra-smooth, flat, inexpensive glass option. The reflective coating doesn’t contact prints (it’s on the back), so they function similarly to regular glass.
Mirrors offer extreme flatness and smoothness, creating beautifully glossy first layers. However, this smoothness can make adhesion challenging—glue stick or hairspray becomes essential. The very smooth surface also makes prints particularly easy to remove, sometimes too easy for adequate adhesion.
PEI (Polyetherimide) Surfaces
PEI has become the gold standard build surface for many users, offering excellent adhesion without aids:
PEI Sheet Material
PEI is a high-performance engineering thermoplastic with unique properties that make it ideal for print surfaces:
Chemistry and Properties: Polyetherimide combines excellent thermal stability (can handle continuous temperatures above 200°C), good chemical resistance, high surface energy promoting plastic adhesion, and an unusual characteristic—it grips hot plastic firmly but releases it easily when cooled.
Form Factors: PEI typically comes as thin sheets (0.5-1mm thick) with adhesive backing that sticks to glass or aluminum beds. Some users apply thicker sheets (2-3mm) directly to the bed without additional backing.
The amber/brown color is characteristic of PEI. If a surface claims to be PEI but appears clear or a different color, it’s likely not genuine PEI or uses a different material composition.
Application and Installation
Installing PEI sheets requires care for optimal results:
Surface preparation: The backing surface (glass or aluminum) must be perfectly clean. Oils, residue, or dust prevent proper adhesion of the PEI sheet itself.
Application technique: Peel backing partially, align the sheet carefully, then slowly roll or squeegee it onto the backing surface while peeling the remaining backing. Work out air bubbles as you go.
Curing: Allow the adhesive to cure fully before use—typically 24 hours. Some users apply gentle heat to accelerate curing and ensure strong bonding.
Edge sealing: Some users seal edges with high-temperature tape to prevent the PEI from peeling at corners over time.
Performance Characteristics
PEI excels across multiple criteria:
Material compatibility: Works excellently with PLA (60°C bed), PETG (70-75°C—be careful not to go higher), ABS (90-100°C), nylon (with proper preparation), and many other materials.
No adhesion aids needed: PEI’s surface chemistry provides adequate adhesion for most materials without glue, tape, or sprays. This simplifies workflow significantly.
Thermal release: The cooling part naturally releases from PEI as it contracts and the surface energy changes with temperature. Most prints pop off with gentle flexing or simply release on their own as they cool.
Smooth finish: PEI produces smooth, matte bottom layers with a professional appearance—not as glossy as glass but very clean-looking.
Durability: Properly maintained PEI lasts for hundreds of prints. The surface eventually glazes (becomes too smooth) but sanding renews it.
Maintenance and Care
PEI requires proper maintenance to maintain performance:
Regular cleaning: Wipe with isopropyl alcohol before each print or when adhesion diminishes. Skin oils from handling parts dramatically reduce adhesion.
Deep cleaning: Periodically wash with dish soap and water, rinse thoroughly, and dry completely. This removes built-up residue that alcohol alone can’t eliminate.
Surface renewal: When PEI becomes too smooth (glazed) and adhesion suffers despite cleaning, light sanding with 400-800 grit sandpaper roughens the surface, restoring adhesion. Sand in circular patterns for even texture.
Avoid gouging: Use appropriate tools for print removal. Aggressive scraping with sharp tools can gouge PEI, creating permanent damage. Flex the bed or use plastic scrapers instead of metal when possible.
Temperature limits: Don’t exceed 220°C bed temperature for extended periods. While PEI can handle brief exposure to higher temperatures, sustained high heat can degrade the material or weaken the adhesive bond.
PEI Challenges
Despite its popularity, PEI has limitations:
PETG over-adhesion: PETG can bond too strongly to PEI, sometimes permanently. Use lower bed temperatures (70-75°C maximum) and consider applying a release agent like glue stick for PETG prints.
Glazing: The surface becomes smoother over time, eventually requiring sanding to restore adhesion. Some users view this maintenance as a drawback.
Cost: Quality PEI sheets cost significantly more than plain glass, though less than powder-coated spring steel systems.
Damage sensitivity: While durable, PEI can be gouged or scratched. Damaged areas may not adhere as well.
Powder-Coated Spring Steel Sheets
This modern approach combines several innovations for exceptional convenience:
System Overview
Powder-coated spring steel systems consist of two components:
Magnetic base: A flexible magnetic sheet adheres permanently to the printer’s heated bed. This base remains in place continuously.
Steel sheet: A spring steel sheet (typically 0.5-0.8mm thick) with powder-coated PEI on one or both sides lays atop the magnetic base. Magnetic attraction holds it in place during printing.
After printing, simply remove the entire steel sheet and flex it. The spring steel’s flexibility combined with thermal contraction causes prints to pop off with minimal effort.
Advantages
This system offers compelling benefits:
Easy print removal: Flexing the sheet pops most prints off instantly. Even stubborn prints release with gentle bending. This eliminates the frustration and risk of aggressive scraping.
Multi-surface capability: Keep multiple sheets—textured PEI for general use, smooth PEI for glossy finishes, specialized surfaces for difficult materials. Swap them in seconds without tools.
Surface protection: Remove the sheet for aggressive print removal away from the printer, preventing damage to the magnetic base or printer itself.
Excellent adhesion: The powder-coated PEI provides the adhesion characteristics of PEI with additional mechanical interlocking from the texture.
Textured finish: The powder coat creates an attractive textured bottom layer that many users prefer to glossy smooth finishes.
Magnetic mounting: No clips needed—the sheet lays flat via magnetic attraction. This allows full bed area usage without edge interference.
Types and Variations
Several powder-coat variations exist:
Textured (standard): The original and most common type features medium texture that provides strong adhesion while creating attractive matte finishes on prints.
Smooth: Some sheets have smooth PEI coating instead of textured powder coat. These produce glossy finishes similar to glass.
Double-sided: Sheets with different surfaces on each side (textured on one, smooth on the other, or different texture levels) provide flexibility within a single sheet.
Satin: Medium texture between smooth and standard textured, balancing finish quality with adhesion strength.
Application Technique
Using spring steel sheets effectively:
Temperature: Standard temperatures work well—50-60°C for PLA, 70-80°C for PETG, 90-100°C for ABS. The powder coat maintains adhesion across these ranges.
Cleaning: Clean with isopropyl alcohol regularly. The textured surface can trap oils and residue, so thorough cleaning matters more than with smooth surfaces.
Print removal: Let prints cool completely before removing the sheet. Cool to room temperature for easiest release. Flex the sheet gently—most prints pop off without excessive force.
Sheet storage: Store spare sheets flat or hanging. Avoid creasing or denting, which can create permanent deformation.
Limitations
Consider these drawbacks:
Cost: Complete systems (magnetic base plus one or more sheets) cost significantly more than glass or PEI sheets—often $50-100+ depending on size.
Thickness: The magnetic base plus steel sheet adds 2-4mm to the bed stack, reducing available build height on printers with limited Z-axis travel.
Flatness: Spring steel’s flexibility means it’s not as perfectly flat as glass, though magnetic attraction pulls it reasonably flat during use.
Coating wear: The powder coat eventually wears or chips with heavy use, though it typically lasts for many hundreds of prints before showing significant degradation.
Magnetic strength: Very heavy prints might require caution when removing the sheet to prevent pulling the magnetic base loose.
BuildTak and Similar Adhesive Surfaces
BuildTak and similar products (like GeckoTek, PrintBite, etc.) use textured plastic sheets with adhesive backing:
Construction and Application
These surfaces consist of textured plastic films with peel-and-stick adhesive backs. Application involves cleaning the bed thoroughly, peeling the backing, and carefully applying the sheet while working out air bubbles.
The texture provides mechanical interlocking for strong adhesion. Different products use different plastic compositions and texture patterns, affecting performance with various materials.
Performance
Strong adhesion: BuildTak grips most materials very firmly—sometimes too firmly. PLA and ABS stick extremely well.
Texture transfer: The surface texture transfers to print bottoms, creating a distinctive appearance.
No heating required: BuildTak works without bed heating for materials like PLA, though heating still helps for others.
Wear resistance: More resistant to gouging than PEI, though the surface still wears over time.
Drawbacks
Several significant limitations affect BuildTak’s appeal:
Difficult print removal: Parts stick so firmly that removal can be challenging. PETG particularly bonds aggressively, sometimes tearing pieces of the surface away with the print.
Limited lifespan: The surface develops smooth spots and gouges with use. Heavily used areas may need replacement after 50-100 prints.
Replacement difficulty: When worn, the entire sheet needs replacement. Removing old sheets and adhesive residue proves frustratingly difficult, often requiring heat guns and aggressive scraping.
Material limitations: Works well for PLA and ABS but struggles with others. PETG’s strong bonding can damage the surface.
Cost: While individual sheets cost moderately, frequent replacement makes this potentially expensive over time.
Best Use Cases
BuildTak suits specific scenarios:
- Printers used exclusively for PLA
- Users who rarely remove the build surface
- Situations where very strong adhesion is needed
- Budget alternatives where PEI or spring steel systems are too expensive
For most users, PEI or powder-coated steel provide better long-term value despite higher initial cost.
Specialty and Alternative Surfaces
Beyond the mainstream options, various specialty surfaces serve niche applications:
Garolite (G10/FR4)
This composite material (phenolic resin-impregnated fiberglass) excels with specific materials:
Nylon compatibility: Garolite provides excellent adhesion for nylon, which challenges most other surfaces. This makes it valuable for users regularly printing engineering-grade nylon parts.
High temperature tolerance: Handles continuous temperatures above 150°C without degradation.
Durability: Extremely wear-resistant and nearly indestructible under normal use.
Limitations: Expensive, requires preparation (light sanding), works poorly with some common materials, and provides a textured finish.
Polypropylene Sheets
Thin polypropylene sheets help print nylon by providing a release surface:
Nylon bonds so strongly to most surfaces that print removal damages parts or surfaces. Polypropylene, having very low surface energy, allows nylon to adhere adequately during printing but releases relatively easily afterward.
The challenge involves getting the polypropylene sheet itself to adhere to the heated bed. Double-sided tape or clips work, though maintaining flatness proves difficult.
Painter’s Tape (Blue Tape)
This old-school approach still has advocates:
Application: Apply blue painter’s tape in overlapping strips across the entire bed surface, smoothing carefully to eliminate gaps.
Performance: Provides adequate PLA adhesion, especially with slight bed heating (40-50°C). Easy to replace when worn.
Limitations: Doesn’t work well for high-temperature materials, wears quickly, time-consuming to apply, creates visible seams that transfer to prints.
Best suited for beginners with basic printers trying PLA before investing in better surfaces.
Kapton Tape (Polyimide)
Kapton tape handles high temperatures and provides good ABS adhesion:
High temperature tolerance: Survives continuous bed temperatures above 100°C without degradation.
ABS adhesion: Works well for ABS when combined with adhesion aids like ABS juice (acetone-dissolved ABS).
Challenges: Expensive, difficult to apply smoothly without bubbles, wears relatively quickly, replacement is tedious.
Largely superseded by PEI, which offers similar temperature tolerance with better adhesion and easier maintenance.
Surface Selection Guide and Comparison
| Surface Type | Best Materials | Adhesion | Release | Durability | Maintenance | Cost | Best For |
|---|---|---|---|---|---|---|---|
| Plain Glass | Most (w/aids) | Moderate | Easy | Excellent | Low | $ | Budget builds, smooth finishes |
| Textured Glass | PLA, PETG, ABS | Good | Easy | Excellent | Low | $$ | General use, matte finishes |
| PEI Sheet | PLA, ABS, most | Excellent | Good | Good | Medium | $$ | All-around performance |
| Powder Steel | All common | Excellent | Excellent | Good | Low | $$$ | Convenience, multi-material |
| BuildTak | PLA, ABS | Very Strong | Difficult | Moderate | High | $$ | PLA-focused, strong grip |
| Garolite | Nylon, high-temp | Good (nylon) | Good | Excellent | Medium | $$$ | Engineering materials |
| Mirror | Most (w/aids) | Moderate | Very Easy | Excellent | Low | $ | Super-smooth finishes |
| Painter’s Tape | PLA | Moderate | Good | Poor | Very High | $ | Temporary, learning |
Making the Right Surface Choice
Selecting the optimal surface depends on several factors:
Material Considerations
Printing mostly PLA: Nearly any surface works well. Glass with glue stick, PEI, textured glass, powder-coated steel, or even painter’s tape all succeed with PLA.
Multi-material printing: PEI sheets or powder-coated spring steel handle various materials without surface changes. Keep bed temperature appropriate for each material.
PETG focus: Use textured surfaces (textured glass, powder-coated steel) or PEI with glue stick release agent. Avoid smooth PEI without protection—PETG can fuse permanently.
ABS printing: PEI or powder-coated steel work excellently at the high bed temperatures ABS requires (90-110°C). Glass with glue stick functions but may show adhesion inconsistency.
Engineering materials (nylon, polycarbonate): Garolite for nylon, high-quality PEI or powder-coated steel for polycarbonate. These demanding materials need specialized surfaces.
Flexible filaments: PEI, powder-coated steel, or textured glass provide adequate adhesion without excessive bonding that makes flexible prints difficult to remove.
Workflow Preferences
Convenience priority: Powder-coated spring steel sheets offer the easiest workflow—no adhesion aids, easy removal, quick surface swaps.
Budget conscious: Plain glass provides excellent value despite requiring adhesion aids. It lasts forever and costs little.
Premium results: High-quality PEI or smooth spring steel for professional bottom layer finishes.
Frequent surface changes: Spring steel magnetic systems allow instant swaps between textured and smooth or different specialized surfaces.
Maintenance Tolerance
Minimal maintenance desired: Glass or powder-coated steel require just occasional cleaning. PEI needs periodic sanding to maintain performance.
Willing to maintain: PEI provides excellent performance if you’re comfortable with regular cleaning and occasional sanding.
Replace when worn: BuildTak and tape surfaces accept that they’ll need complete replacement periodically.
Surface Preparation and Maintenance Best Practices
Regardless of surface type, proper care extends lifespan and maintains performance:
Initial Preparation
New surface setup: Clean thoroughly before first use. Even new surfaces may have manufacturing residue or protective coatings. Wash with dish soap, rinse well, dry completely, then wipe with isopropyl alcohol.
Installation verification: Ensure surfaces sit completely flat without bubbles, gaps, or raised edges. Poor installation creates inconsistent adhesion zones.
First layer calibration: After installing a new surface, re-level the bed and verify first layer height. Different surface thicknesses affect nozzle distance.
Regular Maintenance
Between prints: Quick wipe with isopropyl alcohol removes fingerprints and light contamination. This simple step prevents many adhesion problems.
Weekly (heavy use): Wash with dish soap and water. Rinse thoroughly—soap residue causes adhesion problems. Dry completely before use.
Monthly inspection: Check for wear, damage, coating degradation. Address issues before they cause print failures.
Surface renewal: PEI needs sanding every few months (varies by use). Textured surfaces may need deep cleaning to remove debris trapped in texture.
Storage and Handling
Spare surfaces: Store flat or hanging to prevent warping. Keep in dust-free environment to avoid contamination.
Handling: Touch only the edges when possible. Skin oils from fingerprints reduce adhesion significantly.
Temperature cycling: Allow gradual temperature changes when possible. Rapid heating or cooling can stress some materials.
Troubleshooting Surface Problems
Common issues and solutions:
Poor adhesion despite cleaning: Surface may be glazed (PEI) or contaminated with invisible residue. Try deep cleaning with soap and water, then renewal (sanding for PEI).
Excessive adhesion: Temperature too high, surface too rough, or material-specific over-bonding. Lower bed temperature by 5-10°C, use release agents, or switch surfaces.
Inconsistent adhesion: Surface not level, contamination in specific areas, or bed temperature variations. Re-level carefully, clean thoroughly, check for heating element hotspots.
Warping despite good surface: Inadequate bed temperature, drafts cooling the print, or material-specific thermal properties. Increase bed temp, eliminate air currents, use brim or raft for better contact area.
Surface damage: Gouges, scratches, or coating wear. Minor damage can sometimes work around by positioning prints in undamaged areas. Significant damage requires surface replacement or renewal.
Conclusion
The build surface you choose dramatically influences your 3D printing success, affecting everything from first layer adhesion and print quality to workflow convenience and material compatibility. Understanding the characteristics, advantages, and limitations of each surface type empowers you to make informed decisions rather than relying on trial and error or following others’ recommendations without context.
Glass provides time-tested reliability, perfect flatness, and excellent value despite requiring adhesion aids. PEI delivers outstanding all-around performance with minimal hassle, though it needs periodic maintenance. Powder-coated spring steel offers unmatched convenience and flexibility at premium cost. Specialty surfaces like Garolite serve specific material needs that mainstream surfaces can’t address.
No single surface works optimally for every user, every material, and every situation. Your ideal surface depends on what you print, how often you print, your budget, and your maintenance preferences. Many experienced users maintain multiple surfaces, swapping them as needed for different materials or desired finish characteristics.
The foundation of every successful print truly begins with the surface where plastic meets platform. Invest time understanding your surface’s characteristics, maintain it properly, and choose the right surface for your specific needs. This knowledge transforms the build surface from a potential source of frustration into a reliable partner in your printing success, enabling the first layer adhesion that makes everything else possible.