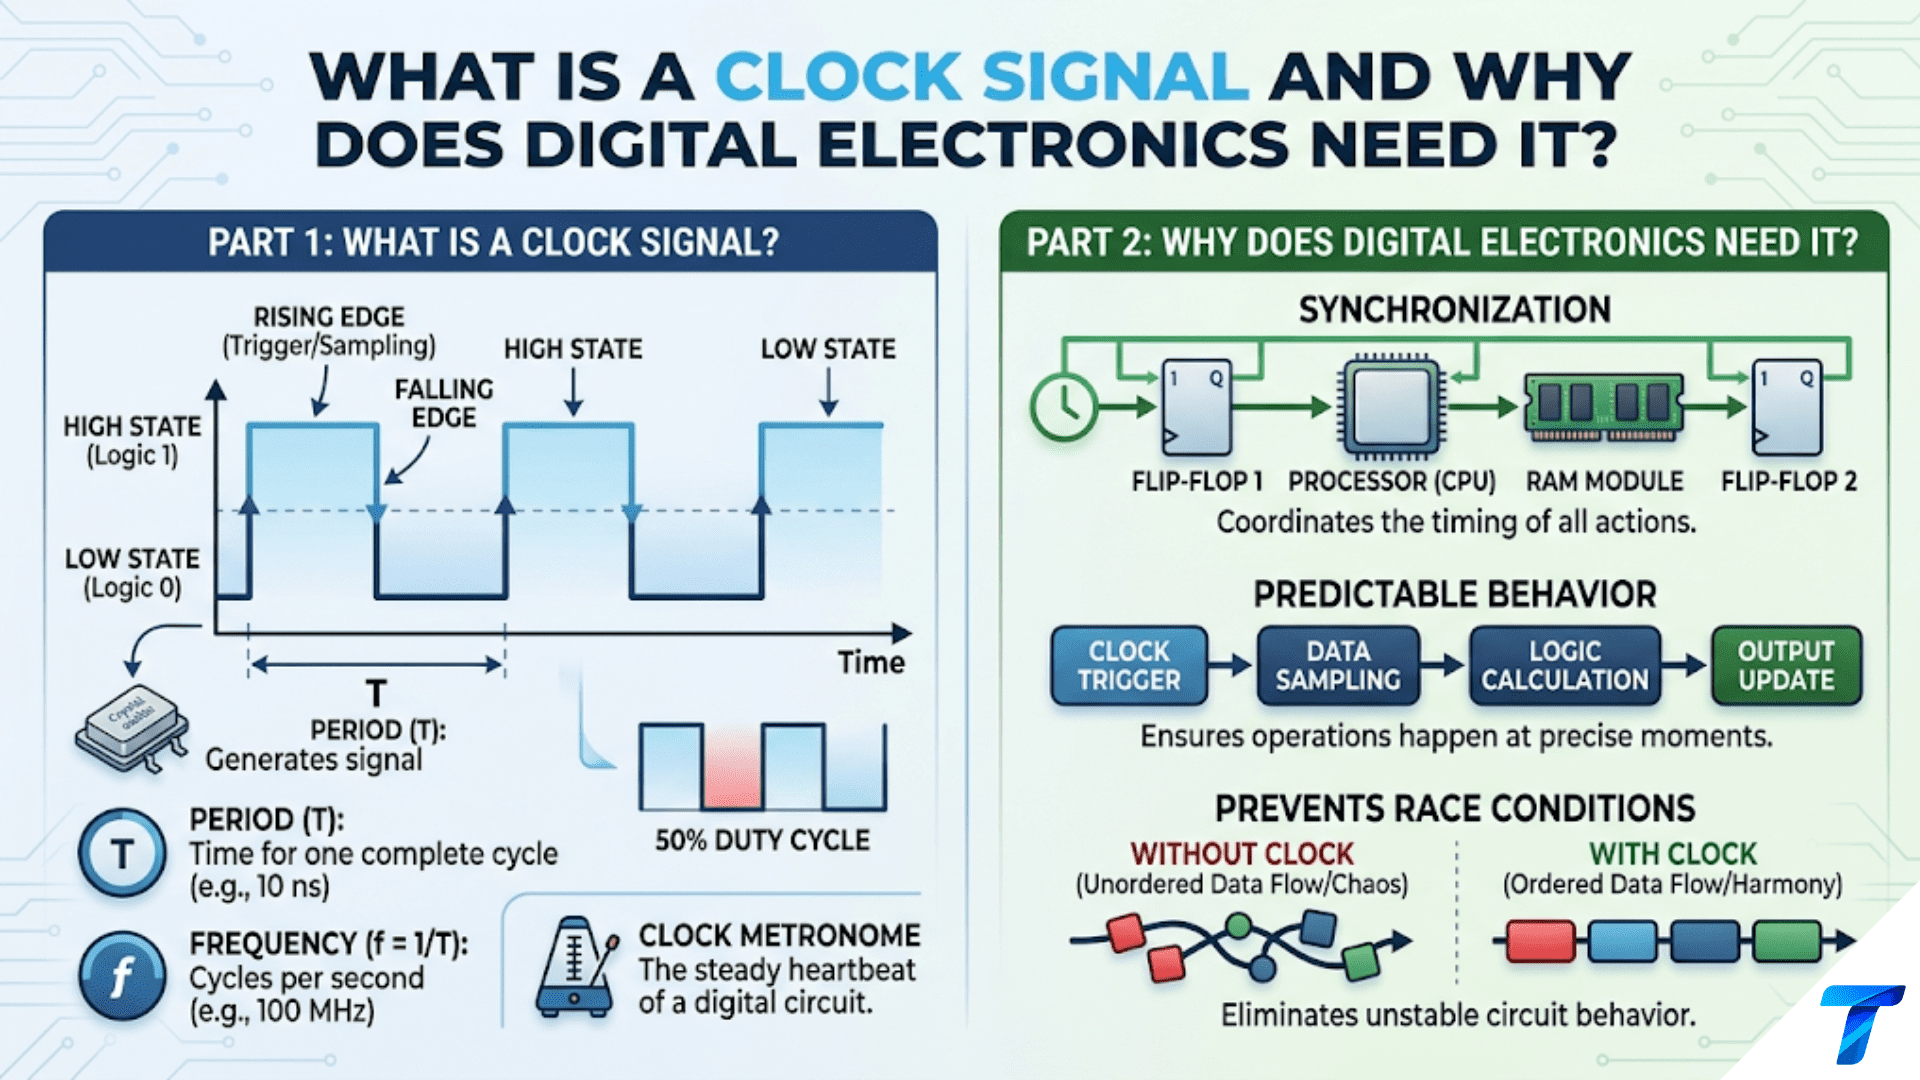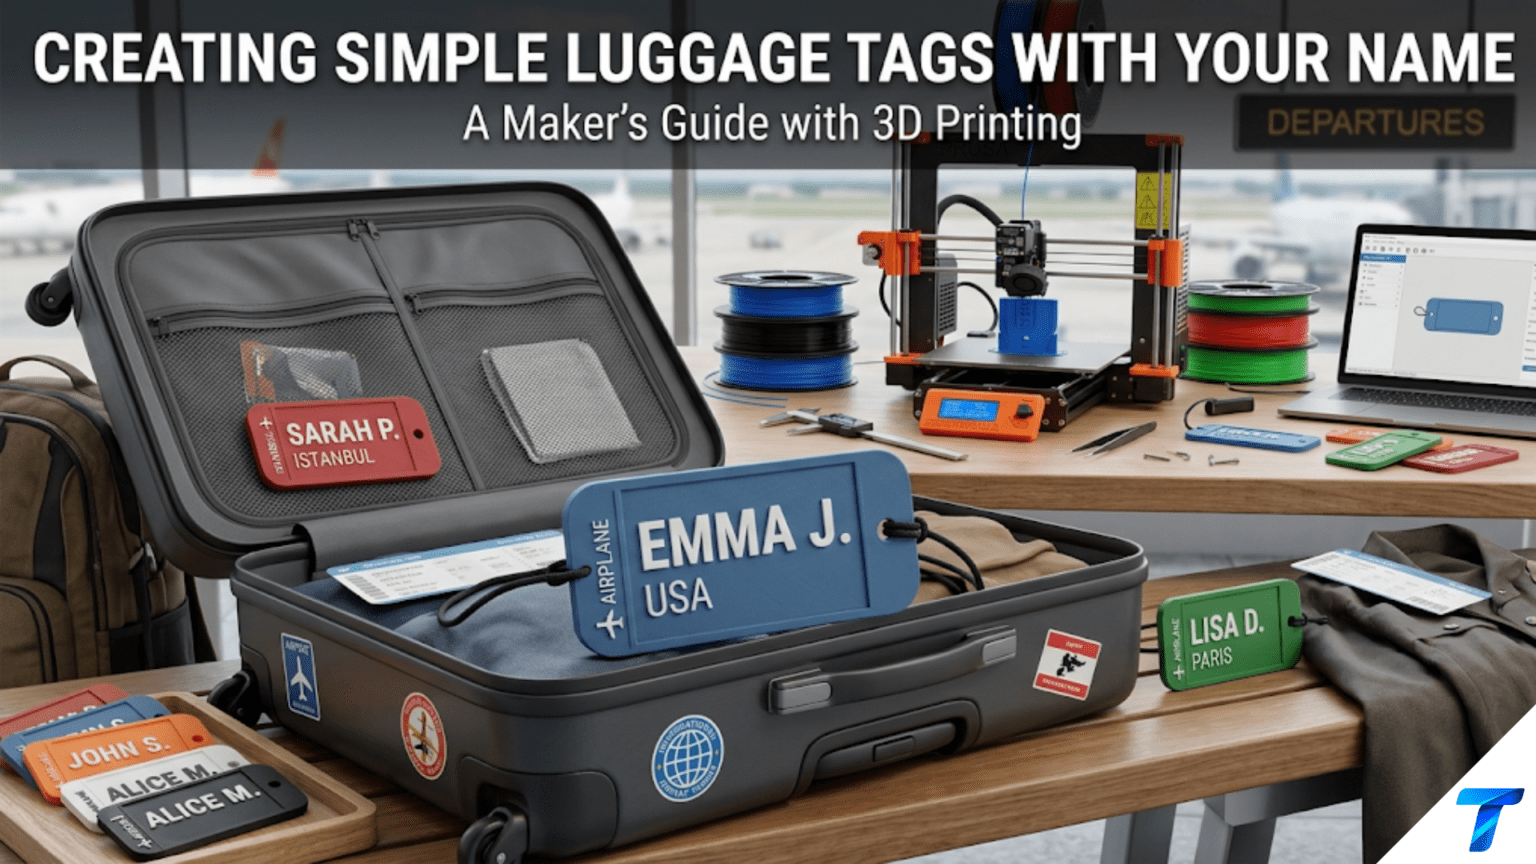
3D printed luggage tags are custom-designed identification tags attached to travel bags, suitcases, backpacks, and carry-on luggage that display the owner’s name, contact information, or identifying design. They are ideal beginner projects because they are flat, print quickly in 20–40 minutes, introduce personalized text design at a practical scale, and produce objects that are genuinely useful — combining the practical function of bag identification with the personal satisfaction of a handmade travel accessory that stands out from the sea of identical commercial tags at baggage claim.
Introduction: Never Confuse Your Bag Again
At any busy airport baggage carousel, the scene is the same: dozens of black suitcases of nearly identical shape and size rotating past while travelers peer at each one, trying to identify their own from the brief view before it passes. The few travelers whose bags have distinctive markings — a colorful ribbon, an unusual cover, a distinctive tag — retrieve their luggage with confident efficiency while others circle the carousel in uncertainty.
A personalized 3D printed luggage tag solves the identification problem permanently and completely. A tag with your name in large, clear letters, in a distinctive color that you can spot at twenty feet, attached securely to your bag’s handle — this turns bag identification from a carousel anxiety into a non-problem. Your bag is instantly recognizable because the tag you designed and printed is unlike any other tag on the carousel.
Beyond the practical identification function, luggage tags have a secondary value that frequent travelers appreciate: they assert ownership. If a bag is accidentally picked up by another traveler (easy to do with identical suitcases), a prominent name tag is immediately visible when opened, preventing theft and enabling easy return. A good luggage tag carries your name, contact phone number, and possibly an email address — enough information for any honest person to return a mislaid bag.
For the 3D printing beginner, luggage tags offer all the educational value of bookmark and gift tag projects while adding the durability requirements of a travel accessory. Tags must survive the rough handling of airline baggage systems — being thrown, stacked under heavy loads, dragged across surfaces, and exposed to rain. This means material selection and structural strength matter more here than for decorative projects, making luggage tags an excellent step up in functional printing complexity.
This guide covers everything you need: the design requirements for effective luggage tags, personalization approaches for text and identification information, the durability considerations that distinguish travel accessories from home decorations, material selection for rough handling, hardware for secure attachment, finishing for weather resistance, and creative ideas for a complete travel accessory set.
What Makes an Effective Luggage Tag
Before designing, understanding what distinguishes a genuinely effective luggage tag from a merely decorative one guides every design decision.
Visibility at Distance
The primary function of a luggage tag is visual identification from a distance — specifically from the distance of a baggage carousel, which is typically 3–10 meters. At this distance, small text is unreadable and fine details are invisible.
Visibility requirements:
- Name text: Minimum 10–15mm character height for readability at 5 meters
- Contrasting colors: The tag must contrast visually with the bag. A black tag on a black bag is nearly invisible. A bright red or white tag on any color bag is immediately visible.
- Simple, bold design: Complex decorative elements reduce visual impact at distance. A large name in bold text is more effective than an ornate design with small text.
Durability for Travel Conditions
Airline baggage handling is not gentle. Tags are regularly:
- Thrown from heights of 1–2 meters onto conveyor belts
- Stacked under heavy loads in cargo holds
- Dragged across rough surfaces
- Exposed to rain and varying temperatures
- Flexed and twisted during handling
Durability requirements:
- Impact resistance: PLA’s brittleness is a concern — dropped tags can crack or shatter at attachment points
- Flexibility: A tag that flexes under impact survives better than one that resists and cracks
- Weather resistance: Rain and humidity affect PLA more than PETG or ASA
- Attachment point strength: The loop, hole, or strap attachment is the highest-stress point — it must survive the tag being pulled and jerked repeatedly
Secure Identification Information
A good luggage tag displays enough information to reunite a lost bag with its owner:
- Name: Large and prominent (primary identification)
- Phone number: Essential for contact if found
- Email address: Secondary contact (smaller text, can be on the back)
- Privacy consideration: Do not display home address on a luggage tag — this tells potential burglars when your house is unoccupied. A phone number and email are sufficient.
Attachment Security
Tags that come loose during travel are useless. The attachment system must:
- Survive the tag being caught on conveyor belts and machinery
- Maintain grip despite repeated tension during normal handling
- Be secure enough that the tag cannot be inadvertently removed
- Be re-attachable (so the tag can be transferred between bags)
Luggage Tag Design Types
Type 1: Standard Flat Tag
The classic luggage tag form: a flat rectangle with the owner’s name on the front, contact information on the back, and an attachment hole or loop at one end.
Design specifications:
- Dimensions: 90–100mm × 55–65mm (standard luggage tag size; similar to a large business card)
- Thickness: 4–6mm (substantial enough for durability; thin enough to not add significant weight)
- Attachment: A reinforced hole (10–12mm diameter) or integrated loop at the top center or top corner
- Corner treatment: Rounded corners (3–5mm radius) to prevent corner damage and reduce injury risk from sharp corners in baggage handling
Front face: Name prominently displayed (12–15mm character height, bold font), optionally with a decorative element or distinctive color block.
Back face: Contact information (phone, email) in smaller text (7–8mm character height, readable but compact).
Reinforcing the attachment hole: The hole area is the highest-stress point. Ensure at least 6mm of material between the hole edge and the tag edge on all sides. Add a raised ring or boss around the hole to increase the material thickness at this critical point.
Type 2: Window Tag (with Contact Card Insert)
A tag with an open window or transparent cover revealing a paper insert card with contact information. The insert can be updated when contact information changes without reprinting the tag.
Design: A frame with an open window sized to display a standard business card or a custom-cut paper card (approximately 80mm × 45mm visible area). A lip or channel at the edges holds the paper in place. Optionally, a snap-fit or sliding clear cover protects the paper from moisture.
Advantage: Contact information can be updated by simply replacing the paper insert — no reprinting required if your phone number changes.
Design challenge: The window frame must be structurally adequate without the center section that a solid tag would have. The frame perimeter carries all structural loads.
Type 3: Shaped/Silhouette Tag
A tag with a distinctive non-rectangular shape — a house silhouette, an animal shape, a geometric form, an initial letter — that makes the bag immediately recognizable even before the name is read.
Design consideration: The shape must remain recognizable at the viewing distances and orientations seen at a baggage carousel. A shape that is instantly identifiable when viewed straight-on may be ambiguous when seen at an angle as the bag rotates on the carousel.
Effective silhouette choices:
- Animal silhouettes (cats, dogs, elephants, birds)
- Geometric shapes (hexagon, star, shield)
- Travel-related shapes (airplane, suitcase, globe)
- Initial letters as the entire tag shape (a large “K” with name text inside)
Type 4: Paired Tags (Matching Set)
A matching set of tags for a family or couple — all the same design with different names. The shared design identifies the bags as belonging together; the individual names identify which bag belongs to which person.
Applications: Particularly useful for family travel where multiple bags of similar appearance need to be quickly identified as a group and then individually distinguished.
Personalization: Making the Tag Yours
Text Design at Luggage Tag Scale
At luggage tag scale (90mm × 55mm), text must be designed for maximum legibility at carousel viewing distances. All the text design principles from earlier articles apply, with these specific considerations:
Primary name text:
- Character height: 12–15mm for the name (this is larger than most commercial tags)
- Font: Bold sans-serif (Roboto Bold, Montserrat Bold, Futura Bold) — the same principles as signs and name plates
- Treatment: Embossed (raised) text is more visible at distance than debossed (recessed) text because it projects from the surface and casts a shadow. For luggage tags, embossed text is recommended.
- Depth/height: 1.5–2mm raised height for embossed text — substantially raised for maximum shadow contrast
Contact information (back face):
- Character height: 6–8mm for phone and email
- Font: Bold sans-serif
- Treatment: Debossed with contrasting paint fill is effective; embossed also works
Design for the two-sided nature: The front and back of a luggage tag serve different purposes and can have different designs:
- Front: Distinctive visual identification (name large, decorative element, distinctive color)
- Back: Functional information (phone, email, smaller text, more compact layout)
Color as Identification
The color of the tag may be more important than any text for rapid visual identification at a carousel. Design your tag so that the color itself is memorable and distinctive:
Most visible at distance:
- Bright red
- Bright yellow
- Bright orange
- Pure white (against dark bags)
Avoid:
- Black (disappears against dark bags, which are common)
- Dark navy or charcoal (similar problem)
- Any color that matches common bag colors (grey, tan, olive)
Multi-color design: If your slicer and printer support multi-material or you’re comfortable with filament swaps, a two-color tag (one body color, contrasting text color) is the most visible option without painting.
Beyond the Name: Creative Personalization
Luggage tags can carry more than just contact information:
Travel icons: A small airplane, compass rose, or globe motif alongside the name reinforces the travel context and adds visual character.
Distinctive patterns: A geometric pattern on the tag body (while keeping the name text prominent) creates a tag that’s recognizable as yours even before reading.
QR code: A debossed QR code linking to a contact page or email address — scannable by anyone who finds a lost bag, providing contact information without displaying it prominently.
Hobby references: A camera icon for a photographer, a book motif for a reader, musical notes for a musician — small personal references that make the tag feel genuinely individual.
Durability: The Key Design Challenge
More than any other project in this guide, luggage tags must be designed for durability. Here is what makes the difference between a tag that survives years of travel and one that breaks on the first trip.
Material Selection
| Material | Impact Resistance | Weather Resistance | Flexibility | Travel Suitability |
|---|---|---|---|---|
| Standard PLA | Poor | Poor | Brittle | Not recommended |
| PETG | Good | Good | Moderate | Recommended |
| ASA | Very good | Excellent | Good | Best for frequent travelers |
| TPU | Excellent | Good | Very flexible | Excellent but printing is more demanding |
| Nylon | Excellent | Good | Good | Premium; harder to print |
| ABS | Good | Moderate | Moderate | Acceptable but less UV stable |
The PLA problem for luggage tags: PLA’s brittleness is a significant concern for travel accessories. A PLA luggage tag dropped on a hard airport floor can crack or shatter at the attachment hole — exactly the worst possible failure mode. The combination of impact loads, temperature variation, and UV exposure makes PLA unsuitable for luggage tags that will see serious use.
PETG is the minimum recommendation. Its better impact resistance, moisture resistance, and temperature stability make it substantially more suitable than PLA for travel applications.
ASA is the best standard choice for frequent travelers — UV stability means the tag won’t yellow and become brittle from sun exposure over months of travel, and its higher heat resistance means it won’t deform in a hot car or summer transit environment.
TPU produces the most durable luggage tags because flexibility absorbs impact rather than transmitting it to the attachment point. A TPU tag bends when caught on conveyor machinery rather than snapping. The tradeoff is more demanding print settings (see Article 77 in this series on phone case printing for TPU guidance).
Structural Reinforcement
Beyond material choice, structural design choices determine durability:
Reinforce the attachment hole: Add a raised ring (boss) around the hole opening, increasing the material thickness at this critical stress point. The ring should be at least 2–3mm thick and extend 3mm beyond the hole edge.
Round all corners generously: Sharp corners are stress concentration points where cracks initiate under impact. 5mm radius fillets on all corners significantly improve impact resistance.
Avoid thin features: Any feature thinner than 3mm is a potential failure point in a travel application. Review your design for any thin sections and either thicken them or redesign to eliminate them.
Adequate overall thickness: 5–6mm minimum for a luggage tag. Thinner tags flex more under load, which sounds desirable but actually creates higher stress at the attachment point. A tag that is stiff in bending distributes impact loads more broadly.
Hardware Selection for Attachment
The hardware that attaches the tag to the bag handle is as important as the tag itself. Three options:
Steel cable tie / loop: A short loop of aircraft cable or braided steel wire threaded through the tag hole and secured with a crimp. Extremely durable; the loop slides over the handle and cinches closed. This is the most secure attachment but permanent — requires cutting to remove.
Nylon loop with buckle: A short loop of nylon webbing with a plastic buckle. Adjustable, removable, and secure. Widely available at outdoor/travel supply stores. Thread through the tag’s attachment hole and buckle around the bag handle.
Metal split ring (keyring): A sturdy metal split ring (not the cheap thin ones — use a heavy-duty split ring) through the tag hole, with a short luggage loop. Simple and reliable. Available at hardware stores.
Printed loop (integrated): A loop printed as part of the tag. The most elegant appearance but the least durable — the printed loop is the weakest element. If using a printed loop, design it with 3mm wall thickness and print in PETG or ASA.
Recommendation: For a tag that will survive serious travel, use a 5mm diameter steel split ring or a nylon loop with a buckle. These are inexpensive, widely available, and far more durable than printed loops.
Slicer Settings for Luggage Tags
Luggage tags prioritize durability and weatherability alongside surface quality.
| Setting | Recommended Value | Notes |
|---|---|---|
| Layer Height | 0.15–0.2mm | 0.15mm for better text quality |
| Print Speed | 35–45 mm/s | Moderate |
| Outer Wall Speed | 20–25 mm/s | Crisp text edges |
| Perimeters/Walls | 4–5 | More perimeters = more impact resistant |
| Infill | 40–50% | Higher for durability |
| Infill Pattern | Gyroid | Isotropic strength in all directions |
| Top/Bottom Layers | 5–6 | Solid, dense faces |
| Support | None | Flat tags never need support |
| Cooling | 80% PETG / 100% PLA | Material-appropriate |
| Bed Adhesion | Brim (5mm) | Flat prints benefit from brim |
| Ironing | Consider | Smoother face for painted text |
| Temperature (PETG) | 238–242°C | Upper range for layer adhesion |
Why More Perimeters for Luggage Tags
A luggage tag’s edges are impact surfaces — the first things to contact the floor when dropped, the surfaces that scrape against conveyor belts, the zones that experience the highest stress from the attachment hardware pulling through the hole. With 4–5 perimeters, the outer 1.6–2.0mm of the tag is entirely solid material with no infill porosity. This solid outer shell is significantly more impact-resistant than a thinner shell backed by infill.
Finishing for Weather Resistance
Luggage tags travel in rain, humidity, and varying temperatures. Post-processing for weather resistance extends the tag’s useful life significantly.
Sanding and Surface Preparation
Light sanding (320-grit, then 400-grit) on the tag faces:
- Removes any layer artifacts that could snag on rough surfaces
- Creates a smoother surface for paint or clear coat adhesion
- Reduces surface porosity that could allow moisture penetration
Weather-Resistant Clear Coat
Apply 2–3 coats of a weather-resistant clear coat (automotive spray clear coat or marine-grade varnish) to protect both the tag material and any paint:
- Apply thin coats, allowing full dry time between
- Ensure all surfaces are coated, including edges and the attachment hole area
- Allow full cure (24–48 hours for most clear coats) before use
Why automotive clear coat: Standard craft clear coats are formulated for indoor use and may fail under UV exposure and repeated wetting. Automotive clear coats are formulated for the exact conditions luggage tags experience — UV, rain, temperature variation, and physical abrasion.
Painting for Maximum Contrast
For the clearest, most visible tag:
- Print in the primary color (tag body color)
- Apply a bold metallic or high-contrast color to the embossed name text using dry brushing (drag a nearly-dry brush with contrasting paint over raised text surfaces)
- Apply weather-resistant clear coat over everything
OR use the contrast painting technique: apply contrasting color over the entire face, wipe clean, leaving color in any debossed recesses.
Step-by-Step: Creating a Complete Travel Tag Set
Let’s walk through creating a set of matched luggage tags for a family of four.
Step 1: Plan the Set
Family of four: two adults (large suitcases), two children (smaller bags). All tags same design, different names. Design:
- Dimensions: 95mm × 60mm × 5mm
- Front: Name large (14mm character height), small airplane motif in corner
- Back: Phone number and email (7mm character height)
- Attachment: 12mm reinforced hole, 7mm material ring around hole
- Color: Bright red ASA (highly visible on any bag)
Step 2: Design or Source Files
Option A: Community design. Search Printables for “luggage tag customizable” — many parametric designs exist where you enter the name and download the STL. Choose one with good user reviews mentioning durability.
Option B: Tinkercad design.
- Create flat box: 95mm × 60mm × 5mm
- Round all corners: 4mm radius
- Create embossed name text: 14mm character height, positioned center-front, 1.5mm raised
- Add airplane icon: Find airplane SVG, import to Tinkercad, extrude 1mm, position upper right corner
- Add attachment boss and hole: 22mm diameter cylinder, 7mm tall, 12mm hole through center; position at top center
- Back face: Add debossed phone and email text
- Export four copies with different names
Step 3: Slice
In your slicer, arrange all four tags in one session if space permits (two per batch if needed). Settings:
- 0.15mm layer height
- 5 perimeters
- 45% Gyroid infill
- ASA at 250°C nozzle / 90°C bed
- 50% cooling (ASA requires reduced cooling)
- 10mm brim (ASA benefits from wider brim)
- Print in enclosure if available (ASA warps without enclosure or draft protection)
Step 4: Post-Process
- Remove brims
- Sand all faces lightly with 320-grit
- Apply gold metallic paint to embossed name text using dry brush technique — gold on red is highly visible and attractive
- Allow to dry fully
- Apply 3 coats of automotive clear coat (wait 30 minutes between coats)
- Allow 24 hours full cure
Step 5: Attach Hardware
For each tag:
- Thread a 5mm diameter steel split ring through the attachment hole
- Attach a 15cm luggage loop (nylon webbing with side-release buckle) through the split ring
- Attach to bag handle by looping the webbing around the handle and clicking the buckle
Step 6: Write Contact Information on Back (Optional)
If the back face contact information is painted on, it’s permanent. Alternatively, the back can have a recessed window where you write contact info with a permanent marker — this is easily updated if your number changes without reprinting the tag.
Creative Luggage Tag Projects
Complete Travel Accessory Set
A matching set of travel accessories all in the same filament color and design language: luggage tags, passport holder, cable organizer for travel chargers, earbud holder, and a travel document organizer. The matched aesthetic transforms a collection of functional pieces into a personal travel kit that feels deliberately designed.
QR Code Contact Tag
A tag with your name prominently displayed and a QR code on the back. The QR code links to a web page (or a simple contact card service like LinkTree) with your contact information. Anyone who finds the bag can scan the code with any smartphone — no hunting for a phone number. The contact information can be updated digitally without reprinting the tag.
Children’s Backpack Tag
Smaller, more colorful tags for children’s school backpacks and sports bags — with the child’s name, parent’s phone number, and a fun design (favorite animal, character silhouette, sports theme). TPU is particularly appropriate for children’s backpack tags because of its flexibility and impact resistance in rough school-day handling.
Camera Bag Tag
A tag designed for a camera bag — with the photographer’s name prominently displayed and a camera icon, plus optionally a tag that indicates the value of the contents (useful for insurance purposes and to communicate to baggage handlers that the bag contains fragile equipment). Print in a distinctive color that makes the bag easy to identify at airports and events.
Adventure/Outdoor Gear Tags
ASA tags for outdoor gear — hiking backpacks, ski bags, surfboard bags, climbing gear. ASA’s UV resistance and temperature stability make it ideal for gear that lives outdoors. Design with a design language that suits the gear type: mountains for hiking gear, waves for surf equipment, a compass for general adventure gear.
Troubleshooting Common Luggage Tag Issues
Tag Breaks at Attachment Hole After One Trip
Cause: Insufficient material around the hole; PLA brittleness; print orientation placing the weakest layer direction at the attachment stress point.
Solution: Switch to PETG or ASA. Increase the boss diameter around the hole to at least 7mm of material on all sides. Ensure 5 perimeters print around the hole area. Redesign the hole to be at least 12mm diameter — larger holes distribute stress over more material.
Name Text Not Visible at Carousel Distance
Cause: Text too small; insufficient contrast; embossing too shallow.
Solution: Increase character height to 14–15mm. Increase emboss height to 2mm. Apply bright contrasting paint to the name text. Consider reprinting the tag in a brighter, more distinctive color.
Tag Has Warped Face — Doesn’t Lie Flat
Cause: Thin flat print warping during cooling; insufficient brim; PLA in a warm environment.
Solution: Reprint with 10mm brim. Use PETG or ASA. If using ASA, use an enclosure. For PLA, ensure print environment is draft-free and allow extended cool-down on the bed.
Painted Text Scratches Off After a Few Trips
Cause: No protective clear coat; automotive-grade clear coat not used; paint applied over unprimed/unsanded surface with poor adhesion.
Solution: Always apply primer before paint and weather-resistant clear coat after paint. Use automotive spray clear coat (more durable than craft store clear coat). Allow full cure before travel. If paint continues to fail, consider switching to embossed text in contrasting filament (printed in) rather than painted-on text.
Contact Information Tag on Back Is Unreadable
Cause: Character height too small for contact text; insufficient contrast on back face; text quality poor at small size.
Solution: Use minimum 7mm character height for any contact information. Increase text depth to 0.8mm minimum. Apply contrasting paint fill to debossed contact information. If text quality is poor at fine scale, consider using the window tag design and writing contact information on a paper insert — handwritten contact information in pen is more readable than poor-quality printed text.
Conclusion: Travel Confidently With Your Name on It
The luggage tag is a small object with an important job: to make your bag yours, visibly and unmistakably, in every airport, bus station, and hotel lobby where bags are collected and identified.
A printed luggage tag does this job better than any commercial alternative because it is specifically yours. Your name, in the size and style that reads clearly at a distance. Your distinctive color that you can spot across a carousel without reading the text. Your contact information on the back, placed there by you, for the specific purpose of getting your bag back if it ever goes missing.
Print in ASA or PETG. Design for visibility first. Reinforce the attachment point generously. Finish with automotive clear coat for the weather it will face.
Then attach it to your bag and travel with the quiet confidence of someone who knows exactly which bag is theirs.
That’s a small print with a large practical return.