The Windows Start Menu is one of the most iconic and essential components of the Windows operating system. Introduced with Windows 95 and evolving through various versions, the Start Menu serves as the central hub for accessing applications, settings, and files. Whether you are a beginner or an experienced user, understanding how to effectively navigate and customize the Start Menu can significantly enhance your productivity and ease of use.
In this guide, we’ll cover the basics of the Start Menu, how it differs across versions like Windows 10 and Windows 11, and tips for personalizing it to better suit your workflow. By the end of this article, you’ll be able to navigate the Start Menu with confidence and customize it to streamline your daily tasks.
Understanding the Structure of the Start Menu
The Start Menu is the gateway to your computer’s programs, settings, and files, but its structure varies slightly depending on the version of Windows you are using. Let’s explore the key elements and how they are organized.
1. The Start Menu in Windows 10
In Windows 10, the Start Menu blends elements from both the classic menu and the tiled interface of Windows 8, creating a versatile hub that is easy to navigate and customize.
- Left Panel (App List and Shortcuts): On the left side of the Start Menu, you’ll find a list of your most-used applications, along with quick access to key system features like Settings, File Explorer, and Power options. You can scroll through the alphabetical list of all installed apps to find what you need or use the search bar at the bottom to locate specific programs or files.
- Right Panel (Live Tiles): The right panel of the Windows 10 Start Menu features Live Tiles, which are customizable blocks representing apps or files. Many of these tiles are “live,” meaning they display real-time information—such as weather updates, calendar events, or email notifications—without needing to open the app.
- Search Bar: The search bar, located at the bottom of the Start Menu, is one of the most powerful tools for quickly finding applications, files, and even performing web searches. Simply start typing, and Windows will display results instantly, based on your input.
2. The Start Menu in Windows 11
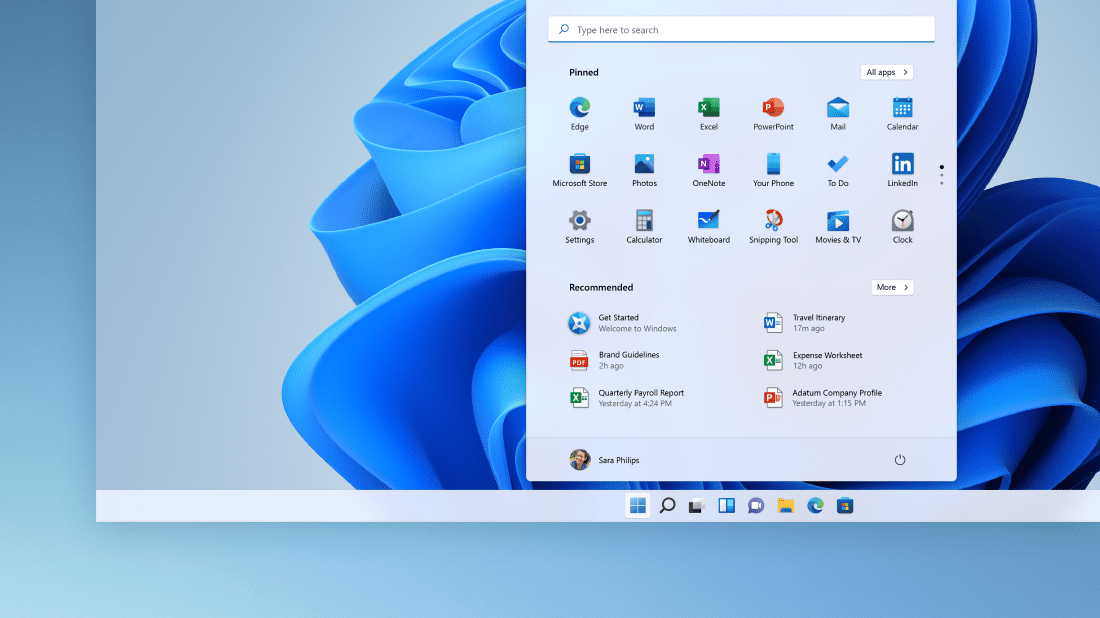
Windows 11 introduced a redesigned Start Menu with a cleaner, more minimalist layout compared to Windows 10. The main changes include the removal of Live Tiles and the central positioning of the Start Menu on the taskbar.
- Pinned Apps Section: The top section of the Start Menu in Windows 11 displays a grid of pinned apps, replacing the Live Tiles of Windows 10. You can pin frequently used apps here for quick access, and you can rearrange or remove them as needed.
- All Apps Button: Below the pinned apps, you’ll find an All apps button, which opens a list of all installed applications, similar to the left panel of the Windows 10 Start Menu. This is where you can access less frequently used programs.
- Recommended Section: The lower portion of the Start Menu features a Recommended section, which shows recently used or newly installed apps and files. This helps you quickly return to what you were working on or find recently added software without having to search for it.
- Search Bar: Similar to Windows 10, Windows 11 also includes a search bar at the top of the Start Menu, allowing you to search for apps, files, and settings.
While the Start Menu looks different in Windows 10 and Windows 11, both versions offer an intuitive and customizable interface for accessing the essential components of your computer.
Navigating the Start Menu Efficiently
Mastering the navigation of the Start Menu is crucial for boosting productivity. Here are some tips for efficiently using both the Windows 10 and Windows 11 Start Menus.
1. Using the Search Bar
The search bar is one of the fastest ways to locate applications, files, and settings. Instead of manually scrolling through the app list or browsing folders, you can simply type the name of the app, document, or even a specific setting, and Windows will bring it up instantly.
- In Windows 10, click on the search bar at the bottom of the Start Menu or press the Windows key and start typing.
- In Windows 11, the search bar is at the top of the Start Menu, or you can press Windows key + S to open a dedicated search interface.
You can even use the search bar for web searches, as Windows integrates results from Microsoft’s Bing search engine. For example, typing “weather” will show local weather information directly within the search results.
2. Accessing Key System Features
The Start Menu provides shortcuts to essential system features such as Settings, File Explorer, and Power options (to shut down, restart, or sleep your PC).
- In Windows 10, these options are located on the left side of the Start Menu.
- In Windows 11, you can access system features through the Power button located at the bottom-right corner of the Start Menu, and Settings is pinned at the top of the app grid.
For quick access to these features, you can also right-click the Start button in both Windows 10 and Windows 11 to open the Power User Menu. This menu includes shortcuts to advanced system tools like Task Manager, Device Manager, and Disk Management, which are essential for troubleshooting and system administration.
3. Pinning and Unpinning Apps
Both Windows 10 and 11 allow you to pin your most-used applications to the Start Menu for easy access. Here’s how to pin and unpin apps:
- Pin an App to the Start Menu:
- Open the Start Menu and locate the app you want to pin.
- Right-click the app and select Pin to Start.
- Unpin an App from the Start Menu:
- Right-click the pinned app in the Start Menu.
- Select Unpin from Start to remove it from the menu.
Pinning apps ensures that your frequently used programs are easily accessible, reducing the time you spend searching for them.
4. Using the All Apps List
For apps that are not pinned to the Start Menu, you can browse the All apps list:
- In Windows 10, the All apps list is located in the left panel of the Start Menu. You can scroll through the alphabetical list to find any installed program.
- In Windows 11, click All apps above the Recommended section to view a full alphabetical list of all installed apps.
This list is particularly useful for accessing apps that you use less frequently or for finding newly installed software that hasn’t been pinned yet.
5. Accessing Recently Used Files and Apps
In Windows 11, the Recommended section of the Start Menu provides quick access to recently used apps and files. This feature saves time by helping you jump back into your work without having to search for your most recent documents or applications.
You can customize what appears in the Recommended section by going to Settings > Personalization > Start and selecting whether to show recently added apps, frequently used apps, or recently opened items.
Start Menu Customization
Both Windows 10 and Windows 11 offer several ways to customize the Start Menu, enabling you to tailor it to your preferences. In the next section, we will explore customization options, including how to resize the Start Menu, rearrange tiles or pinned apps, and personalize the appearance of the Start Menu. Customizing the Start Menu not only improves functionality but also gives your system a personalized look and feel.
Customizing the Windows Start Menu
While the default Start Menu setup in Windows is functional, it may not perfectly suit your specific needs or workflow. Fortunately, both Windows 10 and Windows 11 allow for extensive customization of the Start Menu, enabling you to personalize its layout, adjust the size, and organize apps to improve accessibility and efficiency.
1. Resizing the Start Menu
In Windows 10, the Start Menu can be resized to fit your preferences. Whether you want a larger menu to display more apps and Live Tiles or a more compact layout, resizing is quick and easy.
To resize the Start Menu in Windows 10:
- Open the Start Menu.
- Hover your mouse over the top or side edge of the Start Menu until the resize cursor appears.
- Click and drag the edge to adjust the height or width of the Start Menu to your desired size.
For Windows 11, the Start Menu is more fixed in its layout, but there are some minor adjustments you can make:
- You can resize the grid of pinned apps by adding or removing apps, which will expand or contract the Start Menu’s layout automatically based on the number of apps displayed.
2. Rearranging and Resizing Live Tiles (Windows 10)
In Windows 10, the right panel of the Start Menu contains Live Tiles, which are interactive app tiles that show real-time information or provide quick access to apps. You can rearrange and resize these tiles to suit your preferences.
- Rearrange Tiles:
- Open the Start Menu and locate the Live Tile you want to move.
- Click and drag the tile to a new location within the right panel.
- Resize Tiles:
- Right-click on any Live Tile.
- Select Resize and choose from options such as Small, Medium, Wide, or Large.
3. Customizing the Pinned Apps Grid (Windows 11)
In Windows 11, the Live Tiles from Windows 10 have been replaced by a cleaner grid of pinned apps. Customizing this grid helps you quickly access your most frequently used programs and organize them in a way that aligns with your workflow.
- Rearrange Pinned Apps:
- Open the Start Menu.
- Click and drag any pinned app to a new position in the grid.
- Pin/Unpin Apps:
- Right-click on an app in the Start Menu or All apps list.
- Select Pin to Start to add it to the grid, or Unpin from Start to remove it.
4. Customizing the App List and Folders
In both Windows 10 and Windows 11, you can create custom app folders or group similar apps together within the Start Menu to keep things organized and clutter-free.
- Creating Folders for Apps (Windows 10):
- Drag one Live Tile over another to automatically create a folder.
- You can name the folder by clicking on the folder’s name area and typing a new label.
- Creating App Folders (Windows 11): Windows 11 offers the ability to create app folders within the pinned apps grid:
- Drag one pinned app over another to create a folder.
- You can name the folder by clicking inside it and typing a name.
5. Changing Start Menu Color and Appearance
You can also personalize the appearance of the Start Menu by changing its color scheme to better match your desktop theme or personal style. This customization is available in both Windows 10 and Windows 11.
To change the Start Menu color:
- Open Settings and go to Personalization > Colors.
- Scroll down to the Choose your accent color section and select a color. You can either pick from the preset options or click Custom color to create a unique palette.
- Toggle the option Show accent color on Start, taskbar, and action center (Windows 10) or Show accent color on Start and taskbar (Windows 11).
This will change the background color of your Start Menu to the selected accent color, providing a more personalized and visually cohesive look across your desktop environment.
Organizing and Managing Apps in the Start Menu
Efficiently managing the apps in your Start Menu ensures that you can quickly access what you need without navigating through unnecessary clutter. Here’s how to better organize and manage the apps that appear in the Start Menu.
1. Removing Unwanted Apps from the Start Menu
The default Start Menu includes several pre-installed apps that you may not need or use. To clean up your Start Menu, you can easily remove these apps.
- Unpin from Start (Windows 10 and 11): To remove an app from the pinned section of the Start Menu:
- Right-click the app and select Unpin from Start.
- Uninstall Apps (Windows 10 and 11): If there are pre-installed apps that you don’t use, you can uninstall them:
- Right-click on the app and select Uninstall.
2. Managing Startup Apps
Some apps are set to start automatically when you boot up your computer, which can slow down the startup process. You can manage which apps are allowed to start automatically from the Start Menu.
To manage startup apps:
- Right-click the Start button and select Task Manager.
- In Task Manager, click the Startup tab.
- Here, you can enable or disable apps that are set to run at startup. Disabling unnecessary apps will improve your computer’s boot speed and overall performance.
3. Adding System Shortcuts to the Start Menu
If you frequently access certain system tools (like Control Panel, Device Manager, or Settings), you can pin these to the Start Menu for easier access.
To add system shortcuts to the Start Menu:
- Open the Start Menu and search for the system tool (e.g., “Control Panel”).
- Right-click the tool and select Pin to Start.
By pinning important system tools, you can streamline your workflow and reduce the time spent searching for critical functions.
4. Using the Search Bar for Apps and Settings
Both Windows 10 and 11 feature a powerful Search bar that allows you to find apps, files, and system settings quickly. Using the search bar can save you time, especially when you don’t remember where certain apps or files are located.
To use the search bar:
- Open the Start Menu and begin typing the name of the app, file, or setting.
- Windows will display relevant results based on your input, allowing you to open the item directly from the Start Menu.
In Windows 11, the search bar is integrated directly into the Start Menu, while in Windows 10, you can access the search bar by pressing the Windows key and typing your query.
Advanced Tips for Enhancing Productivity with the Start Menu
While customizing the Start Menu is essential for creating an interface that works for you, there are advanced features and tips that can further streamline your workflow. By learning how to create shortcuts, manage notifications, and make full use of the search bar, you can unlock the full potential of the Start Menu and increase your productivity.
1. Creating Shortcuts for Quick Access
One of the most effective ways to improve your productivity is by creating shortcuts to frequently used applications, folders, or files. These shortcuts can be pinned to the Start Menu or taskbar, making them accessible with just a few clicks.
- Create a Shortcut on the Desktop:
- Right-click on a blank area of the desktop and select New > Shortcut.
- Browse to the location of the application, file, or folder you want to create a shortcut for.
- Click Next and name the shortcut.
- Pinning Specific Files to Start: In Windows 10 and 11, you can also pin individual files (such as Word documents or spreadsheets) to the Start Menu for quick access:
- Find the file in File Explorer.
- Right-click the file and select Pin to Start.
This feature is especially useful for files you need to access regularly, such as project documents, invoices, or personal to-do lists.
2. Managing App Notifications and Live Tiles
The Start Menu, especially in Windows 10, includes Live Tiles that show real-time updates from apps like Mail, Weather, and News. While these updates can be helpful, they can also be distracting or unnecessary depending on your preferences. You can manage these notifications or turn off Live Tiles entirely.
- Turning Off Live Tile Updates (Windows 10):
- Right-click on a Live Tile in the Start Menu.
- Select More > Turn live tile off.
- Managing App Notifications: If you prefer to receive notifications from certain apps, you can customize how they appear in your system. To manage notifications:
- Go to Settings > System > Notifications & actions.
- Scroll down to see a list of apps that can send notifications. Toggle individual apps on or off depending on your needs.
- For more control, click on an app to adjust how notifications are delivered (e.g., whether they appear in the Action Center, show banners, or play sounds).
This helps to keep your Start Menu and desktop free from unnecessary distractions, ensuring that only important updates catch your attention.
3. Maximizing the Power of the Search Bar
The Search bar in the Start Menu is one of the most powerful tools for improving your productivity. It goes beyond just locating apps or files—you can use it to search for system settings, web content, and even perform quick calculations or conversions.
- Search for System Settings: Instead of navigating through the Control Panel or Settings, you can search for specific system settings directly through the Start Menu search bar. For instance, typing “Display” will bring up display settings, and “Power options” will show settings related to your computer’s energy use.
- Perform Web Searches: The Windows search bar integrates with Bing, so you can search the web without opening a browser. For example, if you type a search term such as “local weather” or “latest news,” results will appear within the Start Menu. This saves time, especially for quick lookups.
- Use as a Calculator: You can even perform simple calculations by typing them directly into the search bar. For example, entering “25 * 4” will display the result (100) without opening the Calculator app.
- File Search Shortcuts: If you know the name of a file or document, typing part of the file’s name into the search bar will quickly locate it, saving you time spent browsing through folders. You can also search by file type, such as “pdf” or “docx,” to filter the results.
Mastering the search bar is key to saving time when navigating your system. Whether you need to quickly adjust settings, find a file, or perform basic calculations, the search functionality in Windows can handle it all from one central location.
4. Organizing Workflow with Virtual Desktops
Although Virtual Desktops are more closely related to task management than the Start Menu itself, they enhance productivity by allowing you to organize your workspace across multiple desktops. This feature is particularly useful if you’re working on different projects or want to separate your personal tasks from work-related ones.
To create and manage Virtual Desktops:
- Press Windows key + Tab to open Task View.
- Click New Desktop at the top of the screen to create a new virtual desktop.
- You can switch between desktops by pressing Ctrl + Windows key + Left/Right Arrow.
By separating different tasks into multiple desktops, you can avoid a cluttered workspace and focus better on each project. You can also drag and drop apps between desktops in Task View, making it easy to organize your open applications.
5. Using Cortana for Voice Commands and Quick Tasks
If you’re using Windows 10, Cortana, the built-in virtual assistant, can be a helpful tool for navigating your system with voice commands. While Cortana has been scaled back in Windows 11, it’s still available in earlier versions for hands-free productivity.
- Basic Commands: You can ask Cortana to open apps, send emails, set reminders, or search the web. For example, you can say, “Hey Cortana, open Word,” or “Hey Cortana, what’s the weather today?”
- Reminders and Calendar Integration: You can set up reminders or ask Cortana about upcoming appointments. Cortana integrates with your calendar, providing a hands-free way to manage your schedule.
To enable Cortana in Windows 10:
- Press Windows key + S or click the Cortana icon in the taskbar.
- Follow the prompts to activate voice commands and allow Cortana to respond to “Hey Cortana.”
While it may not be as prominent in Windows 11, Cortana remains a useful tool for users who prefer voice-activated commands to navigate the Start Menu and other system features.
Start Menu Troubleshooting and Best Practices
Even with all the customizations and features, you may occasionally encounter issues with the Start Menu. Here are some common problems and solutions.
1. Start Menu Not Opening
If the Start Menu fails to open when you click on it, try restarting Windows Explorer:
- Press Ctrl + Shift + Esc to open Task Manager.
- Find Windows Explorer in the list of processes.
- Right-click on Windows Explorer and select Restart.
This should refresh the Start Menu and allow it to function normally.
2. Start Menu Search Not Working
Sometimes, the Start Menu’s search functionality may stop working, preventing you from searching for apps or files. To resolve this:
- Open Settings > Update & Security > Troubleshoot.
- Click on Search and Indexing and run the troubleshooter to identify and fix any issues.
3. Apps Missing from the Start Menu
If an app is missing from the Start Menu or you cannot find it using the search bar, try reinstalling the app:
- Open Settings > Apps > Apps & features.
- Find the app, click on it, and select Uninstall.
- Reinstall the app from the Microsoft Store or by downloading it from the developer’s website.
Conclusion
The Windows Start Menu is more than just a simple tool for launching programs—it’s a powerful hub that can be customized to fit your specific needs, enhance your workflow, and boost your productivity. Whether you’re using Windows 10 or Windows 11, mastering the Start Menu by customizing its layout, utilizing the search functionality, and creating shortcuts can significantly improve how you navigate and use your system.
By organizing apps, managing notifications, and incorporating advanced features like Virtual Desktops and Cortana, you can tailor the Start Menu to suit your unique workflow. As you continue to explore the Start Menu’s capabilities, you’ll find that it’s an indispensable part of the Windows experience.