Linux, a versatile and powerful open-source operating system, has gained immense popularity among developers, IT professionals, and everyday users alike. Unlike proprietary systems like Windows or macOS, Linux offers unparalleled flexibility, security, and control over your computing environment. Whether you’re looking to breathe new life into an old computer, create a dedicated server, or simply explore the world of open-source software, installing Linux is an excellent choice.
This guide will take you through a step-by-step process to install Linux on your computer, catering to both beginners and experienced users. From selecting the right Linux distribution to the actual installation and configuration, this article will cover everything you need to know to get started with Linux.
Understanding Linux Distributions
Before diving into the installation, it’s important to understand that Linux is not just a single operating system but a collection of distributions (or distros). Each distribution has its own set of features, interfaces, and tools, tailored for specific use cases. Popular distributions include:
- Ubuntu: Known for its user-friendly interface, extensive community support, and ease of use, Ubuntu is ideal for beginners. It’s a great starting point for those new to Linux.
- Fedora: A cutting-edge distribution known for incorporating the latest software updates. It’s perfect for developers who want the latest tools.
- Debian: A stable and reliable choice, known for its conservative approach to software updates. It’s often used for servers and is the foundation for many other distributions.
- Arch Linux: A rolling-release distribution that offers full control over the system. It’s best suited for advanced users who enjoy customizing every aspect of their OS.
- Linux Mint: Built on Ubuntu and designed to be easy for new users, Mint provides a familiar desktop experience similar to Windows.
The choice of distribution largely depends on your needs, technical skill level, and personal preferences. For this guide, we will focus on installing Ubuntu, as it’s one of the most accessible and widely supported Linux distributions.
Preparing for Installation
1. System Requirements
Before installing Linux, ensure that your computer meets the minimum system requirements for your chosen distribution. For Ubuntu, the recommended specifications are:
- Processor: Dual-core 2 GHz or better
- RAM: 4 GB or more
- Storage: 25 GB of free disk space
- USB Port: For creating installation media
Older computers can run lightweight distributions like Lubuntu or Xubuntu, which are optimized for lower system resources.
2. Back Up Your Data
Installing Linux involves partitioning your hard drive, which can result in data loss if not handled carefully. Always back up your important data to an external hard drive or cloud storage before proceeding.
3. Create Installation Media
To install Linux, you need to create a bootable USB drive or DVD with the Linux ISO file. Here’s how you can create the installation media:
- Download the ISO File: Visit the official website of your chosen Linux distribution (e.g., ubuntu.com) and download the latest version of the ISO file.
- Create a Bootable USB Drive:
- Windows Users: Use a tool like Rufus, Etcher, or UNetbootin to create a bootable USB. Insert a USB drive (at least 8 GB), select the ISO file, and click ‘Start.’
- Mac Users: Use the built-in Terminal application or Balena Etcher. Open Terminal and use the
ddcommand, or opt for the graphical interface of Etcher for simplicity. - Linux Users: Use tools like Startup Disk Creator (Ubuntu) or dd command in the terminal (
sudo dd if=path_to_iso of=/dev/sdX bs=4M), replacingpath_to_isowith the path to your ISO file and/dev/sdXwith your USB drive’s path.
4. Change Boot Order in BIOS/UEFI
Once the installation media is ready, you need to boot your computer from it. To do this:
- Restart your computer and press the key to enter BIOS/UEFI settings (common keys include F2, F12, ESC, or DEL).
- Navigate to the boot menu and change the boot order to prioritize the USB drive or DVD.
- Save the changes and exit.
Your computer will now boot from the Linux installation media, taking you to the installation process.
Booting into the Linux Installer
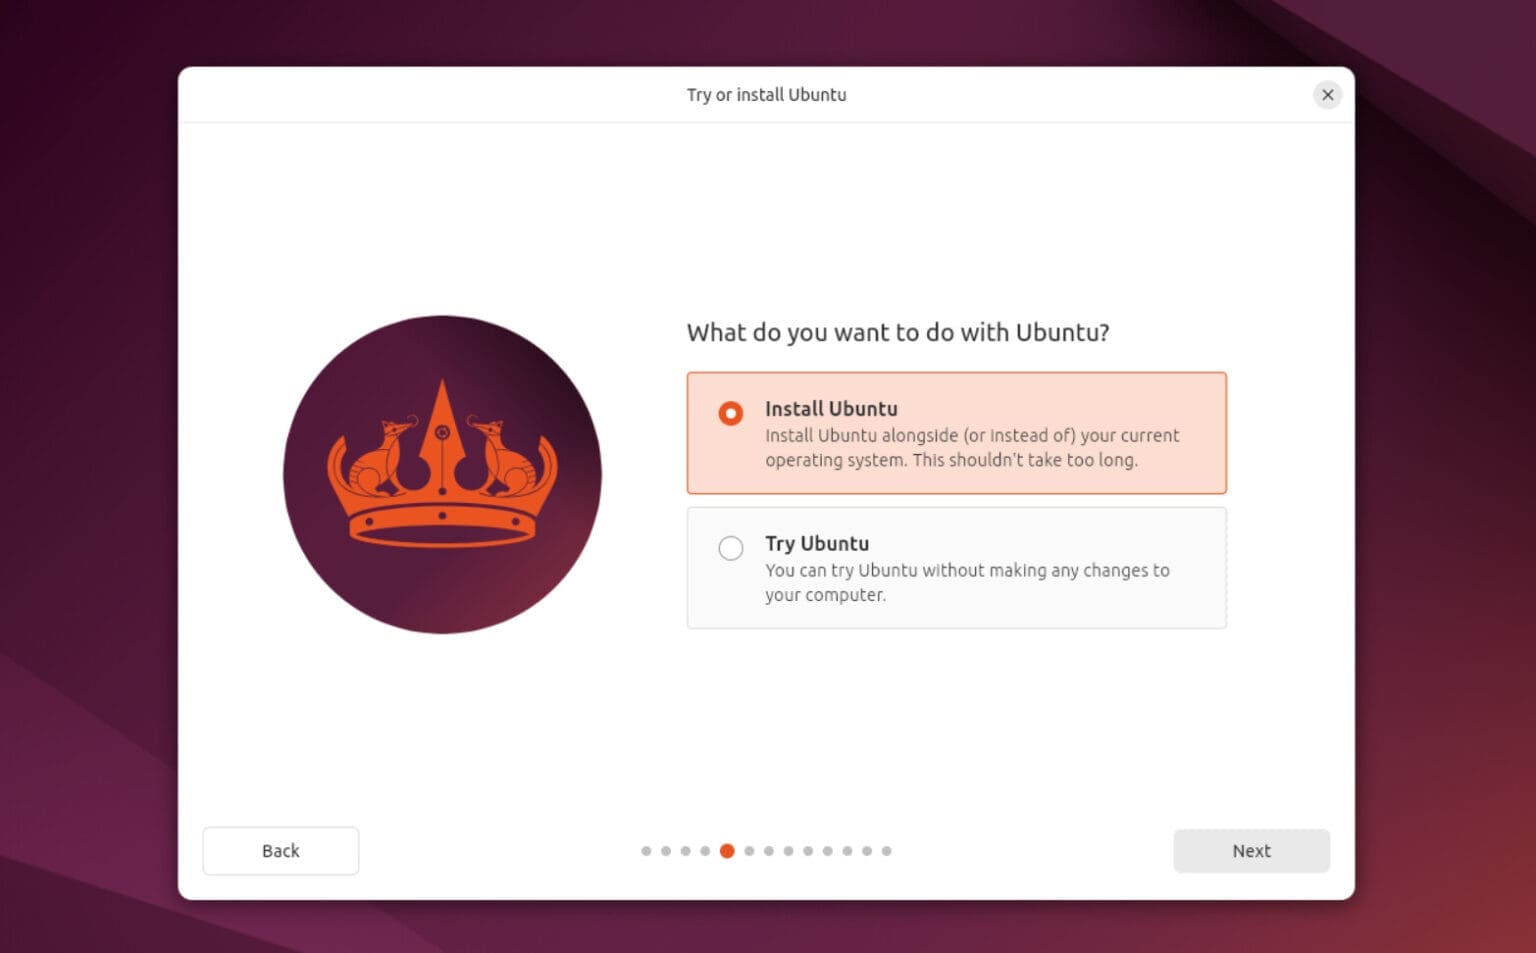
Once your computer boots from the USB drive, you will be greeted by the Linux installer. Most distributions, including Ubuntu, offer a “Try” option and an “Install” option:
- Try Linux: Allows you to test the operating system without making any changes to your computer. This is a great way to ensure that your hardware is compatible.
- Install Linux: Starts the installation process.
For this guide, select the “Install Ubuntu” option to begin.
Step 1: Selecting Your Language and Keyboard Layout
After selecting the “Install Ubuntu” option, the installer will guide you through the initial setup steps. The first screen allows you to choose your preferred language. Select your language and click “Continue.”
Next, you’ll be asked to choose your keyboard layout. The default is usually correct, but if you use a different keyboard layout (such as Dvorak or a non-English setup), you can select it here. You can test your keyboard layout by typing in the provided text box to ensure everything is working as expected. Once done, click “Continue.”
Step 2: Preparing to Install Ubuntu
In the next screen, you’ll be prompted to connect to a network. While this step is optional, connecting to the internet during installation ensures that you have access to the latest updates and drivers. If you prefer to set up your network later, you can skip this step.
The installer will then present you with options for updates and third-party software:
- Normal Installation: This includes the desktop environment, web browser, office software, media players, and more. It’s the recommended option for most users.
- Minimal Installation: This includes only the basic utilities and a web browser, making it a lighter version suitable for minimalists or low-resource systems.
Additionally, you can choose to install updates and third-party software (such as proprietary graphics drivers, Wi-Fi drivers, and codecs for media playback) during the installation. It’s recommended to select both “Install third-party software” and “Download updates while installing Ubuntu” to ensure your system is fully functional from the start.
Click “Continue” to proceed.
Step 3: Disk Partitioning and Installation Type
The next step is crucial: choosing the installation type. The installer will present you with several options, depending on your existing operating systems and hard drive setup:
- Erase Disk and Install Ubuntu: This option wipes your entire hard drive and installs Ubuntu as the sole operating system. It’s the simplest option if you don’t need to keep any existing data.
- Install Ubuntu Alongside Other Operating Systems (Dual Boot): If you already have Windows or another OS installed and want to keep it, this option will set up a dual-boot configuration, allowing you to choose between operating systems at startup.
- Something Else (Manual Partitioning): For advanced users who want to manually partition their hard drive, this option provides full control over how Linux is installed. You can create custom partitions, set specific mount points, and fine-tune your disk setup.
Creating Partitions (Manual Method)
If you opt for the “Something Else” method, you’ll need to manually create partitions. Here’s a basic guide to partitioning for Linux:
- Root Partition (
/): This is the primary partition where the OS will be installed. Allocate at least 20 GB for this partition. Choose the Ext4 filesystem. - Swap Partition: Swap space acts as virtual RAM, helping your system when physical RAM is exhausted. Allocate space equivalent to your RAM size (e.g., 4 GB swap for 4 GB RAM). This is particularly useful on systems with low RAM.
- Home Partition (
/home): This is where your personal files and settings are stored. It’s beneficial to separate this from the root partition to preserve data during future system upgrades. Allocate most of your remaining space here, choosing the Ext4 filesystem. - EFI Partition (if using UEFI): If your computer uses UEFI (modern BIOS), you’ll need a small EFI partition (around 300 MB) formatted with FAT32 to manage boot information.
After setting up your partitions, click “Install Now.” A warning will appear, asking you to confirm the changes to your disk. Review the partitions carefully and, if everything looks correct, click “Continue” to proceed with the installation.
Step 4: Set Your Time Zone
Next, the installer will prompt you to select your time zone. The installer usually detects your location automatically based on your internet connection. If the detected time zone is incorrect, you can click on the map or use the search bar to select your correct location. This step ensures your system clock is set correctly.
Step 5: Creating a User Account
The installer will now ask you to set up your primary user account. You’ll need to provide:
- Your Name: Used to personalize your system.
- Computer Name: This name identifies your computer on a network.
- Username: This is your login name. It’s typically all lowercase and without spaces.
- Password: Create a strong password for your account. You will use this password for logging in and performing administrative tasks.
There’s also an option to “Log in automatically” or “Require my password to log in.” For security reasons, it’s generally recommended to require a password at login.
Step 6: Installing the System
With all settings confirmed, the installation will begin. The process usually takes between 10 to 30 minutes, depending on your computer’s speed and the selected installation options. During this time, the installer will copy files, configure system settings, and set up the bootloader.
You can use this time to explore the slides that provide information about Ubuntu’s features and tips on getting started. Once the installation is complete, you will be prompted to remove the installation media (USB or DVD) and press Enter to restart your computer.
Post-Installation Setup
After rebooting, you will be greeted with your new Linux login screen. Log in with the account credentials you set up earlier. Once logged in, it’s time to finalize your system configuration. This includes installing updates, configuring drivers, and personalizing your desktop environment to suit your needs.
Post-Installation Configuration
Congratulations! You have successfully installed Linux on your computer. Now that the installation is complete, the next step is to set up your system for optimal use. This section will guide you through essential post-installation tasks, including updating your system, installing necessary drivers, securing your environment, and customizing the desktop.
Step 1: Updating Your System
The first thing you should do after logging into your new Linux system is update the software packages. This ensures that you have the latest security patches, bug fixes, and feature enhancements.
To update your system on Ubuntu:
- Open the Terminal application. You can find it in the applications menu or press
Ctrl + Alt + Tto open it quickly. - Run the following commands:
sudo apt update
sudo apt upgrade -yThe apt update command refreshes the list of available packages, while apt upgrade installs the latest versions of the installed packages. Depending on your internet speed, this process may take several minutes.
Step 2: Installing Drivers
Linux is generally good at detecting and installing most hardware drivers automatically. However, some proprietary drivers (especially for graphics cards and Wi-Fi adapters) might require manual installation.
To check and install drivers on Ubuntu:
- Open the Software & Updates application from the applications menu.
- Navigate to the Additional Drivers tab. The system will automatically search for proprietary drivers available for your hardware.
- If recommended drivers are found, select the appropriate driver and click Apply Changes.
- Restart your computer for the changes to take effect.
Installing the correct drivers is crucial for performance, especially for graphics-intensive tasks such as gaming or video editing.
Step 3: Installing Essential Software
Now that your system is up to date, it’s time to install essential software. While Linux comes with a suite of pre-installed applications, you may need additional tools for productivity, development, or entertainment. Here are some commonly used software categories and their popular options:
- Web Browsers: Firefox is installed by default, but you can install others like Google Chrome or Chromium.
sudo apt install chromium-browser- Office Suite: LibreOffice is a powerful office suite included with Ubuntu, but you can also install WPS Office or OnlyOffice for an alternative experience.
- Media Players: VLC is a versatile media player that supports a wide range of audio and video formats.
sudo apt install vlcCode Editors: If you are a developer, consider installing code editors like Visual Studio Code, Atom, or Sublime Text.
sudo apt install code # for Visual Studio CodeSystem Monitoring: Tools like htop provide detailed monitoring of your system’s resource usage.
sudo apt install htopYou can install additional software from the Ubuntu Software Center, a graphical app store that makes it easy to find and install thousands of free and open-source applications.
Step 4: Securing Your Linux System
Linux is inherently secure, but there are still steps you can take to further protect your system:
- Enable Firewall: Ubuntu comes with
ufw(Uncomplicated Firewall), a simple yet effective firewall tool. To enable it, open the terminal and type:
sudo ufw enable- Install Security Updates Automatically: Ensure your system is configured to install security updates automatically. This can be configured in the Software & Updates application under the Updates tab.
- Create Backups: Regularly back up your data using tools like Timeshift for system snapshots or Deja Dup for personal file backups.
Step 5: Customizing Your Desktop Environment
Linux allows you to customize almost every aspect of your desktop environment, making it feel truly your own. Here are some customization tips:
- Change the Desktop Appearance: Modify your desktop background, icons, and themes. In Ubuntu, you can access these settings by right-clicking on the desktop and selecting Settings.
- Install GNOME Tweaks: For deeper customization of the GNOME desktop environment, install GNOME Tweaks.
sudo apt install gnome-tweaks- Set Up Workspaces: Organize your workflow by setting up multiple workspaces, allowing you to separate tasks and manage open windows more efficiently.
- Install Extensions: GNOME extensions add functionality to your desktop. Visit the GNOME Extensions website to browse and install extensions that enhance your workflow.
Step 6: Exploring Linux Commands and Tools
One of the key strengths of Linux is its powerful command-line interface. Familiarizing yourself with basic terminal commands can significantly enhance your Linux experience:
- File Management: Use commands like
ls(list files),cp(copy),mv(move), andrm(remove) to manage files and directories. - System Monitoring: Commands like
top,free, anddfhelp you monitor system performance and disk usage. - Package Management: Beyond
apt, other package managers likesnapandflatpakprovide access to a wide range of applications.
Learning basic terminal commands will empower you to perform tasks more efficiently and troubleshoot problems independently.
Conclusion
Installing Linux opens up a world of possibilities, offering a robust, secure, and customizable environment that can be tailored to your needs. From selecting the right distribution to completing the post-installation setup, this guide has walked you through every essential step to get started with Linux.
Whether you’re a newcomer exploring Linux for the first time or an experienced user looking to refine your setup, the flexibility and power of Linux will enable you to take control of your computing experience. Remember, the Linux community is vast and welcoming, with countless resources available online to help you expand your knowledge and solve any challenges you encounter.
With your Linux system now fully configured, you’re ready to dive into the open-source ecosystem. Explore new software, tweak your system to perfection, and enjoy the freedom that comes with running one of the world’s most versatile operating systems.