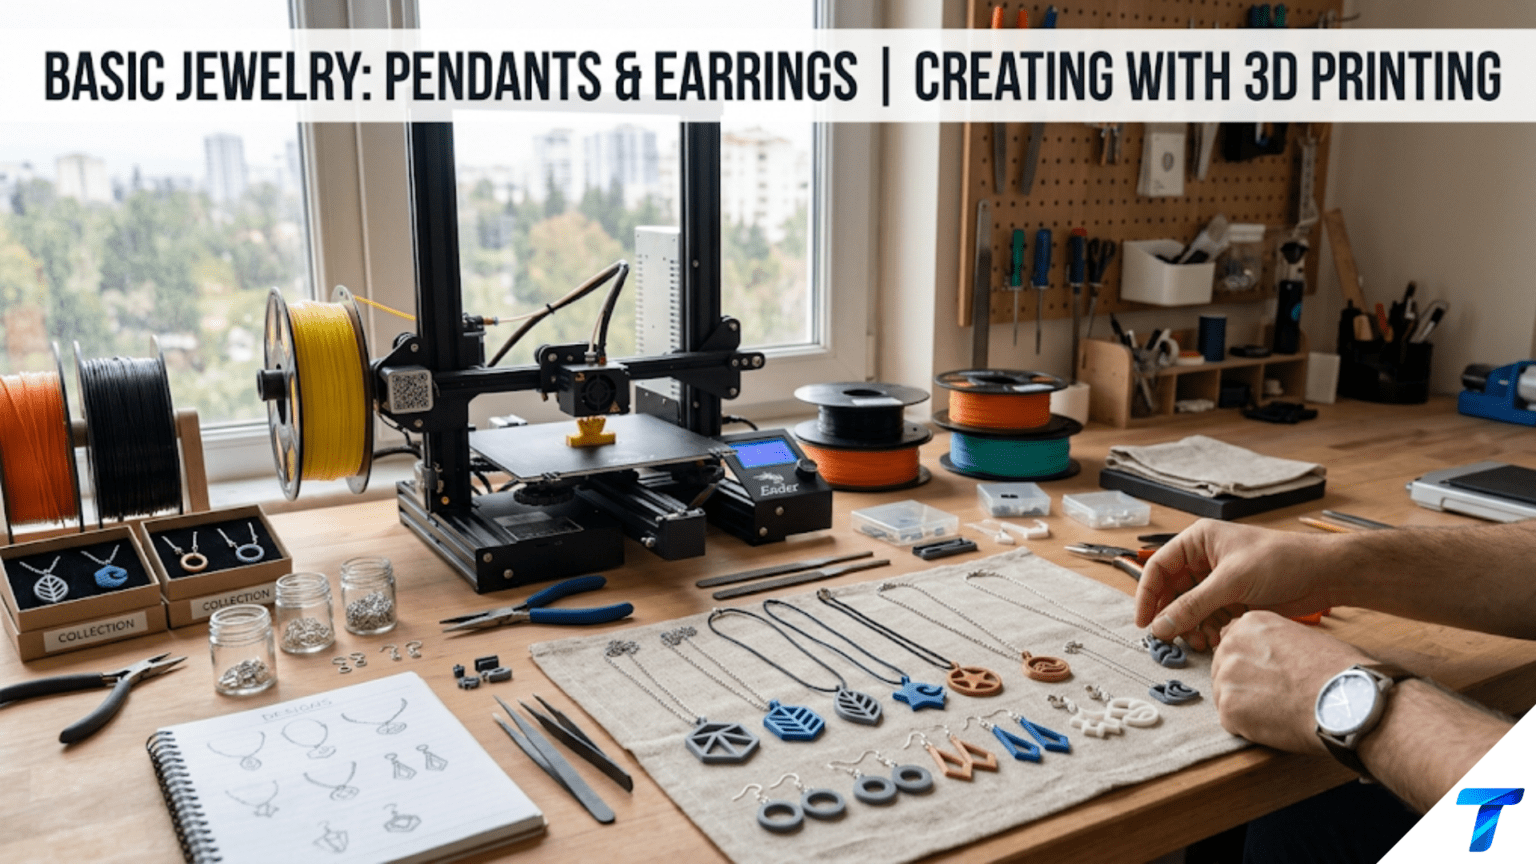
3D printed jewelry — including pendants, earrings, and other wearable accessories — represents one of the most creatively rewarding applications of desktop FDM printing, combining small-scale design precision with personal expression and genuine wearability. Pendants and earrings are particularly accessible beginner jewelry projects because they require only simple flat or low-relief geometry, print in 15–45 minutes each, introduce the critical skills of printing at very small scale with fine layer heights, and can be transformed into genuinely beautiful finished pieces through straightforward post-processing and hardware assembly.
Introduction: Wearing What You Make
There is a special category of made object that travels with the person who made it — or with the person they made it for. It appears in photographs, accompanies important moments, is noticed and asked about, and carries meaning precisely because it was made rather than purchased.
Jewelry belongs to this category, and 3D printed jewelry belongs to it in a way that is simultaneously new and deeply continuous with the oldest tradition in human ornament-making: the impulse to shape materials into objects of personal meaning and wear them as expressions of identity.
A pendant printed with a design that references something specific to the wearer — an astronomical symbol, a mathematical form, a botanical shape, a character from a meaningful story — communicates something that a purchased piece cannot: that someone knew them well enough to make something specific for them, or that they made something specific for themselves.
Beyond the meaning of the object, printed jewelry introduces a set of technical challenges that are genuinely distinct from other printing applications. Scale is smaller than almost anything else you’ll print — details must be rendered at 3–8mm scale rather than 30–80mm. Layer height needs to drop to 0.1mm or lower for surfaces that will be seen and touched at inches-from-the-face distance. Material choice intersects with skin contact and wearability considerations. And the finished piece requires hardware — jump rings, ear wires, necklace chains — that must be properly assembled.
These challenges make jewelry printing genuinely educational, and the results — a set of earrings someone actually wears, a pendant that becomes a cherished piece — are among the most personally meaningful prints possible.
This guide covers the complete jewelry printing workflow for beginners: design approaches for pendants and earrings, the scale and detail requirements that distinguish jewelry from other prints, material selection for skin-contact wearables, slicer settings for very small detailed prints, hardware selection and assembly, post-processing for a professional jewelry finish, and a range of creative directions for every taste and occasion.
Understanding Jewelry Scale and Detail Requirements
Before designing or printing jewelry, understanding how scale affects every aspect of the print is essential. Jewelry printing is not simply small-scale printing of normal objects — it operates under different constraints that require specific adjustments throughout the workflow.
The Scale Challenge
Standard functional prints are typically 30–200mm in major dimensions. Pendants and earrings are typically 15–50mm in major dimensions, with detail features at 1–5mm scale. This difference in scale creates specific challenges:
Minimum feature size: At standard 0.4mm nozzle and 0.2mm layer height, the minimum printable feature is approximately 0.8–1.0mm (two nozzle widths). For jewelry with fine decorative details, this means features smaller than 1mm are unreliable and features smaller than 0.5mm are unprintable with standard equipment.
Layer line visibility: At jewelry viewing distances — inches from the face — layer lines at 0.2mm height are clearly visible and affect the aesthetic quality of the piece significantly. 0.15mm layer height is the practical minimum for acceptable jewelry quality; 0.1mm is preferred for pieces where surface quality matters most.
Minimum wall thickness: Thin elements in jewelry — the loop that accepts a jump ring, thin decorative arms, filigree-like patterns — must maintain adequate wall thickness to survive printing and handling. A minimum of 1.2mm thickness for any structural element; 2mm for elements that will experience stress (like the jump ring loop).
Printing small parts: Small parts accumulate heat rapidly because each layer has a short print time before the next layer begins. Without adequate cooling and minimum layer time settings, the hot nozzle re-heats previously deposited material before it solidifies, causing deformation. This is the primary quality issue in small jewelry printing.
The Key Jewelry Dimensions
Pendants:
- Typical diameter/width: 20–50mm
- Typical thickness: 3–8mm
- Jump ring bail (the loop at the top): 3–4mm inner diameter, 2mm wall thickness minimum
- Total weight target: 2–10g (heavier pendants drag chains down and feel uncomfortable)
Earrings:
- Typical stud diameter: 8–20mm
- Typical drop earring size: 15–40mm long, 10–30mm wide
- Thickness: 2–5mm (thicker is heavier — weight is critical for earring comfort)
- Weight target: 1–4g per earring (heavier earrings stretch earlobes and feel uncomfortable after extended wear)
- Hardware attachment: Ear post hole (stud earrings: 0.7–0.8mm diameter for standard 0.7mm ear posts) or jump ring loop (for drop earrings: 3–4mm inner diameter)
Pendant Design Approaches
Approach 1: Flat Silhouette Pendants
The simplest pendant design: a flat shape, 3–6mm thick, with a bail (loop) at the top for the chain. The shape can be anything — a moon, a star, a leaf, an animal silhouette, a geometric form, a letter, a constellation pattern.
Design in Tinkercad:
- Create or import the silhouette shape as a flat extrusion (2–5mm thick)
- Add a small cylinder or torus at the top as the bail (inner diameter 3.5mm, outer diameter 7mm, wall 2mm)
- Position the bail overlapping the top of the pendant body and group
Finding designs: The community has produced thousands of pendant silhouettes on Printables and Thingiverse. Search for any theme and you’ll find existing designs ready to print. This is the fastest path to a first pendant.
Best for: First pendant attempts, gifts with specific themes, minimalist aesthetic.
Approach 2: Relief Pendants
A pendant with a raised or recessed design on the front face — a portrait, a botanical illustration, a mandala, a geometric pattern. The relief adds depth and shadow that makes the piece far more visually interesting than a flat silhouette.
Relief depth: 0.5–2mm is the typical range. Shallower relief (0.5–1mm) is subtle; deeper relief (1.5–2mm) creates more dramatic shadow and visual depth but requires better print quality to execute cleanly.
Design approach: Design the base shape as a flat disk, rectangle, or other form, then emboss the design elements onto the front face using the solid/hole technique in Tinkercad or mesh sculpting in more advanced tools.
Finding designs: Search “pendant” or “necklace” on Printables with any theme keyword. Relief pendants are extremely well-represented in the community library.
Approach 3: Geometric and Mathematical Forms
Pendants based on geometric forms — polyhedra, mathematical surfaces, knot theory forms, fractals, sacred geometry — that have inherent visual appeal from their precise structure. These are particularly popular with mathematicians, scientists, and people who appreciate form arising from structure.
Examples: Möbius strip pendant, icosahedron pendant, spiral pendant based on the golden ratio, trefoil knot pendant, fractal snowflake, geometric mandala.
Many of these designs are mathematically generated and available as high-quality STL files. They often require more careful print settings than simple silhouettes because of their complex geometry and thin feature elements.
Approach 4: Text and Name Pendants
Pendants featuring names, initials, meaningful words, or significant dates — either as the primary design element or integrated with a background shape. These are the most personal possible pendants and consistently popular as gifts.
Font considerations for pendant text: At pendant scale (6–15mm character height), font selection is even more critical than for larger text applications. Use only bold sans-serif or bold slab-serif fonts. Thin stroke fonts literally cannot be printed at pendant scale — strokes narrow to below the minimum printable feature size and disappear or become ragged.
Single initial pendant: An oversized single letter (20–35mm tall) as the pendant, with a bail integrated at the top. Bold, simple, and highly effective. The letter occupies the full pendant face for maximum visual impact.
Earring Design Approaches
Stud Earrings
The simplest earring form: a flat or slightly domed disk that sits against the earlobe. The ear post (a metal wire that passes through the ear piercing) either glues into a printed hole in the back of the stud or is integrated into a purchased ear post finding that glues to the back.
Stud design specifications:
- Face design: Any shape 8–20mm diameter, 2–4mm thick
- Back: Either flat (for gluing a ear post flat back finding) or with a 0.7mm hole for press-fit ear post
- Weight: Under 2g per earring for all-day comfort
Hardware approach: For beginners, using purchased ear stud backs with a flat pad and butterfly clutch is simpler than trying to integrate the ear post into the print. Sand the back of the stud flat, apply jewelry-grade adhesive (E6000 or similar), press the ear stud back finding onto the back, and allow to cure. The purchased hardware is inexpensive, reliable, and gives a professional result.
Drop Earrings
Earrings that hang below the earlobe, moving freely on a metal ear wire. The printed piece has a jump ring loop at the top, a jump ring attaches through the loop, and the jump ring connects to the ear wire hook.
Drop earring design specifications:
- Shape: Any elongated or visually dynamic shape that reads well when hanging
- Top attachment: Bail or loop at the top, 3–4mm inner diameter, 2mm wall minimum
- Length: 15–40mm from ear wire to bottom of pendant (longer earrings move more dramatically but feel heavier)
- Weight: Under 4g per earring for comfort; under 2g is ideal for all-day wear
- Visual balance: The design should look balanced when hanging — center of visual mass should be centered horizontally
Batch printing drop earrings: Print matched pairs together on the same build plate. This ensures color consistency, identical layer quality between the pair, and efficient use of print time. Arrange both pieces of each pair together so they print under the same ambient conditions.
Hoop and Ring Earrings
Open ring or hoop forms that hang from the ear wire. These can be simple rings, textured bands, or geometric forms. The ring opening must be large enough that the ring can swing freely without catching on the hair or earlobe (inner diameter typically 15–30mm).
Design note: For a ring earring, the ring’s wall must be thick enough to have structural integrity when printed (minimum 2mm wall) but thin enough to print cleanly and be lightweight.
Geometric and Sculptural Earrings
More complex three-dimensional forms — geometric polyhedra, lattice structures, interlocking rings, architectural forms — that treat the earring as a small sculptural object. These are appropriate for more advanced beginners comfortable with complex designs.
The weight constraint is particularly important for sculptural earrings: complex 3D forms can be surprisingly heavy even at small scale. Design with hollow or lattice interiors to reduce weight.
Material Selection for Jewelry
Jewelry is worn against skin, often for extended periods. Material selection must account for skin contact, comfort, and aesthetics beyond the standard FDM material considerations.
Skin Contact Considerations
Most standard PLA and PETG formulations are considered safe for skin contact for healthy individuals — the base polymers are not known skin sensitizers. However, several considerations apply:
Colorants: Some pigments used in filament colorants can cause skin reactions in sensitive individuals. Black, red, and some bright colors use pigments that are potential sensitizers. For sensitive skin, natural (undyed) filaments minimize this risk.
ABS is not appropriate for jewelry: The styrene content of ABS makes it unsuitable for extended skin contact.
Surface porosity: FDM surfaces have microscopic porosity that can harbor oils, sweat, and bacteria over time. More frequent cleaning is advisable for printed jewelry compared to metal jewelry.
Material Comparison for Jewelry
| Material | Appearance | Skin Safety | Weight | Jewelry Suitability |
|---|---|---|---|---|
| Standard PLA | Slight gloss | Generally safe | Light | Good for pendants; brittleness can be a concern |
| Matte PLA | Flat, refined | Generally safe | Light | Excellent; refined appearance |
| Silk/Metallic PLA | Shimmery, premium | Generally safe | Light | Outstanding; looks like metal jewelry |
| PETG | Slight gloss | Generally safe | Light | Good; more durable than PLA |
| Glow-in-dark PLA | Glows | Generally safe | Light | Fun specialty; especially for children |
| Flexible TPU | Matte | Generally safe | Light | Excellent for ear cuffs and flexible elements |
| Wood-fill PLA | Natural | Generally safe | Moderate | Beautiful natural look; earthy aesthetic |
| Resin (SLA) | Very smooth | Requires cure | Light | Superior detail; requires different printer |
The Case for Silk PLA in Jewelry
Silk PLA is the standout material recommendation for jewelry applications. Its shimmering surface effect:
- Creates a metallic appearance that resembles cast metal jewelry
- Hides layer lines more effectively than standard PLA (the sheen diffuses light in ways that minimize visible banding)
- Comes in gold, silver, rose gold, copper, bronze, and multi-color variants that directly evoke precious metal jewelry
- Prints as easily as standard PLA
A silk gold PLA pendant looks, from normal jewelry-viewing distance (arm’s length to across a room), nearly identical to a cast gold-tone metal pendant. The same design that would look obviously “plastic” in standard yellow PLA looks genuinely premium in silk gold.
For any jewelry intended as a gift or for wearing in social contexts, silk PLA is strongly recommended over standard filaments.
Slicer Settings for Jewelry
Jewelry printing has the most demanding quality requirements of any category in this guide. The viewing distance is inches; the scale is tiny; every layer line is visible. Uncompromising settings are the appropriate approach.
| Setting | Recommended Value | Notes |
|---|---|---|
| Layer Height | 0.10–0.12mm | Critical — fine layers are essential for jewelry quality |
| Print Speed | 25–35 mm/s | Slow for accuracy at small scale |
| Outer Wall Speed | 15–20 mm/s | Very slow outer walls for crisp detail |
| Infill Speed | 30–40 mm/s | Can be slightly faster than walls |
| Perimeters/Walls | 3–4 | Adequate for jewelry thickness |
| Infill | 25–40% | Jewelry doesn’t need high structural infill |
| Top/Bottom Layers | 5–6 | Clean, dense surfaces |
| Support | Minimize by design | Support removal damages jewelry surfaces |
| Bed Adhesion | Brim (2–3mm) | Small brim for small pieces |
| Minimum Layer Time | 10–15 seconds | Critical for small parts — prevents heat buildup |
| Cooling | 100% | Maximum cooling at all times for small parts |
| Seam Position | Sharpest Corner or Rear | Hide seam on least visible face |
| Ironing | Consider for flat top faces | Smooths visible top surfaces |
Minimum Layer Time: The Most Critical Jewelry Setting
For small jewelry pieces, minimum layer time is the single most important setting that many beginners overlook. Here’s why it matters so much:
A standard print head deposits a layer of a 30mm pendant in approximately 3–5 seconds. Without a minimum layer time setting, the printer immediately begins the next layer — depositing hot material on material that has had only 3–5 seconds to cool. The result is heat accumulation that causes the small part to deform, become rounded where it should be sharp, or develop surface blobbing.
Setting a minimum layer time of 10–15 seconds forces the printer to wait before beginning the next layer if the current layer finished too quickly. During this wait, the cooling fan runs at full speed, allowing the small part to solidify properly. The print slows down significantly (a pendant that would take 30 minutes might take 45 minutes) but the quality improvement is dramatic.
In Cura: Settings → Cooling → Minimum Layer Time In PrusaSlicer: Print Settings → Speed → Slow Down If Layer Print Time Is Below
Set this to 10 seconds minimum; 15 seconds for very fine pieces or very small pendants.
Printing Multiple Pieces: The Spacing Trick
When printing a batch of multiple earrings or pendants simultaneously, space them well apart on the build plate — at least 30–40mm between pieces. This forces the print head to travel between pieces during each layer, giving each piece more cooling time before the next layer is deposited. The travel time between pieces effectively extends the minimum layer time without explicitly setting it.
This trick is commonly used by jewelry makers printing large batches: arrange pieces at maximum spacing across the full build plate to naturally extend per-piece layer time while running multiple pieces simultaneously.
Hardware Selection and Assembly
The hardware that turns a printed piece into wearable jewelry is as important as the print itself. Using poor-quality hardware undermines the effort of a well-made print.
Hardware Components for Pendants
Jump rings: Small metal rings that connect the pendant bail to the necklace chain. Available in sterling silver, gold-filled, gold-plated, and base metal finishes. For jewelry that will be worn frequently, use sterling silver or gold-filled jump rings — base metal jump rings can tarnish and cause skin reactions.
Necklace chains: Available in standard jewelry supply stores and online in many lengths (16″, 18″, 20″, 24″) and styles (cable chain, box chain, snake chain, rolo chain). Match chain style to pendant aesthetic — delicate chains for delicate pendants, more substantial chains for larger statement pieces.
Opening and closing jump rings: Use two pairs of jewelry pliers (chain nose pliers work well) to twist the jump ring open sideways (not pulling the ends apart, which distorts the ring) — hook the pendant bail onto the open ring — twist closed. Never use a single pair of pliers and pull the ring open; this weakens the ring.
Hardware Components for Earrings
Ear wires (for drop earrings): French hook ear wires are the most comfortable for most wearers. Available in sterling silver and gold-filled finishes. Sterling silver is hypoallergenic for most people; surgical steel or titanium for those with metal allergies.
Ear post findings (for stud earrings): A metal post with a flat pad for gluing, plus butterfly clutch backs. Available in sterling silver and gold-filled. Post diameter is typically 0.7mm — match to any holes designed in the print.
Jump rings for drop earrings: 4–5mm outer diameter jump rings connect the printed piece to the ear wire.
Adhesive: Jewelry-grade E6000 adhesive or similar two-part epoxy. Apply sparingly, press hardware firmly to the cleaned print surface, allow 24 hours cure before wearing.
Matching Hardware Finish to Filament
The hardware finish should complement the filament color for a cohesive, professional result:
- Silk gold PLA → Gold-filled or gold-plated hardware
- Silk silver PLA → Sterling silver or rhodium-plated hardware
- Silk rose gold PLA → Rose gold-filled hardware
- Dark or black filament → Gunmetal or oxidized silver hardware
- Bright colors → Gold or silver hardware depending on the dominant tone
Mismatched hardware (gold hardware with silver-toned filament, or vice versa) makes the piece look unfinished. Take the extra moment to match.
Post-Processing Jewelry
The difference between a good print and a beautiful piece of jewelry often comes down entirely to post-processing.
Sanding for Jewelry-Quality Surfaces
Even at 0.1mm layer height, layer lines are visible at jewelry viewing distances. Sanding produces the smooth surface that printed jewelry needs to look genuinely wearable:
- 220-grit: Remove the most prominent layer ridges and any surface artifacts. Work with small circular motions. For flat surfaces, wrap sandpaper around a small block for consistent pressure.
- 400-grit: Continue smoothing. The surface should start to look consistent and nearly smooth.
- 800-grit (wet): Wet-sand with water. The surface should be visually smooth under most lighting conditions.
- 1500-grit (wet): For a near-polished surface approaching the appearance of injection-molded plastic.
For silk PLA: Sand lightly — the silk sheen can be diminished by aggressive sanding. Light passes with 400-grit followed by 800-grit are usually sufficient and preserve the silk effect.
Painting Jewelry
Painting allows multi-color finishes impossible in single-filament printing:
Base coat: 1–2 thin coats of plastic primer for best paint adhesion.
Color coats: 2–3 thin coats of acrylic craft paint or metallic spray paint in the desired colors.
Metallic effects: For a convincingly metallic appearance, use metallic spray paint (Rust-Oleum metallic or similar) over a black or dark primer. The dark base gives the metallic paint depth and richness.
Detail painting: A fine brush and steady hand can paint tiny detail elements in contrasting colors — the center of a flower design, the eye of an animal silhouette, the negative spaces in a geometric pattern.
Clear Coat for Durability
Printed jewelry takes significant wear — rubbing against clothing, skin, and other surfaces throughout the day. A clear coat is essential for protecting paint and even unpainted prints:
Matte clear coat: For a sophisticated, non-reflective finish. Works well with matte PLA and painted designs.
Gloss clear coat: For a polished, semi-lustrous finish that enhances the appearance of silk and metallic filaments.
UV-resistant clear coat: Recommended for any jewelry that will be worn outdoors frequently — standard clear coats yellow over time with UV exposure; UV-resistant versions maintain clarity.
Apply 2–3 thin coats, allowing full drying between coats.
Step-by-Step: Making Your First Pendant
Let’s walk through creating and finishing a personalized initial pendant as a gift.
Step 1: Design the Pendant
In Tinkercad:
- Create a circle (disk): 35mm diameter, 5mm thick — the pendant base
- Create a text object with the recipient’s initial, set to Bold font, 22mm tall
- Position the letter centered on the disk face
- Keep the text as “Solid” (embossed, not debossed) with the letter standing 1.5mm above the disk surface — this creates a relief effect
- Create a small torus (bail) at the top: 7mm outer diameter, 3.5mm inner diameter, 3mm tall. Position it overlapping the top edge of the disk.
- Group all elements.
- Export as STL.
Step 2: Slice with Jewelry Settings
In your slicer:
- Layer height: 0.12mm
- Outer wall speed: 18mm/s
- Minimum layer time: 12 seconds
- Cooling: 100%
- 3 perimeters
- 30% Grid infill
- 5 top and bottom layers
- 2mm brim
- Seam: Rear
Orient the pendant with its face (the decorated side) pointing upward on the build plate. This places the most important surface as the final top layers, which are the cleanest.
Step 3: Print in Silk Gold PLA
Print. Estimated time: 25–35 minutes. Monitor for heat accumulation (blobbing or deformation at the pendant’s top section) — if seen, increase minimum layer time to 15 seconds.
Step 4: Post-Process
- Remove brim
- Sand back of pendant with 400-grit then 800-grit (the back doesn’t need as much care as the front)
- Sand front face lightly with 400-grit, careful not to lose the embossed letter relief
- Inspect bail loop — ensure it’s clean and the opening is round
- Apply 2 coats of gloss clear coat spray
Step 5: Assemble Hardware
- Open a gold-filled 5mm jump ring using two pairs of chain nose pliers
- Thread the jump ring through the pendant bail
- Thread an 18″ gold-filled cable chain onto the jump ring
- Close the jump ring firmly
- Package in a small jewelry box or pouch
The finished pendant is a genuinely beautiful, personal gift — the initial in silk gold looks premium at a glance, and the personalization means it was made specifically for the recipient.
Creative Jewelry Projects Worth Exploring
Constellation Pendant
A pendant depicting the recipient’s birth constellation — the specific arrangement of stars, connected by lines, forming their zodiac symbol. This requires accurate constellation data (available from astronomy references) and some design work, but produces a deeply personal pendant. Print with tiny raised dots for stars and thin embossed lines connecting them.
Matching Jewelry Set
Designing a matching pendant and earring set where all pieces share the same design element — matching in shape, pattern, or motif but scaled differently for the pendant (larger) and earrings (smaller). Wearing a matched set is significantly more impactful than individual pieces.
Botanical Impression Pendant
A pendant designed from an actual leaf or flower impression — scan or photograph a real botanical specimen, trace it as an SVG, import into the design software, and extrude as a relief pendant. The result is a pendant based on a real natural form, with all the organic accuracy that implies.
Circuit Board Aesthetic Jewelry
Pendants and earrings designed to look like miniature circuit boards — traces, vias, component pads arranged in an aesthetically pleasing pattern. Print in green with gold trace highlights (paint or dual-color) for a tech aesthetic that appeals to electronics enthusiasts.
Interlocking Pair Pendants
Two pendants designed to interlock or connect — a heart split into two halves, two puzzle pieces that fit together, two geometric forms that combine into a complete design. One piece for each person in a relationship. The pendants represent the connection between the two wearers.
Ear Cuff in TPU
A flexible ear cuff that wraps around the upper ear cartilage without requiring a piercing. Print in soft TPU (85A hardness) for the flexibility to spread slightly when put on and spring back to grip the ear. Design as a curved band 5–8mm wide with a gap slightly smaller than typical ear cartilage thickness.
Troubleshooting Common Jewelry Printing Issues
Pendant Has Visible Blobbing or Rounded Corners at the Top
Cause: Heat accumulation in the small part — each layer has insufficient cooling time before the next layer is deposited.
Solution: Increase minimum layer time to 15 seconds. Print at 100% cooling. Reduce print speed to 25mm/s. Print two copies simultaneously (spaced well apart) so each piece gets the travel time between pieces as additional cooling time.
Fine Details in the Design Are Lost or Mushy
Cause: Features are smaller than the minimum printable size for your nozzle; layer height too high; print speed too fast for detail.
Solution: Verify that design features are at least 1.2mm wide (for a 0.4mm nozzle). Reduce layer height to 0.1mm. Reduce outer wall speed to 15mm/s. Consider whether a 0.25mm nozzle would better serve jewelry printing on your specific printer.
Bail Loop is Filled with Material or Too Small
Cause: Small circular openings often print partially or completely filled due to bridging issues or overextrusion at small scale.
Solution: Verify bail inner diameter is at least 3.5mm — smaller loops are unreliable. Ensure the bail opening is horizontal (bridge across the gap) not vertical. After printing, use a small drill bit or round file to clear any material from the bail opening.
Earring Pair is Noticeably Different in Appearance
Cause: Printed at different times (different filament conditions), different positions on the build plate getting different thermal environments, or seam position landing differently on each.
Solution: Always print matched pairs in the same print job at the same time. Mirror the designs in the slicer so seam positions are symmetric. Ensure consistent position on the build plate for both pieces of each pair.
Hardware Adhesive Bond Fails During Wear
Cause: Insufficient surface preparation; wrong adhesive; inadequate cure time.
Solution: Thoroughly sand the attachment surface with 220-grit for mechanical adhesion. Clean with isopropyl alcohol and allow to dry completely before applying adhesive. Use jewelry-grade E6000 or two-part epoxy (not cyanoacrylate/super glue, which is brittle). Allow 24 full hours of cure time before wearing.
Silk PLA Pendant Loses Its Sheen After Sanding
Cause: Over-sanding removes the surface layer that creates the silk effect and reveals the duller subsurface material.
Solution: Use only light sanding on silk PLA — 400-grit with minimal pressure, followed by 800-grit. The goal is to smooth layer lines minimally, not to create a raw surface. Apply clear gloss coat after sanding — the coat restores much of the silk appearance even if sanding has diminished it.
Jewelry as a Gateway to Wearable Making
Printed pendants and earrings are the most accessible entry point into the broader world of wearable 3D printing — a category that extends to hair accessories, belt buckles, shoe charms, bag tags, wristbands, and the full range of personal accessories that people wear and carry.
The skills developed in jewelry printing — small-scale design precision, minimum layer time management, hardware assembly, post-processing for aesthetic quality — transfer directly to all wearable applications. The discipline of designing within weight constraints, printing at fine layer heights, and finishing to a standard appropriate for close-viewing wearables is the foundation for this entire category.
After your first pendant and first pair of earrings, you will look at the accessories people wear around you with different eyes: not as purchased objects, but as design problems with known constraints and achievable solutions. You’ll see the bail on a pendant and understand the geometry. You’ll see the earring fitting and understand the hardware. You’ll see an interesting decorative form and think: I could make that.
That shift in perspective — from consumer to maker even in the intimate space of personal adornment — is one of the most satisfying transformations 3D printing produces.
Conclusion: Making the Personal Personal
There is no more personal application of your printer than making something that someone wears. Not a decorative object that sits on a shelf, not a functional object stored in a drawer, but something that travels with a person through their day — that appears in photographs, companions important moments, and is noticed and asked about.
Printed jewelry can be this kind of object. A well-made silk gold pendant with someone’s initial, finished properly and hung on a good chain, is genuinely beautiful and personal in a way that a purchased pendant simply cannot be.
The barrier to entry is lower than it might seem. A pendant prints in 25 minutes. The hardware costs a few dollars. The finishing takes an afternoon. The result is something the recipient will wear for years.
Start with a simple initial pendant or a meaningful geometric form. Learn the settings, learn the hardware, learn how post-processing transforms the raw print. Then iterate — more complex designs, matched sets, personalized forms, collaborative projects where you make something for someone who matters to you.
The printer that helps you make useful things for your home can also help you make beautiful things for the people you care about.
That’s a remarkable capability to have at your workbench.
SEO Title: 3D Printing Basic Jewelry: Pendants and Earrings for Beginners
Meta Description: Learn how to 3D print beautiful pendants and earrings. Discover design techniques, materials, settings for tiny prints, post-processing, and hardware finishing for wearable jewelry.
Focus Keyphrases: 3D printed jewelry, 3D printed pendants earrings, wearable 3D printing beginner
SEO Slug: basic-jewelry-pendants-and-earrings-3d-printing