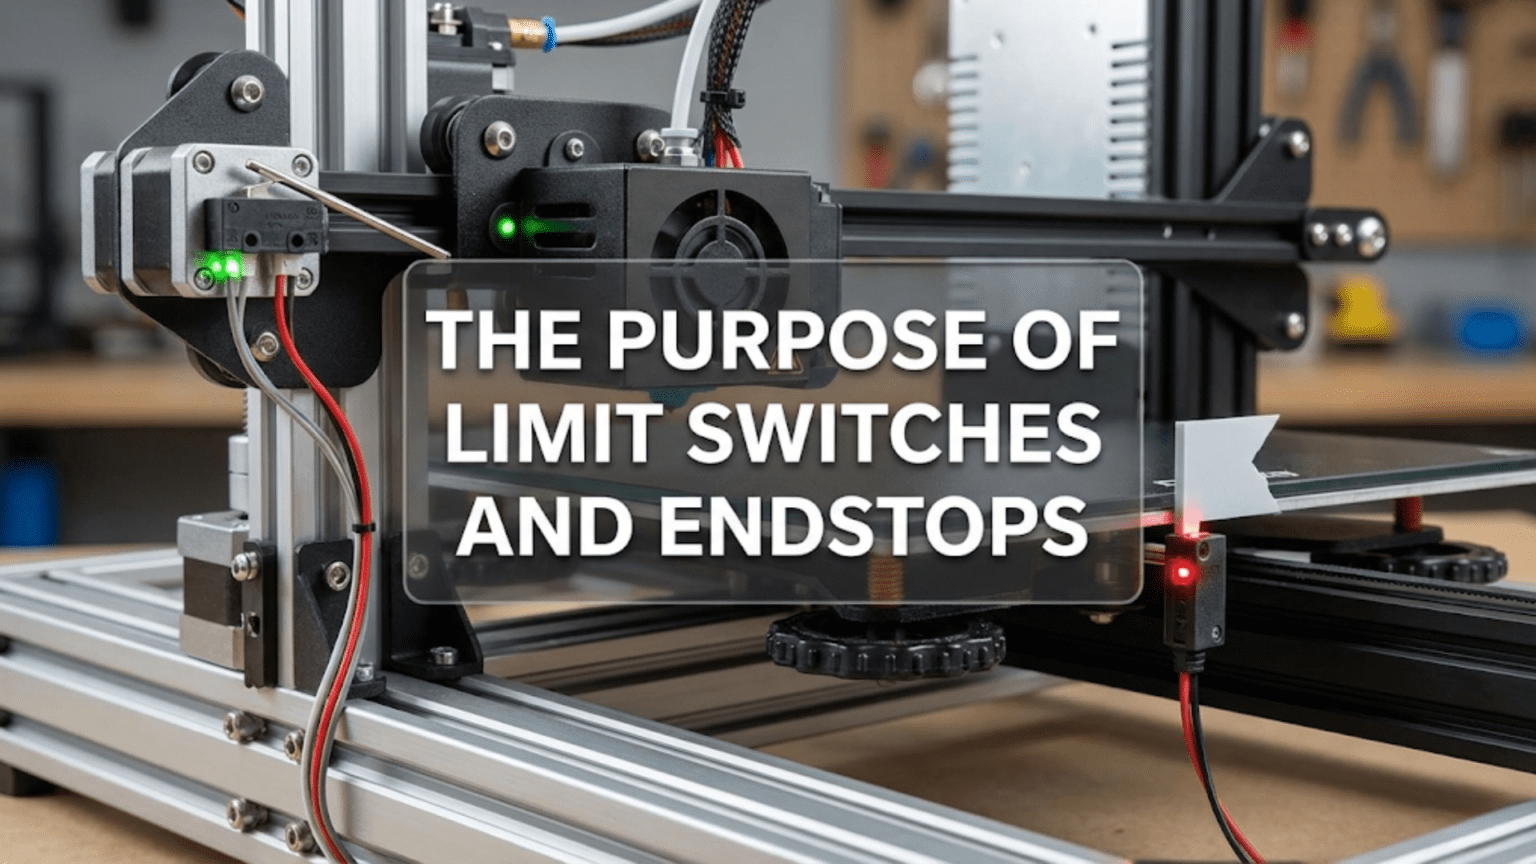
Endstops (also called limit switches) are sensors positioned at the ends of a 3D printer’s axis travel ranges that detect when the print head, bed, or other moving components reach their minimum or maximum positions. They serve the critical function of establishing the printer’s coordinate reference system through the homing process, where each axis moves until it triggers its endstop switch, defining a known zero position from which all subsequent movements are measured, while also preventing mechanical damage by stopping movement when physical travel limits are reached.
Introduction
Every 3D printer faces a fundamental challenge before it can begin creating anything: it needs to know where it is. When you power on your printer, the electronics have no idea whether the print head sits at the front-left corner, center of the bed, or somewhere completely random. The stepper motors don’t have built-in position sensors—they can move a commanded number of steps, but they can’t tell you their absolute position in space.
This is where endstops come in. These humble switches—often overlooked and underappreciated—solve the critical problem of position reference. By providing fixed physical points that the printer can reliably detect, endstops enable the homing process that establishes the coordinate system. Without them, your printer would have no way to know where “home” is, making precise, repeatable positioning impossible.
Yet endstops serve purposes beyond just homing. They protect your printer from mechanical damage by preventing motors from driving components past their travel limits. They enable features like automatic bed leveling by providing consistent reference points. They even allow sensorless homing in advanced systems that detect motor resistance instead of physical switches.
In this comprehensive guide, we’ll explore exactly what endstops do, how different types work, why their position and configuration matter, and how to troubleshoot common endstop problems. You’ll understand why that simple click you hear during startup is actually one of the most important sounds your printer makes.
What Endstops Actually Do
Endstops perform several essential functions that enable reliable printer operation:
Establishing the Coordinate Reference System
The most critical function of endstops is enabling the homing process. When your printer homes an axis, it moves that axis until the endstop triggers, then defines that position as the zero point for that axis.
The Homing Sequence: A typical homing process for the X-axis might proceed as follows:
- The X-axis motor moves the carriage toward the endstop at a moderate speed
- When the carriage contacts the switch, the endstop triggers
- The firmware detects this trigger and stops the motor
- The carriage backs away from the switch slightly
- It approaches again at a slower speed for more precise positioning
- When the switch triggers the second time, the firmware defines this position as X=0
- The axis is now “homed” with a known reference position
This process repeats for Y and Z axes (and any other axes the printer has). After all axes home, the firmware knows the printer’s position with certainty. All subsequent movements are calculated relative to these known home positions.
Why This Matters: Without this reference system, the printer couldn’t:
- Position the nozzle correctly relative to the build plate
- Ensure prints start at the correct location on the bed
- Maintain dimensional accuracy across prints
- Return to exact positions after interruptions
- Execute automatic bed leveling sequences
Every print begins with homing (either explicitly or implicitly) because the coordinate system must be established before controlled movement can occur.
Preventing Mechanical Damage
Endstops act as safety limits preventing the printer from driving components past their mechanical travel range:
Crash Prevention: Without endstops, nothing prevents the firmware from commanding movements beyond what the mechanics allow. The X-axis carriage could crash into the frame. The Z-axis could drive the nozzle into the bed. Motors would continue trying to move against immovable obstacles, potentially:
- Stripping gear teeth
- Bending frame components
- Damaging belts and pulleys
- Skipping steps and losing position
- Overheating motors
- Creating safety hazards
Endstops prevent these scenarios. When triggered during normal operation (not during homing), they signal the firmware to stop immediately, preventing damage.
Safety Stops: In printers with endstops at both ends of travel (min and max endstops), the switches provide protection in both directions. Most consumer printers use only minimum endstops (at the home position) for cost savings, relying on firmware maximum position limits rather than physical switches at the far ends of travel.
Supporting Advanced Features
Modern endstops enable features beyond basic positioning:
Automatic Bed Leveling: Probing sequences that measure bed height at multiple points require a consistent starting position. The printer homes the Z-axis before probing to ensure measurements occur from a known reference height.
Multi-Material Systems: Tool-changing systems use endstop signals to detect when tools reach the parked position during changes.
Pause and Resume: If a print pauses (filament runout, user intervention), the printer can return to exact positions after homing because endstops re-establish the coordinate system.
Firmware Updates: After updating firmware, homing verifies that the axis movement directions are correct relative to endstop positions before allowing normal operation.
Types of Endstops
Several sensor types serve as endstops, each with different characteristics:
Mechanical Microswitches
The most common endstop type uses simple mechanical switches—typically microswitches with lever arms:
Construction: A microswitch contains internal spring-loaded contacts. Pressing the actuator (lever arm) compresses the spring, causing contacts to snap from one position to another, creating or breaking an electrical connection.
Physical Contact: The moving printer component (carriage, bed, etc.) physically contacts the switch lever, triggering it. Most designs use a flag or tab on the moving component that hits the lever as it reaches the endstop position.
Advantages:
- Very reliable—simple mechanical operation with few failure modes
- Inexpensive—microswitches cost pennies in quantity
- No calibration needed—they either trigger or don’t
- Work in all environmental conditions
- Easy to diagnose—visible and audible operation
Disadvantages:
- Wear over time—mechanical contacts degrade with repeated operations
- Bounce—contacts can bounce during triggering, creating multiple signals
- Requires physical contact—adds mechanical complexity to mounting
- Position can shift if mounting loosens
- Audible clicking—noisy during homing
Typical Specifications: Most 3D printers use small microswitches rated for millions of operations, with lever arms 10-20mm long. They typically close (or open, depending on configuration) when pressed with just a few grams of force.
Optical Endstops
Optical sensors detect position without physical contact:
Transmissive Type: Uses an infrared LED on one side and a photodetector on the other. A flag attached to the moving component breaks the light beam when it enters the gap, triggering the sensor.
Reflective Type: Emits infrared light and detects reflection. A reflective surface (or absence of reflection) triggers the sensor as the moving component passes.
Advantages:
- No mechanical wear—no moving parts to degrade
- Precise triggering—optical detection can be very consistent
- Fast response—electronic detection faster than mechanical switch actuation
- Silent operation—no click or mechanical noise
- Can be very compact depending on design
Disadvantages:
- Sensitive to environmental factors—dust, dirt, ambient light can affect operation
- Requires power—unlike simple switches that just make/break connections
- Alignment critical—optical path must remain unobstructed and aligned
- More expensive than simple switches
- Harder to diagnose failures without test equipment
Applications: More common in high-precision printers or industrial machines where the advantages justify the added complexity.
Hall Effect Sensors
Magnetic sensors detect the presence of magnetic fields:
Operation: A Hall effect sensor detects magnetic fields. A small magnet attached to the moving component triggers the sensor when it comes close enough for the sensor to detect its field.
Advantages:
- No contact wear—sensing happens through magnetic fields
- Immune to dirt and dust—magnetic field penetrates contaminants
- Adjustable sensitivity—trigger distance can be tuned
- Solid-state reliability—no mechanical parts
- Consistent triggering
Disadvantages:
- Requires magnets and appropriate mounting
- Magnetic interference can cause false triggers
- More expensive than simple switches
- Requires power
- Sensitivity can drift with temperature
Use Cases: Found in some higher-end printers, particularly where reliability in contaminated environments matters.
Inductive Proximity Sensors
Detect metal objects without contact:
Operation: Generates an electromagnetic field. Metal entering this field changes the field properties, which the sensor detects.
Advantages:
- No wear—contactless operation
- Very reliable for metal detection
- Immune to non-metallic contamination
- Adjustable sensing distance
Disadvantages:
- Only detects metal—requires metal flags or targets
- Relatively expensive
- Larger physical size than microswitches
- Requires power
- Different metals trigger at different distances
Applications: Sometimes used for Z-axis endstops where they can detect the metal bed directly, or in industrial printers.
Endstop Placement and Configuration
Where endstops are positioned and how they’re configured significantly affects printer operation:
Minimum vs. Maximum Endstops
Endstops can be positioned at either end of axis travel:
Minimum Endstops: Located at the minimum position of each axis (X=0, Y=0, Z=0). Most consumer printers use only minimum endstops for cost savings.
When homing with minimum endstops:
- X-axis moves left (toward X=0)
- Y-axis moves forward or back (depending on bed configuration)
- Z-axis moves down (toward the bed)
Maximum Endstops: Located at the maximum position of each axis. Less common in consumer printers but found in some designs.
When homing with maximum endstops:
- Axes move to their maximum positions
- Firmware defines these positions as the maximum build volume values
- All printing occurs moving toward the minimum from this reference
Dual Endstops: Some printers use endstops at both minimum and maximum positions:
- Provides protection in both directions
- Enables automatic gantry squaring (dual Z-axis setups)
- Adds cost and wiring complexity
- Common in larger industrial machines
Homing Direction
The firmware must know which direction to move when homing each axis:
Configuration Setting: Firmware configuration defines whether each axis homes to minimum or maximum. Incorrect configuration causes the axis to move the wrong direction during homing, potentially crashing into frame components on the opposite side.
Verification: After firmware updates or configuration changes, always verify homing direction:
- Manually move the axis to approximately center position
- Initiate homing
- Confirm the axis moves toward (not away from) the endstop
- Stop immediately if movement direction is wrong
Common Configurations:
- Cartesian printers typically home X and Y to minimum, Z to minimum
- CoreXY printers vary but often use minimum endstops
- Delta printers typically home all three towers to maximum (top position)
Endstop Offsets
The physical endstop position rarely coincides exactly with the desired zero point:
X and Y Offsets: The endstop switch might sit slightly inboard from the actual corner of the build area. Firmware offsets define how far to move after homing to reach the true zero position.
Z-Offset: Particularly important—the Z endstop often triggers when the nozzle is some distance above the bed surface. The Z-offset defines this distance, telling the firmware how far to move after homing to reach Z=0 (nozzle just touching the bed).
Probe Offsets: When using automatic bed leveling with a probe that triggers before the nozzle reaches the bed, probe offset configuration tells the firmware the distance between probe trigger point and actual nozzle position.
Configuration: These offsets are set in firmware configuration files or stored in EEPROM for runtime adjustment.
Electrical Configuration
Endstops connect electrically in different ways:
Normally Open (NO): The switch circuit is open (disconnected) normally and closes when triggered. Most 3D printers use NO configuration because:
- Detects disconnected wires as triggered state, preventing crashes
- Standard for most microswitch designs
- Compatible with most firmware defaults
Normally Closed (NC): The switch circuit is closed (connected) normally and opens when triggered. Some users prefer NC because:
- Detects disconnected wires (circuit opens like a trigger)
- Can provide more robust failure detection
- Less common, requires firmware configuration change
Pull-up/Pull-down Resistors: The endstop circuit includes resistors that define the voltage state when the switch isn’t actively pulling the signal to ground or voltage. Firmware configuration must match the hardware design.
Signal Logic: Firmware configuration defines whether a high or low signal indicates triggering. This must match the electrical design and switch type.
The Homing Process in Detail
Understanding the complete homing sequence reveals why endstops are so critical:
Multi-Axis Homing Sequence
When you initiate homing (G28 command or home button), a specific sequence occurs:
Order Matters: Most printers home axes in a specific order to prevent collisions:
- Z-axis homes first (on some printers): Lifts the nozzle away from the bed to prevent dragging during X and Y homing
- X and Y axes home: Can occur simultaneously or sequentially depending on firmware and printer design
- Z-axis homes (on printers that didn’t home Z first): With X and Y positioned safely, Z homes to establish nozzle-to-bed relationship
Some printers vary this sequence based on design. Delta printers home all three towers simultaneously since they work together to position the effector.
Two-Stage Homing
Modern firmware implements two-stage homing for precision:
First Approach (Fast): The axis moves toward the endstop at moderate speed (maybe 30-50mm/s). When the endstop triggers, the firmware stops movement.
Back-off: The axis moves a small distance (typically 5-10mm) away from the endstop.
Second Approach (Slow): The axis moves toward the endstop again at very slow speed (perhaps 5-10mm/s). When the endstop triggers this time, the firmware defines this position as zero.
Why Two Stages: The fast approach saves time (doesn’t require slow movement across the entire axis). The slow second approach provides precision—triggering at slow speed means position is more accurately defined since less overrun occurs before the motor stops.
Accuracy Impact: This two-stage process can improve homing accuracy to within a few micrometers compared to single-stage fast homing that might vary by 0.1mm or more.
Position Verification
After homing, the firmware knows:
- Exact position of each axis (at the homing position)
- Travel direction from home position
- How to calculate positions throughout the build volume
The firmware can now accept G-code commands like “move to X=100, Y=50, Z=10” and execute them accurately because it knows where it started (home position).
Common Endstop Problems and Solutions
Several issues commonly affect endstop operation:
Endstop Not Triggering
Symptoms: Axis continues moving past the endstop without stopping, potentially causing crashes.
Causes and Solutions:
- Disconnected wire: Check all connections from switch to mainboard
- Broken switch: Test switch with multimeter for continuity changes
- Misaligned trigger flag: Verify the moving component actually contacts the switch lever
- Wrong firmware configuration: Check that endstop pin and logic are correctly configured
- Damaged mainboard pin: Test endstop signal at the board
False Triggering
Symptoms: Firmware thinks endstop is triggered when it isn’t, preventing movement or causing homing failures.
Causes and Solutions:
- Stuck switch: Clean or replace switch if mechanically stuck
- Electrical interference: Route endstop wires away from stepper motor cables
- Wrong logic configuration: Verify NO vs NC configuration matches hardware
- Short circuit: Check for damaged wire insulation causing shorts
Inconsistent Triggering
Symptoms: Homing position varies between attempts, Z-offset seems to change, dimensional accuracy suffers.
Causes and Solutions:
- Loose mounting: Secure endstop switch firmly to frame
- Worn switch: Replace switches showing mechanical wear
- Electrical noise: Add filtering capacitors if interference suspected
- Bouncing contacts: Enable debounce settings in firmware if available
- Mechanical play: Ensure moving component contacts switch consistently
Homing in Wrong Direction
Symptoms: Axis moves away from endstop instead of toward it during homing.
Causes and Solutions:
- Inverted motor direction: Change motor direction in firmware
- Wrong endstop position configuration: Verify min vs max setting in firmware
- Incorrect homing direction setting: Check firmware homing direction parameters
Crashes During Homing
Symptoms: Printer tries to move past physical limits during homing, causing crashes.
Causes and Solutions:
- Endstop on wrong end: Verify endstop is positioned where firmware expects
- Inverted logic: Check that triggered/not triggered states match expectations
- Multiple configuration errors: Systematically verify all endstop-related settings
Advanced Endstop Concepts
Beyond basic operation, several advanced concepts expand endstop capabilities:
Sensorless Homing (StallGuard)
Modern TMC stepper drivers enable homing without physical endstop switches:
Operation: The driver detects when the motor stalls against an obstacle (the physical end of travel). This stall detection substitutes for endstop switches.
Advantages:
- Eliminates endstop switches and wiring
- Reduces cost and complexity
- No switches to fail or wear out
- Cleaner appearance
Disadvantages:
- Requires compatible drivers (TMC2130, TMC2209, etc.)
- Needs careful tuning for reliable detection
- Doesn’t work well at very slow speeds
- Can’t detect light collisions—requires hitting the hard stop
- Not suitable for Z-axis on most printers (too much risk)
Configuration: Requires setting sensitivity values that distinguish normal operation resistance from stall conditions. Too sensitive causes false triggers; too insensitive misses stalls.
Z-Probes as Endstops
Automatic bed leveling probes can serve as Z-axis endstops:
BLTouch and Similar: These deployable pin probes detect when the pin touches the bed surface. Using a probe as Z-endstop provides:
- Consistent triggering relative to the bed surface
- Automatic compensation for bed height variations
- No separate Z-endstop switch needed
Inductive Probes: Can detect the metal bed surface, triggering at a consistent height above it.
Considerations:
- Probe offset from nozzle tip must be configured accurately
- Probe repeatability becomes critical for Z-homing precision
- Deployment time (for BLTouch) increases homing duration
Dual Endstops for Gantry Squaring
Some printers use two endstops per axis for automatic squaring:
Dual Z-Axis: Two independent Z motors with separate endstops allow:
- Automatic gantry tramming during homing
- Compensation for gantry tilt
- Elimination of manual adjustment
Dual Y-Axis: CoreXY and similar designs sometimes use dual Y endstops for:
- Automatic belt tension balancing
- Gantry squaring
- Improved dimensional accuracy
Implementation: Requires firmware support (Marlin 2.0+ or equivalent) and additional wiring for the second endstop per axis.
Endstop Maintenance and Reliability
Keeping endstops working reliably:
Regular Inspection
Visual Checks: Look for:
- Loose mounting screws
- Frayed or damaged wires
- Worn or broken switch levers
- Proper alignment of trigger flags
- Secure wire connections
Functional Tests: Periodically verify:
- Homing completes successfully
- Position repeatability remains good
- Z-offset doesn’t drift
- Switches trigger with appropriate force
Cleaning and Care
Dust Removal: Accumulated dust can affect mechanical switches. Blow out dust periodically with compressed air.
Contact Cleaning: For accessible microswitches, contact cleaner can restore reliable operation if oxidation affects contacts.
Wire Management: Secure endstop wiring to prevent flexing fatigue:
- Use strain relief at connection points
- Route wires away from moving components
- Avoid sharp bends that stress conductors
Replacement
Endstops are wear items that eventually need replacement:
Mechanical Switches: Rated for millions of operations but eventually fail. Replace when:
- Inconsistent triggering develops
- Visible mechanical damage occurs
- Homing reliability decreases
Optical/Hall Effect Sensors: Can fail from electrical stress or component degradation. Replace when:
- Testing shows inconsistent operation
- Environmental contamination can’t be cleaned
- Electronic components fail
Endstop Configuration Comparison
| Endstop Type | Reliability | Cost | Precision | Maintenance | Noise | Environmental Sensitivity |
|---|---|---|---|---|---|---|
| Mechanical Microswitch | High | Very Low | Good | Low | Moderate (click) | Low |
| Optical Transmissive | Moderate | Medium | Excellent | Medium | None | High (dust, light) |
| Optical Reflective | Moderate | Medium | Excellent | Medium | None | High (dust, light) |
| Hall Effect | High | Medium | Very Good | Low | None | Moderate (magnetic fields) |
| Inductive Proximity | High | Medium-High | Good | Low | None | Low |
| Sensorless (StallGuard) | Moderate | Low (driver cost) | Moderate | Low | None | Low |
Conclusion
Endstops might be the simplest components in your 3D printer—basic switches that either trigger or don’t—yet they enable everything else the printer does. Without these humble sensors providing reference points, the printer would have no way to establish its coordinate system, no protection against mechanical damage, and no foundation for advanced features like automatic bed leveling.
Understanding endstops transforms them from mysterious components that occasionally cause homing failures into logical, comprehensible sensors that you can confidently troubleshoot and maintain. You recognize why homing happens before every print, understand what that two-stage slow-approach process accomplishes, and know how to diagnose problems when homing fails.
The endstop’s reliability directly impacts your printing success. Inconsistent triggering causes variable first layer heights, dimensional inaccuracy, and frustrating failures. Proper endstop maintenance and configuration ensure the printer starts every job from known, precise positions, enabling the accuracy that makes quality prints possible.
Whether your printer uses basic mechanical microswitches, sophisticated optical sensors, or cutting-edge sensorless homing, the fundamental purpose remains the same: providing the reference points that transform a collection of motors and controllers into a precision positioning system. These simple sensors enable complex capabilities, proving that sometimes the most critical components are the ones we notice least during normal operation.
Next time your printer homes before a print, appreciate that seemingly simple clicking sound. It represents the printer methodically establishing its coordinate reference system, verifying its endstops work correctly, and preparing to transform your digital design into physical reality—all thanks to those simple switches positioned at the edges of the build volume.