Flutter, a powerful UI toolkit developed by Google, has revolutionized the way developers create cross-platform applications. Whether you’re targeting Android, iOS, web, or desktop, Flutter allows you to build natively compiled applications with a single codebase. Its rich set of pre-designed widgets, fast development cycles with hot reload, and a robust performance architecture have made it a popular choice for developers globally.
When starting with Flutter, one of the best ways to understand its architecture and framework is by building a simple app. The iconic “Hello World” app serves as a perfect introduction to Flutter’s key concepts, from setting up your development environment to writing your first lines of Dart code. In this article, we’ll guide you through the entire process of building your first Flutter app, introducing fundamental concepts like the widget tree, state management, and user interface creation.
By the end of this article, you’ll not only have a functional Flutter app but also a foundational understanding of how Flutter operates, preparing you for more complex app development.
Setting Up Your Development Environment
Before we dive into coding, let’s ensure your development environment is properly set up. The following steps will guide you through installing Flutter on your system and configuring an IDE (Integrated Development Environment) for Flutter development.
Step 1: Install Flutter SDK
The Flutter SDK provides all the necessary tools to build Flutter apps. To install Flutter, follow these steps based on your operating system:
- Windows:
- Download the latest stable version of Flutter from the official Flutter website.
- Extract the ZIP file to a folder of your choice (e.g.,
C:\src\flutter). - Update your PATH environment variable to include Flutter’s
bindirectory (e.g.,C:\src\flutter\bin). - Verify your installation by opening a new command prompt and running
flutter doctor. This will show any missing dependencies or configurations needed for your system.
- macOS:
- Download the Flutter SDK for macOS from the Flutter installation page.
- Extract the SDK to your desired location (e.g.,
~/development/flutter). - Open a terminal and add Flutter’s bin directory to your PATH by adding the following line to your
bashrcorzshrcfile:
export PATH="$PATH:`pwd`/flutter/bin"Run flutter doctor in the terminal to check for missing dependencies, such as Xcode (for iOS development) and Android Studio (for Android development).
- Linux:
- Download the Flutter SDK from the Linux installation guide.
- Extract the file to your preferred directory (e.g.,
~/development/flutter). - Add Flutter’s bin directory to your PATH by modifying your shell configuration file (
bashrcorzshrc). - Use the command
flutter doctorto verify installation and check for any missing tools like Android Studio or Git.
Step 2: Install an IDE
Flutter can be developed using various IDEs, but two of the most popular ones are Visual Studio Code and Android Studio.
- Visual Studio Code (VS Code):
- Download and install VS Code from the official website (code.visualstudio.com).
- Once installed, open VS Code and navigate to the Extensions panel (left sidebar).
- Search for the Flutter extension and install it. This will also install the Dart extension, which is necessary for Flutter development.
- Once the extension is installed, open a new terminal inside VS Code and run
flutter doctorto ensure that Flutter is properly configured in your IDE.
- Android Studio:
- Download and install Android Studio from the official website (developer.android.com/studio).
- During installation, make sure to install the Android SDK and Android Virtual Device (AVD) components.
- After installation, open Android Studio and go to Preferences -> Plugins. Search for Flutter and install the plugin, which will also include the Dart plugin.
- Once set up, open the terminal in Android Studio and run
flutter doctorto ensure all configurations are in place.
Step 3: Configure an Emulator or Connect a Device
To run your Flutter apps, you can either use an Android or iOS emulator (virtual devices) or connect a real physical device to your computer.
- Android Emulator:
- Open Android Studio, go to AVD Manager (accessible from Tools -> AVD Manager), and create a new virtual device.
- Choose a device template (e.g., Pixel 3) and download the recommended system image.
- Once created, start the emulator by clicking the play icon in AVD Manager.
- You can verify that the emulator is recognized by running
flutter devicesin the terminal.
- iOS Simulator (macOS only):
- Install Xcode from the Mac App Store.
- Open Xcode and go to Xcode -> Open Developer Tool -> Simulator. Select the device model you want to emulate.
- To ensure that Flutter recognizes the iOS simulator, run
flutter devicesin the terminal.
- Real Device:
- For Android, enable Developer Mode on your device and turn on USB Debugging. Connect the device to your computer via USB.
- For iOS, connect your device via USB and trust the computer from the device’s settings.
- Run
flutter devicesto see if the device is detected by Flutter.
Creating Your First Flutter Project: “Hello World”
Now that your development environment is set up, it’s time to create your first Flutter project. The Hello World app is a simple introduction to the core Flutter concepts and provides a hands-on way to understand the Flutter framework.
Step 1: Create a New Flutter Project
- Using Visual Studio Code:
- Open VS Code and press
Ctrl+Shift+P(orCmd+Shift+Pon macOS) to open the Command Palette. - Type Flutter: New Project and select it.
- Choose Application from the list and specify a project name, such as
hello_world. - Select the location where you want to store the project files, and VS Code will automatically generate the Flutter project structure.
- Open VS Code and press
- Using Android Studio:
- Open Android Studio and select File -> New -> New Flutter Project.
- Choose Flutter Application as the project type.
- Enter the project name (e.g.,
hello_world), set the Flutter SDK path, and choose a location for your project files. - Click Finish to create the project.
Step 2: Understanding the Project Structure
Once the project is generated, it’s important to familiarize yourself with the Flutter project structure:
- lib/main.dart: This is the main file where your Flutter app logic lives. By default, it includes a simple counter app, but you’ll replace it with your Hello World code.
- android and ios folders: These contain platform-specific code for Android and iOS. While Flutter takes care of most cross-platform differences, you may occasionally need to modify these files.
- pubspec.yaml: This file manages project dependencies, assets, and metadata. You’ll use it to add third-party packages or specify fonts and images in your app.
Step 3: Writing the Hello World Code
In your main.dart file, replace the default counter app code with the following simple Hello World app:
import 'package:flutter/material.dart';

void main() {
  runApp(MyApp());
}

class MyApp extends StatelessWidget {
  @override
  Widget build(BuildContext context) {
    return MaterialApp(
      home: Scaffold(
        appBar: AppBar(
          title: Text('Hello World App'),
        ),
        body: Center(
          child: Text('Hello, World!'),
        ),
      ),
    );
  }
}In this code:
runApp(MyApp()): This method initializes the app by running the MyApp widget, which serves as the root of the widget tree.- StatelessWidget: Since this app doesn’t require any mutable state, it’s defined as a stateless widget.
- MaterialApp: This widget provides the structure for your app and defines its theme.
- Scaffold: This is a layout component that provides basic app layout features like the app bar and body.
- Center: Centers the text widget on the screen.
- Text: Displays the string “Hello, World!” in the center of the screen.
Step 4: Running the App
Once your code is in place, you can run the app to see the result:
- Using VS Code: Open the terminal (
Ctrl+```) and typeflutter run`. The app will compile and launch on the connected device or emulator. - Using Android Studio: Click the green play button in the toolbar to run the app. It will automatically compile and run on the selected emulator or physical device.
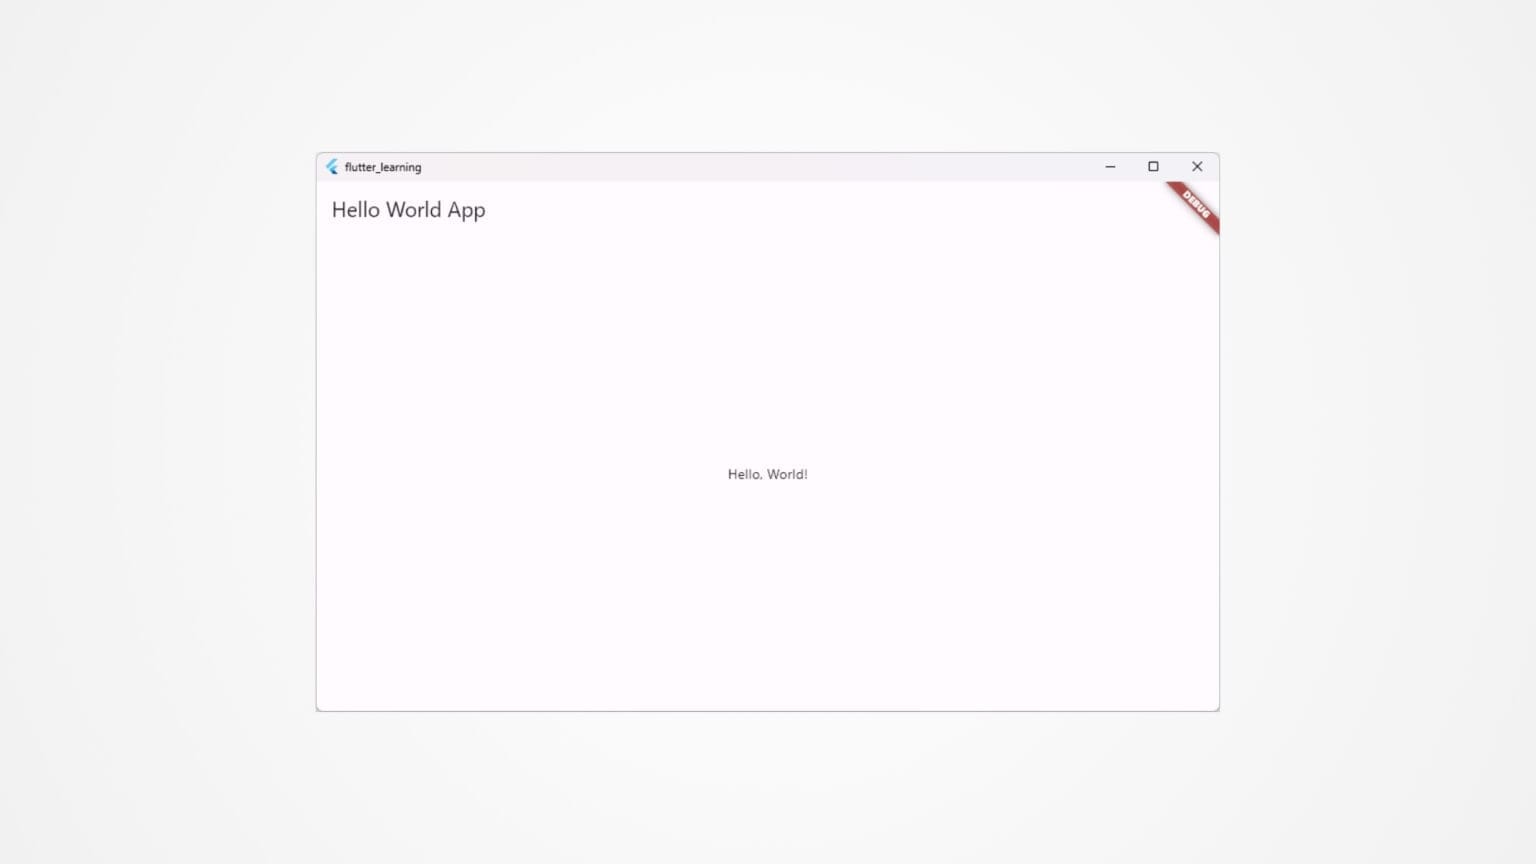
When the app launches, you’ll see the Hello World text in the center of the screen, confirming that your first Flutter app is up and running.
Customizing the Hello World App: Exploring Flutter Widgets and UI Elements
Now that you’ve successfully created your first Flutter app, it’s time to dive deeper into how Flutter handles user interface components and customization. Understanding how to use Flutter’s widgets will allow you to build more complex and visually appealing apps. Widgets are the core building blocks of Flutter, and by leveraging them, you can create custom designs, layouts, and interactivity.
In this section, we’ll explore how to modify the Hello World app by introducing more Flutter widgets, customizing the UI, and adding interactivity. By the end, you’ll have a better understanding of how widgets work, how to manage layouts, and how to enhance the look and feel of your app.
Step 1: Exploring the Widget Tree and Layouts
As mentioned earlier, everything in Flutter is a widget. Flutter uses a widget tree to structure the app’s interface, where each widget is either a parent or a child of another widget. This hierarchical structure allows for easy composition of widgets to create complex UIs.
Modifying the Hello World App Layout
In the default Hello World app, we used basic widgets such as Text and Center. Let’s modify the layout to add more elements, such as a Column widget to arrange multiple components vertically and a Container to style those components.
Here’s how we can update the layout:
import 'package:flutter/material.dart';

void main() {
  runApp(MyApp());
}

class MyApp extends StatelessWidget {
  @override
  Widget build(BuildContext context) {
    return MaterialApp(
      home: Scaffold(
        appBar: AppBar(
          title: Text('Hello World App'),
        ),
        body: Center(
          child: Column(
            mainAxisAlignment: MainAxisAlignment.center,
            children: <Widget>[
              Text(
                'Hello, World!',
                style: TextStyle(fontSize: 24, fontWeight: FontWeight.bold),
              ),
              SizedBox(height: 20),
              Text(
                'Welcome to Flutter!',
                style: TextStyle(fontSize: 18),
              ),
            ],
          ),
        ),
      ),
    );
  }
}In this updated version:
- Column: We use the Column widget to arrange the
Textwidgets vertically. The mainAxisAlignment property is set to center to center-align the column’s children. - TextStyle: We’ve added custom styles to both
Textwidgets using the TextStyle class, allowing us to change the font size, weight, and other attributes. - SizedBox: The SizedBox widget is used to add spacing between the two
Textwidgets. We set its height to 20 pixels, creating some vertical space between the text elements.
Using Containers for Styling
The Container widget is one of the most versatile widgets in Flutter, often used to add padding, margins, borders, background colors, and other layout features. Let’s wrap our text in a Container to demonstrate its styling capabilities:
import 'package:flutter/material.dart';

void main() {
  runApp(MyApp());
}

class MyApp extends StatelessWidget {
  @override
  Widget build(BuildContext context) {
    return MaterialApp(
      home: Scaffold(
        appBar: AppBar(
          title: Text('Hello World App'),
        ),
        body: Center(
          child: Column(
            mainAxisAlignment: MainAxisAlignment.center,
            children: <Widget>[
              Container(
                padding: EdgeInsets.all(16),
                decoration: BoxDecoration(
                  color: Colors.blueAccent,
                  borderRadius: BorderRadius.circular(8),
                ),
                child: Text(
                  'Hello, World!',
                  style: TextStyle(
                    fontSize: 24,
                    fontWeight: FontWeight.bold,
                    color: Colors.white,
                  ),
                ),
              ),
              SizedBox(height: 20),
              Text(
                'Welcome to Flutter!',
                style: TextStyle(fontSize: 18),
              ),
            ],
          ),
        ),
      ),
    );
  }
}In this code:
- Container: The
Textwidget is now wrapped inside a Container. The padding property adds space inside the container around the text. - BoxDecoration: This property is used to customize the container’s appearance. Here, we added a background color (
blueAccent) and rounded corners using borderRadius. - Text color: The color of the text inside the container is set to white to ensure contrast against the blue background.
Handling Layout Responsiveness
In mobile development, responsive design ensures that your app looks good on various screen sizes and orientations. Flutter provides widgets like Expanded and Flexible to manage how widgets respond to screen space.
For instance, let’s wrap one of our text widgets inside an Expanded widget to ensure that it takes up available space on the screen:
import 'package:flutter/material.dart';

void main() {
  runApp(MyApp());
}

class MyApp extends StatelessWidget {
  @override
  Widget build(BuildContext context) {
    return MaterialApp(
      home: Scaffold(
        appBar: AppBar(
          title: Text('Hello World App'),
        ),
        body: Center(
          child: Column(
            mainAxisAlignment: MainAxisAlignment.center,
            children: <Widget>[
              Expanded(
                child: Container(
                  padding: EdgeInsets.all(16),
                  decoration: BoxDecoration(
                    color: Colors.blueAccent,
                    borderRadius: BorderRadius.circular(8),
                  ),
                  child: Text(
                    'Hello, World!',
                    style: TextStyle(
                      fontSize: 24,
                      fontWeight: FontWeight.bold,
                      color: Colors.white,
                    ),
                    textAlign: TextAlign.center,
                  ),
                ),
              ),
              SizedBox(height: 20),
              Text(
                'Welcome to Flutter!',
                style: TextStyle(fontSize: 18),
              ),
            ],
          ),
        ),
      ),
    );
  }
}- Expanded: The Expanded widget ensures that the container stretches to fill the available space on the screen, providing a more flexible layout.
Step 2: Adding Interactivity with Stateful Widgets
So far, we’ve been using StatelessWidgets, which are ideal for static content that doesn’t need to change. However, many apps require dynamic content or user interaction. To achieve this, you’ll need to use StatefulWidget.
Converting Hello World to a Stateful App
Let’s modify the Hello World app to make it interactive by adding a button that updates the text when pressed.
import 'package:flutter/material.dart';

void main() {
  runApp(MyApp());
}

class MyApp extends StatefulWidget {
  @override
  _MyAppState createState() => _MyAppState();
}

class _MyAppState extends State<MyApp> {
  String message = 'Hello, World!';

  void updateMessage() {
    setState(() {
      message = 'You pressed the button!';
    });
  }

  @override
  Widget build(BuildContext context) {
    return MaterialApp(
      home: Scaffold(
        appBar: AppBar(
          title: Text('Interactive Hello World'),
        ),
        body: Center(
          child: Column(
            mainAxisAlignment: MainAxisAlignment.center,
            children: <Widget>[
              Text(
                message,
                style: TextStyle(fontSize: 24, fontWeight: FontWeight.bold),
              ),
              SizedBox(height: 20),
              ElevatedButton(
                onPressed: updateMessage,
                child: Text('Press Me'),
              ),
            ],
          ),
        ),
      ),
    );
  }
}In this code:
- StatefulWidget: We’ve converted the app to a StatefulWidget by creating a class called MyApp that extends
StatefulWidgetand its corresponding state class (_MyAppState). - State Management: The updateMessage() method is called when the button is pressed, updating the
messagevariable usingsetState(). This triggers a rebuild of the widget tree, updating the displayed text. - ElevatedButton: The button is implemented using the ElevatedButton widget, which responds to the user’s interaction and triggers the
updateMessage()function.
Adding More Interactivity: Reset Button
Let’s enhance the interactivity by adding another button to reset the message back to “Hello, World!” when pressed:
import 'package:flutter/material.dart';

void main() {
  runApp(MyApp());
}

class MyApp extends StatefulWidget {
  @override
  _MyAppState createState() => _MyAppState();
}

class _MyAppState extends State<MyApp> {
  String message = 'Hello, World!';

  void updateMessage() {
    setState(() {
      message = 'You pressed the button!';
    });
  }

  void resetMessage() {
    setState(() {
      message = 'Hello, World!';
    });
  }

  @override
  Widget build(BuildContext context) {
    return MaterialApp(
      home: Scaffold(
        appBar: AppBar(
          title: Text('Interactive Hello World'),
        ),
        body: Center(
          child: Column(
            mainAxisAlignment: MainAxisAlignment.center,
            children: <Widget>[
              Text(
                message,
                style: TextStyle(fontSize: 24, fontWeight: FontWeight.bold),
              ),
              SizedBox(height: 20),
              ElevatedButton(
                onPressed: updateMessage,
                child: Text('Press Me'),
              ),
              ElevatedButton(
                onPressed: resetMessage,
                child: Text('Reset'),
              ),
            ],
          ),
        ),
      ),
    );
  }
}- Reset Button: We added another button with an onPressed event handler to reset the message back to its original value. The resetMessage() function calls setState() to update the state of the message.
Step 3: Enhancing the User Interface with Icons and Colors
Let’s make the app more visually appealing by adding an icon to the button and changing the color scheme.
import 'package:flutter/material.dart';

void main() {
  runApp(MyApp());
}

class MyApp extends StatefulWidget {
  @override
  _MyAppState createState() => _MyAppState();
}

class _MyAppState extends State<MyApp> {
  String message = 'Hello, World!';

  void updateMessage() {
    setState(() {
      message = 'You pressed the button!';
    });
  }

  void resetMessage() {
    setState(() {
      message = 'Hello, World!';
    });
  }

  @override
  Widget build(BuildContext context) {
    return MaterialApp(
      home: Scaffold(
        appBar: AppBar(
          title: Text('Interactive Hello World'),
          backgroundColor: Colors.teal,
        ),
        body: Center(
          child: Column(
            mainAxisAlignment: MainAxisAlignment.center,
            children: <Widget>[
              Text(
                message,
                style: TextStyle(
                  fontSize: 24,
                  fontWeight: FontWeight.bold,
                  color: Colors.teal,
                ),
              ),
              SizedBox(height: 20),
              ElevatedButton.icon(
                onPressed: updateMessage,
                icon: Icon(Icons.touch_app),
                label: Text('Press Me'),
                style: ElevatedButton.styleFrom(primary: Colors.teal),
              ),
              ElevatedButton(
                onPressed: resetMessage,
                child: Text('Reset'),
                style: ElevatedButton.styleFrom(primary: Colors.grey),
              ),
            ],
          ),
        ),
      ),
    );
  }
}- ElevatedButton.icon: We replaced the basic button with ElevatedButton.icon, which includes both an icon and text.
- Colors: The app’s color scheme has been updated, using Colors.teal for the primary button and text, and Colors.grey for the reset button.
Adding Advanced Features: State Management, Navigation, and Third-Party Integrations
Now that you’ve successfully built and customized your first Flutter app with interactive features, it’s time to explore more advanced aspects of app development. In this section, we’ll introduce state management, how to navigate between multiple screens in Flutter, and how to integrate third-party packages to extend your app’s functionality.
By the end of this section, you’ll have a deeper understanding of how to manage the state of your app effectively, build multi-screen applications, and use external libraries to enhance app performance and features.
Step 1: Managing State with Provider
In the previous sections, we used setState() to manage state within a single widget. While this is an effective approach for small apps, managing state in larger apps requires more scalable solutions. One of the most popular state management packages in Flutter is Provider. It helps you efficiently share and manage state across your entire application without relying on complex widget trees.
Let’s enhance the Hello World app by managing the message state globally using Provider.
Adding Provider to the App
- First, add the provider package to your project by updating the
pubspec.yamlfile:
dependencies:
  flutter:
    sdk: flutter
provider: ^6.0.0- Run
flutter pub getin your terminal to install the package.
Using Provider for State Management
We will refactor the app to use Provider for managing the message state:
import 'package:flutter/material.dart';
import 'package:provider/provider.dart';

void main() {
  runApp(
    ChangeNotifierProvider(
      create: (context) => MessageProvider(),
      child: MyApp(),
    ),
  );
}

class MessageProvider extends ChangeNotifier {
  String _message = 'Hello, World!';

  String get message => _message;

  void updateMessage() {
    _message = 'You pressed the button!';
    notifyListeners();
  }

  void resetMessage() {
    _message = 'Hello, World!';
    notifyListeners();
  }
}

class MyApp extends StatelessWidget {
  @override
  Widget build(BuildContext context) {
    return MaterialApp(
      home: Scaffold(
        appBar: AppBar(
          title: Text('Provider Example'),
        ),
        body: Center(
          child: Column(
            mainAxisAlignment: MainAxisAlignment.center,
            children: <Widget>[
              Consumer<MessageProvider>(
                builder: (context, messageProvider, child) {
                  return Text(
                    messageProvider.message,
                    style: TextStyle(
                      fontSize: 24,
                      fontWeight: FontWeight.bold,
                      color: Colors.teal,
                    ),
                  );
                },
              ),
              SizedBox(height: 20),
              ElevatedButton(
                onPressed: () => context.read<MessageProvider>().updateMessage(),
                child: Text('Press Me'),
                style: ElevatedButton.styleFrom(primary: Colors.teal),
              ),
              ElevatedButton(
                onPressed: () => context.read<MessageProvider>().resetMessage(),
                child: Text('Reset'),
                style: ElevatedButton.styleFrom(primary: Colors.grey),
              ),
            ],
          ),
        ),
      ),
    );
  }
}In this code:
- ChangeNotifierProvider: We wrap the app in a ChangeNotifierProvider, which provides the MessageProvider to the widget tree. This allows any widget to access and modify the message state.
- MessageProvider: This class extends ChangeNotifier and holds the message state. It also has methods to update and reset the message. Calling notifyListeners() triggers a rebuild for any widget listening to this provider.
- Consumer: We use the Consumer widget to listen for changes in the message state and rebuild the UI when the state changes.
Benefits of Provider
Using Provider for state management offers several advantages:
- It simplifies the sharing of state between different parts of your app.
- It allows for more maintainable and scalable code, especially in larger applications.
- It decouples the business logic from the UI, making the code more testable.
Step 2: Navigating Between Screens
Most apps consist of multiple screens, and Flutter provides robust tools for navigating between them. The Navigator widget is used to manage a stack of pages, allowing you to push and pop screens.
Adding Multiple Screens
Let’s add a second screen to our Hello World app. We’ll create a simple page that displays a different message and allows the user to return to the previous screen.
1. Create a new Dart file named second_screen.dart:
import 'package:flutter/material.dart';

class SecondScreen extends StatelessWidget {
  @override
  Widget build(BuildContext context) {
    return Scaffold(
      appBar: AppBar(
        title: Text('Second Screen'),
      ),
      body: Center(
        child: Column(
          mainAxisAlignment: MainAxisAlignment.center,
          children: <Widget>[
            Text(
              'You are now on the second screen!',
              style: TextStyle(fontSize: 24, fontWeight: FontWeight.bold),
            ),
            SizedBox(height: 20),
            ElevatedButton(
              onPressed: () {
                Navigator.pop(context); // Go back to the previous screen
              },
              child: Text('Go Back'),
              style: ElevatedButton.styleFrom(primary: Colors.teal),
            ),
          ],
        ),
      ),
    );
  }
}2. Modify your main.dart file to include navigation to the second screen:
import 'package:flutter/material.dart';
import 'package:provider/provider.dart';
import 'second_screen.dart';

void main() {
  runApp(
    ChangeNotifierProvider(
      create: (context) => MessageProvider(),
      child: MyApp(),
    ),
  );
}

class MyApp extends StatelessWidget {
  @override
  Widget build(BuildContext context) {
    return MaterialApp(
      home: Scaffold(
        appBar: AppBar(
          title: Text('Provider Example'),
        ),
        body: Center(
          child: Column(
            mainAxisAlignment: MainAxisAlignment.center,
            children: <Widget>[
              Consumer<MessageProvider>(
                builder: (context, messageProvider, child) {
                  return Text(
                    messageProvider.message,
                    style: TextStyle(
                      fontSize: 24,
                      fontWeight: FontWeight.bold,
                      color: Colors.teal,
                    ),
                  );
                },
              ),
              SizedBox(height: 20),
              ElevatedButton(
                onPressed: () => context.read<MessageProvider>().updateMessage(),
                child: Text('Press Me'),
                style: ElevatedButton.styleFrom(primary: Colors.teal),
              ),
              ElevatedButton(
                onPressed: () => context.read<MessageProvider>().resetMessage(),
                child: Text('Reset'),
                style: ElevatedButton.styleFrom(primary: Colors.grey),
              ),
              SizedBox(height: 20),
              ElevatedButton(
                onPressed: () {
                  Navigator.push(
                    context,
                    MaterialPageRoute(builder: (context) => SecondScreen()),
                  );
                },
                child: Text('Go to Second Screen'),
                style: ElevatedButton.styleFrom(primary: Colors.teal),
              ),
            ],
          ),
        ),
      ),
    );
  }
}In this code:
- Navigator.push: We use Navigator.push() to navigate from the first screen to the SecondScreen. This method adds a new screen to the top of the navigation stack.
- Navigator.pop: On the second screen, Navigator.pop() is used to return to the previous screen.
Step 3: Integrating Third-Party Packages
Flutter’s pub.dev repository provides access to thousands of third-party packages that extend the functionality of your app. One common integration is using the http package for network requests.
Using the HTTP Package
1. Add the http package to your pubspec.yaml file:
dependencies:
  flutter:
    sdk: flutter
http: ^0.13.32. Run flutter pub get to install the package.
3. Use the http package to make a network request in your app. In this example, we’ll fetch some data from a sample API and display it in the app:
import 'package:flutter/material.dart';
import 'package:http/http.dart' as http;
import 'dart:convert';

class NetworkScreen extends StatefulWidget {
  @override
  _NetworkScreenState createState() => _NetworkScreenState();
}

class _NetworkScreenState extends State<NetworkScreen> {
  String data = 'Fetching data...';

  void fetchData() async {
    final response = await http.get(Uri.parse('https://jsonplaceholder.typicode.com/posts/1'));

    if (response.statusCode == 200) {
      setState(() {
        data = json.decode(response.body)['title'];
      });
    } else {
      setState(() {
        data = 'Failed to fetch data';
      });
    }
  }

  @override
  void initState() {
    super.initState();
    fetchData();
  }

  @override
  Widget build(BuildContext context) {
    return Scaffold(
      appBar: AppBar(
        title: Text('Network Request Example'),
      ),
      body: Center(
        child: Text(
          data,
          style: TextStyle(fontSize: 24),
        ),
      ),
    );
  }
}In this example:
- http.get: We use the http package to make a GET request to a sample API.
- json.decode: We decode the JSON response and display the data in the app.
- initState: The fetchData() method is called in initState() to ensure the data is fetched when the screen is initialized.
Building Complex Flutter Apps
Congratulations! You’ve successfully taken the first steps toward building a robust Flutter application. In this article, you learned how to:
- Customize the UI with widgets like Container, Column, and Text.
- Manage state globally using Provider.
- Navigate between multiple screens using the Navigator widget.
- Integrate third-party packages like http to extend your app’s functionality.
These foundational skills will help you as you move forward in your Flutter development journey, allowing you to build more complex applications with confidence. As you continue learning, you’ll explore advanced topics such as animations, state management with Bloc, and integrating features like notifications and databases.