Introduction
Among all the factors that determine whether three-dimensional prints succeed or fail catastrophically, none proves more critical than bed adhesion—the bond between the first layer of the print and the build surface beneath it. This foundation layer must stick firmly enough to remain anchored throughout the potentially hours-long build process, yet not so strongly that removing the completed part damages either the print or the build surface. Finding this balance represents one of the first challenges that every newcomer must overcome, and even experienced users occasionally struggle with adhesion issues that cause prints to detach mid-build, wasting time, material, and effort.
Bed adhesion failure manifests in unmistakable ways. Sometimes the print detaches completely from the build surface within minutes of starting, leaving a tangled mess of plastic spaghetti as the nozzle continues extruding material onto nothing. Other times, corners gradually lift and curl upward over hours as thermal stresses overcome the adhesion, creating warping that distorts geometry and may eventually cause complete detachment. In the worst cases, a large print with hours invested suddenly separates from the bed near completion, destroying what would have been a successful build. These failures are frustrating, wasteful, and completely preventable with proper attention to bed adhesion.
The importance of bed adhesion stems from the first layer’s role as the literal foundation upon which all subsequent layers build. Every layer that follows depends on the first layer remaining firmly anchored to the build surface. If the foundation shifts or detaches, everything built upon it shifts or collapses as well. No amount of perfect settings for upper layers can compensate for inadequate first layer adhesion. This makes bed adhesion the single most important factor determining whether prints make it past the critical first minutes of building.
Understanding bed adhesion requires examining multiple interrelated factors: the physical and chemical nature of how plastic bonds to various build surfaces, the mechanical setup including bed leveling that ensures consistent nozzle-to-surface distance, the material-specific considerations that make some plastics easier to adhere than others, the thermal management including bed heating that affects adhesion strength, and the various enhancement techniques from glue sticks to specialty surface treatments that improve adhesion when basic approaches fall short.
This comprehensive guide will explore what bed adhesion actually is and why it matters so critically, how different build surface materials work and their respective advantages, what proper bed leveling means and how to achieve it, what settings and techniques optimize first layer adhesion, what common problems cause adhesion failures and how to diagnose them, what adhesion aids and enhancements exist for challenging situations, and how to balance strong adhesion during printing with easy part removal after completion. Whether experiencing frequent failures or seeking to improve already-acceptable results, mastering bed adhesion principles enables the reliable first layers that successful printing demands.
The Critical Importance of First Layer Adhesion
Understanding why bed adhesion matters requires examining what happens during printing when adhesion is adequate versus when it fails, revealing how this single factor cascades through the entire build process.
The first layer establishes the foundation that anchors the entire print to the build surface. Unlike subsequent layers that bond to previously deposited plastic, the first layer must adhere to a fundamentally different material—glass, metal, plastic, or coated surface that has different surface energy and chemical compatibility than the printing material. This dissimilar material junction creates inherently weaker bonding potential than layer-to-layer plastic-to-plastic bonding, making first layer adhesion the weakest link in the entire structure.
Thermal stresses develop as prints cool because plastic contracts when transitioning from processing temperature to room temperature. This contraction creates internal stresses that pull inward from all edges, with corners experiencing particularly high stress concentrations. These stresses constantly work to overcome bed adhesion throughout the build. If adhesion is marginal, the thermal stresses eventually win, causing corners to lift or the entire print to detach. Strong adhesion resists these stresses long enough for the print to complete successfully.
Warping occurs when thermal contraction stresses exceed adhesion strength at specific locations, typically corners or edges. The plastic lifts away from the bed surface, curling upward and creating the characteristic warped appearance where previously flat surfaces now curve. Once warping begins, it often accelerates as the lifted areas cool faster than adhered regions, creating differential stresses that propagate the lifting. Early warping may be correctable through heating or pressing flat, but advanced warping usually ruins prints irrevocably.
Print failure cascades from adhesion loss because once the foundation detaches or shifts, everything built upon it moves out of position. The nozzle continues following its programmed path, but the part is no longer where the printer expects it. New material deposits in wrong locations or into empty air. Layer registration fails catastrophically. The print becomes a tangled mess rather than the intended object. Time spent printing before the failure represents complete loss since partially detached prints cannot be salvaged.
Quality degradation occurs even when prints do not completely fail but experience marginal adhesion. Slight movement or flexing of the first layer during printing creates dimensional inaccuracy, layer misalignment, or surface defects. The bottom surface quality reflects the quality of adhesion and contact with the bed. Poor adhesion creates rough, inconsistent bottom surfaces even if the print completes. The base layers may show gaps, ridges, or texture that make the difference between professional-looking parts and obviously problematic results.
Material waste from failed prints due to adhesion problems represents direct cost that compounds over many builds. Filament consumed before a print fails is simply discarded. The wasted material itself might be modest for small prints but substantial for large builds that fail hours into the process. Multiply these losses across multiple failures while troubleshooting adhesion issues, and the material cost becomes significant even for cheap commodity filament.
Time waste exceeds material cost for many users because hours invested in a print that fails represent opportunity cost preventing other productive work. A print that fails after six hours wastes not just the filament but the six hours the printer sat producing garbage instead of something useful. For users running print farms or businesses dependent on throughput, adhesion-related failures directly impact productivity and revenue.
Frustration and discouragement particularly affect newcomers who may conclude that 3D printing “doesn’t work” after experiencing repeated adhesion failures. The technology can seem capricious and unreliable when prints randomly fail for reasons that are not immediately obvious. Understanding that adhesion is critical and learning how to achieve it reliably transforms the experience from frustrating to empowering.
Build Surface Materials and Their Characteristics
The choice of build surface material significantly affects adhesion characteristics, ease of part removal, durability, and maintenance requirements. Understanding different surface options enables selecting appropriate surfaces for specific materials and applications.
Glass build surfaces provide perfectly flat reference planes with excellent flatness tolerance. Glass does not warp or deform from heating cycles, maintaining geometry indefinitely. The smooth surface creates glossy bottom finishes on prints. However, bare glass offers poor adhesion for most materials, requiring adhesion aids like glue stick or hairspray. Borosilicate glass handles thermal cycling better than regular glass, resisting thermal shock that might crack standard glass. Cleaning glass is straightforward with isopropyl alcohol removing residues effectively.
PEI (polyetherimide) sheets have become popular for their excellent adhesion when heated combined with easy part release when cooled. PEI bonds well to hot printed plastic but releases readily after cooling. The textured surface some PEI sheets feature creates matte bottom finishes while smooth PEI creates semi-gloss finishes. PEI sheets attach to build plates with adhesive backing, making them replaceable consumables. Over time and use, PEI surfaces degrade and lose adhesion properties, requiring eventual replacement. Light sanding can restore adhesion temporarily before replacement becomes necessary.
BuildTak and similar textured plastic sheets provide aggressive mechanical grip through surface texture that plastic embeds into during printing. These surfaces work well for many materials and offer strong adhesion. However, part removal can be challenging, sometimes damaging either the part or the surface during separation. The texture creates distinctive patterned bottom finishes. BuildTak surfaces wear over time as repeated printing and removal gradually damages the texture. Replacement sheets are relatively inexpensive consumables.
Textured powder-coated steel sheets combine durability with strong adhesion and easy part removal. The textured coating provides mechanical grip while heating the steel provides thermal control. Many modern printers use spring steel sheets that flex when bent, allowing parts to pop off easily when the sheet is flexed. The powder coating wears eventually but steel sheets typically last much longer than plastic surface materials. Different textures create different bottom surface appearances from smooth to aggressive texture.
Flexible magnetic build surfaces use spring steel sheets with magnetic backing that attach to build plates magnetically. The flexibility allows bending the sheet after printing to pop off parts without tools. Magnetic attachment enables quick swapping between different surface sheets for different materials. The magnetic base remains permanently on the printer while textured sheets can be collected and swapped. This system combines convenience with material-specific surface optimization.
Blue painter’s tape was widely used in early 3D printing before modern surface materials became available. Tape provides reasonable adhesion for PLA and creates distinct lined texture from the tape seams. The low-tack adhesive allows easy part removal. Tape wears quickly and requires frequent replacement, making it labor-intensive to maintain. Modern alternatives generally outperform tape but it remains a viable option for emergency repairs when better surfaces are unavailable.
Kapton polyimide tape offers high-temperature resistance needed for printing materials like ABS that require hot beds. The amber-colored tape withstands temperatures exceeding 300 degrees Celsius without degrading. Adhesion characteristics suit ABS and similar materials when properly prepared. Like blue tape, Kapton wears and requires replacement but less frequently due to its durability. Surface preparation with acetone or adhesion aids improves performance.
Bare aluminum build plates offer poor adhesion without surface treatment but serve as solid bases for mounting other surface materials. Aluminum’s excellent thermal conductivity distributes heat evenly across the build area. The smooth surface provides poor grip, requiring coating with adhesion aids or applying surface sheets. Anodized aluminum offers slightly better adhesion than bare aluminum while resisting corrosion.
Bed Leveling: The Foundation of Good Adhesion
Even the best build surface material cannot compensate for improper bed leveling that creates inconsistent distance between the nozzle and surface. Achieving and maintaining proper leveling represents an essential prerequisite for reliable adhesion.
Bed leveling ensures the build surface sits parallel to the plane in which the print head moves, maintaining constant distance between nozzle tip and surface across the entire build area. If the bed tilts relative to the nozzle’s travel plane, the gap varies across the bed. Too large a gap prevents adhesion as material falls through excessive distance before contacting the surface. Too small a gap causes the nozzle to scrape the surface or prevents material from flowing properly.
The paper method provides the traditional manual leveling technique. A standard piece of printer paper slips between nozzle and bed, serving as a feeler gauge. Adjusting bed leveling screws while sliding the paper across the gap achieves correct spacing when the paper experiences light friction but can still slide. This friction indicates clearance approximately equal to the paper thickness, typically around 0.1 millimeters. The technique works reliably despite its simplicity.
Four-point leveling represents the common configuration with adjustment screws or wheels at each corner of a rectangular build plate. Leveling proceeds iteratively, adjusting each corner in sequence and rechecking previously adjusted corners because changing one affects others through frame flex. Multiple complete circuits around all four points are usually necessary before achieving consistent results across the build area. Patience and methodical approach prevent frustration.
Three-point leveling offers theoretical advantages because three points define a plane mathematically while four points can be over-constrained. However, most consumer printers use four-point adjustment. Users of four-point systems sometimes encounter situations where perfect adjustment proves impossible due to frame warping or mechanical issues. Understanding that the problem may be structural rather than adjustment technique helps diagnose such situations.
Automatic bed leveling uses probe sensors to measure the bed surface at multiple points, creating a map of height variations. The printer’s firmware uses this map to adjust Z-height dynamically during printing, compensating for bed irregularities. Auto-leveling reduces manual adjustment frequency but does not completely eliminate the need for proper mechanical leveling. The sensor itself requires calibration to establish correct Z-offset between the probe trigger point and the actual nozzle position.
Mesh bed leveling extends auto-leveling by measuring many points across the build area, creating a detailed height map. This fine-grained mapping compensates for subtle variations including slight warping or surface irregularities. The mesh resolution typically ranges from 3×3 to 7×7 or finer grids. Storing and applying these meshes through firmware enables accurate compensation that maintains proper first layer height despite imperfect bed flatness.
Capacitive, inductive, and BLTouch sensors represent different probe technologies. Capacitive sensors detect surface proximity through capacitance changes. Inductive sensors work through magnetic field disruption, requiring metal surfaces. BLTouch uses a mechanical pin that physically touches the surface. Each technology has characteristics affecting accuracy, repeatability, and compatibility with different build surfaces. Understanding your specific sensor’s behavior helps configure it optimally.
Z-offset configuration determines the vertical distance between where the probe triggers and where the nozzle should be for proper first layer height. Setting Z-offset correctly is critical for successful printing with automatic leveling. Too large an offset lifts the nozzle too high, preventing adhesion. Too small an offset drives the nozzle into the bed, potentially damaging both nozzle and surface. Z-offset adjustment represents a key calibration that requires periodic refinement.
First Layer Settings and Techniques
Beyond mechanical leveling and surface selection, specific print settings and techniques for the first layer significantly affect adhesion success. Optimizing these parameters creates conditions favoring strong initial bonding.
First layer height often increases slightly compared to standard layer height, creating extra material squish that improves contact with the build surface. Using 0.3 millimeter for the first layer when printing 0.2 millimeter layers subsequently provides this beneficial compression. The extra material spreads slightly wider, increasing contact area and bonding surface. However, excessive first layer height risks improper flow and poor bonding to the second layer.
First layer speed reduces dramatically compared to normal print speeds, typically twenty to thirty millimeters per second versus fifty to eighty for subsequent layers. This slower speed gives deposited material more time to spread and bond before the nozzle moves away. The reduced speed also improves accuracy of position, ensuring material deposits exactly where intended without the position lag that higher speeds create. The time investment for careful first layer printing pays dividends in improved success rates.
First layer line width often increases to one hundred twenty or even one hundred fifty percent of normal line width, creating wider lines that cover more area per pass. Wider lines improve contact with the bed and create robust anchor points for subsequent layers. The nozzle extrudes more material per unit length traveled, requiring proper flow rate calculation, but the improved adhesion usually justifies the additional material and time.
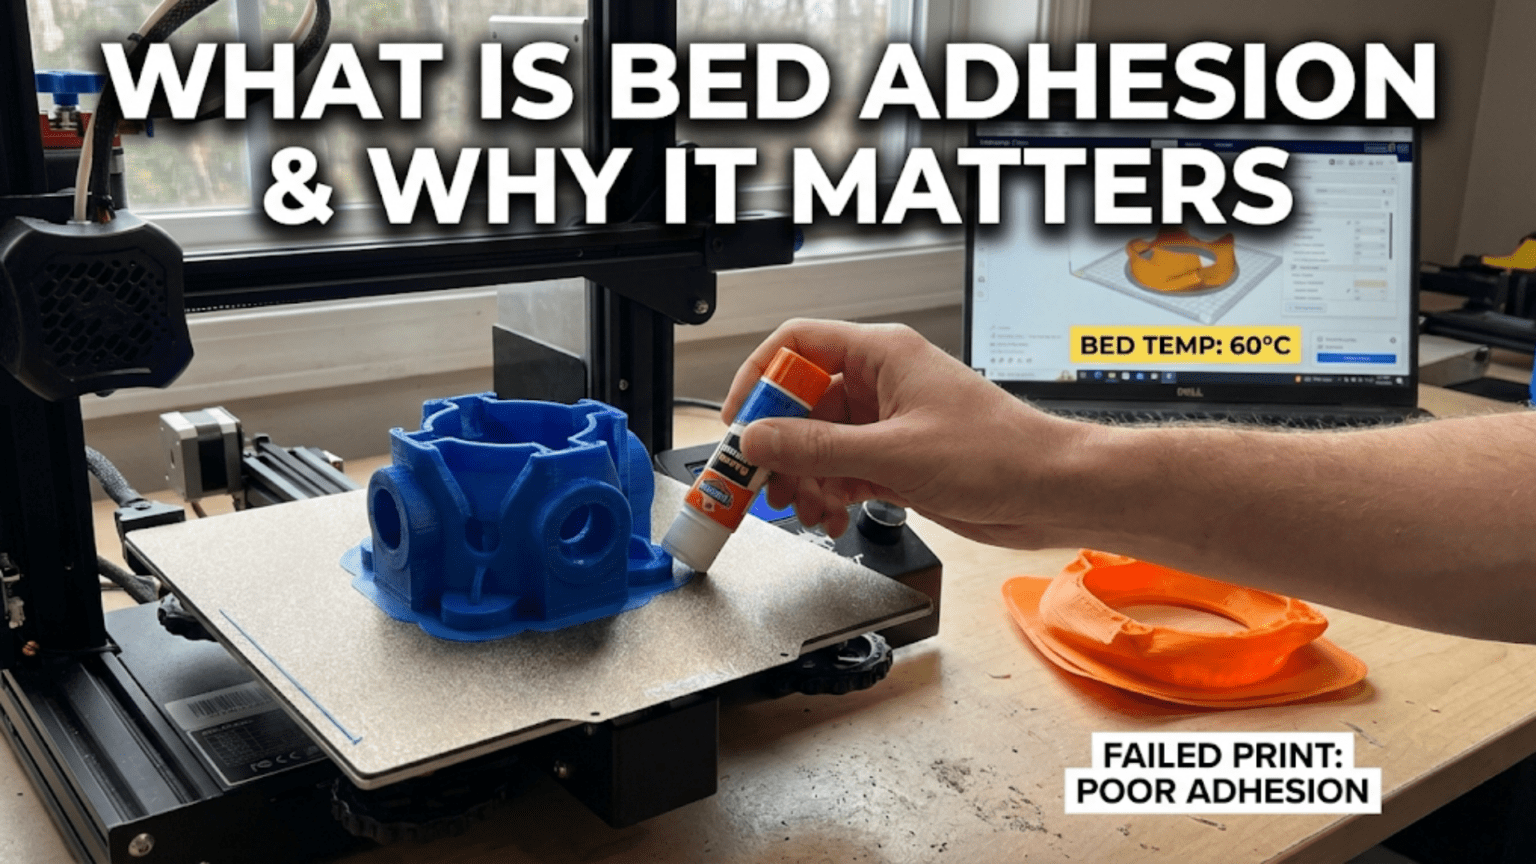
Bed temperature optimization varies by material but generally increases adhesion when set appropriately. PLA typically prints on beds heated to 50-60 degrees Celsius. PETG uses 70-85 degrees. ABS benefits from 90-110 degrees. Nylon often requires 70-90 degrees or higher. Proper bed temperature keeps the bottom of the print warm and slightly soft, improving conformance to surface irregularities and reducing thermal contraction stresses that cause warping.
Hotend temperature for the first layer sometimes increases by 5-10 degrees above normal printing temperature, creating slightly more fluid material that spreads better onto the bed surface. The extra heat improves flow and bonding but must not increase enough to cause oozing or sagging. Material-specific testing determines whether first layer temperature adjustment helps for particular filament brands and colors.
Cooling fan settings typically disable or minimize part cooling for the first few layers to prevent rapid cooling that can cause warping or poor bed adhesion. The first layer in particular benefits from no part cooling, allowing it to remain warm and pliable while bonding. Subsequent layers may gradually introduce cooling over three to five layers rather than abruptly activating the cooling fan immediately after the first layer completes.
Extrusion multiplier for the first layer may increase by five to ten percent above normal extrusion rate, providing extra material that improves contact through additional squish. This adjustment should be subtle—excessive over-extrusion creates elephant’s foot bulging where the first layer spreads excessively beyond upper layers’ footprints. Small increases improve adhesion while excessive increases create dimensional accuracy problems.
Common Adhesion Problems and Solutions
When adhesion fails despite seemingly proper setup, systematic troubleshooting identifies the specific cause and points toward appropriate solutions. Different failure modes have characteristic patterns that indicate their underlying causes.
Complete non-adhesion where material does not stick at all often indicates the nozzle is too far from the bed. The extruded plastic falls through excessive distance before contacting the surface, arriving with insufficient temperature and pressure to bond. Solution: reduce Z-offset or lower the bed to decrease the gap. The paper test should show light friction rather than loose sliding.
Corner lifting occurs when edges and particularly corners progressively curl upward as thermal contraction overcomes adhesion. Large parts and materials with high thermal contraction like ABS are particularly susceptible. Solutions include increasing bed temperature, using enclosures to reduce temperature differentials, applying adhesion aids specifically to corners, using brims or rafts to increase adhered area, and reducing cooling fan speeds that exacerbate thermal gradients.
Elephant’s foot describes excessive spreading of the first layer creating a bulge wider than upper layers. This indicates over-compression from the nozzle being too close to the bed or excessive first layer extrusion. Solutions include increasing Z-offset slightly, reducing first layer extrusion multiplier, or reducing first layer line width. A small amount of elephant’s foot is normal and acceptable, but excessive bulging indicates parameter adjustment is needed.
Poor adhesion in specific areas while other regions stick well suggests uneven bed leveling. One side or corner may be slightly higher or lower than the rest, creating inconsistent gaps. Solution: perform thorough bed leveling, paying particular attention to problem areas. Consider automatic bed leveling with mesh compensation if manual leveling cannot achieve sufficient uniformity.
Layer separation where the first layer stays adhered but second or third layers detach indicates the first layer temperature is adequate but interlayer bonding is insufficient. This differs from pure bed adhesion failure. Solutions focus on printing temperature, cooling settings, and environmental temperature rather than bed adhesion specifically.
Adhesion to only part of the first layer, with certain regions not sticking, may indicate contamination on the build surface preventing adhesion where contaminants exist. Oils from handling, residue from previous prints, or dust and debris prevent proper bonding. Solution: thoroughly clean the build surface with isopropyl alcohol, and avoid touching the surface with bare hands after cleaning.
Adhesion Aids and Enhancement Techniques
When basic adhesion proves insufficient, various enhancement techniques and adhesion aids improve bonding strength for challenging materials or geometries.
Glue stick (PVA-based) represents the most common adhesion aid, creating a thin tacky layer on the build surface that plastic adheres to readily. Standard purple disappearing glue sticks work well when applied in thin even coats. The glue dissolves in water for easy cleanup. Glue stick particularly helps with PLA on glass surfaces. Too much glue creates sticky messes while too little provides inadequate enhancement, requiring experimentation to find the right amount.
Hairspray (unscented extra-hold formulations) provides adhesion enhancement similar to glue stick but applies more evenly through spraying. A light mist creates a tacky surface that improves adhesion for many materials. Hairspray buildup requires periodic cleaning as successive coats accumulate. Some users find hairspray messier than glue stick while others prefer the spray application. Brand and formulation matter, with some hairsprays working better than others.
Magigoo and similar commercial 3D printing adhesives are formulated specifically for additive manufacturing. These products often target specific materials, with different formulations for PLA, PETG, Nylon, or other plastics. They provide strong adhesion when hot but release readily when the bed cools. The targeted formulations often work better than general-purpose glue stick or hairspray for their intended materials.
ABS slurry or “ABS juice” consists of ABS plastic dissolved in acetone, creating a liquid that can be painted onto build surfaces. The acetone evaporates leaving a thin layer of ABS that subsequent ABS prints chemically bond to excellently. This works specifically for ABS printing on glass or similar surfaces. Creating slurry involves dissolving ABS scraps or failed prints in acetone until reaching a paint-like consistency.
Brims add extra material around the first layer base of prints, increasing the total adhered area without adding height or interior volume. The brim extends outward from the model’s footprint by several millimeters, providing extra surface area that resists warping forces. Brims peel away easily after printing, leaving the model clean. They work well for parts with small base areas or sharp corners prone to lifting.
Rafts create a complete separate base structure beneath the print, with the actual model building on top of the raft. Rafts provide maximum adhesion enhancement by maximizing contact area and creating separation between the bed and the model. However, rafts waste material, add print time, and must be removed carefully to avoid damaging the model’s bottom surface. Rafts are typically reserved for particularly challenging adhesion situations.
Skirts trace one or more perimeter loops around the print area without touching the model, serving to prime the extruder and verify bed leveling before the actual print begins. While not directly enhancing adhesion, skirts help ensure consistent extrusion and catch adhesion problems immediately rather than ruining the model’s first layer. Observing skirt quality provides early warning of potential issues.
Enclosures or build chambers maintain elevated ambient temperature around prints, reducing thermal gradients that cause warping. This is particularly beneficial for materials like ABS that warp readily when cooling too quickly. Full enclosures with temperature control represent sophisticated solutions, while simple cardboard boxes provide basic enclosure benefits at minimal cost.
Conclusion
Bed adhesion represents the foundation upon which successful three-dimensional printing builds, with the first layer’s bond to the build surface determining whether prints complete successfully or fail catastrophically. No subsequent layer can compensate for inadequate first layer adhesion, making this the single most critical factor determining print success, particularly in the vulnerable first minutes of building.
Understanding bed adhesion requires recognizing that multiple factors contribute simultaneously to success: the build surface material providing appropriate surface energy and texture for bonding, the mechanical bed leveling ensuring consistent nozzle-to-surface distance across the entire build area, the thermal management through bed and nozzle temperatures optimizing material flow and bonding, and the first layer print settings creating conditions favorable for strong initial adhesion.
Different build surface materials from glass to PEI to textured steel sheets offer distinct advantages and limitations. Selecting appropriate surfaces for specific materials and applications, maintaining surfaces properly, and knowing when replacement is necessary all contribute to consistent adhesion success. No single surface works optimally for all materials and situations, requiring users to match surfaces to their specific needs.
Bed leveling, whether manual or automatic, establishes the proper nozzle-to-surface distance that allows material to squish appropriately onto the surface without being too compressed or too loose. Mastering leveling techniques and understanding when mechanical adjustments are necessary versus when firmware compensation suffices prevents adhesion problems before they occur.
First layer settings including reduced speed, increased temperature, and adjusted extrusion create optimized conditions for strong bonding. These settings differ from normal printing parameters because the first layer faces unique challenges bonding to dissimilar materials rather than to previously deposited plastic. Taking time to print careful first layers prevents hours of wasted time from failures later in builds.
Troubleshooting adhesion problems requires systematic diagnosis of whether issues stem from bed distance, surface preparation, temperature settings, or material-specific characteristics. Different failure modes like corner lifting, complete non-adhesion, or elephant’s foot each point toward specific causes and solutions. Understanding these patterns enables efficient problem-solving rather than random parameter adjustment.
Adhesion aids from simple glue stick to sophisticated commercial formulations provide enhancement when basic techniques prove insufficient. Structural aids like brims and rafts increase contact area, while chemical aids create tackier surfaces. Knowing which enhancement to apply for specific situations and materials maximizes success while minimizing unnecessary interventions.
Mastering bed adhesion transforms the 3D printing experience from unpredictable and frustrating to reliable and controlled. The ability to achieve strong first layer adhesion consistently enables confidence that prints will complete successfully, allowing focus on other aspects of print quality rather than constant worry about bed adhesion failures. This mastery represents essential foundational knowledge that every successful 3D printing practitioner must develop through understanding principles, applying proper techniques, and building experience across many prints.