Introduction
Among the many aspects of three-dimensional printing that confuse newcomers, few generate as much frustration as support structures—the temporary scaffolding that enables printing geometries that would otherwise collapse during construction. These supports seem like an annoying necessity that adds material cost, increases print time, and creates tedious post-processing work removing them from finished parts. Yet understanding why supports exist, when they are truly necessary, and how to use them effectively transforms them from mysterious obstacles into powerful tools that dramatically expand what geometries can be successfully printed.
Support structures address a fundamental challenge inherent to layer-by-layer additive manufacturing: material must be deposited onto something solid beneath it or it will fall due to gravity. When a new layer needs to extend beyond the boundaries of the layer below, creating what is called an overhang, the material being deposited has nothing immediately beneath it to support its weight while it cools and solidifies. Without intervention, such overhanging material would sag, droop, or collapse entirely, ruining the print. Support structures provide temporary foundations that hold up these overhangs during printing, then remove after completion to reveal the intended geometry.
The necessity of supports arises directly from the physics of depositing semi-molten material in mid-air. Unlike traditional manufacturing where parts are machined from solid blocks or formed in molds that support all surfaces simultaneously, additive manufacturing builds incrementally with only previously deposited material available for support. This constraint means certain geometries simply cannot print successfully without supports. A part with horizontal surfaces projecting into empty space, like the brim of a hat or the extended arms on a figurine, requires supports unless the printer can somehow deposit material onto nothing and have it magically remain in position.
Understanding when supports are necessary versus when designs can avoid them, how different support strategies work and their respective tradeoffs, and how to configure support generation for optimal results separates successful printing from constant frustration with failed builds and damaged parts. The goal is not eliminating supports entirely—some geometries genuinely require them—but rather using supports intelligently where necessary while designing to minimize support needs where practical. This balance maximizes success rates while minimizing the material waste and post-processing tedium that supports inherently create.
This comprehensive guide will explore the physics determining when supports are necessary, what the critical overhang angles are and why they matter, how different support generation strategies work from basic columns to sophisticated tree structures, how to configure support settings for the best balance between reliability and ease of removal, what techniques exist for support-free design, how to remove supports effectively without damaging parts, and what advanced support options exist for challenging geometries. Whether designing original models or printing existing files, mastering support structures enables successfully producing complex geometries that would otherwise be impossible.
The Physics of Overhangs and Why Supports Matter
To understand when supports become necessary, examining what happens physically when material is deposited beyond the boundaries of previous layers reveals the fundamental limits that supports address.
Gravity acts constantly on material being deposited, pulling it downward whether or not solid support exists beneath it. When printing vertical walls or features that stay within the footprint of lower layers, gravity pulls deposited material straight down onto the solid surface below, where it bonds and remains in position. When printing overhangs that extend beyond lower layers, gravity pulls the deposited material downward but no solid surface exists directly beneath to catch it. The material’s own stiffness must resist gravity until it cools enough to solidify.
Cooling time determines how long deposited material remains soft enough to deform under gravity. Immediately after extrusion from a hot nozzle, plastic is molten and flows like thick honey with essentially no strength. Within a second or two, rapid cooling increases viscosity dramatically, providing increasing resistance to deformation. After several seconds, the plastic solidifies enough to hold its shape against gravity. The challenge is that during those first critical seconds, material is vulnerable to sagging if unsupported.
Part cooling fans accelerate solidification by blowing air onto freshly deposited material, removing heat faster than passive cooling would. Aggressive cooling helps overhangs by solidifying material before it sags significantly. However, cooling too aggressively creates other problems including poor layer adhesion and warping. The optimal cooling for overhangs may differ from the optimal cooling for other aspects of print quality, creating tradeoffs that must balance competing requirements.
Bridge printing demonstrates that horizontal gaps can span limited distances without support if proper technique is employed. When printing a bridge—a horizontal span with support at both ends but nothing beneath the middle—the first line of material stretches between the endpoints. Aggressive cooling, appropriate speed, and tensioning the filament by starting and ending on solid anchor points allow successful bridges spanning ten to thirty millimeters depending on material and settings. Bridges work because the material forms a stretched membrane under tension rather than trying to support its own weight in compression.
The maximum overhang angle that can print successfully without supports typically ranges from forty-five to sixty degrees from horizontal, depending on material, cooling, speed, and other factors. An overhang angle specifies how far from vertical a surface tilts. Vertical surfaces at ninety degrees print easily. Surfaces at forty-five degrees, where each layer extends half a layer width beyond the one below, approach the limit. Shallower angles exceeding forty-five degrees from horizontal increasingly risk sagging and rough surfaces.
The overhang angle limit arises because plastic can support its own weight somewhat when deposited onto a mostly-supported platform. At forty-five degrees, half of each new layer’s width sits on solid support from the layer below while only half extends into air. The supported half provides enough foundation that the unsupported half stays mostly in position, though surface quality degrades. At angles exceeding forty-five degrees, less than half of each layer has solid support, and the unsupported portion increasingly sags under its own weight.
Different materials show varying overhang capabilities. PLA with its lower printing temperature and better cooling response typically handles overhangs better than ABS. PETG falls between PLA and ABS. Flexible materials like TPU struggle with overhangs because their inherent flexibility means even solidified material deforms under stress. Engineering materials vary widely in overhang performance. Understanding material-specific capabilities helps set realistic expectations for what can print without supports.
Print orientation dramatically affects whether supports are necessary. A part printed one orientation might require extensive supports, while reorienting it eliminates supports entirely. Consider a simple rectangular bracket with a horizontal hole. Oriented with the hole vertical, it prints without supports. Oriented with the hole horizontal, the top of the hole requires supports. Thoughtful orientation during print setup can minimize or eliminate support needs for many geometries.
Types of Support Structures and Their Characteristics
Different support generation strategies create distinct types of support structures with varying material efficiency, print time, ease of removal, and surface quality where supports contact the model. Understanding these options allows selecting appropriate support types for specific geometries and priorities.
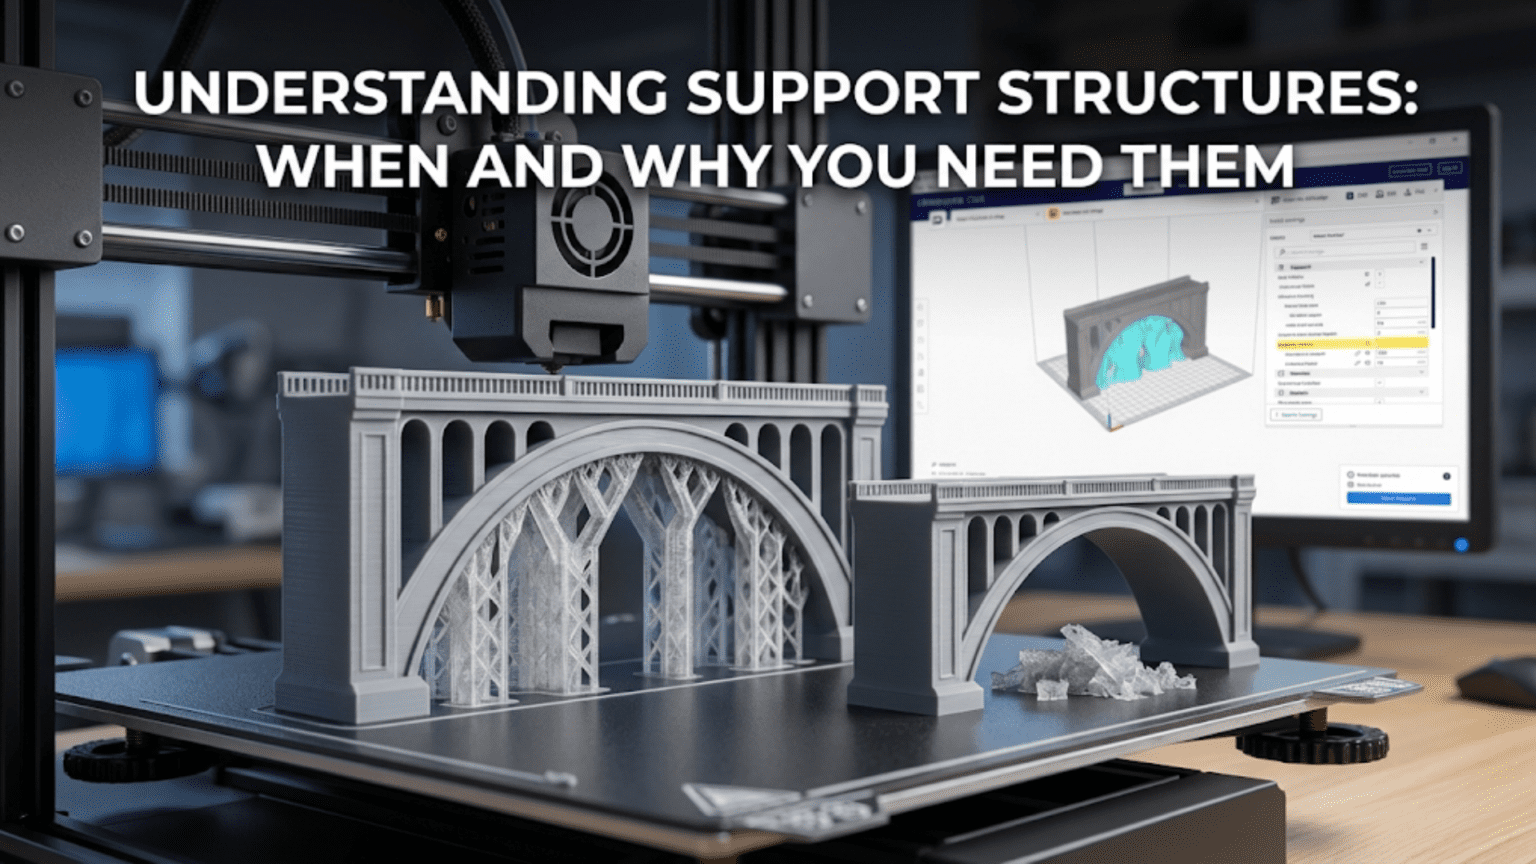
Basic rectilinear supports consist of vertical columns or walls rising from the build plate to the overhang surfaces needing support. These supports use simple back-and-forth line patterns similar to normal infill, creating scaffolding that holds up overhangs. The simplicity makes rectilinear supports fast to generate and print, but they use substantial material and can be difficult to remove from models with complex geometry. The contact between supports and model can leave surface marks that require cleanup.
Grid supports reduce material usage compared to solid walls by creating lattice structures with open spaces between support elements. Rather than continuous walls, grid supports use perpendicular lines at each layer creating a mesh or scaffolding appearance. This structure uses less material while providing adequate support strength. The gaps between grid elements make supports more flexible, sometimes easing removal compared to solid support walls.
Tree supports represent a sophisticated approach that grows branching structures from the build plate to overhangs, similar to how tree branches reach toward light. Starting from a trunk or multiple trunks on the build plate, branches divide and spread outward as they grow upward, reaching wherever support is needed. Tree supports minimize contact with the model by touching only at branch tips rather than along continuous surfaces. This approach dramatically reduces support material, reduces print time, and often makes removal much easier because supports connect to the model at discrete points rather than along entire surfaces.
Organic supports extend tree support principles by allowing branches to curve and merge more freely, creating structures that resemble natural tree growth even more closely. These supports optimize material usage and minimize contact points through sophisticated algorithms that analyze the model geometry and generate supports that efficiently reach all locations needing support while using minimal material and minimizing model contact. Organic supports typically require advanced slicing software but provide excellent results for complex geometries.
Support interface layers create a thin separation between the main support structure and the model surface where they meet. These interface layers use finer settings than the main support body, creating smoother contact surfaces that reduce surface marking and sometimes ease removal. Interface layers below the model support the model’s bottom surfaces, while interface layers above the support structure create a roof that supports the model’s bottom surfaces from below. The denser interface improves surface quality at support contact points.
Breakaway supports use the same material as the model but generate with settings that create weak enough structures they can be broken or pulled away by hand. The supports print with less density, fewer perimeter walls, or other modifications that make them deliberately fragile. This approach works well for FDM printing where physical separation is possible. The removed supports leave surfaces that may need minor cleanup but generally work well for many applications.
Soluble supports use water-soluble or chemically-soluble materials that dissolve away after printing, leaving no marks on the model surface. Materials like PVA dissolve in water, while HIPS dissolves in limonene. This requires printers capable of multi-material printing with separate extruders for model and support materials. The process eliminates manual support removal but requires additional equipment, increases material costs, and adds post-processing time for the dissolution. The benefit is perfect surfaces where supports were present since no mechanical removal occurs.
Support blockers allow manually preventing support generation in specific regions where the automatic algorithms would place supports but they are not actually needed or where they would be impossible to remove. By painting or placing blocking volumes in those locations, you tell the slicer not to generate supports there. This manual control helps optimize support structures for specific situations where automatic generation does not understand the geometry’s specific requirements.
Support enforcers allow manually requiring support generation in regions where automatic algorithms do not generate supports but experience suggests they are needed. This enables fixing situations where the automatic support generation fails to identify necessary support locations, allowing you to force supports where needed based on your knowledge of the geometry and printing characteristics.
Determining When Supports Are Actually Necessary
Learning to predict whether a given geometry will print successfully with or without supports requires understanding the principles determining overhang printability and recognizing geometry features that reliably need support.
The forty-five degree rule provides a rough guideline that surfaces angled more than forty-five degrees from horizontal (or less than forty-five degrees from vertical) generally need supports. Surfaces steeper than this threshold increasingly risk quality problems or failures. However, this represents a guideline rather than absolute rule, as other factors modify the threshold in specific situations.
Surface quality tolerance determines whether marginal overhangs can go unsupported. A surface just beyond the forty-five degree threshold might print successfully in a technical sense but show roughness and drooping that makes it unacceptable for visible surfaces. If the surface will be hidden or post-processed anyway, allowing some degradation may be preferable to dealing with support removal. For visible surfaces demanding good quality, supporting overhangs even within nominally printable angles ensures better results.
Small overhangs sometimes print successfully despite severe angles because the short distance involved solidifies before significant sagging occurs. A tiny overhang of one or two millimeters might work at sixty degrees where a larger overhang would fail. The material can self-bridge short distances that exceed its capabilities over longer spans. Testing specific geometries reveals what works for your printer rather than assuming all overhangs beyond threshold angles require supports.
Enclosed overhangs inside the model sometimes do not need supports if the overhang is small enough. A horizontal hole through a vertical wall creates an overhang inside the hole that must print without support because supports could not be removed from inside the enclosed space. Small holes of perhaps five millimeters diameter often print acceptably despite this impossible overhang because the bridging distance is manageable. Larger internal overhangs may print but with degraded quality because they exceed bridging capabilities.
Gradual overhangs that angle slowly outward from vertical may not need supports even when they eventually exceed typical thresholds. The gentle progression gives each layer significant support from the layer below, allowing the structure to cantilever outward successfully. Sudden overhangs that go directly from vertical to angled create more challenging conditions where supports become necessary at more conservative angles.
Model orientation affects support requirements dramatically, as discussed earlier. Before resigning yourself to extensive supports, experiment with rotating the model to find orientations that minimize support needs. Sometimes a ninety-degree rotation eliminates supports entirely. Other times, a fifteen-degree tilt significantly reduces support volume. The time invested optimizing orientation often saves material and post-processing time.
Test prints reveal what your specific printer handles without supports. Overhang test models with surfaces at various angles show where your printer’s limit lies. Bridge test models show maximum bridging distance. These empirical tests account for your specific equipment, material, and settings better than theoretical guidelines can. Maintaining notes about test results helps predict support needs for future prints.
Configuring Support Settings for Optimal Results
Support generation algorithms offer numerous settings that affect support density, attachment to models, ease of removal, material usage, and print time. Understanding these settings enables optimizing supports for specific situations rather than accepting defaults that may not suit particular geometries.
Support overhang angle threshold controls when the slicer generates supports. Setting this threshold to forty-five degrees means surfaces exceeding this angle from horizontal get supports while steeper surfaces do not. Reducing the threshold to thirty-five or forty degrees generates supports more conservatively, reducing risk of quality problems but increasing support material and removal work. Increasing to fifty or fifty-five degrees reduces supports but risks quality issues on marginal overhangs.
Support density determines how much infill structure the support bodies contain. Denser supports are stronger and less likely to collapse during printing but use more material and may be harder to remove. Typical support densities range from ten to twenty-five percent. Very sparse supports below ten percent risk structural failure during printing. Dense supports above thirty percent waste material and complicate removal while providing strength beyond what is typically necessary.
Support pattern selection affects structural characteristics and removal difficulty similarly to how infill patterns affect model properties. Rectilinear supports print quickly but may be stubborn to remove. Grid patterns offer good compromise. Zigzag patterns can peel away more easily than grids. The optimal pattern depends on model geometry and removal tool access.
Interface layer thickness controls the separation between support body and model surfaces. Thicker interfaces improve surface quality where supports contact the model by creating finer-detailed separation layers. However, excessively thick interfaces waste material and may make supports unnecessarily strong. Typical interface thicknesses range from two to four layers, creating enough separation for good surface quality without excessive material.
Interface density typically uses much higher density than the support body, creating nearly solid contact surfaces that provide smooth support for model surfaces. Interface densities of fifty to eighty percent create effective separation layers. The interface provides the actual support for the model while the body just needs to hold up the interface without necessarily being solid.
Support Z-distance or gap controls how far the interface separates from the model in the vertical direction. Too small a gap makes supports fuse to the model, creating difficult removal and damaged surfaces. Too large a gap allows the model to sag into the gap, degrading quality. Typical Z-distances equal one or two layer heights, providing separation without excessive gaps. Materials that adhere strongly benefit from larger gaps, while materials with poor adhesion need smaller gaps to prevent sagging.
Support XY-distance controls horizontal separation between support and model. This offset creates air gaps that prevent supports from fusing to vertical model surfaces. The gap eases removal and reduces marking but must not be so large that overhangs lack adequate support. Typical XY-distances range from 0.4 to 0.8 millimeters, creating visible separation while maintaining close support proximity.
Support brim adds extra base material around support structures to improve bed adhesion. Tall thin supports might topple without adequate base adhesion. A support brim extending a few millimeters outward increases the adhesion area, stabilizing supports. This helps especially with tree supports that have small base areas compared to their height.
Support roof and floor enable or disable the interface layers above and below the support body. The roof interfaces the support top surface with the model bottom surfaces above. The floor interfaces between the build plate and support. Enabling these interfaces improves quality and makes supports easier to remove but adds complexity and print time.
Support minimum area threshold prevents generating supports for tiny islands too small to be meaningful. Below a specified area, the slicer does not bother creating supports, avoiding time-consuming infill of microscopic regions that contribute negligibly. This threshold must be set carefully—too high and small necessary supports get skipped, too low and the slicer wastes time on meaningless details.
Design Strategies to Minimize Support Requirements
While supports enable printing geometries that would otherwise fail, designing with printability in mind reduces or eliminates support needs, saving material and post-processing effort. These strategies integrate manufacturing awareness into the design process.
The forty-five degree design rule suggests keeping all overhanging surfaces within forty-five degrees of vertical when possible. Designing walls with slight inward slopes rather than outward overhangs eliminates support needs. Adding chamfers or angled transitions instead of abrupt horizontal surfaces reduces overhangs. This design-for-manufacturing approach accepts geometric constraints that make printing successful without supports.
Orientation optimization often eliminates supports by reorienting parts so problematic overhangs face upward rather than downward. A complex part might need extensive supports in one orientation but print support-free when rotated. Evaluating multiple orientations during design reveals options that minimize manufacturing challenges even if they differ from the natural or obvious orientation.
Chamfers and fillets eliminate sharp transitions that create demanding overhangs. A sharp ninety-degree transition from vertical to horizontal creates a severe overhang. Adding a forty-five-degree chamfer creates a gradual transition that prints without supports. Fillets achieve similar results with curved rather than angled transitions. These features often improve structural performance beyond just easing manufacturing.
Teardrop holes create printable openings where circular holes would require supports. Horizontal circular holes create overhangs at the top. Reshaping the hole with a pointed teardrop top eliminates the overhang while maintaining a circular bottom. The shape looks distinctive but functions similarly to a circle for many applications while printing support-free.
Breaking parts into multiple pieces allows printing each piece in optimal orientation then assembling them. A complex part might require supports regardless of orientation when printed whole, but splitting it into two or three components allows printing each piece support-free. The assembly effort trades off against support removal work. Designing appropriate joint features like snap-fits or alignment pins facilitates reassembly.
Draft angles on vertical surfaces improve printability by eliminating exactly vertical walls that sometimes have adhesion issues. A slight five to ten-degree draft means walls angle slightly inward or outward, which can improve surface quality. While not directly related to supports, draft angles represent another design-for-manufacturing principle that eases production.
Avoiding thin horizontal spans prevents situations where bridging capabilities get exceeded. If a design requires spanning a gap, keeping it under ten millimeters allows successful bridging. Longer spans need supports or intermediate posts that provide support points that reduce unsupported distance.
Support Removal Techniques and Best Practices
After printing completes, supports must be removed without damaging the model surface. Proper technique and appropriate tools make this process easier while minimizing surface marking and part damage.
Cooling before removal helps because most materials become more brittle when cold, making supports snap away more cleanly. Allowing the build plate to cool completely before attempting support removal often reveals that supports release more readily from cold parts than from warm parts where adhesion remains stronger. Some users even refrigerate parts briefly before removing stubborn supports.
Needle-nose pliers provide precise grip on support structures, allowing controlled pulling that removes supports without stressing the main model unnecessarily. Gripping supports near their connection points and pulling parallel to surfaces minimizes the force transmitted into the model. Pulling perpendicular to surfaces risks tearing or breaking the model along with the supports.
Flush cutters or diagonal cutters allow snipping away supports close to surfaces, leaving minimal stubs that can be cleaned up subsequently. Cutting close to contact points removes most support material while avoiding the full force of pulling entire support structures away. Multiple careful cuts remove supports incrementally rather than trying to tear away large sections.
Craft knives or hobby knives carefully applied can slice through support-model interfaces, separating them without the pulling forces that risk damage. The knife blade slides along the interface, severing connections while leaving surfaces mostly unmarked. This technique works well for detailed areas where pliers cannot grip effectively.
Support removal while prints remain on the build plate provides stability that prevents part flexing during removal. The build plate holds the model rigidly, allowing more forceful support removal than freestanding parts could withstand. However, removal from the plate requires care to avoid damaging the part’s base.
Layer-by-layer removal works for particularly stubborn supports by removing support structure progressively rather than all at once. Starting at the top of supports and removing one layer at a time reduces forces compared to tearing away entire support sections. This tedious process suits situations where careful work prevents part damage.
Cleanup after removal addresses the marks and surface irregularities that supports leave. Sanding, filing, or cutting away remaining stubs brings surfaces to final finish. The extent of cleanup required depends on how well support settings were configured and how carefully removal proceeded.
Solvent smoothing or vapor treatments can hide support marks on exterior surfaces by melting surface layers. Acetone vapor for ABS or similar treatments for other materials blur the transition between support contact points and surrounding surfaces. This works only for appropriate materials and requires careful control to avoid damaging the entire part.
Conclusion
Support structures represent an essential component of successful three-dimensional printing for any geometry that includes overhangs, bridges, or other features that extend beyond the boundaries of lower layers. While supports add complexity, material cost, and post-processing work to projects, they enable printing geometries that would otherwise be completely impossible. Understanding when supports are truly necessary, how to generate them effectively, and how to remove them properly transforms them from mysterious necessities into manageable aspects of the printing process.
The physics determining when supports become necessary centers on gravity pulling deposited material downward and the material’s limited ability to support its own weight during the seconds while it cools and solidifies. The practical manifestation of this constraint is the forty-five-degree overhang angle threshold beyond which most materials cannot print successfully without supports. Material properties, cooling effectiveness, print speed, and other factors modify this threshold somewhat, but the fundamental limit remains.
Different support strategies from simple rectilinear columns to sophisticated tree and organic supports offer distinct tradeoffs between material efficiency, print time, ease of removal, and surface quality. Understanding these options allows selecting appropriate support types for specific situations. Tree supports minimize material and contact points, making them ideal for many applications. Interface layers improve surface quality where supports contact models. Soluble supports eliminate manual removal for users with appropriate multi-material equipment.
Configuration settings affecting support density, interface characteristics, and spacing from models significantly impact results. Conservative settings reduce risk of support failure during printing but create more difficult removal and higher material usage. Aggressive settings minimize material and ease removal but risk inadequate support that leads to failed prints. Finding optimal settings for specific printer-material combinations requires experimentation and builds experience over multiple prints.
Design strategies that minimize support requirements save the time and effort that supports inherently demand. Orienting parts to reduce overhangs, maintaining surfaces within forty-five-degree angles, using chamfers and fillets instead of sharp transitions, and breaking complex parts into simpler components all represent design-for-manufacturing principles that make parts easier to produce successfully. While not all geometries can avoid supports regardless of design choices, thoughtful design dramatically reduces support needs.
Support removal technique determines whether parts emerge from post-processing with acceptable surface quality or damage that compromises appearance or function. Proper tools, careful technique, and patience allow removing supports while minimizing surface marking. Understanding when to use pliers versus cutters versus knives, how to apply force along safe directions, and how to clean up residual marks all contribute to successful support removal.
Mastering support structures requires both technical understanding and practical experience. The concepts of when supports are necessary, how different support types work, and what settings control their characteristics provide the foundation. Experience with actual printing, support removal, and iterating on settings builds intuition about what works for specific situations. Together, this knowledge and experience enable successfully printing complex geometries that would otherwise be impossible, expanding the range of what can be created through additive manufacturing while managing the inevitable complications that supports introduce.