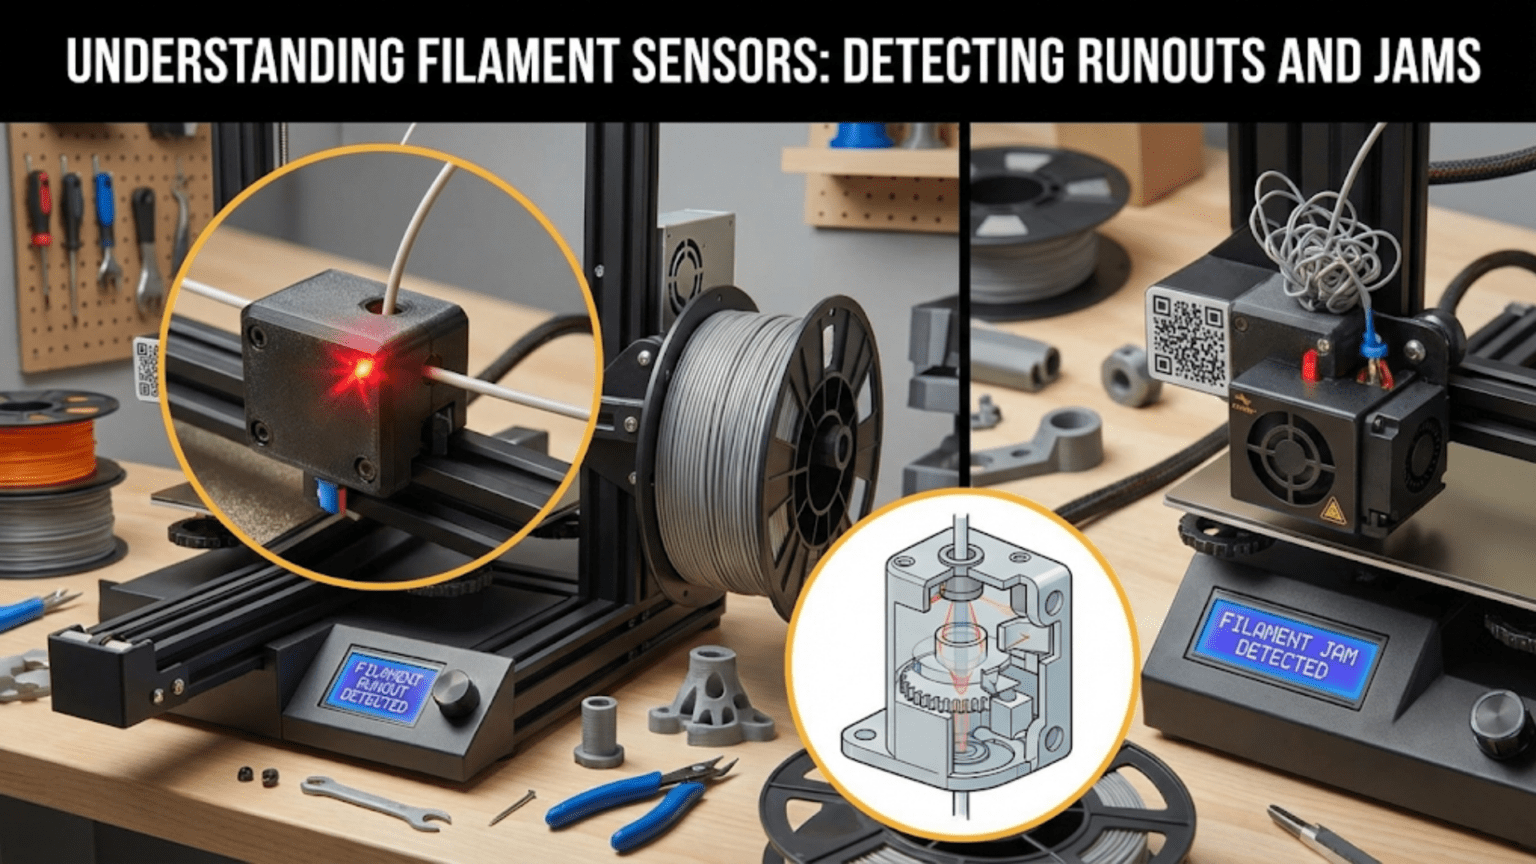
Filament sensors detect when filament runs out or stops moving during printing, automatically pausing the print to allow filament replacement or jam clearing before resuming, preventing wasted prints and material. Common types include mechanical switch sensors (detecting filament presence with a simple lever), optical sensors (using infrared beams to detect filament), and encoder-based motion sensors (measuring actual filament movement to detect both runouts and jams), each connecting to the mainboard and triggering firmware actions when filament issues occur.
Introduction
Few experiences in 3D printing are more frustrating than discovering a failed print caused by running out of filament. You return after hours to find the printer continuing through empty motions, layers of air being “printed” above where the filament ran out. The time is wasted, the print ruined, and if you’re unlucky, you’ve also wasted the partial spool that could have completed a smaller project.
Filament sensors solve this problem by detecting when filament runs out or stops feeding, automatically pausing the print so you can reload filament and continue. This simple capability transforms printing from an activity requiring constant supervision into one where you can start prints confidently, knowing the printer will alert you if intervention becomes necessary.
Yet filament sensors vary enormously in sophistication and capability. Simple switch-based sensors detect only complete filament absence. Optical sensors improve reliability. Advanced encoder-based sensors detect not just runouts but also jams, clogs, and feed failures. Understanding these differences helps you evaluate what your printer offers, recognize upgrade opportunities, and troubleshoot sensor problems when they occur.
In this comprehensive guide, we’ll explore how filament sensors work, examining each type’s strengths and limitations, understanding the firmware integration that makes them useful, and learning to maintain and optimize these helpful safety features.
Why Filament Sensors Matter
Before examining specific sensor types, understanding the problems they solve reveals their value:
Preventing Wasted Prints
The Runout Problem: Filament spools eventually run empty:
- Difficult to judge remaining filament accurately
- Transparent or similar-colored filament makes visual estimation harder
- Small spools exhaust quickly
- Unexpected usage (support material, brim, raft) consumes more than calculated
Without Sensors: The printer continues attempting to extrude after filament runs out:
- Extruder motor turns but pushes nothing
- Print head moves through air
- Layers after runout are missing completely
- Entire print typically ruined
- Material and time wasted
With Sensors: Detection and pause enable recovery:
- Sensor triggers when filament absent
- Print pauses automatically at current position
- User loads new filament
- Print resumes from pause point
- Minor seam where resume occurred but print succeeds
Detecting Jams and Feed Issues
More sophisticated sensors identify feeding problems:
Jam Scenarios:
- Hotend clogs blocking plastic flow
- Extruder grinding through filament
- Tangled spool preventing feed
- PTFE tube gaps catching filament
- Filament brittle/broken inside tube
Motion Detection: Encoder sensors detect that filament isn’t moving despite extruder motor turning, indicating jams even with filament still present.
Early Detection: Catching problems early prevents damage:
- Stopped before extruder grinds completely through filament
- Clogs detected before they worsen
- Opportunity to address root cause
Enabling Unattended Printing
Sensors provide peace of mind for long prints:
Confidence: Start overnight or while-away prints knowing:
- Runouts will pause rather than fail
- Jams will be detected
- Intervention opportunity provided
Remote Monitoring: Combined with network connectivity:
- Receive notifications when sensor triggers
- Remote camera shows sensor activated
- Can return to address issue
Filament Sensor Types
Several sensor technologies detect filament presence or movement:
Mechanical Switch Sensors
The simplest approach uses a basic switch:
Operation:
- Filament passes through a guide with a lever
- Filament presence holds the lever in one position
- Lever actuates a microswitch (open or closed)
- When filament runs out, lever moves to opposite position
- Switch state change signals runout
Typical Design:
- 3D printed or molded plastic housing
- Pivoting lever with contact surface for filament
- Microswitch mounted to detect lever position
- Mounting bracket for installation in filament path
Advantages:
- Extremely simple and inexpensive ($5-15)
- Easy to understand and troubleshoot
- Reliable mechanical action
- No complex electronics needed
- DIY fabrication possible
Disadvantages:
- Detects only complete filament absence
- Cannot detect jams or feed problems
- Sensitive to filament diameter variations
- Mechanical wear over time
- May add friction to filament path
Installation:
- Mounts anywhere in filament path before extruder
- Typically near spool holder or frame
- Wiring runs to mainboard sensor input
- Firmware configuration enables runout detection
Typical Behavior:
- Filament present: Switch in normal state
- Filament runs out: Switch changes state
- Firmware detects state change
- Print pauses with option to reload
Optical Sensors
Optical detection provides non-contact sensing:
Transmissive Optical:
- IR LED on one side, photodetector opposite
- Filament passes through the gap
- Filament presence blocks light path
- Light reaching detector indicates no filament
Reflective Optical:
- LED and detector on same side
- Filament reflects light from LED to detector
- Filament absence means no reflection
- Detector signal changes when filament missing
Electronics:
- Simple comparator circuit determines filament presence
- Digital output (high/low) to mainboard
- Some include LED indicators for status
- May require power from mainboard
Advantages:
- No mechanical contact with filament (zero friction)
- Fast response time
- No mechanical wear
- Can be very compact
- Reliable operation
Disadvantages:
- More expensive than mechanical ($15-30)
- Sensitive to dust and contamination
- May be affected by filament color (especially transparent)
- Requires power
- Cannot detect jams (only presence/absence)
Design Considerations:
- Optical path must remain clear
- Shielding from ambient light sometimes needed
- Mounting must maintain alignment
- Regular cleaning prevents false triggers
Encoder-Based Motion Sensors
The most sophisticated type measures actual filament movement:
Operation Principle:
- Small encoder wheel contacts filament
- Wheel rotates as filament moves
- Optical or magnetic encoder measures rotation
- Microcontroller compares expected vs. actual movement
- Detects both runouts and movement failures
Encoder Technologies:
- Optical encoder: LED shines through slotted disk, detector counts pulses
- Magnetic encoder: Magnet on disk, Hall sensor detects field changes
- Both provide pulse train proportional to rotation
Intelligence:
- Firmware or sensor electronics knows expected filament speed
- Compares encoder pulses to expected movement
- If pulses stop but extruder motor active = jam detected
- If filament speed too low = partial clog or feed problem
Advantages:
- Detects jams and clogs, not just runouts
- Early problem detection
- Can measure actual feed rate
- Most comprehensive monitoring
- Enables advanced features (automatic flow rate adjustment)
Disadvantages:
- Most expensive ($30-80)
- More complex installation and configuration
- Requires firmware support for motion detection
- Calibration may be needed
- Additional failure points (encoder itself)
Advanced Features:
- Flow rate monitoring
- Clog detection before complete blockage
- Feed rate verification
- Statistical analysis of feeding issues
- Integration with monitoring systems
Filament Sensor Comparison Table
| Sensor Type | Cost | Detects Runout | Detects Jams | Complexity | Friction | Maintenance | Best For |
|---|---|---|---|---|---|---|---|
| Mechanical Switch | $ | Yes | No | Very Low | Slight | Low | Budget, basic protection |
| Optical (Transmissive) | $$ | Yes | No | Low | None | Medium (cleaning) | Clean environments |
| Optical (Reflective) | $$ | Yes | No | Low | None | Medium (cleaning) | Compact installations |
| Encoder (Basic) | $$$ | Yes | Yes | Medium | Slight | Medium | Better protection |
| Encoder (Advanced) | $$$$ | Yes | Yes | High | Slight | Medium | Professional, maximum safety |
Firmware Integration
Sensors require proper firmware configuration and support:
Sensor Input Configuration
Pin Assignment:
- Sensor connects to mainboard GPIO pin
- Firmware must know which pin to monitor
- Pull-up or pull-down resistor configuration
- Active high or active low signal logic
Marlin Example:
#define FILAMENT_RUNOUT_SENSOR
#define FIL_RUNOUT_PIN 2
#define FIL_RUNOUT_STATE LOWTrigger Logic:
- Normally open vs. normally closed switch configuration
- Active high (triggered when pin goes high)
- Active low (triggered when pin goes low)
- Must match sensor hardware behavior
Pause and Resume Behavior
When sensor triggers, firmware executes a pause sequence:
Immediate Actions:
- Stop extruding immediately
- Retract filament slightly (prevent oozing)
- Move nozzle away from print (Z-hop and/or XY offset)
- Disable heaters or reduce to standby temperature
- Display notification to user
- Wait for user intervention
User Actions:
- Acknowledge sensor alert
- Clear jam or load new filament
- Manually extrude to prime nozzle
- Confirm ready to resume
- Initiate resume
Resume Sequence:
- Reheat nozzle to printing temperature
- Return to pause position
- Prime nozzle (extrude small amount)
- Resume print from paused layer
Configurable Parameters:
- Retraction distance
- Z-hop height
- Parking position coordinates
- Temperature behavior during pause
- Purge amount on resume
Advanced Firmware Features
Filament Change Integration:
- Sensor triggers can initiate filament change routine
- Automated unload/load procedures
- Color change pausing at specific layers
Multiple Sensors:
- Support for multiple extruders
- Each with independent sensor
- Individual monitoring and alerts
Encoder Processing:
- Pulse counting and comparison
- Jam detection algorithms
- Statistical filtering (ignore brief anomalies)
- Adjustable sensitivity
Installation and Setup
Proper installation ensures reliable sensor operation:
Mechanical Installation
Location Selection:
- Before extruder (detect runouts before they reach extruder)
- After spool holder (ensures spool-related issues detected)
- Accessible for maintenance
- Protected from collisions
Mounting Considerations:
- Secure mounting prevents vibration-induced false triggers
- Filament path must be straight through sensor
- Avoid sharp bends near sensor
- Easy filament loading/unloading
Filament Path:
- Sensor should not add significant friction
- Adequate clearance for filament diameter
- Smooth entry and exit guides
- No catching or binding points
Electrical Connection
Wiring:
- Appropriate cable length to mainboard
- Proper gauge for signal (typically small, 24-28 AWG adequate)
- Secure connectors
- Strain relief at both ends
Shielding:
- Twisted pair helps reject interference
- Shielded cable for noisy environments
- Keep away from motor cables and heater wires
Power Requirements:
- Some sensors need power (optical, encoder types)
- Check voltage requirements (typically 5V or 12V/24V)
- Verify mainboard provides adequate current
Firmware Configuration
Enable Sensor:
- Uncomment or enable sensor feature
- Specify sensor type if multiple supported
- Assign correct input pin
Calibration (Encoder Sensors):
- Configure pulses per millimeter
- Set detection thresholds
- Adjust sensitivity
- Test with known conditions
Testing:
- Manually trigger sensor to verify detection
- Test pause/resume cycle
- Confirm proper behavior without actual printing
- Fine-tune settings based on testing
Common Problems and Solutions
False Positives
Symptom: Sensor triggers when filament is present and feeding normally.
Causes:
- Dirty optical sensor (dust blocking path)
- Mechanical switch misadjusted
- Electrical noise causing false triggers
- Encoder wheel slipping on filament
- Firmware sensitivity too high
Solutions:
- Clean optical sensors regularly
- Adjust mechanical switch position/tension
- Improve wiring shielding
- Increase encoder wheel contact pressure
- Reduce firmware sensitivity
Missed Detection
Symptom: Filament runs out but sensor doesn’t trigger.
Causes:
- Sensor disabled in firmware
- Wiring disconnected or damaged
- Wrong trigger logic (active high vs. low)
- Sensor failed
- Filament fragment holds switch/blocks optical path
Solutions:
- Verify firmware sensor enabled
- Check wiring continuity
- Confirm trigger logic configuration
- Test sensor independently
- Clear any debris or fragments
Inconsistent Behavior
Symptom: Sometimes detects correctly, other times fails.
Causes:
- Loose connections
- Intermittent wiring breaks
- Environmental factors (temperature, vibration)
- Marginal sensor alignment
- Borderline detection threshold
Solutions:
- Secure all connections
- Replace questionable wiring
- Improve mounting rigidity
- Realign sensor carefully
- Adjust detection threshold
Encoder Miscounting
Symptom: Encoder sensor falsely detects jams during normal printing.
Causes:
- Calibration incorrect (pulses per mm wrong)
- Encoder wheel slipping on filament
- Retraction movements confusing detection
- Sensitivity too high
Solutions:
- Recalibrate encoder ratio
- Increase wheel pressure or texture
- Configure retraction compensation
- Reduce sensitivity slightly
Upgrading and Adding Sensors
Many printers ship without sensors or with basic types:
When to Add Sensors
Missing Entirely:
- Printer has no runout detection
- Frequent filament changes during prints
- Long prints risk running out
- Desire unattended printing capability
Upgrading Type:
- Current mechanical sensor too unreliable
- Want jam detection (upgrade to encoder)
- Better reliability needed
- Professional use demands better protection
Selection Criteria
Needs Assessment:
- Just runout detection? Mechanical adequate
- Need jam detection? Encoder required
- Budget constraints? Start with mechanical
- Professional reliability? Encoder worth investment
Compatibility:
- Mainboard must have available input pin
- Firmware must support sensor type
- Physical space for mounting
- Wiring routing possibilities
Quality vs. Price:
- Very cheap sensors often problematic
- Mid-range usually adequate
- Premium sensors for critical applications
Popular Sensor Options
Generic Mechanical:
- Widely available
- $5-10 typical
- Many DIY designs
- Adequate for basic needs
BTT Smart Filament Sensor:
- Encoder-based
- Good value (~$20)
- Popular upgrade choice
- Well-documented
Prusa Filament Sensor:
- Optical design
- Good reliability
- ~$10
- Compatible with many printers
Advanced Sensor Applications
Multi-Material Systems
Requirements:
- Sensor for each filament path
- Independent monitoring
- Firmware supporting multiple sensors
- Coordinated pause behavior
Benefits:
- Detect runout on any material
- Material-specific behavior possible
- Better multi-color/multi-material reliability
Remote Monitoring Integration
Connectivity:
- Sensor status via OctoPrint or similar
- Network notifications when triggered
- Webcam monitoring of sensor area
- Remote intervention possible
Automation:
- Automatic notifications (email, SMS, app push)
- Integration with home automation
- Statistical tracking of sensor events
- Predictive analytics on filament consumption
Filament Tracking
Spool Management:
- Some systems track filament usage
- Estimate remaining material
- Alert before complete exhaustion
- Database of spool inventories
Features:
- Length used vs. remaining
- Automatic spool profiling
- Pre-emptive low filament warnings
- Cost tracking per print
Maintenance Best Practices
Regular Inspection
Monthly:
- Visual check for debris or damage
- Test trigger manually
- Verify mounting security
- Check wiring connections
Quarterly:
- Clean optical sensors thoroughly
- Lubricate mechanical components if applicable
- Verify calibration (encoder types)
- Test complete pause/resume cycle
Annually:
- Consider preventive replacement of marginal sensors
- Deep clean entire filament path
- Verify firmware configuration still optimal
Cleaning Procedures
Optical Sensors:
- Compressed air to remove dust
- Soft cloth with isopropyl alcohol
- Ensure both LED and detector clean
- Allow complete drying before use
Mechanical Sensors:
- Remove any filament debris
- Check for filament dust accumulation
- Verify switch actuation smooth
- Clean contact surfaces if accessible
Encoder Sensors:
- Clean encoder wheel surface
- Remove any filament residue
- Verify wheel rotates freely
- Clean optical slots if optical encoder
Conclusion
Filament sensors transform 3D printing from an activity requiring constant supervision into one where you can confidently start long prints and trust the printer to alert you if intervention becomes necessary. Whether a simple mechanical switch detecting only complete runouts or a sophisticated encoder sensor catching jams before they waste hours of printing, these devices provide valuable protection against common failure modes.
Understanding how different sensor types work—mechanical switches using lever actuation, optical sensors using light interruption, encoder sensors measuring actual movement—helps you evaluate what your printer offers and recognize when upgrades make sense. A basic mechanical sensor costs little and prevents most runout failures. An encoder sensor costs more but catches problems mechanical sensors miss, providing professional-grade reliability.
Proper installation, firmware configuration, and maintenance ensure sensors function reliably when needed. The best sensor is one you never think about because it works perfectly, silently monitoring your filament and alerting only when genuine problems occur. The worst sensor creates more problems than it solves through false triggers and missed detections.
The next time you start a print that will consume most of a spool, appreciate the filament sensor monitoring the feed. That simple switch, optical gate, or encoder wheel isn’t just detecting filament—it’s standing guard over your print, ready to pause and preserve your work the moment filament disappears or stops moving, ensuring you waste neither time nor material on failed prints that could have been saved.