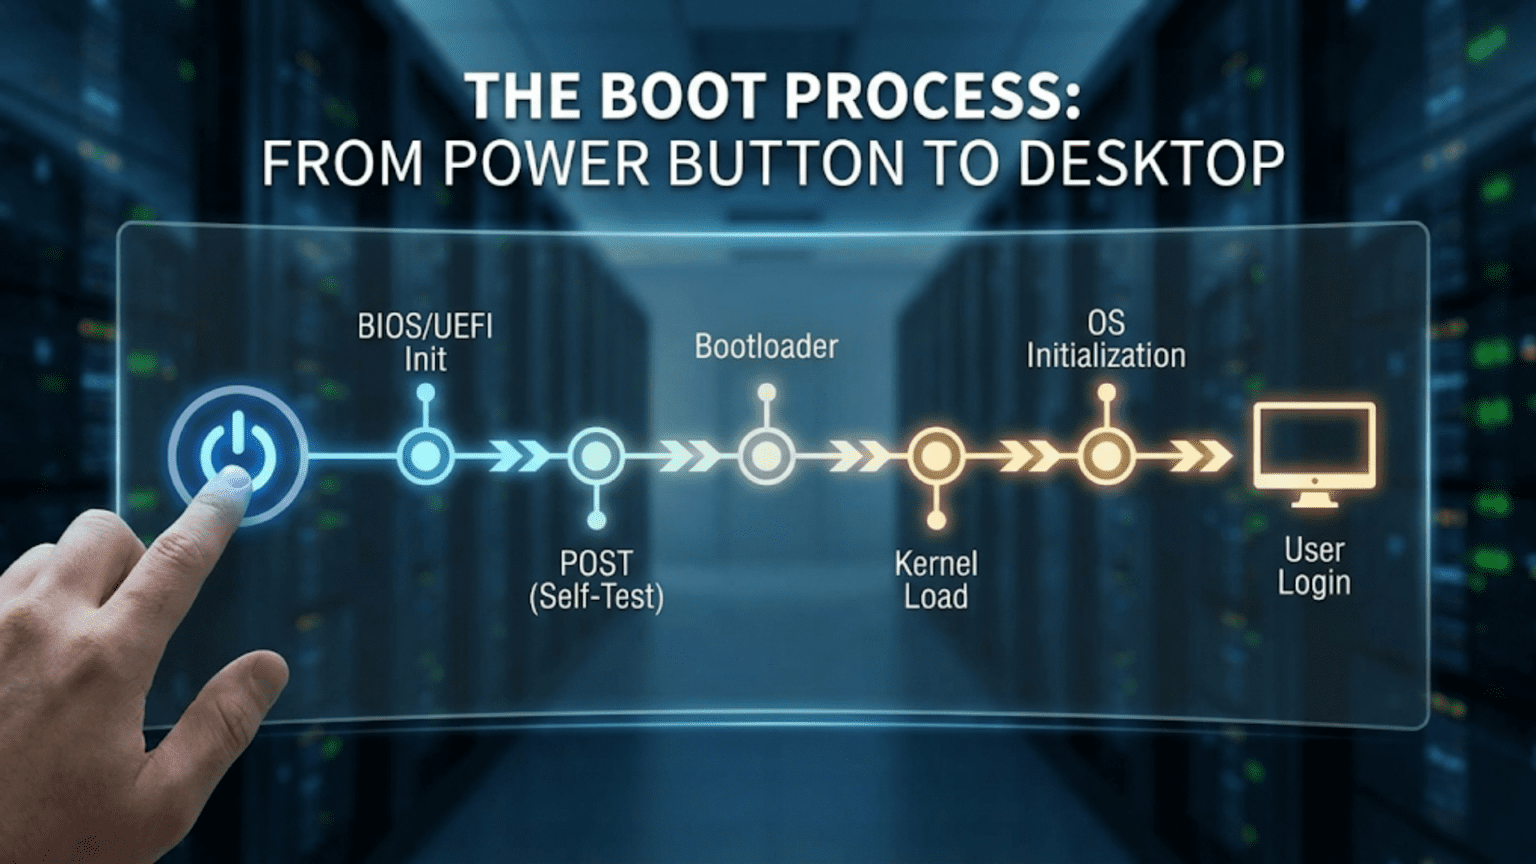
The Journey From Power-On to Desktop in Seconds
Every time you press the power button on your computer, smartphone, or tablet, you initiate one of the most remarkable sequences in modern technology. In just a few seconds, your device transforms from an inert collection of silicon and metal into a functioning computer ready to respond to your commands. This transformation, called booting or the boot process, involves a carefully orchestrated sequence of hardware initialization, software loading, and system configuration that happens so quickly and reliably that we rarely stop to appreciate its complexity.
The term “boot” comes from the phrase “pulling yourself up by your bootstraps”—the seemingly impossible task of lifting yourself off the ground by pulling on your own boots. This metaphor perfectly captures the fundamental challenge of computer startup: how does a computer run the software needed to start itself when that software isn’t yet running? The boot process solves this chicken-and-egg problem through a series of progressively more sophisticated programs, each one loading and starting the next, until finally the complete operating system is running and ready for you to use.
Understanding the boot process reveals the deep relationship between hardware and software, shows why certain problems occur and how to fix them, and demonstrates the elegant engineering that makes modern computing reliable. From the first microsecond when electricity flows through the circuits to the moment when you see your desktop and can start working, dozens of distinct phases occur, each essential to the final result. This journey through the boot process will take you from raw hardware through firmware, bootloaders, kernel initialization, and finally to the user interface you interact with every day.
The Power-On Self Test: First Contact
The boot process begins the instant electrical power reaches your computer’s motherboard. Before any software can run, before any operating system loads, before anything you’d recognize as “computing” happens, the hardware must verify that it’s functioning correctly. This verification happens through a process called the Power-On Self Test, universally known by its acronym POST. The POST occurs so early in the boot sequence that if something goes wrong during this phase, your computer might not be able to display error messages or respond to input at all.
When you press the power button, you complete an electrical circuit that allows power from the power supply to flow to the motherboard. The power supply takes AC power from the wall outlet and converts it to the various DC voltages that computer components require—typically 12 volts, 5 volts, and 3.3 volts for different components. Once the power supply stabilizes these voltages, it sends a “power good” signal to the motherboard, indicating that stable power is available. This signal releases the processor from its reset state, allowing it to begin executing instructions.
At this moment, the processor faces a fundamental problem: it needs instructions to execute, but those instructions reside in memory that hasn’t been initialized yet. The solution lies in the processor’s design. When released from reset, the processor always begins executing instructions from a specific, hardwired memory address. This address points to a small chip on the motherboard called the firmware ROM (Read-Only Memory), which contains the first software the computer runs—code that was programmed into the chip during manufacturing and persists even when the computer is powered off.
This firmware, traditionally called the BIOS (Basic Input/Output System) on older computers and increasingly called UEFI (Unified Extensible Firmware Interface) on modern systems, represents the bridge between hardware and software. The processor executes firmware code that begins testing the computer’s fundamental components. First, it tests the processor itself, verifying that basic operations work correctly. Then it tests the memory controller and checks that RAM is present and functioning. It verifies that the keyboard controller responds, that video hardware is present, and that critical motherboard components are operational.
During POST, you might hear a single beep from your computer’s speaker—this is the firmware’s way of announcing that basic hardware checks passed successfully. If POST detects a problem, it might emit a series of beeps in a specific pattern that indicates which component failed. A computer with no RAM might beep three times repeatedly. A graphics card problem might produce one long beep followed by two short beeps. These beep codes serve as a primitive communication method when the system can’t yet display messages on screen.
On some systems, POST displays diagnostic information on screen as it progresses. You might see messages about memory being counted, drives being detected, or hardware being initialized. Modern systems often hide these details behind manufacturer logos, completing POST so quickly that you barely see anything before the operating system takes over. However, most systems allow you to access detailed POST information by pressing a specific key—often F2, Delete, or Escape—during startup to enter the firmware setup interface.
The firmware also initializes hardware components to a basic operational state. It configures the memory controller so the processor can access RAM. It sets up the interrupt controller so devices can signal the processor when they need attention. It initializes display hardware enough to show basic text output. It detects storage devices connected to the system—hard drives, SSDs, optical drives, USB devices—and creates a list of bootable devices. None of these initializations are complete or sophisticated; they’re just enough to allow the next stage of booting to proceed. The operating system will later reconfigure hardware more thoroughly, but the firmware provides the minimal initialization needed to get that far.
BIOS and UEFI: The Firmware Foundation
The firmware that manages POST and the early boot process has evolved significantly over the decades. The original BIOS, developed in the 1970s and standardized for IBM PC compatibles in the 1980s, served admirably for many years but eventually showed its age. Modern computers use UEFI, a far more sophisticated firmware environment that addresses BIOS limitations while maintaining backward compatibility with older systems.
Traditional BIOS operated in 16-bit real mode, a processor mode that provided access to only one megabyte of memory—a limitation from the original 8086 processors of the early 1980s. This constraint meant BIOS code had to be small and simple, written in low-level assembly language, and could perform only basic operations. BIOS stored configuration settings in a small amount of battery-backed RAM called CMOS memory—typically only a few hundred bytes, limiting how much information could be saved. The BIOS interface for changing settings was text-based and often cryptic, accessible only by pressing specific keys during boot.
BIOS used a partitioning scheme called Master Boot Record (MBR) for organizing hard drives. The MBR resided in the first sector of the disk—a mere 512 bytes—containing both the partition table that described how the disk was divided and a small program called the bootstrap loader. This 512-byte limitation created various restrictions: disks couldn’t be larger than 2 terabytes, and only four primary partitions were possible. The bootstrap loader in the MBR was so small that it could barely do anything beyond loading a slightly larger second-stage bootloader from the active partition.
UEFI, developed in the 1990s and widely adopted in the 2010s, represents a complete reimagining of firmware. UEFI runs in 32-bit or 64-bit mode, allowing it to access gigabytes of memory and execute sophisticated code. It’s written in C rather than assembly language, making it easier to develop and maintain. UEFI firmware can be several megabytes in size, supporting complex functionality that BIOS could never achieve. It includes drivers for hardware devices, network protocol stacks, and even web browsers, transforming firmware from a simple startup program into a complete pre-boot environment.
The UEFI interface for changing settings uses graphics, mouse support, and intuitive layouts rather than the text-mode interfaces of BIOS. Users can navigate with a mouse, see helpful descriptions of settings, and sometimes browse the web or run diagnostics without loading an operating system. UEFI stores configuration in non-volatile storage rather than battery-backed RAM, eliminating the problem of losing settings when the CMOS battery dies.
UEFI uses the GUID Partition Table (GPT) instead of MBR for disk partitioning. GPT removes the 2-terabyte disk size limit, supports up to 128 partitions by default, and stores redundant copies of partition information for reliability. Instead of a tiny 512-byte bootstrap loader, UEFI systems use a dedicated EFI System Partition (ESP)—a small FAT32-formatted partition that stores bootloaders as regular files. Each operating system can install its own bootloader as a file in the ESP, and UEFI includes a boot manager that lets you choose which bootloader to run.
Security represents another major UEFI advantage. UEFI Secure Boot verifies digital signatures on bootloaders and operating system kernels before executing them, preventing malware from injecting itself into the boot process. This protection helps combat rootkits and bootkits—malicious software that loads before the operating system and can be extremely difficult to detect and remove. While Secure Boot has sparked controversy regarding user control and open-source operating systems, it provides significant security benefits when properly implemented.
Both BIOS and UEFI perform the same fundamental job: test hardware, initialize components to a basic operational state, and transfer control to bootloader software that will continue the startup process. The difference lies in how sophisticated and flexible they are in performing these tasks. UEFI systems boot faster, support modern hardware better, provide enhanced security, and offer far more flexibility for managing multiple operating systems. However, billions of BIOS-based systems remain in use, and understanding both technologies helps when troubleshooting boot problems or working with older hardware.
The Bootloader: Bridging Firmware and Operating System
After the firmware completes its work, it must transfer control to the operating system, but it can’t load the OS directly—operating systems are far too large and complex for the firmware to handle. This is where the bootloader comes in. The bootloader is a small program whose sole purpose is loading the operating system kernel into memory and starting it. Despite this seemingly simple task, bootloaders have become sophisticated pieces of software that support multiple operating systems, encrypted drives, graphical menus, and various boot options.
On BIOS systems, the firmware reads the Master Boot Record from the boot drive and executes the tiny program found there. This first-stage bootloader is so constrained by the 512-byte limit that it can do little more than load a second-stage bootloader from elsewhere on the disk. This second-stage bootloader, now freed from size constraints, can present a menu of operating systems, load configuration files, and perform the actual work of loading an operating system kernel. Common bootloaders for BIOS systems include GRUB (GRand Unified Bootloader) for Linux and the Windows Boot Manager for Windows.
On UEFI systems, the firmware directly loads a bootloader application from the EFI System Partition. These bootloader applications are standard executable files—there’s no need for multi-stage loading or special disk locations. The UEFI firmware includes a boot manager that knows about all installed bootloaders and can present a menu allowing you to choose between them. When you install an operating system on a UEFI system, the installer typically adds an entry to the firmware’s boot menu pointing to that operating system’s bootloader file.
The bootloader’s primary task is locating and loading the operating system kernel. This sounds straightforward but involves several challenges. The kernel might reside on an encrypted partition, requiring the bootloader to prompt for a password and decrypt data before loading. The kernel might need to be loaded at a specific memory address with specific permissions. The bootloader must construct a data structure containing information about the system—how much RAM exists, what boot parameters were specified, where the bootloader found the kernel—and pass this to the kernel as it starts.
Many bootloaders support multiple operating systems, allowing you to choose at boot time which OS to start. If you have Windows and Linux installed on the same computer, the bootloader can present a menu letting you select which to boot. Some bootloaders support chainloading—instead of directly loading an operating system kernel, they load another bootloader, which might load yet another bootloader, eventually reaching the final OS. This technique allows bootloaders that don’t understand how to load a particular operating system to delegate the task to that OS’s own bootloader.
Bootloaders also handle kernel command-line parameters that modify operating system behavior. You might specify to boot into a recovery mode, disable certain hardware features, or enable debugging output. The bootloader passes these parameters to the kernel as it loads, influencing how the kernel initializes. This capability is crucial for troubleshooting—if your system won’t boot normally, you can often specify parameters that work around the problem, allowing you to start the system and fix the underlying issue.
Some modern bootloaders include advanced features like a minimal shell environment where you can manually specify what to boot, explore the filesystem before booting, or run diagnostics. GRUB, widely used on Linux systems, includes a powerful command-line interface that can manually load kernels, specify parameters, and even perform basic filesystem operations. These capabilities make bootloaders valuable troubleshooting tools when boot problems occur.
The bootloader represents the last point where you have easy control over the boot process. Once the bootloader transfers control to the kernel, you’re committed to booting that operating system with those parameters. Understanding your bootloader—how to access its configuration, modify boot options, and troubleshoot problems—provides important capabilities for managing your system effectively.
Kernel Initialization: The Operating System Awakens
When the bootloader finishes its work and jumps to the operating system kernel, the kernel finds itself in a peculiar situation. It’s running, but almost nothing is initialized. No drivers are loaded. No filesystems are mounted. No services are running. The kernel must bootstrap itself from this minimal state into a fully functioning operating system core. This kernel initialization phase represents some of the most complex and critical code in the entire operating system.
The kernel’s first task is detecting and cataloging hardware. It probes for processors and determines how many CPU cores exist. It examines memory to determine how much RAM is installed and whether that RAM is working correctly. It scans for peripheral devices connected to various buses—PCI, USB, and others—building a comprehensive picture of the system’s hardware configuration. Modern kernels can detect thousands of different devices, matching each discovered device with the appropriate driver from the kernel’s collection.
As the kernel identifies hardware, it loads and initializes device drivers. Driver initialization can be complex because devices often depend on other devices. The graphics driver might depend on the PCI bus driver being initialized first. The filesystem driver might need the disk controller driver to be working before it can access storage. The kernel carefully orders driver initialization to respect these dependencies, starting with fundamental buses and controllers before moving to higher-level devices.
Memory management initialization represents a critical early step. The kernel sets up its page tables, enabling the virtual memory system that will protect processes from each other and the kernel from buggy code. It initializes memory allocators that will provide memory to other kernel subsystems and eventually to user programs. It might activate swap space or page files if configured, extending available memory. The kernel marks memory regions containing its own code and data as special, protecting them from accidental modification.
The kernel mounts the root filesystem—the primary filesystem containing the operating system itself. On systems with encrypted root filesystems, the kernel must first decrypt storage before mounting, potentially requiring you to enter a password very early in boot. Once the root filesystem is available, the kernel can access configuration files, additional drivers, and programs needed for the remaining boot process. Some systems use an initial RAM filesystem (initramfs or initrd)—a small filesystem loaded into RAM by the bootloader containing just enough drivers and utilities to mount the real root filesystem, especially useful when that filesystem uses advanced features like RAID, encryption, or network storage.
The kernel initializes its various subsystems in sequence. The networking stack initializes, preparing to handle network connections though actual connections won’t be established yet. The process scheduler starts, ready to manage multiple running programs though only the kernel itself is executing so far. The security subsystem activates, loading security policies and initializing access control mechanisms. Each subsystem performs its initialization, transitioning from dormant code into an active, functional component.
Throughout this initialization, the kernel often prints status messages that you can see on screen or examine later in log files. These messages might report successful driver initialization, note any hardware problems detected, warn about deprecated features being used, or provide other diagnostic information. While modern systems often hide these messages behind splash screens, they remain available and provide valuable troubleshooting information when boot problems occur.
Eventually, the kernel reaches a point where it has initialized enough functionality to run user-space programs—programs that aren’t part of the kernel itself. The kernel executes the first user-space program, traditionally called init, which will orchestrate the rest of system startup. This transition from kernel initialization to user-space initialization represents a crucial milestone in the boot process.
Init Systems and Service Startup
With the kernel fully initialized and the first user-space program running, the boot process enters its final phase: starting all the services, daemons, and background processes that make up a functioning operating system. This phase is managed by the init system—the first user-space process, which has the responsibility of starting everything else. Different operating systems use different init systems, each with distinct philosophies about how services should start and be managed.
The traditional Unix init system, sometimes called SysV init after System V Unix, uses a simple sequential approach. It runs shell scripts in a predetermined order, each script starting one service. These scripts reside in directories like /etc/rc.d/, organized by runlevel—a concept representing different system states like single-user mode, multi-user mode, or graphical mode. This approach is straightforward and predictable but slow because services start one after another even if they have no dependencies between them.
Modern init systems like systemd (used by many Linux distributions), launchd (used by macOS), and Windows Service Control Manager have replaced the simple sequential approach with more sophisticated dependency-based and parallel startup. These systems understand that some services depend on others—the web server needs networking to be initialized, the database needs the filesystem mounted—but many services are independent and can start simultaneously. By starting independent services in parallel and respecting dependencies between dependent services, modern init systems dramatically reduce boot times.
The init system starts numerous services during boot. The system logger begins recording messages from other services. The network manager configures network interfaces and establishes connections. The display manager starts, eventually presenting the login screen. Audio services initialize sound hardware. Print spoolers prepare to handle print jobs. Update services check for available updates. Dozens of services specific to your operating system and configuration launch, each performing its role in creating a functioning system.
Services can be configured to start automatically at boot, start on demand when first needed, or remain disabled until manually started. This flexibility allows you to control which services run, affecting both boot time and system resource usage. Disabling unnecessary services can speed up boot and free memory, while enabling additional services provides functionality but increases overhead.
The init system also monitors running services, restarting them if they crash and managing their lifecycle. If a critical service fails, the init system can automatically restart it, often without requiring any user intervention. This automatic management improves system reliability, helping systems recover from transient failures without manual intervention.
Different user profiles might trigger different services. On a multi-user system, certain services might start when a specific user logs in, customizing the environment for that user’s needs. Desktop environments load various components—window managers, panels, notification daemons, file managers—specific to the user’s preferences.
The User Login and Session Initialization
After all system services start, the boot process reaches its final stage: waiting for user login and initializing a user session. This phase varies dramatically between different types of systems. Desktop systems present a graphical login screen. Server systems might present a text-based login prompt. Mobile devices might show a lock screen waiting for a fingerprint or passcode. Regardless of the interface, the process serves the same purpose: authenticating the user and starting their personal computing environment.
When you enter your username and password, the system checks these credentials against stored information. On local systems, it compares the password hash against values in security databases. On networked systems, it might contact an authentication server to verify credentials. Multi-factor authentication might require additional verification—a code from an authenticator app, a fingerprint scan, or a security key. Only after successful authentication does the system proceed with user session initialization.
Creating a user session involves loading that user’s preferences, starting user-specific services, and preparing the desktop environment or command shell. The system reads configuration files from the user’s home directory, applying personalized settings for appearance, keyboard layouts, default applications, and countless other preferences. It starts background services specific to that user—cloud sync services, messaging clients, calendar updates, and other programs configured to run automatically.
The desktop environment or window manager loads, presenting the user interface you actually interact with. This interface represents another complex piece of software—managing windows, handling input, rendering graphics, and coordinating with applications. Even at this late stage, seconds after you entered your password, programs are still initializing, icons appearing in system trays, startup programs launching, and the system settling into its ready state.
On mobile devices, this process is streamlined but functionally similar. The lock screen authentication succeeds, the system loads the user’s data and preferences from secure storage, cloud-synchronized information updates, and background services start refreshing data. Within seconds, the device transitions from powered-off hardware to a personalized, connected computer ready for use.
Understanding Boot Problems and Recovery
Understanding the boot process helps tremendously when problems occur. If the system doesn’t boot, where the failure happens indicates what’s wrong and how to fix it. No POST beeps and a blank screen suggests hardware failure. POST beeps in error patterns indicate specific component problems. Messages about not finding bootable devices suggest hard drive problems or incorrect boot order in firmware settings. Bootloader errors indicate corrupted bootloader code or configuration. Kernel panics during initialization point to driver problems or hardware incompatibilities.
Most operating systems provide recovery options that skip problematic phases of normal boot. Recovery modes might boot with minimal drivers, safe mode, or single-user mode, allowing you to fix problems that prevent normal boot. Boot from removable media—installation USB drives or recovery discs—provides complete access to the system even when the installed OS won’t start, enabling repairs, data recovery, or reinstallation.
The boot process, from power-on to ready-to-use desktop, represents one of computing’s most impressive choreographed sequences. Hardware tests itself. Firmware initializes components. Bootloaders load kernels. Kernels initialize subsystems. Init systems start services. Login systems authenticate users. Hundreds of components coordinate seamlessly, transforming powered-off hardware into a functioning computer in seconds. Next time you press that power button, you’ll know the remarkable journey your computer takes from cold metal to warm welcome.