A Python virtual environment is an isolated, self-contained directory that holds a specific Python interpreter and a set of installed packages, completely separate from your system Python and all other environments. Virtual environments solve the critical problem of dependency conflicts — when different projects require different versions of the same library — by giving each project its own independent package ecosystem. Every professional data scientist uses virtual environments as standard practice on every project they work on.
Introduction
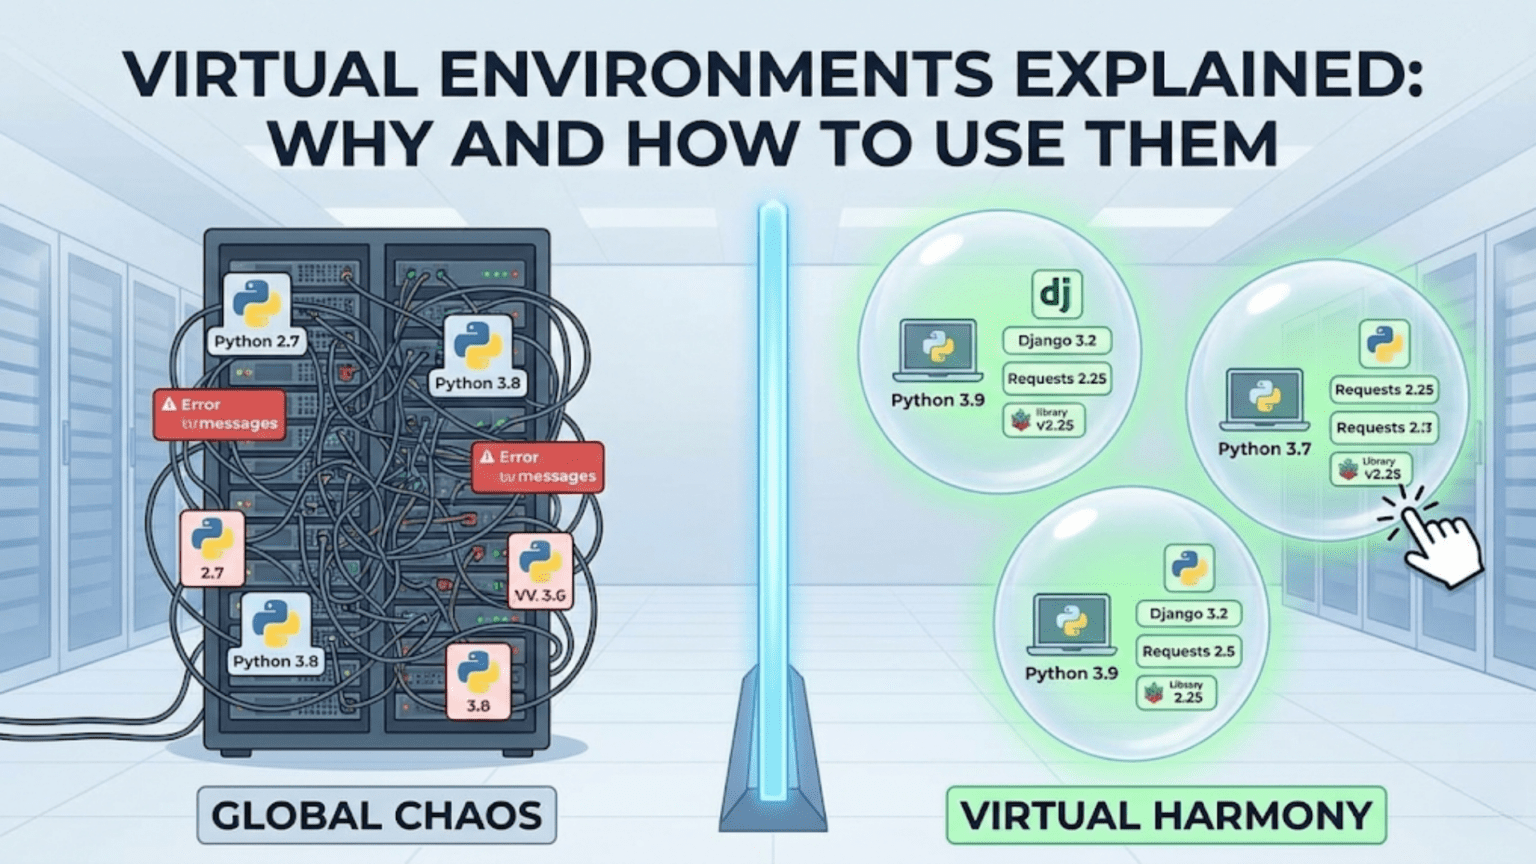
Picture this: you finish a machine learning project that uses scikit-learn 1.0 and pandas 1.3. Six months later, you start a new project and install scikit-learn 1.3 and pandas 2.0 — the latest versions with exciting new features. Then you go back to your old project and run it. Suddenly, things that worked perfectly before are throwing errors. The API changed, a function was deprecated, a parameter was renamed. Your working code is broken — and you didn’t change a single line.
This is the dependency conflict problem, and it’s one of the most frustrating issues in Python development. It’s not a problem unique to beginners — it bites experienced developers regularly when they try to maintain multiple projects on the same machine without isolation.
Virtual environments are the complete solution. They are one of the most fundamental tools in a Python developer’s toolkit, and yet they are frequently skipped by beginners because they seem like an extra step with no immediate payoff. This article will show you exactly why that thinking is wrong, what virtual environments actually do under the hood, and how to use all the major virtual environment tools confidently.
By the end, creating and activating a virtual environment will feel like putting on a seatbelt — a reflex you do automatically before every project, without thinking.
The Problem: Why Virtual Environments Exist
To truly understand the value of virtual environments, you need to understand the problem they solve in concrete detail.
The Global Python Installation
When you install Python on your computer, you get a global Python installation with a single, shared site-packages directory where all packages are installed. When you run pip install pandas, it goes into this global directory.
Here’s what the global site-packages folder might look like after a year of Python work without virtual environments:
/usr/lib/python3.11/site-packages/
├── pandas/              ← version 2.0.3 (latest install wins)
├── numpy/               ← version 1.25.2
├── scikit-learn/        ← version 1.3.0
├── tensorflow/          ← version 2.13.0
├── torch/               ← version 2.0.1
├── matplotlib/          ← version 3.7.2
├── flask/               ← version 2.3.3
└── ... (hundreds more packages)The fundamental problem: only one version of each package can exist in this directory at a time. The last pip install wins.
Scenario 1: The Version Conflict Disaster
You’re maintaining two projects:
- Project A (built 18 months ago): Requires
scikit-learn==0.24.2because it uses an API that was removed in version 1.0 - Project B (new project): Requires
scikit-learn>=1.3.0to use the newset_outputAPI
There is no way to have both versions of scikit-learn in the global environment simultaneously. You install 0.24.2 for Project A — Project B breaks. You install 1.3.0 for Project B — Project A breaks.
Without virtual environments, you’re stuck in an endless cycle of reinstalling packages whenever you switch projects.
Scenario 2: The “Works on My Machine” Problem
You build a model, it works perfectly. You share your code with a colleague. They install your requirements and run the code. It crashes immediately with a bizarre error about a missing function.
The problem: you both have “the latest version” of a library, but “latest” was different at the time each of you installed it. Your pandas is 1.5.3, theirs is 2.0.0. A function signature changed between those versions.
Without a locked, reproducible environment, sharing code that reliably works is nearly impossible.
Scenario 3: The Corrupted Global Environment
You’re experimenting with a new deep learning library. Its installation pulls in dozens of dependencies and upgrades several existing packages. Now your existing scikit-learn code has cryptic errors. You spend two hours figuring out that the new library upgraded numpy in a way that broke scikit-learn’s internal usage.
You want to uninstall the new library, but pip uninstall only removes the library itself, not all the dependencies it pulled in or the packages it upgraded. Your global environment is now in an undefined, partially-broken state.
The fix: nuclear option — uninstall Python and start over. Or, if you’d used virtual environments, just delete the environment folder.
The Solution: How Virtual Environments Work
A virtual environment creates an isolated Python environment in a specific directory. This isolation works through a simple but elegant mechanism.
What’s Inside a Virtual Environment
When you create a virtual environment with python -m venv myenv, Python creates a directory structure like this:
myenv/
├── bin/                    (Scripts/ on Windows)
│   ├── python              ← Symlink or copy of the Python interpreter
│   ├── python3             ← Symlink to python
│   ├── pip                 ← pip tied to this environment
│   └── activate            ← Shell script to activate the environment
├── include/                ← C header files for compiling packages
├── lib/
│   └── python3.11/
│       └── site-packages/  ← THIS environment's packages only
│           ├── pip/
│           └── setuptools/
└── pyvenv.cfg ← Configuration fileThe key components are:
- A Python interpreter (or symlink to one) — this environment’s Python
- A pip executable — this environment’s package manager, tied to this Python
- A
site-packagesdirectory — this environment’s isolated package storage - An
activatescript — modifies your shell’sPATHto prioritize this environment
How Activation Works
When you run source myenv/bin/activate (or myenv\Scripts\activate on Windows), the activate script modifies your shell’s PATH environment variable to put the environment’s bin/ directory first:
Before activation:
PATH = /usr/bin:/usr/local/bin:/usr/lib/python3.11/bin:...

After activation:
PATH = /home/user/myproject/myenv/bin:/usr/bin:/usr/local/bin:...Now when you type python, your shell searches PATH from left to right and finds the environment’s Python first, before the system Python. Same for pip. You’re operating inside the isolated environment.
Your shell prompt changes to show the environment name:
(myenv) user@machine:~/myproject$When you deactivate, the PATH modification is reversed and you’re back to the global Python.
Tool 1: venv — Python’s Built-In Solution
venv is Python’s built-in virtual environment tool, included in the standard library since Python 3.3. It’s the simplest and most portable option — it requires no installation and works wherever Python is installed.
Creating a Virtual Environment
# Navigate to your project directory
cd my-data-science-project

# Create a virtual environment named 'venv'
python -m venv venvThe conventional name is venv (it’s descriptive, short, and widely recognized), though you can name it anything. The environment is created as a subdirectory of your current folder.
Activating the Environment
# On macOS and Linux:
source venv/bin/activate

# On Windows (Command Prompt):
venv\Scripts\activate.bat

# On Windows (PowerShell):
venv\Scripts\Activate.ps1
After activation, your prompt changes:
(venv) user@machine:~/my-data-science-project$Verify you’re using the right Python:
which python          # Should show: /path/to/project/venv/bin/python
python --version      # The Python version your venv was created with
pip list # Only shows packages installed in this environmentInstalling Packages
With the environment activated, every pip install goes into the environment’s site-packages:
pip install numpy pandas matplotlib scikit-learn seaborn jupyterThese packages are isolated to this environment. They don’t affect your global Python or any other environment.
Saving Your Environment: requirements.txt
The requirements.txt file is the standard way to document and share a project’s dependencies:
# Generate requirements.txt from current environment
pip freeze > requirements.txtThis creates a file like:
certifi==2023.7.22
contourpy==1.1.0
cycler==0.11.0
fonttools==4.42.1
joblib==1.3.2
kiwisolver==1.4.5
matplotlib==3.7.2
numpy==1.25.2
packaging==23.1
pandas==2.0.3
Pillow==10.0.0
pyparsing==3.0.9
python-dateutil==2.8.2
pytz==2023.3
scikit-learn==1.3.0
scipy==1.11.2
seaborn==0.12.2
six==1.16.0
threadpoolctl==3.2.0Every package and its exact version is pinned. Anyone who runs pip install -r requirements.txt gets the exact same environment you have.
Recreating the Environment
When a teammate clones your repository and wants to set up the same environment:
# Clone the repo
git clone git@github.com:username/project.git
cd project

# Create a fresh virtual environment
python -m venv venv

# Activate it
source venv/bin/activate

# Install all dependencies from requirements.txt
pip install -r requirements.txtThey now have an identical environment to yours. This is reproducibility in practice.
Deactivating and Deleting
# Deactivate (return to global Python)
deactivate

# Delete the environment entirely (just delete the folder)
rm -rf venv/   # macOS/Linux
rmdir /s venv # WindowsDeleting a virtual environment is safe and clean — it’s just a folder. No system files are affected. If you need to start fresh, just create a new one.
What to Add to .gitignore
The venv/ folder should always be in your .gitignore. It’s large (potentially hundreds of MB), contains platform-specific binaries, and is fully reproducible from requirements.txt:
# .gitignore
venv/
env/
.venv/
ENV/You commit requirements.txt, not the environment folder. Your teammates recreate the environment themselves on their machines.
Tool 2: conda — The Data Scientist’s Package Manager
conda is a package manager and environment manager created by Anaconda. It’s more powerful than venv in several important ways — and the preferred choice for many data scientists.
How conda Differs from venv + pip
The fundamental difference: conda manages both Python environments and non-Python dependencies, while venv only manages Python packages.
Many data science packages — numpy, scipy, pandas, scikit-learn — have C and Fortran extensions that need to be compiled or that depend on system-level libraries (BLAS, LAPACK, HDF5). pip installs pre-compiled wheels when available, but sometimes compilation fails due to missing system libraries. conda distributes pre-built binary packages and manages their non-Python dependencies automatically, making installation significantly more reliable for complex scientific packages.
Additionally, conda can install different Python versions per environment, while venv creates environments using the Python version it was invoked with.
| Feature | venv + pip | conda |
|---|---|---|
| Manages Python packages | Yes | Yes |
| Manages Python version per env | No (uses existing Python) | Yes |
| Manages non-Python dependencies | No | Yes |
| Binary package distribution | Wheels (sometimes) | Always |
| Cross-platform reliability | Good | Excellent for scientific computing |
| Environment creation speed | Fast | Slower (downloads more) |
| Disk space usage | Minimal | Larger (more comprehensive packages) |
| Ecosystem | PyPI (all Python packages) | conda-forge + Anaconda channel |
| Installation required | No (built into Python) | Yes (Anaconda or Miniconda) |
Installing conda
There are two distributions:
Anaconda: A full data science platform that installs conda plus 250+ pre-installed data science packages. Large (~3 GB). Good for absolute beginners who want everything ready to go.
Miniconda (recommended): A minimal installer that includes only conda and Python. Smaller (~400 MB). You install only what you need. Better for professionals who want control over their environment.
Download Miniconda from conda.io/miniconda.html and run the installer for your platform.
Creating a conda Environment
# Create an environment named 'myproject' with Python 3.11
conda create --name myproject python=3.11

# Activate it
conda activate myproject

# Your prompt changes:
# (myproject) user@machine:~$

# Install packages
conda install numpy pandas matplotlib scikit-learn seaborn jupyter

# Or install from conda-forge (often more up-to-date)
conda install -c conda-forge numpy pandas matplotlib scikit-learn

# Mix conda and pip when a package isn't on conda channels
pip install some-package-not-on-condaListing and Managing conda Environments
# List all conda environments
conda env list
# Output:
# base                  * /home/user/miniconda3
# myproject               /home/user/miniconda3/envs/myproject
# nlp-experiments         /home/user/miniconda3/envs/nlp-experiments

# Activate an environment
conda activate myproject

# Deactivate current environment
conda deactivate

# Remove an environment
conda env remove --name myprojectThe environment.yml File
conda’s equivalent of requirements.txt is environment.yml — a more structured format that captures Python version, conda packages, and pip packages:
# environment.yml
name: customer-churn-model
channels:
  - conda-forge
  - defaults
dependencies:
  - python=3.11
  - numpy=1.25.2
  - pandas=2.0.3
  - scikit-learn=1.3.0
  - matplotlib=3.7.2
  - seaborn=0.12.2
  - jupyter=1.0.0
  - pip:
    - xgboost==1.7.6
    - shap==0.42.1
- mlflow==2.6.0This file captures everything: the Python version, all conda packages with versions, and any pip packages for things not available on conda channels.
Create environment from yml:
conda env create -f environment.ymlExport current environment to yml:
conda env export > environment.ymlUpdate an existing environment from yml:
conda env update --file environment.yml --pruneconda vs. venv: Which Should You Use?
For most data science work, use conda if you:
- Work with packages that have complex binary dependencies (TensorFlow, PyTorch with GPU support, OpenCV)
- Need to manage multiple Python versions across projects
- Work on Windows, where compiling packages from source is especially painful
- Are part of a team that already uses Anaconda/conda
Use venv + pip if you:
- Want the simplest possible setup with no extra installation
- Are building Python packages or libraries
- Prefer using PyPI as your primary source
- Work in environments where Anaconda isn’t allowed or available (some enterprise environments)
In practice, many data scientists use Miniconda for local development (for the Python version management and binary packages) and venv in CI/CD pipelines and Docker containers (for simplicity and reproducibility).
Tool 3: pipenv — Combining venv and pip
pipenv was created to bring together the best ideas from pip and virtual environments into a single tool, inspired by modern package managers in other languages (like npm for JavaScript).
What pipenv Adds
pipenv introduces two key concepts:
Pipfile: A human-readable specification of your project’s dependencies (what you want):
[[source]]
url = "https://pypi.org/simple"
verify_ssl = true
name = "pypi"

[packages]
pandas = ">=2.0"
scikit-learn = ">=1.3"
matplotlib = "*"

[dev-packages]
pytest = "*"
black = "*"
flake8 = "*"

[requires]
python_version = "3.11"Pipfile.lock: An automatically generated, exact lock file (what actually got installed):
{
    "default": {
        "pandas": {
            "version": "==2.0.3",
            "hashes": ["sha256:a...", "sha256:b..."]
        }
    }
}This two-file approach separates intent (Pipfile) from exact reproducibility (Pipfile.lock) — an elegant solution to the tension between flexibility and reproducibility.
Basic pipenv Usage
# Install pipenv
pip install pipenv

# Navigate to project directory and create environment
cd my-project
pipenv install numpy pandas scikit-learn

# Activate the environment
pipenv shell
# (myproject) user@machine:~/my-project$

# Install a dev-only dependency (testing, linting)
pipenv install --dev pytest black flake8

# Run a command without activating the shell
pipenv run python src/train.py

# Install from existing Pipfile (for teammates)
pipenv install

# Install from Pipfile.lock exactly (for production)
pipenv install --deploypipenv Pros and Cons
Pros:
- Combines environment management and package management in one tool
- Pipfile is more readable than requirements.txt
- Automatic lock file generation ensures reproducibility
- Separates production and development dependencies cleanly
- Checks for security vulnerabilities in packages
Cons:
- Slower than venv + pip for environment creation
- Had a period of slow development that caused some ecosystem uncertainty
- Less widely adopted than venv or conda in data science specifically
pipenv is an excellent choice for Python web applications and scripts, though in data science specifically, conda has become more dominant due to binary package management.
Tool 4: poetry — Modern Python Package Management
poetry is the most modern Python package management tool, combining dependency resolution, virtual environment management, and package publishing in one elegant system.
Why poetry Stands Out
poetry solves a subtle but important problem with pip freeze > requirements.txt: it captures all installed packages — including transitive dependencies (dependencies of your dependencies) — making it hard to distinguish what you actually need from what was installed as a side effect.
poetry maintains a clean separation:
- pyproject.toml: Your direct, explicit dependencies
- poetry.lock: The complete, exact dependency tree (for reproducibility)
Basic poetry Usage
# Install poetry
curl -sSL https://install.python-poetry.org | python3 -

# Create a new project
poetry new my-data-science-project
# Or initialize poetry in an existing directory
cd existing-project && poetry init

# Add dependencies
poetry add pandas scikit-learn matplotlib
poetry add --group dev pytest black flake8

# Install all dependencies (creates venv automatically)
poetry install

# Activate the environment
poetry shell

# Run commands in the environment without activating
poetry run python src/train.py

# Update all dependencies to latest compatible versions
poetry updateThe pyproject.toml with poetry
[tool.poetry]
name = "customer-churn-model"
version = "0.1.0"
description = "Customer churn prediction model"
authors = ["Your Name <you@example.com>"]

[tool.poetry.dependencies]
python = "^3.11"
pandas = "^2.0"
scikit-learn = "^1.3"
matplotlib = "^3.7"
xgboost = "^1.7"

[tool.poetry.group.dev.dependencies]
pytest = "^7.4"
black = "^23.7"
flake8 = "^6.1"
jupyter = "^1.0"

[build-system]
requires = ["poetry-core"]
build-backend = "poetry-core.masonry.api"poetry is gaining popularity in data science, particularly in teams that also build Python packages or APIs, because it handles the full Python package lifecycle elegantly.
Practical Workflows: Day-to-Day Usage
Starting a New Data Science Project
Here’s the complete workflow for starting a fresh project with venv (the simplest, most universally applicable approach):
# 1. Create project directory
mkdir customer-churn-analysis
cd customer-churn-analysis

# 2. Create virtual environment
python -m venv venv

# 3. Activate it
source venv/bin/activate   # macOS/Linux
# or: venv\Scripts\activate  # Windows

# 4. Upgrade pip (always a good idea)
pip install --upgrade pip

# 5. Install your packages
pip install numpy pandas matplotlib seaborn scikit-learn jupyter ipykernel

# 6. Pin your dependencies
pip freeze > requirements.txt

# 7. Create .gitignore entry
echo "venv/" >> .gitignore

# 8. Initialize git
git init
git add requirements.txt .gitignore
git commit -m "Initialize project with dependencies"

# 9. Start working
jupyter labJoining an Existing Project
# 1. Clone the repository
git clone git@github.com:team/project.git
cd project

# 2. Create your own virtual environment
python -m venv venv

# 3. Activate it
source venv/bin/activate

# 4. Install all dependencies from requirements.txt
pip install -r requirements.txt

# 5. Verify everything installed correctly
pip list
python -c "import pandas, sklearn, matplotlib; print('All good!')"

# 6. Start workingUpdating Dependencies
When you add a new package to your project:
# Install the new package
pip install shap

# Update requirements.txt to include the new package
pip freeze > requirements.txt

# Commit the updated requirements
git add requirements.txt
git commit -m "Add SHAP for model explainability"When you want to upgrade existing packages:
# Upgrade a specific package
pip install --upgrade pandas

# Upgrade all packages (use with caution — can break things)
pip list --outdated | awk '{print $1}' | xargs pip install --upgrade

# After upgrading, update requirements.txt
pip freeze > requirements.txt

# Test that nothing broke
python -m pytest tests/

# If tests pass, commit
git add requirements.txt
git commit -m "Upgrade pandas to 2.0.3"Managing Multiple Python Versions
Sometimes you need to create environments with different Python versions. With venv, you specify the Python executable:
# If you have Python 3.9 and 3.11 installed:
python3.9 -m venv venv-py39
python3.11 -m venv venv-py311

# Or use pyenv to manage multiple Python installations
# pyenv allows switching Python versions per directorypyenv is a popular tool for managing multiple Python versions:
# Install pyenv (macOS/Linux)
curl https://pyenv.run | bash

# Install a specific Python version
pyenv install 3.11.4
pyenv install 3.9.17

# Set default version for current directory
pyenv local 3.11.4

# Now python -m venv creates a 3.11.4 environment
python -m venv venvWith conda, Python version management is built-in:
conda create --name py39-project python=3.9
conda create --name py311-project python=3.11Common Problems and Solutions
“I activated the environment but it’s still using the system Python”
Verify activation worked:
which python   # Should point to your venv's python
# If not, try:
source venv/bin/activate # Note: must use 'source', not 'bash' or 'sh'On Windows, you may need to allow PowerShell scripts:
Set-ExecutionPolicy -ExecutionPolicy RemoteSigned -Scope CurrentUser“pip install fails with permission errors”
This usually means pip is trying to install to the system Python instead of your environment. Verify your environment is activated (check your prompt for the environment name).
“My Jupyter Notebook isn’t using the right environment”
Jupyter needs a kernel that points to your environment. Register your virtual environment as a Jupyter kernel:
# Make sure your venv is activated and ipykernel is installed
pip install ipykernel

# Register the environment as a kernel
python -m ipykernel install --user --name=myproject --display-name="Python (myproject)"

# Now when you open Jupyter, select "Python (myproject)" as the kernelFor conda environments:
conda activate myproject
conda install ipykernel
python -m ipykernel install --user --name=myproject --display-name="Python (myproject)"“requirements.txt install fails because a package isn’t available”
Package availability can differ between platforms or Python versions. The solution is to use a less pinned requirements file for cross-platform projects:
Instead of fully pinned (==), use minimum versions (>=) for the top-level dependencies:
# requirements.txt (flexible version)
numpy>=1.24
pandas>=2.0
scikit-learn>=1.3
matplotlib>=3.7And maintain a separate requirements-lock.txt (generated by pip freeze) for exact reproducibility on your development platform.
“My environment got corrupted after a bad pip install”
The beauty of virtual environments: just delete and recreate:
deactivate
rm -rf venv/
python -m venv venv
source venv/bin/activate
pip install -r requirements.txtTwo minutes to get back to a clean state. This is the single most compelling argument for using virtual environments.
“VS Code / PyCharm isn’t using my virtual environment”
Both IDEs need to be pointed to the correct interpreter. In VS Code, press Ctrl+Shift+P → “Python: Select Interpreter” → choose the venv path. In PyCharm, go to Settings → Project → Python Interpreter and select or add the venv’s Python.
Environment Best Practices for Data Scientists
Always Create an Environment Before Installing Anything
Make this your unconditional rule: before running a single pip install for a new project, create and activate a virtual environment. The two minutes it takes will save hours of debugging dependency conflicts.
Keep requirements.txt Up to Date
Every time you install a new package that your project actually needs, update requirements.txt with pip freeze > requirements.txt and commit it. Stale requirements files create “works on my machine” problems.
Separate Development and Production Dependencies
Not every package needed for development belongs in production. Testing frameworks, linting tools, and Jupyter Notebook libraries don’t need to be deployed with your model:
# requirements.txt — production dependencies only
numpy==1.25.2
pandas==2.0.3
scikit-learn==1.3.0
xgboost==1.7.6

# requirements-dev.txt — development + testing
-r requirements.txt    # Include production deps
pytest==7.4.3
black==23.7.0
flake8==6.1.0
jupyter==1.0.0
ipykernel==6.25.2Install with:
pip install -r requirements-dev.txt  # For development
pip install -r requirements.txt # For production/deploymentDocument Environment Setup in README
Every project’s README should include clear environment setup instructions:
## Setup

**Prerequisites**: Python 3.11+

```bash
# Clone the repository
git clone git@github.com:username/project.git
cd project

# Create and activate virtual environment
python -m venv venv
source venv/bin/activate  # On Windows: venv\Scripts\activate

# Install dependencies
pip install -r requirements-dev.txt

# Verify setup
python -c "import pandas; print(f'pandas {pandas.__version__} ✓')"
New team members and your future self will thank you.

### Use Consistent Environment Names

Standardize on `venv` as your environment directory name across all projects. This makes the `.gitignore` entry universal (you can add `venv/` to a global `.gitignore`) and avoids confusion about what directory name to activate.

### Pin Exact Versions for Production, Use Ranges for Libraries

If you're building a deployable product (a model API, a data pipeline), pin exact versions in `requirements.txt` for maximum reproducibility. If you're building a library that others will install, use version ranges (`>=`) to avoid forcing users into specific version combinations.

---

## A Comparison of All Virtual Environment Tools

| Tool | Best For | Python Version Management | Non-Python Deps | Learning Curve | Speed |
|---|---|---|---|---|---|
| **venv** | Simple projects, scripts, learning | No | No | Low | Fast |
| **conda** | Scientific computing, multiple Python versions | Yes | Yes | Medium | Slower |
| **pipenv** | Web applications, APIs | No | No | Medium | Medium |
| **poetry** | Packages, modern workflows | No | No | Medium-High | Fast |
| **pyenv + venv** | Multiple Python versions with venv simplicity | Yes | No | Medium | Fast |

**Recommendation for data scientists:**
- Learning Python or simple projects → **venv**
- Professional data science with scientific packages → **conda (Miniconda)**
- Building and deploying Python packages → **poetry**
- Teams already using pip who want better dependency management → **pipenv** or **poetry**

---

## Virtual Environments in Different Contexts

### In Docker Containers

When running Python inside Docker, the container itself provides isolation — a virtual environment inside a container adds redundant isolation. Most Docker-based data science setups use the system Python directly:

```dockerfile
FROM python:3.11-slim

WORKDIR /app
COPY requirements.txt .
RUN pip install --no-cache-dir -r requirements.txt

COPY . .
CMD ["python", "src/train.py"]However, some teams still use virtual environments in Docker for consistency with local development and to keep the container’s system Python unmodified.
In CI/CD Pipelines
GitHub Actions, GitLab CI, and other CI systems run in fresh containers for every job. Creating a virtual environment in CI ensures the build is isolated from the CI runner’s pre-installed packages:
# .github/workflows/tests.yml
- name: Set up Python
  uses: actions/setup-python@v4
  with:
    python-version: '3.11'

- name: Create virtual environment and install dependencies
  run: |
    python -m venv venv
    source venv/bin/activate
    pip install -r requirements-dev.txt

- name: Run tests
  run: |
    source venv/bin/activate
    pytest tests/ -v
With Jupyter Notebooks
Jupyter requires registering each virtual environment as a separate kernel. The process (shown in the troubleshooting section above) takes about 30 seconds and gives you a clean, named kernel in Jupyter’s kernel picker.
For teams using JupyterHub or shared Jupyter environments, conda environments are typically used since conda’s kernel management integrates particularly well with JupyterHub.
Summary
Virtual environments are not an optional extra step — they are the foundation of professional, reproducible Python work. The dependency isolation they provide eliminates entire categories of bugs and frustrations that plague developers who work directly in the global Python environment.
The mechanics are simple: a virtual environment is a directory containing an isolated Python interpreter and package space. Activation modifies your shell’s PATH to prioritize this isolated Python. Every pip install after activation goes only into this environment, leaving everything else untouched.
The practical workflow becomes automatic with practice: create a new project, immediately run python -m venv venv, activate it, install packages, freeze to requirements.txt, add venv/ to .gitignore. This sequence, executed consistently for every project, makes your code reproducible, shareable, and maintainable for years.
The choice between venv, conda, pipenv, and poetry depends on your specific needs. For most data scientists, Miniconda provides the best combination of Python version management, reliable binary package installation for scientific packages, and ease of use across Windows, macOS, and Linux. For simple projects or production environments where Anaconda isn’t available, venv + pip is a clean, zero-overhead solution.
Key Takeaways
- Virtual environments solve the dependency conflict problem by giving each project an isolated Python interpreter and package directory — only one version of each package per environment, with no interference between projects
- Activation works by modifying the shell’s
PATHvariable to prioritize the environment’s Python and pip executables over the system ones - The core venv workflow is:
python -m venv venv→source venv/bin/activate→pip install packages→pip freeze > requirements.txt→ addvenv/to.gitignore requirements.txtis the contract for your project’s dependencies — keep it updated and commit it to version control so teammates can reproduce your exact environment- conda is the preferred choice for scientific computing because it manages Python versions and non-Python binary dependencies (BLAS, HDF5, CUDA libraries) that pip cannot handle
- Jupyter Notebooks need the virtual environment registered as a kernel with
python -m ipykernel install --user --name=envname— without this step, notebooks use the wrong Python - Always separate production dependencies (
requirements.txt) from development/testing dependencies (requirements-dev.txt) to keep deployments lean - The best fix for a corrupted or broken environment is to delete it and recreate from
requirements.txt— two minutes of work that demonstrates exactly why environments are stored separately from code