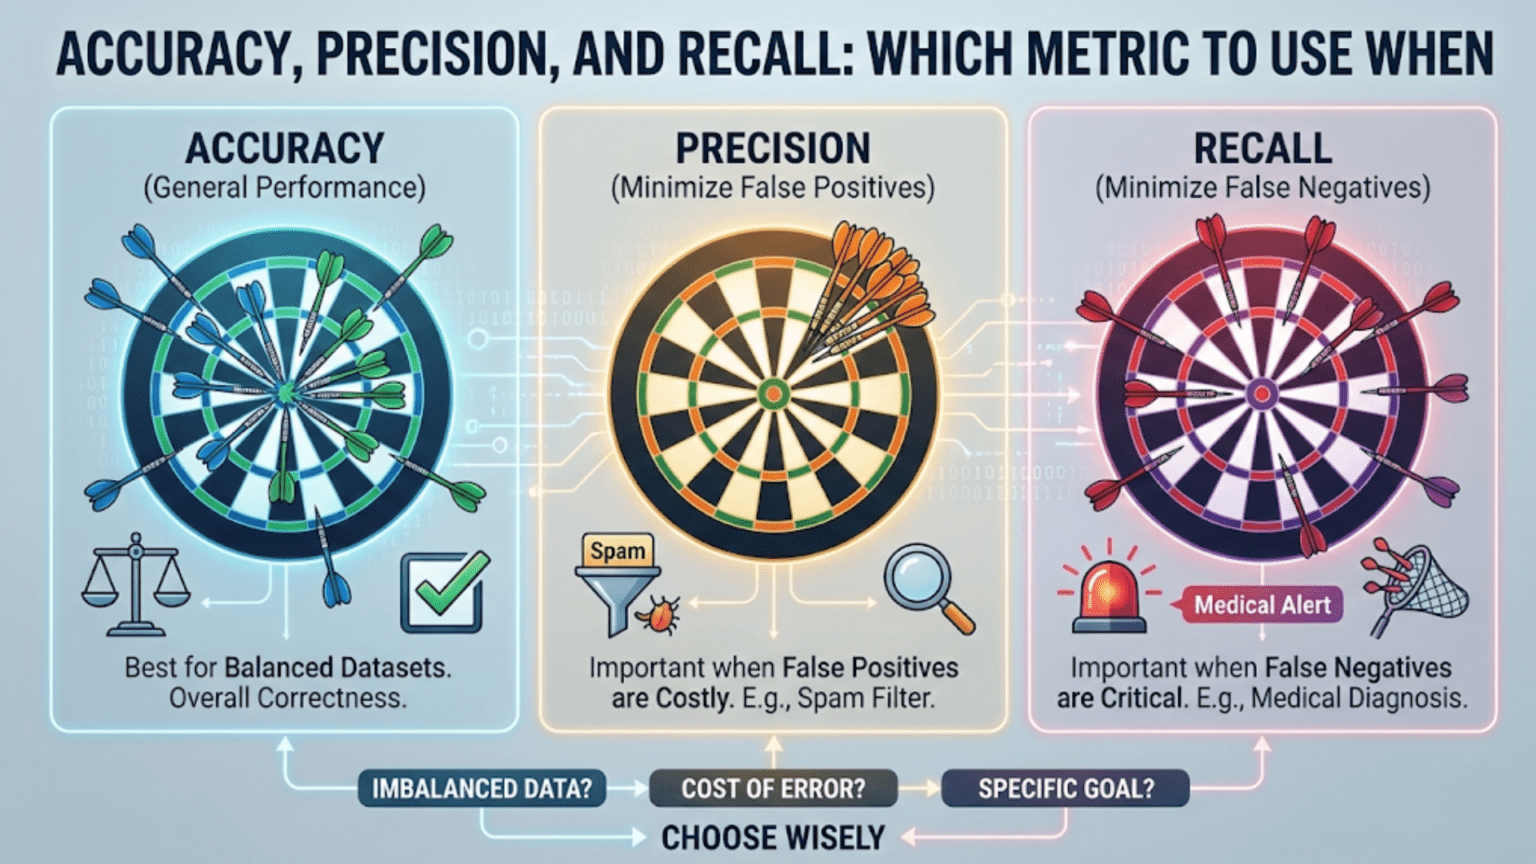
Accuracy, precision, and recall are three fundamental classification metrics in machine learning. Accuracy measures overall correctness, precision measures how many positive predictions were actually correct, and recall measures how many actual positives were correctly identified. Choosing the right metric depends entirely on the cost of different types of errors in your specific use case.
Introduction
Imagine you have built a model to detect cancer from medical images. You test it on 1,000 patients: 950 are healthy and 50 have cancer. If your model simply predicts “healthy” for every single patient, it achieves 95% accuracy. Impressive on paper — but completely useless, and even dangerous, because it misses every single cancer case.
This is one of the most important lessons in machine learning evaluation: accuracy alone can be deeply misleading. Depending on your problem, the cost of a false negative (missing a real positive) might be catastrophic, while the cost of a false positive (flagging something that isn’t really positive) might be trivial — or vice versa.
Understanding accuracy, precision, and recall — and knowing when to apply each — is not merely an academic exercise. It is a foundational skill that separates practitioners who build truly useful models from those who build models that look good on paper but fail in the real world.
In this article, we will break down each metric from first principles, explore the mathematics behind them, implement them in Python, and — most importantly — give you a clear framework for deciding which metric to prioritize in any situation.
The Confusion Matrix: The Foundation of Classification Metrics
Before we can understand accuracy, precision, or recall, we need to understand the confusion matrix. Despite its intimidating name, it is simply a table that summarizes how well a classification model performed.
For a binary classification problem (where outcomes are either “positive” or “negative”), the confusion matrix has four cells:
| Predicted Positive | Predicted Negative | |
|---|---|---|
| Actual Positive | True Positive (TP) | False Negative (FN) |
| Actual Negative | False Positive (FP) | True Negative (TN) |
Let’s define each term clearly:
- True Positive (TP): The model predicted positive, and the actual label is positive. A correct positive prediction. Example: The model says “cancer,” and the patient actually has cancer.
- True Negative (TN): The model predicted negative, and the actual label is negative. A correct negative prediction. Example: The model says “no cancer,” and the patient is healthy.
- False Positive (FP): The model predicted positive, but the actual label is negative. Also called a Type I error. Example: The model says “cancer,” but the patient is healthy.
- False Negative (FN): The model predicted negative, but the actual label is positive. Also called a Type II error. Example: The model says “no cancer,” but the patient has cancer.
All three of our core metrics — accuracy, precision, and recall — are derived directly from these four values.
Accuracy: The Most Intuitive Metric
What Is Accuracy?
Accuracy is the simplest and most commonly cited classification metric. It answers one question: Of all the predictions made, what fraction were correct?
The Formula
Accuracy = (TP + TN) / (TP + TN + FP + FN)
In plain English: the number of correct predictions (both true positives and true negatives) divided by the total number of predictions.
Example
Suppose you build a spam email classifier and test it on 1,000 emails. 900 are legitimate emails and 100 are spam.
- Your model correctly identifies 870 legitimate emails as legitimate (TN = 870)
- Your model correctly identifies 80 spam emails as spam (TP = 80)
- Your model wrongly marks 30 legitimate emails as spam (FP = 30)
- Your model misses 20 spam emails, calling them legitimate (FN = 20)
Accuracy = (80 + 870) / (80 + 870 + 30 + 20) = 950 / 1000 = 0.95 = 95%
A 95% accuracy score. That sounds excellent.
When Accuracy Is Useful
Accuracy works well when:
- The dataset is balanced — roughly equal numbers of positive and negative examples.
- The cost of false positives and false negatives is approximately equal — neither type of error is dramatically more harmful than the other.
- You want a single, simple number to compare models at a high level.
When Accuracy Fails: The Class Imbalance Problem
The example we opened with illustrates this perfectly. If 95% of your emails are legitimate, a model that predicts “legitimate” for every single email gets 95% accuracy while catching exactly zero spam messages. High accuracy, zero usefulness.
This is the class imbalance problem, and it is extremely common in the real world:
- Fraud detection: 99.9% of transactions are legitimate
- Disease detection: most patients don’t have a rare disease
- Defect detection in manufacturing: most products are fine
- Intrusion detection: most network traffic is benign
In all of these cases, a model that simply predicts “not fraud,” “healthy,” “no defect,” or “benign” achieves overwhelming accuracy while completely failing at its purpose.
Precision: When False Positives Are Costly
What Is Precision?
Precision asks: Of all the cases your model predicted as positive, how many were actually positive?
It measures how trustworthy your positive predictions are. A high-precision model rarely cries wolf — when it says “positive,” you can believe it.
The Formula
Precision = TP / (TP + FP)
The denominator includes only predicted positives — the cases where your model raised its hand and said “this is positive.”
Example: Spam Detection
Using our email example:
- TP = 80 (correctly identified spam)
- FP = 30 (legitimate emails wrongly marked as spam)
Precision = 80 / (80 + 30) = 80 / 110 ≈ 72.7%
This means that when the spam filter flags an email as spam, it is correct about 72.7% of the time. Nearly 1 in 4 “spam” predictions is actually a legitimate email being wrongly blocked.
When to Prioritize Precision
You should prioritize precision when false positives are expensive or harmful. Ask yourself: “What is the cost of incorrectly labeling a negative case as positive?”
Real-world examples where precision matters most:
Email spam filtering: A false positive means a legitimate email ends up in the spam folder. You might miss an important message from your boss. High precision keeps legitimate emails in your inbox.
Search engine results: Returning an irrelevant result when a user searches for something specific is a false positive. Search engines optimize heavily for precision so users see relevant results.
Drug screening for athletes: A false positive accuses an innocent athlete of doping. The cost — reputation damage, career destruction — is enormous. Labs therefore design tests to be very precise.
Content moderation at scale: Incorrectly removing a user’s content when it’s actually benign (a false positive) frustrates users and damages trust in the platform.
Recall: When False Negatives Are Costly
What Is Recall?
Recall (also called sensitivity or true positive rate) asks: Of all the actual positive cases, how many did your model correctly identify?
It measures how comprehensive your model is at catching real positives. A high-recall model is vigilant — it rarely misses a real positive case.
The Formula
Recall = TP / (TP + FN)
The denominator includes all actual positives — both the ones your model caught and the ones it missed.
Example: Cancer Detection
Suppose you test a model on 200 patients: 160 are healthy and 40 have cancer.
- TP = 32 (cancer patients correctly identified)
- FN = 8 (cancer patients the model missed, calling them healthy)
- TN = 155 (healthy patients correctly identified)
- FP = 5 (healthy patients wrongly flagged as having cancer)
Recall = 32 / (32 + 8) = 32 / 40 = 80%
This model catches 80% of cancer cases, but misses 20% — 8 patients who have cancer but are sent home thinking they’re healthy.
Precision = 32 / (32 + 5) = 32 / 37 ≈ 86.5%
The precision is higher — when the model flags someone as having cancer, it’s usually right. But missing 20% of actual cancer cases is a serious problem.
When to Prioritize Recall
You should prioritize recall when false negatives are expensive or harmful. Ask yourself: “What is the cost of missing a real positive case?”
Real-world examples where recall matters most:
Cancer and disease detection: Missing a cancer case (false negative) means a patient doesn’t get treatment they urgently need. Far better to flag more people for follow-up testing (even if some are false positives) than to miss real cases.
Fraud detection: If a fraudulent transaction slips through (false negative), money is lost and potentially unrecoverable. Banks often err on the side of flagging more transactions for review.
Security systems: A burglar alarm that misses a real break-in (false negative) is essentially useless. It’s better to have occasional false alarms than to miss an actual intrusion.
COVID-19 testing (or any infectious disease): Missing a positive case means an infected person walks around unknowingly spreading the disease. High recall testing is critical during pandemic response.
The Precision-Recall Tradeoff
Here is a fundamental truth that every practitioner must understand: precision and recall are inversely related. When you increase one, you typically decrease the other. This is called the precision-recall tradeoff.
Understanding the Tradeoff Intuitively
Most classifiers don’t just output “positive” or “negative” — they output a probability score between 0 and 1. You then choose a threshold above which predictions are classified as positive.
- If you lower the threshold (e.g., from 0.5 to 0.3): More cases get classified as positive. You catch more real positives (recall goes up), but you also generate more false positives (precision goes down).
- If you raise the threshold (e.g., from 0.5 to 0.8): Fewer cases get classified as positive. You only flag cases you’re very confident about (precision goes up), but you miss more real positives (recall goes down).
Think of it like a fishing net with adjustable mesh size. A tight mesh (high threshold) only catches large fish with very few small fish getting through, but some larger fish also escape. A loose mesh catches nearly all fish (high recall) but also pulls in a lot of small fish you didn’t want (low precision).
The Precision-Recall Curve
A precision-recall curve plots precision (y-axis) against recall (x-axis) as you vary the threshold from 0 to 1. A perfect model would achieve both high precision and high recall simultaneously, appearing in the upper-right corner of the plot. A random classifier follows a roughly horizontal line close to the baseline.
The Area Under the Precision-Recall Curve (AUC-PR) summarizes performance across all thresholds. A higher AUC-PR indicates a better model, especially for imbalanced datasets.
The F1 Score: Balancing Precision and Recall
When you need to balance precision and recall into a single metric, the F1 score is the standard choice. It is the harmonic mean of precision and recall.
The Formula
F1 = 2 × (Precision × Recall) / (Precision + Recall)
Why the Harmonic Mean?
The harmonic mean is used instead of the arithmetic mean because it penalizes extreme imbalance between the two values more heavily.
Consider a model with Precision = 1.0 and Recall = 0.0 (predicts “positive” for no cases):
- Arithmetic mean: (1.0 + 0.0) / 2 = 0.5
- Harmonic mean (F1): 2 × (1.0 × 0.0) / (1.0 + 0.0) = 0.0
The F1 score correctly identifies this as a useless model. A high F1 score requires both precision and recall to be reasonably high.
When to Use F1 Score
The F1 score is appropriate when:
- You need a single metric that accounts for both precision and recall
- The dataset is imbalanced and accuracy would be misleading
- You don’t have a strong reason to weight one type of error over another
Comparing the Metrics: A Quick Reference
| Metric | Formula | Measures | Best Used When |
|---|---|---|---|
| Accuracy | (TP + TN) / Total | Overall correctness | Balanced datasets, equal error costs |
| Precision | TP / (TP + FP) | Trustworthiness of positive predictions | False positives are costly |
| Recall | TP / (TP + FN) | Completeness of positive detection | False negatives are costly |
| F1 Score | 2 × (P × R) / (P + R) | Balance of precision and recall | Imbalanced datasets, both errors matter |
| Specificity | TN / (TN + FP) | Correctness on negatives | Medical screening, high-stakes negatives |
Python Implementation from Scratch
Let’s implement all of these metrics manually in Python so you understand exactly what’s happening under the hood.
Step 1: Build the Confusion Matrix
def confusion_matrix_values(y_true, y_pred):
    """
    Calculate TP, FP, FN, TN from true and predicted labels.

    Args:
        y_true: List of true labels (1 for positive, 0 for negative)
        y_pred: List of predicted labels (1 for positive, 0 for negative)

    Returns:
        Dictionary with TP, FP, FN, TN counts
    """
    TP = sum(1 for t, p in zip(y_true, y_pred) if t == 1 and p == 1)
    TN = sum(1 for t, p in zip(y_true, y_pred) if t == 0 and p == 0)
    FP = sum(1 for t, p in zip(y_true, y_pred) if t == 0 and p == 1)
    FN = sum(1 for t, p in zip(y_true, y_pred) if t == 1 and p == 0)

    return {"TP": TP, "TN": TN, "FP": FP, "FN": FN}

# Test with our cancer detection example
y_true = [1]*40 + [0]*160   # 40 cancer patients, 160 healthy
y_pred = [1]*32 + [0]*8 + [1]*5 + [0]*155  # Model predictions

cm = confusion_matrix_values(y_true, y_pred)
print(f"True Positives: {cm['TP']}")   # 32
print(f"True Negatives: {cm['TN']}")   # 155
print(f"False Positives: {cm['FP']}")  # 5
print(f"False Negatives: {cm['FN']}") # 8This gives us the raw counts we need to calculate all our metrics.
Step 2: Calculate Each Metric
def calculate_metrics(y_true, y_pred):
    """
    Calculate accuracy, precision, recall, and F1 score.

    Includes division-by-zero protection for edge cases.
    """
    cm = confusion_matrix_values(y_true, y_pred)
    TP, TN, FP, FN = cm["TP"], cm["TN"], cm["FP"], cm["FN"]

    # Accuracy: proportion of all correct predictions
    accuracy = (TP + TN) / (TP + TN + FP + FN)

    # Precision: of predicted positives, how many are actually positive?
    precision = TP / (TP + FP) if (TP + FP) > 0 else 0

    # Recall: of actual positives, how many did we catch?
    recall = TP / (TP + FN) if (TP + FN) > 0 else 0

    # F1 Score: harmonic mean of precision and recall
    f1 = (2 * precision * recall) / (precision + recall) if (precision + recall) > 0 else 0

    return {
        "accuracy": round(accuracy, 4),
        "precision": round(precision, 4),
        "recall": round(recall, 4),
        "f1_score": round(f1, 4)
    }

# Test our cancer detection model
metrics = calculate_metrics(y_true, y_pred)
for metric, value in metrics.items():
    print(f"{metric.capitalize()}: {value:.4f} ({value*100:.2f}%)")

# Output:
# Accuracy: 0.9350 (93.50%)
# Precision: 0.8649 (86.49%)
# Recall: 0.8000 (80.00%)
# F1_score: 0.8312 (83.12%)Step 3: Visualize the Confusion Matrix
import matplotlib.pyplot as plt
import seaborn as sns
import numpy as np

def plot_confusion_matrix(y_true, y_pred, class_names=["Negative", "Positive"]):
    """
    Plot a visual confusion matrix using seaborn heatmap.
    """
    cm = confusion_matrix_values(y_true, y_pred)

    # Build the 2x2 matrix: [[TN, FP], [FN, TP]]
    matrix = np.array([
        [cm["TN"], cm["FP"]],
        [cm["FN"], cm["TP"]]
    ])

    plt.figure(figsize=(6, 5))
    sns.heatmap(
        matrix,
        annot=True,
        fmt="d",
        cmap="Blues",
        xticklabels=["Predicted " + c for c in class_names],
        yticklabels=["Actual " + c for c in class_names]
    )
    plt.title("Confusion Matrix")
    plt.tight_layout()
    plt.savefig("confusion_matrix.png", dpi=150)
    plt.show()

plot_confusion_matrix(y_true, y_pred, class_names=["Healthy", "Cancer"])Step 4: Using Scikit-learn for Production Code
In practice, you will use scikit-learn’s built-in metrics. Here is the complete workflow:
from sklearn.metrics import (
    accuracy_score,
    precision_score,
    recall_score,
    f1_score,
    confusion_matrix,
    classification_report
)
import numpy as np

# Simulate a cancer detection scenario
y_true = np.array([1]*40 + [0]*160)
y_pred = np.array([1]*32 + [0]*8 + [1]*5 + [0]*155)

# Individual metrics
print("=== Individual Metrics ===")
print(f"Accuracy:  {accuracy_score(y_true, y_pred):.4f}")
print(f"Precision: {precision_score(y_true, y_pred):.4f}")
print(f"Recall:    {recall_score(y_true, y_pred):.4f}")
print(f"F1 Score:  {f1_score(y_true, y_pred):.4f}")

# Full classification report
print("\n=== Classification Report ===")
print(classification_report(
    y_true, y_pred,
    target_names=["Healthy", "Cancer"]
))

# Raw confusion matrix
print("=== Confusion Matrix ===")
print(confusion_matrix(y_true, y_pred))The classification_report function is especially useful. It shows precision, recall, F1, and support (sample count) for each class in a neatly formatted table — your fastest way to get a complete picture of model performance.
Visualizing the Precision-Recall Tradeoff
Understanding the tradeoff visually is crucial. Let’s plot how precision and recall change as we adjust the decision threshold.
from sklearn.metrics import precision_recall_curve
from sklearn.linear_model import LogisticRegression
from sklearn.datasets import make_classification
from sklearn.model_selection import train_test_split
import matplotlib.pyplot as plt

# Create an imbalanced binary classification dataset
X, y = make_classification(
    n_samples=1000,
    n_features=20,
    n_informative=10,
    weights=[0.9, 0.1],  # 90% negative, 10% positive (imbalanced)
    random_state=42
)

X_train, X_test, y_train, y_test = train_test_split(
    X, y, test_size=0.3, random_state=42, stratify=y
)

# Train logistic regression
model = LogisticRegression(random_state=42, max_iter=1000)
model.fit(X_train, y_train)

# Get probability scores
y_proba = model.predict_proba(X_test)[:, 1]

# Calculate precision-recall curve
precision_vals, recall_vals, thresholds = precision_recall_curve(y_test, y_proba)

# Plot the precision-recall tradeoff
fig, axes = plt.subplots(1, 2, figsize=(14, 5))

# Left plot: Precision-Recall Curve
axes[0].plot(recall_vals, precision_vals, 'b-', linewidth=2)
axes[0].set_xlabel("Recall (Sensitivity)", fontsize=12)
axes[0].set_ylabel("Precision", fontsize=12)
axes[0].set_title("Precision-Recall Curve", fontsize=14)
axes[0].grid(True, alpha=0.3)

# Right plot: Precision and Recall vs Threshold
axes[1].plot(thresholds, precision_vals[:-1], 'b-', linewidth=2, label="Precision")
axes[1].plot(thresholds, recall_vals[:-1], 'r-', linewidth=2, label="Recall")
axes[1].axvline(x=0.5, color='gray', linestyle='--', alpha=0.7, label="Default threshold (0.5)")
axes[1].set_xlabel("Decision Threshold", fontsize=12)
axes[1].set_ylabel("Score", fontsize=12)
axes[1].set_title("Precision & Recall vs Threshold", fontsize=14)
axes[1].legend(fontsize=11)
axes[1].grid(True, alpha=0.3)

plt.tight_layout()
plt.savefig("precision_recall_tradeoff.png", dpi=150)
plt.show()

# Show metrics at different thresholds
print(f"{'Threshold':>10} | {'Precision':>10} | {'Recall':>8} | {'F1':>8}")
print("-" * 45)

for threshold in [0.3, 0.4, 0.5, 0.6, 0.7, 0.8]:
    y_pred_thresh = (y_proba >= threshold).astype(int)

    if y_pred_thresh.sum() == 0:
        prec, rec, f1 = 0, 0, 0
    else:
        prec = precision_score(y_test, y_pred_thresh, zero_division=0)
        rec  = recall_score(y_test, y_pred_thresh, zero_division=0)
        f1   = f1_score(y_test, y_pred_thresh, zero_division=0)

print(f"{threshold:>10.1f} | {prec:>10.4f} | {rec:>8.4f} | {f1:>8.4f}")Run this code and observe the output table. Notice how raising the threshold increases precision while decreasing recall — the tradeoff in action. The visualization makes it easy to choose the threshold that best suits your business requirements.
Real-World Scenario Analysis
Let’s work through several real-world scenarios to solidify your intuition for which metric matters most.
Scenario 1: Email Spam Filtering
Business goal: Keep legitimate emails out of the spam folder while still catching most spam.
Key concern: False positives (legitimate emails marked as spam) — losing an important email is more harmful to most users than receiving some spam.
Primary metric: Precision
A high-precision spam filter is conservative — it only flags emails it’s very confident are spam. Some spam will leak through (lower recall), but important emails won’t be lost. Most production spam filters offer a “safe mode” that prioritizes precision.
Scenario 2: Credit Card Fraud Detection
Business goal: Catch as much fraudulent activity as possible before money is lost.
Key concern: False negatives (fraudulent transactions that slip through) — missed fraud means real financial losses.
Primary metric: Recall (with attention to precision to avoid blocking too many legitimate transactions)
Recommended summary metric: F1 Score — neither extreme is acceptable in a fraud detection system.
Scenario 3: Pre-screening for a Rare Disease
Business goal: Use a low-cost screening test to decide who should receive an expensive follow-up test.
Key concern: Missing a real positive (false negative) — sending a sick person home untreated is the worst outcome.
Primary metric: Recall (target >99%)
Acceptable tradeoff: Lower precision. The follow-up test will filter out these false positives. This is exactly how two-stage medical testing works in clinical practice.
Scenario 4: Legal Document Review
Business goal: Flag documents that may contain evidence relevant to a lawsuit.
Key concern: Missing a relevant document (false negative) — overlooked evidence could be catastrophic for the legal case.
Primary metric: Recall
Lawyers can manually review the flagged documents, handling false positives. Missing relevant documents is the unacceptable error.
Scenario 5: Content Recommendation System
Business goal: Recommend articles users will want to read.
Key concern: Recommending irrelevant articles (false positives) — users who see bad recommendations lose trust and disengage.
Primary metric: Precision
It is better to recommend a small number of highly relevant articles than to flood users with marginally relevant ones.
A Decision Framework for Choosing Your Metric
Use this systematic approach whenever you face a new classification problem:
Step 1: Analyze class balance Check if your dataset is balanced or heavily imbalanced. If imbalanced, accuracy is almost certainly misleading — move to precision, recall, or F1.
Step 2: Identify the cost of each error type Think clearly about what happens when your model makes a false positive versus a false negative in your specific application. Concretely: what does a wrong prediction cost in money, time, health, or trust?
Step 3: Select your primary metric If false positives are more costly → prioritize Precision. If false negatives are more costly → prioritize Recall. If costs are roughly equal and the dataset is imbalanced → use F1 Score. If costs are equal and the dataset is balanced → Accuracy is fine.
Step 4: Consider business constraints Are there regulatory or compliance requirements? Medical devices and financial systems often have legally required sensitivity minimums. What threshold of false positives can your team handle manually? What is the downstream impact of each error type?
Step 5: Track multiple metrics, optimize one Report all relevant metrics to give a complete picture. But choose one primary metric to optimize when tuning your model and selecting between competing models.
Advanced Topics: Beyond Binary Classification
Multiclass Metrics
When your problem has more than two classes, you compute precision, recall, and F1 per class, then aggregate. Scikit-learn supports three aggregation strategies:
- Macro averaging: Calculate each metric for each class independently and take the unweighted average. Treats all classes equally, regardless of their size in the dataset.
- Weighted averaging: Calculate each metric per class and take a weighted average based on class size (support). This is the most common choice in practice.
- Micro averaging: Aggregate TP, FP, FN across all classes globally, then calculate the metric. For F1, micro-averaging is equivalent to accuracy.
from sklearn.metrics import f1_score

y_true_multi = [0, 1, 2, 0, 1, 2, 0, 0, 1, 2]
y_pred_multi = [0, 2, 1, 0, 0, 2, 0, 1, 1, 2]

print(f"Macro F1:    {f1_score(y_true_multi, y_pred_multi, average='macro'):.4f}")
print(f"Weighted F1: {f1_score(y_true_multi, y_pred_multi, average='weighted'):.4f}")
print(f"Micro F1: {f1_score(y_true_multi, y_pred_multi, average='micro'):.4f}")For highly imbalanced multiclass problems, always look at per-class metrics individually. Weighted averages can mask poor performance on the minority class.
The Fbeta Score
The standard F1 score weights precision and recall equally. If your application requires you to weight one more than the other, use the Fbeta score:
Fbeta = (1 + beta²) × (Precision × Recall) / (beta² × Precision + Recall)
- Beta > 1: Weights recall more heavily (favors catching more positives)
- Beta < 1: Weights precision more heavily (favors fewer false positives)
- Beta = 1: Standard F1 (equal weight to both)
from sklearn.metrics import fbeta_score

# F2 score: weights recall twice as heavily as precision
# Good for fraud detection or disease screening
f2 = fbeta_score(y_true, y_pred, beta=2)
print(f"F2 Score (recall-focused): {f2:.4f}")

# F0.5 score: weights precision twice as heavily as recall
# Good for spam filtering or recommendation systems
f05 = fbeta_score(y_true, y_pred, beta=0.5)
print(f"F0.5 Score (precision-focused): {f05:.4f}")Common Mistakes and How to Avoid Them
Mistake 1: Reporting only accuracy on imbalanced data. A 99% accurate model that labels everything as “not fraud” is worthless. Always check if your data is imbalanced before trusting accuracy numbers alone.
Fix: Compute precision, recall, and F1 alongside accuracy. If they differ dramatically from accuracy, you likely have class imbalance.
Mistake 2: Forgetting to choose a threshold. Most models output probabilities, not binary labels. The default threshold of 0.5 is often not optimal, especially for imbalanced data.
Fix: Plot precision vs. recall vs. threshold for your specific dataset and business constraints. Select the threshold that best meets your requirements rather than accepting the default.
Mistake 3: Optimizing the wrong metric. Training and tuning a model to maximize accuracy when recall is what matters leads to a model that fails in production.
Fix: Define your evaluation metric before building the model, ideally during problem definition with business stakeholders. Make it a formal agreement, not an afterthought.
Mistake 4: Ignoring the base rate. A model with 90% recall sounds impressive — until you discover that randomly flagging 10% of cases would also give you close to that recall.
Fix: Always compare against a simple baseline (majority class classifier, random classifier) to understand whether your model actually adds value beyond the trivial solution.
Mistake 5: Using macro-averaged metrics on highly imbalanced multiclass problems. Macro averaging treats a class with 5 samples the same as one with 5,000. This can paint a misleadingly positive picture if your model works well on large classes but fails on small ones.
Fix: Use weighted averaging, or report per-class metrics separately so you can see exactly where your model struggles.
Putting It All Together: A Complete Evaluation Workflow
Here is a production-quality evaluation workflow that integrates everything we have covered:
import numpy as np
import matplotlib.pyplot as plt
from sklearn.datasets import make_classification
from sklearn.linear_model import LogisticRegression
from sklearn.ensemble import RandomForestClassifier
from sklearn.model_selection import train_test_split
from sklearn.metrics import (
    accuracy_score, precision_score, recall_score, f1_score,
    confusion_matrix, classification_report, roc_auc_score,
    average_precision_score
)

def full_model_evaluation(model, X_train, X_test, y_train, y_test,
                           model_name="Model", threshold=0.5):
    """
    Complete evaluation of a binary classifier across all key metrics.
    """
    # Get probability predictions
    y_proba = model.predict_proba(X_test)[:, 1]

    # Apply threshold to get binary predictions
    y_pred = (y_proba >= threshold).astype(int)

    print(f"\n{'='*50}")
    print(f"  Evaluation: {model_name}  (threshold={threshold})")
    print(f"{'='*50}")

    # Core metrics
    accuracy  = accuracy_score(y_test, y_pred)
    precision = precision_score(y_test, y_pred, zero_division=0)
    recall    = recall_score(y_test, y_pred, zero_division=0)
    f1        = f1_score(y_test, y_pred, zero_division=0)
    roc_auc   = roc_auc_score(y_test, y_proba)
    avg_prec  = average_precision_score(y_test, y_proba)

    print(f"\n  Accuracy:      {accuracy:.4f}")
    print(f"  Precision:     {precision:.4f}")
    print(f"  Recall:        {recall:.4f}")
    print(f"  F1 Score:      {f1:.4f}")
    print(f"  ROC-AUC:       {roc_auc:.4f}")
    print(f"  Avg Precision: {avg_prec:.4f}")

    # Class balance info
    n_pos = y_test.sum()
    n_neg = len(y_test) - n_pos
    print(f"\n  Positives: {n_pos} ({n_pos/len(y_test)*100:.1f}%)")
    print(f"  Negatives: {n_neg} ({n_neg/len(y_test)*100:.1f}%)")

    # Classification report
    print(f"\n{classification_report(y_test, y_pred, target_names=['Negative', 'Positive'])}")

    return {
        "model": model_name, "threshold": threshold,
        "accuracy": accuracy, "precision": precision,
        "recall": recall, "f1": f1, "roc_auc": roc_auc
    }


# Create a realistic imbalanced dataset
X, y = make_classification(
    n_samples=5000, n_features=15, n_informative=8,
    weights=[0.85, 0.15],  # 85% negative, 15% positive
    random_state=42
)

X_train, X_test, y_train, y_test = train_test_split(
    X, y, test_size=0.25, random_state=42, stratify=y
)

# Train two models
lr = LogisticRegression(random_state=42, max_iter=1000)
lr.fit(X_train, y_train)

rf = RandomForestClassifier(n_estimators=100, random_state=42)
rf.fit(X_train, y_train)

# Evaluate with default threshold
lr_results = full_model_evaluation(lr, X_train, X_test, y_train, y_test,
                                    "Logistic Regression")

rf_results = full_model_evaluation(rf, X_train, X_test, y_train, y_test,
                                    "Random Forest")

# Demonstrate threshold tuning for a high-recall use case
rf_high_recall = full_model_evaluation(rf, X_train, X_test, y_train, y_test,
"Random Forest (High Recall)", threshold=0.3)Running this code shows you how threshold tuning can dramatically shift the precision-recall balance without retraining the model — a powerful tool when deploying to different business contexts.
Summary
Accuracy, precision, and recall each tell a different story about your model’s performance, and understanding when to use each metric is one of the most practically important skills in applied machine learning.
Accuracy is the go-to metric for balanced datasets with equal error costs, but it becomes dangerously misleading when classes are imbalanced. A model that perfectly learns the majority class will show high accuracy while completely ignoring the minority class that matters most.
Precision is your metric when false positives hurt. You want to be sure that when your model raises an alarm, it’s worth paying attention to. Spam filters, search engines, and drug testing are precision-oriented applications.
Recall is your metric when false negatives hurt. You want to make sure your model catches as many real positives as possible, even at the cost of some false alarms. Disease detection, fraud detection, and security systems are recall-oriented applications.
The F1 score is the single-number summary that balances both, making it the standard metric for imbalanced classification problems when neither precision nor recall clearly dominates in importance.
The precision-recall tradeoff is managed through threshold selection. Understanding that you can shift a model’s behavior by changing the decision threshold — without retraining — gives you powerful control over the balance between precision and recall in production systems.
As you advance through more complex machine learning problems, these fundamentals will serve as the bedrock of your evaluation framework. The right metric isn’t determined by the algorithm you chose — it’s determined by the real-world consequences of the errors your model makes.
Further Reading and Next Steps
With a solid understanding of accuracy, precision, and recall, you are ready to explore:
- Article 62: Understanding the F1 Score for Imbalanced Datasets — deeper treatment of handling class imbalance
- Article 63: ROC Curves and AUC — an excellent complement to precision-recall curves for balanced problems
- Article 67: Sensitivity and Specificity in Medical AI — how these concepts apply in regulated healthcare applications
- Article 68: Cross-Validation Strategies — ensuring your metrics are reliable across different data splits
Experiment with the code examples in this article using your own datasets. The best way to internalize the precision-recall tradeoff is to watch it happen live as you adjust thresholds on a real classification problem.