Introduction: Decoding the Language of 3D Printing
When you first enter the world of 3D printing, one of the most disorienting aspects is the sheer volume of specialized terminology that experienced users throw around casually in conversations, tutorials, and documentation. Terms like “retraction,” “bed leveling,” “STL,” “G-code,” “extrusion multiplier,” and dozens of others get used as though everyone naturally understands them, leaving beginners feeling lost and uncertain. It’s like trying to learn a new skill while simultaneously learning a new language, and the combination can be overwhelming.
The terminology challenge goes beyond just not knowing what words mean. Many 3D printing terms are borrowed from other fields like manufacturing, computer science, or materials engineering, where they have specific technical meanings that don’t always align intuitively with how they’re used in 3D printing. Other terms are community-created jargon or abbreviations that make sense once explained but are completely opaque to newcomers. Still others sound like they should be self-explanatory but actually refer to specific technical concepts that require real understanding to use correctly.
Making matters worse, some 3D printing terms are used inconsistently across the community or have slightly different meanings depending on context. What one person calls “bed tramming” another might call “bed leveling,” even though technically these aren’t quite the same thing. Some use “filament” and “material” interchangeably while others use them to distinguish between the physical form and the chemical composition. These ambiguities make learning terminology more challenging than it would be in fields with more standardized vocabulary.
However, understanding common 3D printing terminology is essential for several practical reasons. First, you need to understand documentation, tutorials, and instructions that use these terms without stopping to define them. When a guide tells you to “adjust your retraction settings” or “enable supports,” you need to know what those instructions actually mean. Second, you need to communicate effectively with the community when asking for help or sharing knowledge. Describing your problems using correct terminology helps others understand and assist you more effectively. Third, understanding terms helps you think clearly about concepts, as vocabulary provides mental frameworks for understanding how things work.
The good news is that while 3D printing terminology initially seems vast and confusing, most beginners need to understand only a few dozen core terms to handle the majority of situations they’ll encounter. More specialized vocabulary can be learned gradually as you encounter it in specific contexts. This article focuses on the essential terms that every beginner should understand, organized by category for easier learning. We’ll explain each term in plain English, describe how it’s used in context, and clarify common confusions or ambiguities.
Rather than presenting a dry dictionary-style list, we’ll explore terms in meaningful groups and explain the relationships between related concepts. Understanding how terms connect to each other and to the broader printing process makes them easier to remember and use correctly. We’ll also note when terms have multiple meanings or when there’s variation in how the community uses them, preparing you for the imperfect consistency you’ll encounter in the real world.
By the end of this article, you’ll have a solid foundation in 3D printing vocabulary that allows you to understand tutorials, follow documentation, participate in community discussions, and think clearly about printing concepts. While you won’t know every specialized term (that comes with time and experience), you’ll know the core vocabulary that handles most situations and provides context for learning additional terms as you encounter them. Let’s decode the language of 3D printing together.
Core Technologies and Process Terms
Understanding the fundamental technology terms helps you grasp what type of printing you’re doing and how the basic process works. These terms appear constantly in any 3D printing discussion and form the foundation for all other terminology.
FDM (Fused Deposition Modeling) or FFF (Fused Filament Fabrication) refers to the most common type of consumer 3D printing where thermoplastic filament is melted and deposited layer by layer to build objects. These terms are essentially synonymous, with FDM being a trademarked term originally owned by Stratasys and FFF being the generic equivalent. Most consumer 3D printers use this technology. When people say “3D printer” without qualification, they usually mean an FDM printer.
Additive Manufacturing describes the overall category of manufacturing processes that create objects by adding material layer by layer, as opposed to subtractive processes like machining that remove material. 3D printing is a type of additive manufacturing, though technically additive manufacturing is the broader professional term while 3D printing is sometimes considered the hobbyist term. In practice, they’re often used interchangeably.
Layer refers to a single horizontal slice of your print, one of many stacked on top of each other to create the complete three-dimensional object. Each layer is typically between one tenth of a millimeter and three tenths of a millimeter thick, though this can vary. Understanding that prints are built as stacks of many thin layers is fundamental to understanding how FDM printing works and why prints show characteristic layer lines.
Layer Height is the thickness of each individual layer, measured in millimeters. Smaller layer heights like zero point one millimeters create smoother surfaces and finer details but take longer to print because more layers are needed. Larger layer heights like zero point three millimeters print faster but show more visible layer lines and less detail. Layer height is one of the most important settings affecting print quality and time.
Extrusion describes the process of pushing molten plastic through the nozzle to deposit material. When the printer is extruding, material is actively flowing out of the nozzle. Understanding extrusion as the fundamental material deposition mechanism helps you understand many other terms and concepts related to material flow, pressure, and quality.
Slicing is the process of converting a 3D model (typically an STL file) into instructions (G-code) that tell the printer exactly how to build the object layer by layer. Slicing software analyzes the model, divides it into layers, generates toolpaths for the nozzle to follow, and applies your settings for materials, quality, and other parameters. You “slice” a model before printing it.
Slicer is the software application that performs slicing. Common slicers include Cura, PrusaSlicer, Simplify3D, and many others. Your slicer is where you load 3D models, adjust print settings, add supports, choose orientation, and generate the actual print files. Mastering your slicer is essential to successful printing.
G-code is the instruction file that tells your printer exactly what to do. It contains thousands of individual commands like “move to these coordinates,” “heat to this temperature,” “extrude this much material,” and so on. The slicer generates G-code from your model and settings, and the printer executes G-code to actually create the print. You rarely need to read or write G-code manually, but understanding that it’s the actual instruction language helps you understand the workflow.
STL (Standard Tessellation Language) is the most common 3D model file format used in 3D printing. STL files describe the surface geometry of objects as triangular meshes. When you download models from repositories like Thingiverse, they’re usually STL files. Your CAD software exports STL files, and your slicer imports them for processing.
Hardware and Mechanical Terms
These terms describe the physical components and mechanisms of the 3D printer itself. Understanding printer anatomy helps you follow instructions, perform maintenance, and troubleshoot problems.
Hotend is the component that melts filament and deposits it through the nozzle. The hotend includes the heating element, temperature sensor, heat sink, heat break, and nozzle as a complete system. Understanding the hotend as the heart of the extrusion system helps you grasp how material gets melted and controlled. We covered hotends in detail in a previous article.
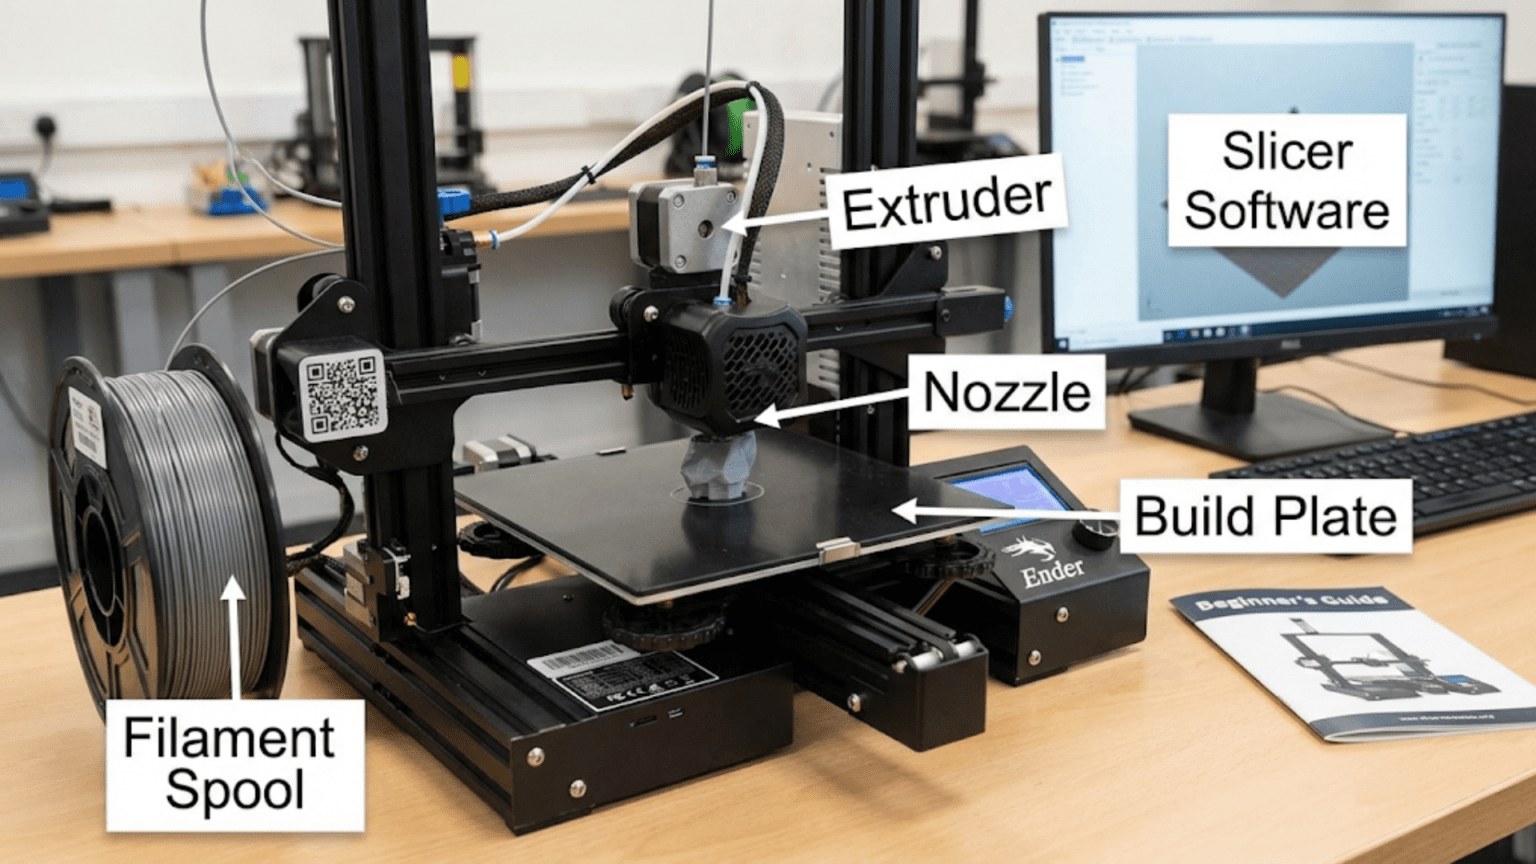
Nozzle is the small brass or hardened steel component at the very tip of the hotend where molten plastic emerges. Nozzles have an orifice diameter, commonly zero point four millimeters but also available in other sizes. The nozzle size affects print resolution, speed, and the types of details you can achieve. Nozzles are replaceable and occasionally need changing due to wear or clogs.
Extruder is the mechanism that pushes filament through the hotend. The extruder includes a motor and a gear that grips and drives the filament. Extruders can be direct drive (mounted on the print head) or Bowden (mounted on the frame with a tube carrying filament to the hotend). Understanding extruder types helps you set appropriate retraction settings.
Build Plate or Print Bed is the surface where prints are built. The build plate provides the foundation for first layer adhesion and may be heated to improve adhesion with certain materials. Understanding bed-related terminology helps you with leveling, adhesion, and surface selection topics.
Bed Leveling or more accurately Bed Tramming refers to adjusting the build plate so it’s parallel to the nozzle’s motion plane and at the correct distance from the nozzle throughout the printing area. Proper bed leveling is essential for first layer adhesion and overall print success. This is covered extensively in our bed leveling article.
Auto Bed Leveling (ABL) is a system using sensors to automatically measure bed topology and compensate for any variations during printing. ABL reduces or eliminates manual bed leveling requirements. Common probe types include BLTouch, inductive sensors, and capacitive sensors.
Build Volume or Print Volume is the maximum space in which the printer can create objects, specified as width x depth x height in millimeters. A printer with a two hundred by two hundred by two hundred millimeter build volume can print objects up to those dimensions. Understanding build volume helps you determine whether models will fit on your printer.
Motion System describes how the printer moves the print head and/or bed to create prints. Common types include Cartesian (XYZ axes), CoreXY, and Delta systems. Each has different characteristics affecting speed, accuracy, and build volume shape.
Stepper Motor refers to the precise electric motors that control all movement in 3D printers. Stepper motors can move in exact tiny increments, allowing precise positioning. Printers typically have four or more stepper motors controlling X, Y, Z movement and extrusion.
Belt is the toothed belt connecting motors to moving components, transmitting rotational motion into linear movement. Belts need proper tension; too loose and positioning becomes imprecise, too tight and motors struggle or components wear. Belt maintenance is routine printer upkeep.
Material and Filament Terms
Understanding material terminology helps you choose appropriate filaments, set correct temperatures, and understand material behavior during printing.
Filament is the plastic material fed into the printer, typically supplied on spools as a continuous strand with diameter of one point seven five millimeters or three millimeters. Filament is heated in the hotend until molten, then extruded through the nozzle to build prints. Understanding filament as your raw material helps you grasp material-related settings and issues.
PLA (Polylactic Acid) is the most common and beginner-friendly 3D printing material. PLA is biodegradable plastic derived from renewable resources like corn starch or sugarcane. It prints at relatively low temperatures, adheres well to beds, doesn’t warp excessively, and is generally easy to work with. Most beginners start with PLA.
PETG (Polyethylene Terephthalate Glycol) is a popular material that’s stronger and more temperature-resistant than PLA but slightly more challenging to print. PETG is the same basic plastic as water bottles but modified for 3D printing. It bridges between PLA’s ease of use and ABS’s mechanical properties, making it popular for functional parts.
ABS (Acrylonitrile Butadiene Styrene) is a tough, impact-resistant plastic commonly used for functional parts and items requiring higher temperature resistance. ABS is more challenging to print than PLA due to its tendency to warp and its requirement for higher temperatures. It’s the same plastic used for LEGO bricks.
TPU (Thermoplastic Polyurethane) or Flexible Filament refers to rubber-like materials that create flexible, springy prints. TPU is more challenging to print than rigid materials, particularly on Bowden extruders, but enables unique applications like phone cases, gaskets, or wearable items.
Glass Transition Temperature (Tg) is the temperature at which plastic transitions from rigid to soft/rubbery. Understanding Tg helps explain material behavior; PLA’s low Tg around sixty degrees explains why PLA parts soften in hot cars, while ABS’s higher Tg around one hundred degrees makes it more temperature-resistant.
Extrusion Temperature or Nozzle Temperature is the temperature at which you heat the hotend to melt filament. Different materials require different temperatures; PLA typically prints around one hundred ninety to two hundred twenty degrees Celsius, while ABS needs around two hundred thirty to two hundred fifty degrees.
Bed Temperature is the temperature of the heated build plate. Heating the bed improves first layer adhesion and reduces warping. PLA might use sixty degree beds, while ABS benefits from beds at one hundred to one hundred ten degrees.
Hygroscopic describes materials that absorb moisture from air. Many 3D printing filaments including PLA, PETG, and nylon are hygroscopic and print poorly when wet. Understanding hygroscopic behavior explains why filament storage matters and why dried filament prints better than wet filament.
Print Settings and Quality Terms
These terms describe the settings you adjust in your slicer to control print quality, speed, and characteristics.
Infill is the internal structure of a print. Rather than making solid objects that would use excessive material and time, prints typically have outer shells filled with a partial internal structure. Infill percentage describes how much of the internal volume is filled versus empty; twenty percent infill means twenty percent filled, eighty percent air.
Infill Pattern describes the geometric pattern used for internal structure. Common patterns include grid, honeycomb, triangular, gyroid, and cubic. Different patterns have different strength characteristics and print speeds.
Perimeter or Wall refers to the outer vertical surfaces of a print. Prints typically use multiple perimeter lines, with outer perimeters visible on the surface and inner perimeters providing strength. The number of perimeters affects part strength and print time.
Top/Bottom Layers are the solid horizontal surfaces above and below infill. Multiple top and bottom layers create solid surfaces that don’t expose internal infill structure. Too few layers create surfaces with visible infill, while more layers create smoother surfaces.
Print Speed is how fast the print head moves while extruding material, measured in millimeters per second. Faster speeds reduce print time but may decrease quality or reliability. Typical speeds range from thirty to eighty millimeters per second, with slower speeds for first layers and detailed areas.
Retraction is when the extruder motor briefly reverses to pull filament back from the nozzle, reducing pressure and preventing oozing during travel moves. Retraction distance and speed are critical settings for preventing stringing. We covered retraction in detail in a previous article.
Travel Move is movement where the nozzle relocates without extruding material. Travel moves connect different parts of the print or move between layers. Retraction typically occurs during travel moves to prevent stringing.
Support Structures or simply Supports are temporary structures printed to hold up overhanging parts of a model during printing. Supports are removed after printing completes. Effective support configuration is essential for successfully printing complex geometries.
Overhang is a surface that extends outward beyond the layer below it. Steep overhangs approaching horizontal can’t be printed without support structures because there’s nothing for new material to rest on. Understanding overhang limits helps you design printable models.
Bridge or Bridging is printing a horizontal span across a gap between two support points without support underneath. Good bridging requires appropriate cooling and speed settings. Successfully printing bridges reduces or eliminates support needs.
Seam or Z-Seam is the visible line where each layer starts and stops. All prints have a seam, though its visibility can be minimized through placement and settings. Understanding seams helps you position them in less visible locations.
Adhesion and First Layer Terms
First layer adhesion is critical for print success, and these terms describe concepts related to getting prints to stick properly.
Bed Adhesion refers to how well the first layer sticks to the build plate. Good bed adhesion keeps prints attached during printing, while poor adhesion causes prints to lift, shift, or fail. Many factors affect adhesion including bed leveling, temperature, surface cleanliness, and material choice.
First Layer is the initial layer that contacts the build plate. The first layer is critical because it provides the foundation for the entire print. First layer quality determines whether prints stick and establish correct geometry for subsequent layers.
Z-Offset is the vertical distance adjustment for the nozzle relative to the bed. Adjusting Z-offset lets you fine-tune the nozzle-to-bed gap for optimal first layer squish. Many printers allow live Z-offset adjustment while the first layer prints.
Squish is the informal term for the compression of the first layer against the bed. Proper squish means the nozzle is close enough that plastic gets pressed into the bed surface, spreading slightly for good adhesion. Too much squish causes scraping, too little causes poor adhesion.
Brim is additional perimeter lines printed around the base of your object to increase first layer contact area and improve adhesion. Brims are particularly useful for objects with small footprints or materials prone to warping. The brim is removed after printing.
Raft is a thick platform printed underneath your object, providing a larger, more stable base for adhesion. Rafts use more material and time than brims but provide maximum adhesion security. The object is separated from the raft after printing.
Skirt is one or more loops printed around your object but not attached to it. Skirts don’t improve adhesion but prime the nozzle and let you verify that extrusion is working before the actual object starts. Skirts are standard practice for most prints.
Warping or Curling is when corners or edges of prints lift from the bed during printing due to thermal contraction as plastic cools. Warping is particularly common with ABS and other materials with high thermal expansion. We covered warping prevention in previous articles.
Elephant’s Foot is the slight bulging at the very bottom of prints where the first layer is compressed and spreads wider than intended. While minor elephant’s foot is acceptable, excessive bulging affects dimensional accuracy and can be reduced by adjusting Z-offset or first layer settings.
Print Quality and Problem Terms
Understanding terms for quality issues and problems helps you diagnose issues and communicate about them clearly.
Stringing or Oozing describes thin strands of plastic stretching between parts of the print where the nozzle traveled through air. Stringing indicates inadequate retraction or excessive temperature. Clean prints show minimal stringing.
Layer Shift is when layers misalign horizontally, creating a stepped appearance where the print shifts position partway through. Layer shifts indicate mechanical problems like loose belts, motor issues, or excessive speed causing the printer to lose position.
Under-Extrusion is when the printer deposits less plastic than needed, creating gaps, thin walls, or weak structures. Under-extrusion indicates problems with extrusion calibration, partial nozzle clogs, or feeding issues.
Over-Extrusion is the opposite, depositing too much plastic causing blobs, rough surfaces, or dimensional inaccuracy. Over-extrusion typically results from incorrect extrusion multiplier settings or filament diameter assumptions.
Ringing or Ghosting or Echoing describes ripple patterns visible on surfaces after sharp corners or details, caused by vibration in the printer’s motion system. Reducing print speed or increasing mechanical rigidity reduces ringing.
Z-Wobble creates wavy patterns on vertical surfaces caused by imperfect Z-axis motion, often from bent lead screws or misaligned components. Z-wobble creates periodic surface artifacts following the rotation of the Z-axis drive mechanism.
Layer Adhesion refers to how well successive layers bond to each other. Poor layer adhesion creates weak parts that separate along layer lines. Adequate temperature and appropriate cooling ensure good layer bonding.
Delamination is when layers separate after printing, indicating poor layer adhesion during the print. Delamination creates structural failure and is often caused by excessive cooling or insufficient temperature.
Blobs or Zits are small imperfections on print surfaces where excess material accumulated, often at layer start/stop points or where the nozzle changed direction. Retraction tuning and seam placement help minimize blobs.
Advanced and Technical Terms
These terms appear in more advanced discussions but are worth understanding as you progress beyond basic printing.
Extrusion Multiplier or Flow Rate is the calibration setting that adjusts how much plastic the printer extrudes. Setting the extrusion multiplier correctly ensures accurate dimensional accuracy and prevents over or under-extrusion. This typically requires calibration testing.
Volumetric Flow Rate describes how much material volume the hotend can melt and extrude per unit time, typically measured in cubic millimeters per second. Volumetric flow rate limits maximum print speed; exceeding your hotend’s flow capacity causes under-extrusion.
Linear Advance or Pressure Advance are firmware features that compensate for the springiness and pressure effects in the extrusion system, improving corners and reducing artifacts. Properly calibrated pressure advance improves print quality.
Jerk and Acceleration settings control how quickly the printer changes speed and direction. Lower values create smoother motion but slower prints, while higher values enable faster printing but may introduce ringing or layer shifts if mechanical systems can’t keep up.
PID Tuning is calibrating the temperature control algorithm to maintain stable temperatures without overshooting or oscillating. Properly tuned PID ensures the hotend and bed maintain target temperatures accurately.
Firmware is the software running on the printer’s control board that interprets G-code and controls physical movement, heating, and sensors. Common firmwares include Marlin, Klipper, and RepRap. Firmware settings affect printer behavior and capabilities.
Mesh Bed Leveling or Bed Mesh is a detailed map of the bed’s surface topology created by probing multiple points. The mesh allows the firmware to compensate for bed irregularities during printing by adjusting Z height dynamically.
Bowden Extruder has the extruder motor mounted on the printer frame with a PTFE tube carrying filament to the hotend. Bowden systems reduce moving mass but require longer retraction settings.
Direct Drive Extruder mounts the extruder motor directly on the print head, minimizing distance between motor and hotend. Direct drive provides better control and shorter retraction but increases moving mass.
E-Steps or Steps per Millimeter for the extruder defines how many motor steps equal one millimeter of filament movement. Calibrating E-steps ensures the printer extrudes the commanded amount of filament accurately.
Conclusion: Building Your 3D Printing Vocabulary
The terminology of 3D printing, while initially overwhelming, becomes increasingly familiar and intuitive with continued exposure and practice. You don’t need to memorize every term immediately; understanding develops gradually as you encounter terms in context, use them in your own troubleshooting and discussions, and build connections between related concepts. The vocabulary presented in this article provides the essential foundation that will carry you through most beginner and intermediate situations.
Understanding terminology does more than just help you comprehend tutorials and documentation. It actually helps you think more clearly about 3D printing concepts by providing precise mental categories for different aspects of the process. When you can distinguish retraction problems from temperature problems, identify layer adhesion issues separately from bed adhesion issues, and understand the relationship between extrusion multiplier and flow rate, you’re not just using words correctly, you’re developing more sophisticated mental models of how printing works.
The terms covered here represent the core vocabulary you’ll encounter most frequently in your 3D printing journey. As you advance, you’ll naturally encounter additional specialized terms related to specific materials, advanced techniques, or particular printer types. When you encounter unfamiliar terms, online resources including community forums, documentation, and specifically focused glossaries help you learn them in context. The foundation built by understanding these core terms makes learning additional vocabulary much easier because you have frameworks for understanding how new terms relate to concepts you already grasp.
Remember that 3D printing terminology continues evolving as the technology develops and the community grows. New terms emerge for new techniques or features, while some older terms fade from use or change meaning. Staying engaged with the community through forums, social media, and online content helps you keep your vocabulary current and understand evolving terminology. This linguistic evolution is part of being involved in an active, rapidly developing field.
Don’t be intimidated by terminology you don’t understand or hesitate to ask for clarification when encountering unfamiliar terms. The 3D printing community generally recognizes that terminology can be confusing and most experienced users remember their own confusion when starting. Asking “what does that term mean?” is a normal part of learning and often helps others who had the same question but didn’t ask. Contributing to clear communication by using precise terminology yourself and explaining terms when helping others reinforces the vocabulary throughout the community.
The vocabulary of 3D printing reflects the field’s multidisciplinary nature, borrowing from manufacturing, materials science, computer science, and mechanical engineering while also developing its own unique jargon. This rich linguistic tapestry can be confusing but also reflects the fascinating complexity of what happens when you transform digital designs into physical objects through precise control of materials, motion, and temperature. Understanding the language helps you appreciate the sophistication of what your 3D printer accomplishes with every successful print.
As you continue your 3D printing journey, you’ll find that terms that initially seemed arcane become second nature. You’ll use words like “retraction,” “overhang,” and “extrusion multiplier” without conscious thought, and you’ll recognize print quality issues by their technical names before you fully process what you’re seeing. This internalization of vocabulary signals your progression from beginner to practitioner, from someone learning the language to someone speaking it fluently. The journey from confusion to competence is gradual but inevitable with continued engagement and practice.
This glossary will remain a useful reference as you encounter terms you’ve forgotten or need to clarify. Bookmark it, return to it when needed, and use it as a foundation for building your expanding vocabulary. Combined with hands-on experience and continued learning, understanding this terminology empowers you to learn more effectively, communicate more clearly, troubleshoot more systematically, and generally succeed in the fascinating world of 3D printing. Welcome to the community, and happy learning!