The Raspberry Pi has revolutionized the world of computing by making powerful, affordable single-board computers accessible to everyone. Originally designed as an educational tool to teach basic computer science in schools, the Raspberry Pi has grown into a versatile platform used by hobbyists, developers, and professionals worldwide. From simple DIY electronics projects to advanced robotics, home automation, and IoT (Internet of Things) applications, the Raspberry Pi’s flexibility and low cost have made it a favorite in the tech community.
This guide will introduce you to the basics of the Raspberry Pi, including what it is, the different models available, and how to set up and start using your own Raspberry Pi. Whether you are a beginner looking to get started with programming or an experienced developer exploring new possibilities, this guide will provide you with a solid foundation to begin your journey with Raspberry Pi.
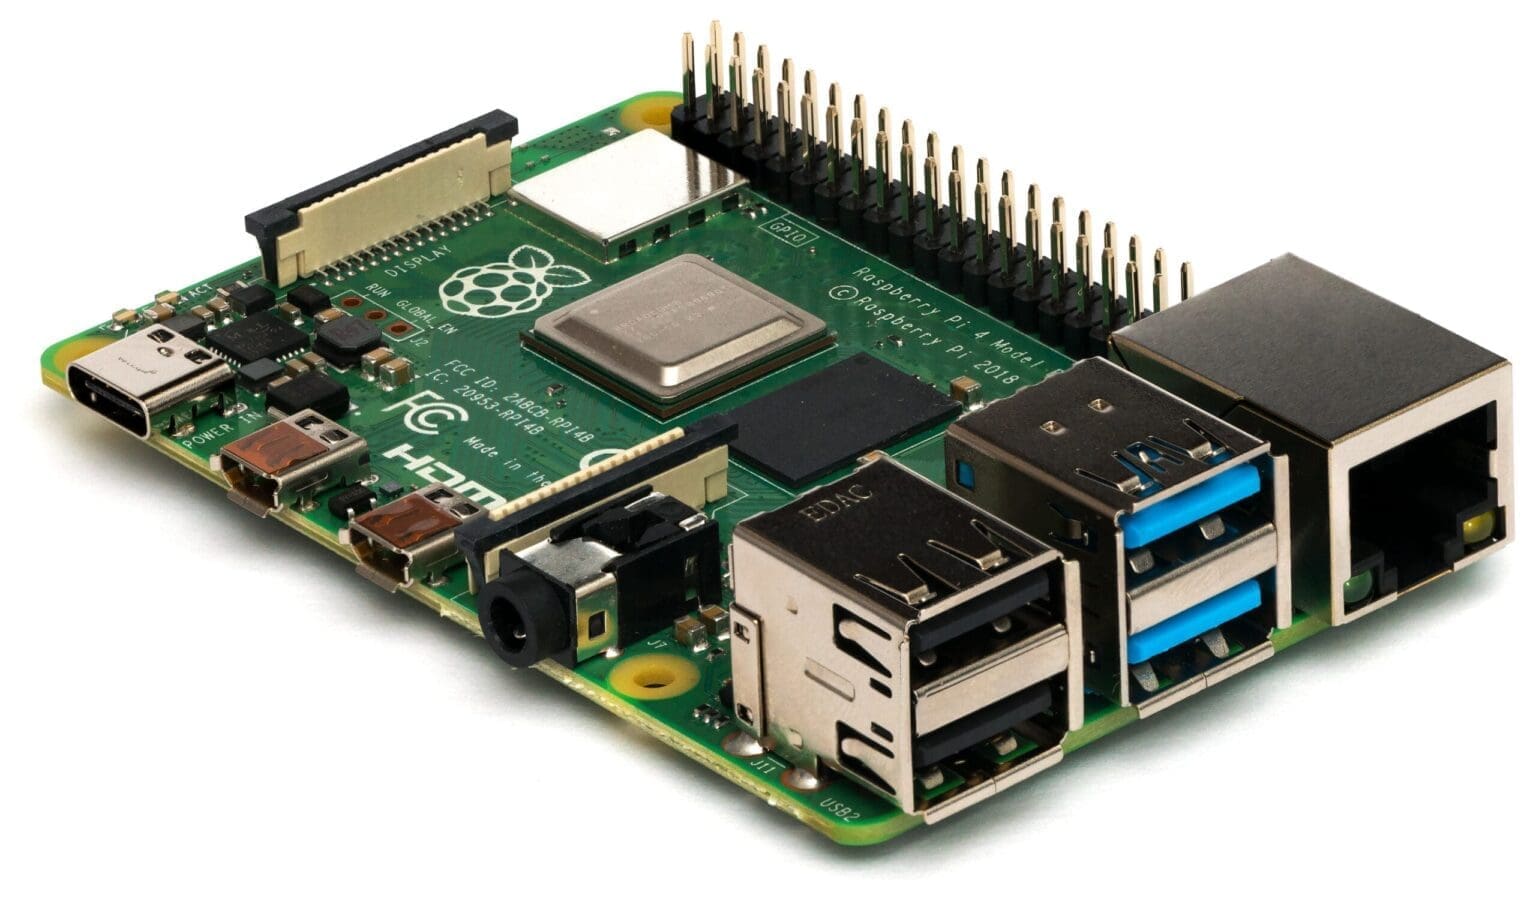
What is Raspberry Pi?
The Raspberry Pi is a series of small, affordable, single-board computers developed by the Raspberry Pi Foundation, a UK-based charity dedicated to promoting computer science education. These credit-card-sized computers pack a lot of power, offering users the ability to run a full operating system, connect to various peripherals, and interact with the physical world through General-Purpose Input/Output (GPIO) pins.
Key Features of the Raspberry Pi:
- Low Cost: Starting at around $35, the Raspberry Pi offers an affordable entry into computing and electronics.
- Compact Size: Its small form factor makes it ideal for embedded applications, portable projects, and space-constrained setups.
- Versatile Connectivity: Includes HDMI, USB, Ethernet, Wi-Fi, Bluetooth, and GPIO for interfacing with external devices and sensors.
- Full Operating System: Runs various Linux distributions, with Raspberry Pi OS (formerly Raspbian) being the official and most commonly used OS.
- Community Support: Backed by a large and active community, with extensive online resources, tutorials, and forums.
Raspberry Pi Models Overview
The Raspberry Pi family has evolved over the years, with several models available to cater to different needs and budgets. Here are some of the most popular models:
1. Raspberry Pi 4 Model B
The Raspberry Pi 4 Model B is the latest and most powerful version, offering significant improvements in speed, connectivity, and memory over its predecessors. It is suitable for demanding tasks such as media centers, programming environments, web servers, and more.
Key Specifications:
- Processor: Quad-core ARM Cortex-A72, 1.5GHz
- RAM Options: 2GB, 4GB, or 8GB LPDDR4
- Connectivity: Dual-band Wi-Fi, Bluetooth 5.0, Gigabit Ethernet
- Ports: 2 x micro-HDMI (4K output), 2 x USB 3.0, 2 x USB 2.0, USB-C power input
- GPIO: 40-pin header for interfacing with sensors and devices
Ideal Use Cases:
- Desktop replacement for basic computing tasks
- Media center for streaming 4K video
- Home automation hub with multiple connected sensors
- Programming and development platform for Python, Java, and more
2. Raspberry Pi 3 Model B+
The Raspberry Pi 3 Model B+ is a solid all-rounder, offering good performance and connectivity. It’s a great choice for those looking for a balance of power and affordability.
Key Specifications:
- Processor: Quad-core ARM Cortex-A53, 1.4GHz
- RAM: 1GB LPDDR2
- Connectivity: Dual-band Wi-Fi, Bluetooth 4.2, Fast Ethernet
- Ports: HDMI, 4 x USB 2.0, micro-USB power input
- GPIO: 40-pin header
Ideal Use Cases:
- Basic robotics and automation projects
- Retro gaming console with emulators
- Lightweight server for web hosting or file sharing
- Learning platform for beginners in programming and electronics
3. Raspberry Pi Zero and Zero W
The Raspberry Pi Zero series offers a highly compact and low-cost option, ideal for embedded and portable applications. The Zero W variant adds Wi-Fi and Bluetooth connectivity, making it perfect for IoT projects.
Key Specifications:
- Processor: Single-core ARM11, 1GHz
- RAM: 512MB
- Connectivity (Zero W): Wi-Fi, Bluetooth 4.1
- Ports: Mini HDMI, micro-USB OTG, micro-USB power input, GPIO header (unpopulated)
- Size: 65mm x 30mm x 5mm
Ideal Use Cases:
- Ultra-portable projects like wearable tech or hidden cameras
- IoT devices with low power requirements
- Custom keyboards, game controllers, or other USB devices
- Learning to solder and assemble electronic components
4. Raspberry Pi Pico
Unlike other Raspberry Pi models, the Pico is a microcontroller board rather than a full-fledged computer. It’s designed for low-power, real-time applications and can be programmed using MicroPython or C/C++.
Key Specifications:
- Processor: Dual-core ARM Cortex-M0+, 133MHz
- RAM: 264KB
- Storage: 2MB Flash
- Connectivity: None (can be expanded with modules)
- GPIO: 26 multifunctional pins
Ideal Use Cases:
- Real-time control for sensors, motors, and displays
- Embedded systems where low power and small size are crucial
- Simple robotics, data logging, and automation projects
- Learning about microcontroller programming with Python
Setting Up Your Raspberry Pi
Getting started with the Raspberry Pi involves a few simple steps: assembling the hardware, installing the operating system, and configuring the software. Here’s a step-by-step guide to help you set up your Raspberry Pi for the first time.
1. Gathering the Required Components
Before you start, make sure you have all the necessary components:
- Raspberry Pi Board: Choose a model that suits your needs.
- MicroSD Card (16GB or higher): Used as the main storage for the operating system and data. A class 10 card is recommended for better performance.
- Power Supply: A 5V USB power supply (minimum 2.5A for the Raspberry Pi 4).
- HDMI Cable: For connecting to a monitor or TV.
- Keyboard and Mouse: USB or Bluetooth for input.
- Optional: Case for protection, heat sinks, fan for cooling, and additional accessories like cameras or sensors.
2. Installing the Operating System
The official operating system for the Raspberry Pi is Raspberry Pi OS, a Debian-based Linux distribution optimized for the hardware. You can also install other operating systems like Ubuntu, RetroPie (for gaming), or specialized IoT OS like balenaOS.
Steps to Install Raspberry Pi OS:
- Download Raspberry Pi Imager: Visit the official Raspberry Pi website and download the Raspberry Pi Imager tool, which simplifies the process of installing an OS on your microSD card.
- Prepare the SD Card:
- Insert the microSD card into your computer’s card reader.
- Open Raspberry Pi Imager and select the “CHOOSE OS” button to pick Raspberry Pi OS (32-bit recommended for beginners).
- Click “CHOOSE SD CARD” to select your microSD card.
- Click “WRITE” to start the installation. The process may take a few minutes.
- Insert the SD Card into the Raspberry Pi: Once the OS is written, safely remove the microSD card from your computer and insert it into the microSD slot on the Raspberry Pi.
3. Connecting and Powering On
- Connect the Raspberry Pi to a Monitor: Use the HDMI cable to connect your Raspberry Pi to a monitor or TV.
- Attach Keyboard and Mouse: Connect the keyboard and mouse to the USB ports on the Raspberry Pi.
- Power Up: Connect the power supply to the Raspberry Pi. The board will boot up, and you should see the Raspberry Pi OS desktop environment on the screen.
4. Initial Configuration with Raspberry Pi OS
When you first boot Raspberry Pi OS, you’ll be guided through an initial setup process:
- Language and Time Zone: Select your preferred language, country, and time zone settings.
- Wi-Fi Connection: If your Raspberry Pi has Wi-Fi, connect to your local network.
- Update the System: The setup will prompt you to update your software. This step ensures you have the latest drivers, security patches, and features.
- Enable Additional Features: If you plan to use specific hardware like cameras, GPIO pins, or SSH for remote access, you can enable these in the Raspberry Pi Configuration tool.
Congratulations! Your Raspberry Pi is now set up and ready to use. You can start exploring the vast array of possibilities, from programming and electronics to media playback and home automation.
Basic Operations and Navigation in Raspberry Pi OS
Raspberry Pi OS offers a familiar desktop experience similar to other operating systems like Windows or macOS, with a taskbar, start menu, and file manager.
Key Areas to Explore:
- File Manager: Browse files and folders, copy, move, and manage data just like on any other computer.
- Terminal: Access the command line to execute commands, install software, and control the system. The terminal is a powerful tool, especially for advanced users.
- Programming Tools: Pre-installed software like Python, Scratch, and Thonny IDE are available for coding and learning.
- Web Browser: Chromium is the default browser, allowing you to browse the internet, watch videos, and access web-based applications.
With the basics of Raspberry Pi hardware and software in place, you’re now ready to start exploring specific projects and applications that leverage the power and flexibility of this remarkable little computer.
Exploring the Capabilities of Raspberry Pi: Basic Projects and Applications
Getting Started with Your First Raspberry Pi Projects
Now that you have set up your Raspberry Pi, it’s time to dive into some basic projects to familiarize yourself with its capabilities. The following projects are beginner-friendly and will help you learn how to use the Raspberry Pi’s GPIO pins, connect external components, and write simple programs.
1. Blinking an LED with Raspberry Pi’s GPIO
One of the most common first projects is controlling an LED using the GPIO (General-Purpose Input/Output) pins on the Raspberry Pi. This project will introduce you to basic electronics and Python programming.
Components Needed:
- 1 x LED (any color)
- 1 x 330-ohm resistor
- Jumper wires
- Breadboard
Circuit Setup:
- Connect the long leg (anode) of the LED to GPIO pin 17 on the Raspberry Pi (pin 11 on the GPIO header).
- Connect the short leg (cathode) of the LED to one end of the 330-ohm resistor.
- Connect the other end of the resistor to a ground (GND) pin on the Raspberry Pi (e.g., pin 6).
Writing the Code: Open the Terminal on your Raspberry Pi and use Python to control the LED. Create a new Python file by typing:
nano blink.pyThen, type the following code into the editor:
import RPi.GPIO as GPIO
import time

# Set up the GPIO using the BCM pin numbering
GPIO.setmode(GPIO.BCM)
GPIO.setup(17, GPIO.OUT)  # Set GPIO 17 as an output pin

try:
    while True:
        GPIO.output(17, GPIO.HIGH)  # Turn on the LED
        time.sleep(1)               # Wait for one second
        GPIO.output(17, GPIO.LOW)   # Turn off the LED
        time.sleep(1)               # Wait for one second
except KeyboardInterrupt:
GPIO.cleanup() # Clean up GPIO settings when exitingSave and exit by pressing CTRL + X, then Y, and Enter. Run the script with:
python3 blink.pyWhat This Code Does:
- Sets up GPIO pin 17 as an output.
- Blinks the LED on and off every second in a loop.
- Cleans up GPIO settings when you stop the script with
CTRL + C.
This simple project teaches you the basics of using the GPIO pins and running Python scripts, setting the stage for more complex projects.
2. Setting Up a Raspberry Pi Media Center with OSMC
Turning your Raspberry Pi into a media center is another popular project that showcases the device’s versatility. With software like OSMC (Open Source Media Center), you can transform your Raspberry Pi into a powerful home theater system capable of streaming video, music, and more.
Requirements:
- Raspberry Pi (3 or 4 recommended for smooth performance)
- MicroSD card (16GB or larger)
- HDMI cable
- USB keyboard and mouse (for initial setup)
- Internet connection
Steps to Set Up OSMC:
- Download OSMC: Go to the OSMC website and download the installer for your operating system.
- Install OSMC on the SD Card:
- Use the OSMC installer to write the software to your microSD card. Follow the on-screen instructions to select the correct Raspberry Pi model and preferred settings.
- Insert the SD Card and Boot:
- Insert the prepared SD card into your Raspberry Pi and power it on. The OSMC setup wizard will guide you through the initial configuration.
- Connect to Wi-Fi: Set up your network connection during the initial setup to enable streaming and updates.
- Start Streaming:
- Use the built-in media player to watch movies, listen to music, and explore add-ons that provide access to popular streaming services like Netflix, YouTube, and Spotify.
Benefits of Using Raspberry Pi as a Media Center:
- Affordable and customizable alternative to commercial media players.
- Supports high-definition video playback, including 4K on the Raspberry Pi 4.
- Access to a wide range of streaming services and local media files.
- Ability to expand functionality with additional add-ons and plugins.
3. Building a Retro Gaming Console with RetroPie
Another exciting project is converting your Raspberry Pi into a retro gaming console using RetroPie, a software package that emulates classic gaming systems like NES, SNES, Sega Genesis, and more. This project is perfect for nostalgic gamers who want to relive their favorite childhood games.
Requirements:
- Raspberry Pi 3 or 4 for best performance
- MicroSD card (32GB or larger recommended)
- USB game controllers
- HDMI cable
- Keyboard for setup
Steps to Set Up RetroPie:
- Download RetroPie: Go to the RetroPie website and download the appropriate image for your Raspberry Pi model.
- Install RetroPie on the SD Card:
- Use a tool like Raspberry Pi Imager or Etcher to flash the RetroPie image to your microSD card.
- Insert the SD Card and Boot:
- Place the microSD card into your Raspberry Pi and power it on. RetroPie will boot up and guide you through the initial setup process, including controller configuration.
- Add Game ROMs:
- Transfer game ROM files to the RetroPie system via USB or network. ROMs are digital copies of classic games that you own.
- Start Playing:
- Browse through your game library, select a title, and enjoy retro gaming on your TV or monitor.
Features of RetroPie:
- Supports a wide variety of gaming systems, from early arcade machines to PlayStation.
- Customizable interface with themes and artwork for your game collection.
- Ability to save game states, adjust settings, and connect multiple controllers for multiplayer action.
4. Creating a Personal Web Server with Raspberry Pi
Setting up a web server on a Raspberry Pi is a great way to learn about web hosting, build your own websites, or develop web-based applications. You can use software like Apache or Nginx to create a fully functional server right at home.
Requirements:
- Raspberry Pi (any model, but Pi 3 or 4 recommended for better performance)
- MicroSD card (16GB or larger)
- Internet connection
Steps to Set Up a Web Server:
1. Install Apache: Open the Terminal and install the Apache web server with:
sudo apt update
sudo apt install apache2 -y2. Test the Server: Open a web browser and type your Raspberry Pi’s IP address in the address bar (e.g., http://192.168.1.10). You should see the default Apache welcome page.
3. Install PHP: To add dynamic content capabilities, install PHP with:
sudo apt install php libapache2-mod-php -y4. Create a PHP Test Page: Create a test file to check that PHP is working correctly:
Add the following code:
<?php
phpinfo();
?>Save and exit, then go to http://your-pi-ip-address/info.php to see the PHP information page.
5. Host Your Website: You can now upload your HTML, CSS, JavaScript, and PHP files to the /var/www/html/ directory to host your website.
Applications of a Raspberry Pi Web Server:
- Host personal websites or blogs.
- Develop and test web applications locally.
- Set up a local network server for file sharing or intranet services.
- Learn about server management, security, and web technologies.
Expanding Your Skills with Raspberry Pi: Intermediate and Advanced Applications
As you gain confidence with basic projects, you can start exploring more complex applications that take full advantage of the Raspberry Pi’s capabilities. Here are some project ideas that will challenge you to learn more about programming, electronics, and network communication.
1. Home Automation with Raspberry Pi and Home Assistant
Raspberry Pi can serve as the central hub of a smart home system, allowing you to control lights, appliances, security cameras, and other IoT devices. Home Assistant is an open-source platform that integrates with hundreds of smart home products, enabling automation and remote control from your smartphone.
Key Features:
- Supports popular smart home brands like Philips Hue, Sonos, and Google Home.
- Create custom automations based on sensors, schedules, or voice commands.
- Access and control devices remotely via the Home Assistant app.
2. Weather Station Using Sensors and Data Logging
Create a weather station using temperature, humidity, and barometric pressure sensors connected to your Raspberry Pi. Use Python to read sensor data and log it to a file, display it on an LCD screen, or upload it to an online dashboard.
Skills Gained:
- Learn about different types of sensors and how to connect them to GPIO.
- Use Python to collect, process, and visualize data.
- Explore cloud services for remote data access and analysis.
3. Security Camera with Motion Detection
Turn your Raspberry Pi into a security camera system with motion detection capabilities. Use a compatible camera module or USB webcam and set up software like MotionEyeOS to monitor and record video based on movement.
Applications:
- Home or office security with live streaming and alerts.
- Time-lapse photography or wildlife observation.
- Remote monitoring of specific areas through a web interface.
Raspberry Pi’s versatility makes it an invaluable tool for learning, experimenting, and building real-world applications. With these projects, you’ll not only gain hands-on experience but also develop a deeper understanding of how single-board computers can be used to solve everyday problems.
Advanced Raspberry Pi Projects and Tips for Optimizing Your Single-Board Computer Experience
Scaling Up: Advanced Raspberry Pi Projects
As you become more comfortable with Raspberry Pi, you can take on more complex projects that push the boundaries of what this tiny computer can do. Here are some advanced project ideas that will challenge your skills and open new possibilities.
1. Building a Smart Mirror with Raspberry Pi
A smart mirror is a sleek, futuristic project that displays information like time, weather, news, and calendar events on a reflective surface. By combining a two-way mirror, a monitor, and a Raspberry Pi, you can create a personalized smart home device.
Components Needed:
- Raspberry Pi 3 or 4
- Two-way mirror glass
- Monitor or screen
- Frame (wood or other materials)
- HDMI cable, power supply, and other standard accessories
Steps to Build a Smart Mirror:
1. Assemble the Hardware: Mount the monitor behind the two-way mirror and encase it in a frame. Ensure that the screen is aligned with the reflective surface to display the content clearly.
2. Install MagicMirror² Software:
- MagicMirror² is an open-source platform that runs on Raspberry Pi and allows you to customize what is displayed on your smart mirror.
- Install it by opening the Terminal and entering:
curl -sL https://raw.githubusercontent.com/MichMich/MagicMirror/master/installers/raspberry.sh | bash3. Configure Modules: Customize the information displayed on the mirror by editing the configuration file to include modules like weather, calendar, news feeds, and more.
4. Power On and Test: Power on your Raspberry Pi and test the smart mirror. Make adjustments to module placement and settings to achieve the desired appearance.
Applications of a Smart Mirror:
- Display personalized information such as reminders, messages, and traffic updates.
- Integrate with voice assistants like Google Assistant or Amazon Alexa for added functionality.
- Use the mirror in a commercial setting for interactive displays or advertisements.
2. Raspberry Pi Cluster for Parallel Computing
Creating a Raspberry Pi cluster involves connecting multiple Raspberry Pi boards to work together as a single, powerful unit. This setup is used for learning about distributed computing, running parallel processes, and experimenting with cloud-like environments on a small scale.
Requirements:
- Multiple Raspberry Pi boards (4 or more recommended)
- Network switch and Ethernet cables
- Power supply for each Raspberry Pi
- Rack or case for organizing the cluster
Steps to Set Up a Raspberry Pi Cluster:
1. Set Up Each Node: Install Raspberry Pi OS on each Raspberry Pi and configure them with unique hostnames.
2. Network Configuration: Connect all Raspberry Pis to a network switch using Ethernet cables. Assign static IP addresses to make it easier to manage and access each node.
3. Install Cluster Management Software: Tools like MPI (Message Passing Interface) allow the cluster nodes to communicate and work together. Use the Terminal to install MPI on each node:
sudo apt-get install mpich4. Run Parallel Tasks: Write Python scripts or use existing software to run computations across the cluster. This is ideal for processing large datasets, testing parallel algorithms, or learning about distributed systems.
Applications of Raspberry Pi Clusters:
- Learn about parallel computing, distributed databases, and cloud infrastructure.
- Set up a small-scale server farm for web hosting or data processing.
- Run simulations or large-scale experiments that require significant computational power.
3. DIY Home Automation System with Node-RED and MQTT
Node-RED is a visual programming tool that allows you to create complex workflows for home automation without writing much code. Combined with MQTT (Message Queuing Telemetry Transport), a lightweight messaging protocol, you can control and automate devices throughout your home using Raspberry Pi as the central hub.
Components Needed:
- Raspberry Pi (any model, but 3 or 4 recommended for performance)
- Sensors and actuators (temperature sensors, smart bulbs, relays, etc.)
- MQTT broker software (like Mosquitto)
Setting Up Home Automation:
1. Install Node-RED: Install Node-RED on your Raspberry Pi using the Terminal:
bash <(curl -sL https://nodered.org/setup_12.x)2. Set Up MQTT Broker: Install Mosquitto to handle messaging between devices:
sudo apt-get install mosquitto mosquitto-clients3. Connect Devices: Use Node-RED’s drag-and-drop interface to create automation flows. Connect inputs (like temperature sensors) to outputs (like smart plugs) via MQTT.
4. Create Automations: Design automations such as turning on lights when motion is detected or adjusting the thermostat based on room occupancy.
Benefits of Node-RED and MQTT:
- Easy integration with a wide range of IoT devices and protocols.
- Visual programming interface makes automation accessible to beginners and non-programmers.
- Scalable and flexible, allowing for complex home automation setups.
4. Machine Learning on the Edge with TensorFlow Lite
Running machine learning models on the Raspberry Pi enables real-time decision-making without relying on cloud services. TensorFlow Lite, a lightweight version of TensorFlow optimized for edge devices, allows you to deploy AI models for tasks like image recognition, speech processing, and more.
Requirements:
- Raspberry Pi 4 (recommended for performance)
- USB camera for image recognition tasks
- Python environment with TensorFlow Lite installed
Example Project: Real-time Object Detection:
1. Install TensorFlow Lite: Install TensorFlow Lite on your Raspberry Pi by running:
pip3 install tflite-runtime2. Download a Pre-trained Model: Use a pre-trained MobileNet model for object detection, which is lightweight and optimized for edge devices.
3. Set Up the Camera: Use OpenCV and TensorFlow Lite to capture video from a USB camera and process frames to detect objects in real time.
4. Run the Model: Use Python to execute the object detection and display the results with bounding boxes around recognized objects.
Applications:
- Smart home monitoring systems with facial recognition.
- Quality control in manufacturing environments.
- Real-time data analysis for robotics and autonomous vehicles.
Tips for Optimizing Raspberry Pi Performance
To get the most out of your Raspberry Pi, especially in demanding projects, consider these tips for optimizing performance and maintaining reliability:
1. Use a High-Quality Power Supply
The Raspberry Pi requires a stable power supply to function correctly, especially when using USB peripherals like cameras or external hard drives. A power supply rated at 5V with at least 3A (for Raspberry Pi 4) is recommended to avoid undervoltage warnings and system instability.
2. Manage Thermal Performance
High temperatures can throttle the performance of your Raspberry Pi, especially during intensive tasks. Use heat sinks, fans, or a cooling case to keep temperatures within a safe range. The Raspberry Pi 4, in particular, benefits from active cooling solutions.
3. Optimize Storage with a Fast microSD Card or SSD
A fast microSD card (Class 10 or UHS-I) improves read/write speeds and overall system responsiveness. For even better performance, consider booting your Raspberry Pi from an external SSD, which offers much faster access times and increased storage capacity.
4. Keep Software Updated
Regularly update the operating system and installed software to benefit from the latest features, security patches, and performance improvements. Use the following commands to update your Raspberry Pi:
sudo apt update
sudo apt upgrade -y5. Disable Unused Services
Free up system resources by disabling unused services and background processes. Use raspi-config to turn off features like Bluetooth, Wi-Fi, or boot services that are not required for your project.
6. Overclock with Caution
If you need extra performance, you can overclock your Raspberry Pi’s CPU and GPU. This can boost speeds for specific tasks, but it increases power consumption and heat output, so ensure adequate cooling and consider the potential impact on system stability.
Example: Overclocking the Raspberry Pi 4:
1. Open the configuration file:
sudo nano /boot/config.txt2. Add the following lines to overclock the CPU to 2GHz (proceed with caution):
over_voltage=6
arm_freq=20003. Save the file and reboot. Monitor temperatures and performance to ensure stable operation.
Conclusion
The Raspberry Pi is more than just a tiny computer—it’s a gateway to learning, experimenting, and creating. From basic projects like blinking LEDs and setting up media centers to advanced applications like AI on the edge and home automation, the possibilities with Raspberry Pi are nearly limitless. Whether you’re a beginner or an experienced developer, Raspberry Pi provides a versatile platform that encourages innovation and discovery.
By continuously exploring new projects and pushing the boundaries of what you can achieve, you’ll not only expand your technical skills but also discover the joy of bringing ideas to life with single-board computing. Embrace the versatility of the Raspberry Pi, and let it inspire you to turn your creative visions into reality.