Arduino is an open-source electronics platform based on easy-to-use hardware and software. It has revolutionized the world of electronics by making it accessible to beginners, hobbyists, artists, and professionals alike. Arduino boards are microcontrollers that allow users to interact with the physical world through sensors, actuators, and other electronic components. By learning how to program and connect these devices, you can create a wide variety of projects, from simple LED blinkers to complex robotics and home automation systems.
One of the main reasons Arduino is so popular is its simplicity and flexibility. The platform is designed to be beginner-friendly, requiring no prior knowledge of electronics or programming to get started. Arduino boards come in various models, each designed to cater to different needs, whether it’s a simple project like controlling LEDs or more advanced applications like IoT (Internet of Things) devices. With a vast community of users, countless tutorials, and extensive online resources, Arduino provides a perfect starting point for anyone interested in exploring the world of electronics and coding.
The heart of any Arduino project is the Arduino board, which consists of a microcontroller chip that executes code, input/output pins for connecting sensors and actuators, and a USB interface for programming. To program the board, you use the Arduino Integrated Development Environment (IDE), which allows you to write code in a simplified version of C++ and upload it directly to the board. This process makes learning electronics and coding both engaging and accessible.
Understanding the Arduino Ecosystem
The Arduino ecosystem includes several components that work together seamlessly: the hardware (Arduino boards), the software (Arduino IDE), and the community (resources, forums, and libraries). Here’s a closer look at each of these elements:
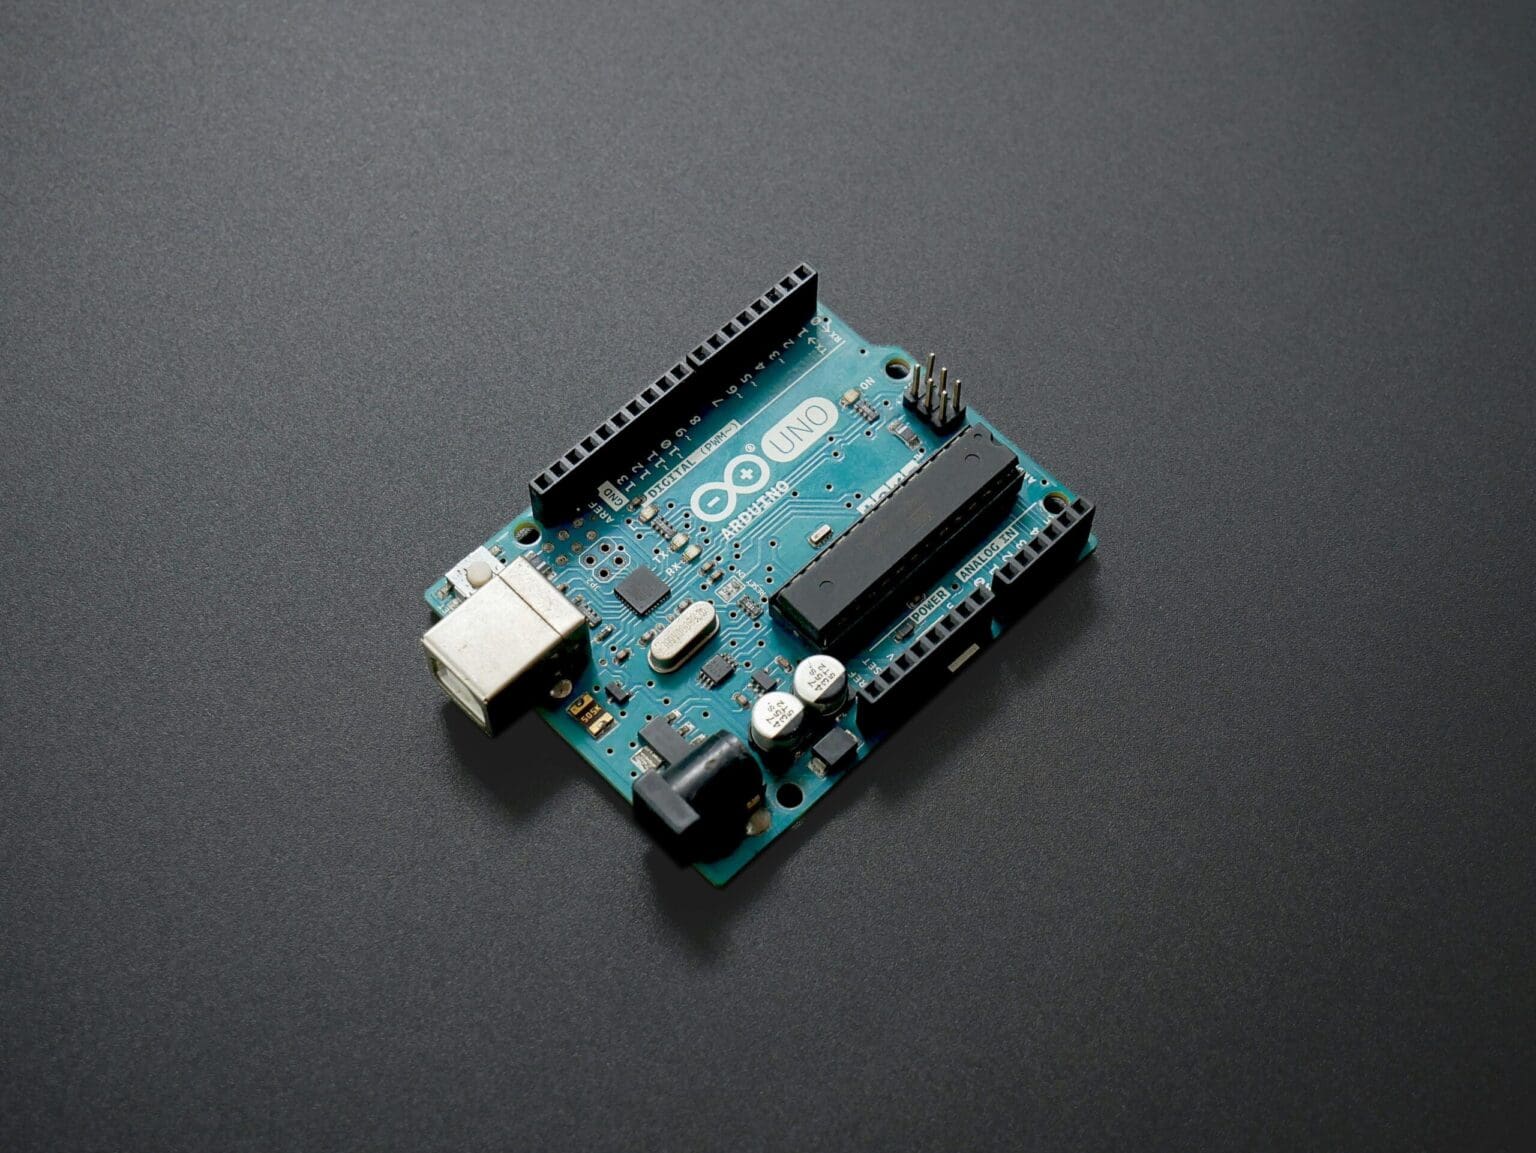
- Arduino Boards: Arduino offers a range of boards, each with different capabilities tailored to specific needs. The most common board for beginners is the Arduino Uno, which is equipped with a microcontroller, digital and analog input/output pins, and a USB connection for programming. Other popular boards include the Arduino Nano, which is smaller and perfect for space-constrained projects, and the Arduino Mega, which offers more pins and memory for larger, more complex projects.
- Arduino Software (IDE): The Arduino IDE is the software used to write, compile, and upload code to your Arduino board. It features a simple code editor, a serial monitor for debugging, and one-click uploading to the board. The programming language used is a simplified version of C++, which makes it easy for beginners to understand while still being powerful enough for advanced applications. The IDE is available for Windows, macOS, and Linux, and it supports a wide range of Arduino boards.
- Arduino Libraries: Libraries are pre-written code that extends the functionality of the Arduino IDE, allowing you to use complex hardware components like sensors, displays, and motors with minimal coding effort. For example, the Servo library makes it easy to control servo motors, while the LiquidCrystal library simplifies the use of LCD displays. Libraries are an essential part of the Arduino ecosystem, enabling you to add new capabilities to your projects without reinventing the wheel.
- Shields and Modules: Arduino shields are plug-in boards that add specific functionality to Arduino boards, such as Wi-Fi connectivity, motor control, or GPS capabilities. Shields stack on top of the Arduino board, providing a simple way to expand its capabilities without complex wiring. Modules, on the other hand, are small breakout boards that add sensors, relays, or other components, which you can connect to the Arduino via jumper wires.
- The Arduino Community: One of the greatest strengths of Arduino is its vibrant community of makers, educators, and engineers who share projects, tutorials, and advice. Websites like Arduino.cc, forums, and social media platforms provide a wealth of resources to help you get started and troubleshoot any issues you may encounter. Community-contributed libraries, code examples, and project guides mean that no matter what you want to build, someone has likely done something similar and shared their insights.
Getting Started with Your First Arduino Project
Starting your first Arduino project is exciting and straightforward. Below is a step-by-step guide to getting your Arduino up and running, along with a simple project to help you understand the basics.
1. Choose Your Arduino Board: For beginners, the Arduino Uno is the best choice due to its simplicity, wide availability, and extensive community support. However, if you have a different board, don’t worry—most boards follow a similar setup process.
2. Download and Install the Arduino IDE: Visit the Arduino website and download the latest version of the Arduino IDE for your operating system. Follow the installation instructions, and once installed, launch the IDE.
3. Connect Your Arduino Board: Use a USB cable to connect your Arduino board to your computer. The Arduino IDE should automatically detect the board. If not, go to Tools > Board and select your board model (e.g., Arduino Uno). Then, select the correct COM port under Tools > Port.
4. Write Your First Program (Sketch): In the Arduino world, a program is called a “sketch.” Let’s start with the classic “Blink” example, which makes an LED on the Arduino board blink on and off. Open the IDE and type the following code:
// This program blinks the onboard LED
void setup() {
  pinMode(LED_BUILTIN, OUTPUT); // Initialize the onboard LED pin as an output
}

void loop() {
  digitalWrite(LED_BUILTIN, HIGH); // Turn the LED on
  delay(1000);                     // Wait for one second
  digitalWrite(LED_BUILTIN, LOW);  // Turn the LED off
  delay(1000);                     // Wait for one second
}This code sets up the onboard LED as an output and alternates between turning it on and off with a one-second delay.
5. Upload the Code to Your Board: Click the Upload button (arrow icon) in the IDE. The code will compile, and if there are no errors, it will upload to your board. You should see the onboard LED start blinking, confirming that the code is running successfully.
6. Experiment and Modify the Code: Try changing the delay times to make the LED blink faster or slower. You can also connect an external LED to a different pin and modify the code to control it. Experimenting with simple changes helps reinforce your understanding of how Arduino code works.
Key Concepts in Arduino Programming
Understanding some basic programming concepts will help you get the most out of your Arduino projects. Here are a few fundamental concepts:
- Setup and Loop Functions: Every Arduino sketch has two main functions:
setup()andloop(). Thesetup()function runs once when the board is powered on or reset and is used to initialize settings like pin modes. Theloop()function runs repeatedly aftersetup(), allowing your program to respond to inputs and perform tasks continuously. - Digital and Analog Pins: Arduino boards have digital pins that can be used for digital inputs (e.g., reading a button press) or outputs (e.g., turning an LED on or off). Some pins can also handle PWM (Pulse Width Modulation) for simulating analog output. Analog pins, labeled A0, A1, etc., can read varying voltage levels from sensors, allowing you to work with real-world signals like temperature, light, or sound.
- Variables and Data Types: In Arduino programming, variables store data that your program can use and manipulate. Common data types include
int(integer),float(floating-point number), andbool(boolean, true/false). Understanding how to declare and use variables is crucial for creating dynamic, responsive projects. - Control Structures: Control structures like
ifstatements,forloops, andwhileloops allow you to create conditional logic and repetitive tasks. For example, anifstatement can be used to check if a button is pressed and then perform an action, such as lighting up an LED. - Functions: Functions are blocks of code that perform specific tasks and can be reused throughout your sketch. Besides the built-in
setup()andloop(), you can create your own functions to simplify your code and make it more readable. For example, a function to turn on all LEDs in a sequence can be called multiple times without rewriting the code.
Arduino programming is designed to be easy to understand, and by experimenting with simple projects, you’ll quickly gain confidence and start building more complex creations.
Exploring Arduino Projects and Common Components
Building Your First Arduino Circuit
After getting familiar with the Arduino environment and programming basics, the next step is to build your first circuit. Combining coding with hardware gives you a deeper understanding of how Arduino works and lets you bring your ideas to life. Here, we’ll guide you through a simple circuit that uses an external LED and a pushbutton, demonstrating how Arduino interacts with sensors and outputs.
Project: LED Control with a Pushbutton
This project will teach you how to control an LED with a pushbutton. When you press the button, the LED will turn on, and when you release it, the LED will turn off.
Components Needed:
- 1 x Arduino board (e.g., Arduino Uno)
- 1 x Breadboard
- 1 x LED
- 1 x 220-ohm resistor
- 1 x Pushbutton
- 1 x 10k-ohm resistor
- Jumper wires
Steps to Build the Circuit:
1. Connect the LED: Place the LED on the breadboard. Connect the shorter leg (cathode) to ground (GND) on the Arduino and the longer leg (anode) to a 220-ohm resistor. Connect the other end of the resistor to digital pin 13 on the Arduino.
2. Connect the Pushbutton: Place the pushbutton on the breadboard. Connect one side of the pushbutton to 5V on the Arduino and the other side to digital pin 2. Connect a 10k-ohm resistor from pin 2 to GND to act as a pull-down resistor, ensuring the pin reads LOW when the button is not pressed.
3. Write the Code: Open the Arduino IDE and write the following code:
// LED control with pushbutton
const int buttonPin = 2;    // Pin connected to the pushbutton
const int ledPin = 13;      // Pin connected to the LED

void setup() {
  pinMode(buttonPin, INPUT);  // Set button pin as input
  pinMode(ledPin, OUTPUT);    // Set LED pin as output
}

void loop() {
  int buttonState = digitalRead(buttonPin);  // Read the state of the pushbutton

  if (buttonState == HIGH) {  // If button is pressed
    digitalWrite(ledPin, HIGH);  // Turn LED on
  } else {
    digitalWrite(ledPin, LOW);   // Turn LED off
  }
}4. Upload the Code: Click the Upload button in the IDE to send the code to your Arduino board. When you press the button, the LED should light up, demonstrating how digital inputs and outputs work together.
This simple project helps you understand the basics of controlling components with Arduino. By adding sensors, motors, and other modules, you can create more complex and interactive projects.
Common Arduino Components and Their Uses
Arduino projects often involve a range of sensors, actuators, and other components that expand the board’s capabilities. Below are some commonly used components and how they interact with Arduino:
- LEDs: LEDs (Light Emitting Diodes) are basic components used for visual indicators in projects. They can display status, provide feedback, or even create decorative lighting effects. LEDs are usually connected with a current-limiting resistor to prevent damage.
- Resistors: Resistors limit the amount of current that flows through a component. They are essential in almost every circuit, protecting LEDs, controlling sensor inputs, and managing current in various parts of the circuit. Resistors are available in various values, indicated by colored bands that denote their resistance.
- Pushbuttons and Switches: Pushbuttons and switches are used as user inputs in Arduino projects. They can trigger actions, navigate menus, or control other components. When pressed, these components change the state of a circuit, allowing Arduino to read user inputs.
- Potentiometers: Potentiometers are variable resistors that can adjust voltage or control values like volume and brightness. Rotating the knob changes the resistance, and Arduino can read this change to adjust outputs accordingly. Potentiometers are commonly used in control panels and interactive projects.
- Sensors: Sensors allow Arduino to interact with the environment by detecting physical phenomena such as temperature, light, motion, or sound. Common sensors include:
- Temperature Sensors (e.g., LM35, DHT11): Measure temperature and sometimes humidity, useful in weather stations and climate control projects.
- Light Sensors (LDR): Light-dependent resistors change their resistance based on light levels, making them ideal for light-sensing applications.
- Ultrasonic Sensors: Measure distance using sound waves, often used in robotics and automation for obstacle detection.
- Accelerometers and Gyroscopes: Detect motion and orientation, used in wearable devices, drones, and game controllers.
- Motors and Actuators: Motors and actuators provide movement in Arduino projects, enabling tasks such as rotating wheels, opening doors, or controlling robotic arms. Common types include:
- DC Motors: Provide continuous rotation, used in vehicles and fans.
- Servo Motors: Offer precise control over position, commonly used in robotics, RC vehicles, and automated systems.
- Stepper Motors: Provide accurate control over movement and position, ideal for CNC machines, 3D printers, and camera controls.
- Displays: Displays are used to show information, such as sensor readings, messages, or user interfaces. Common display types include:
- LCD Displays: Used to display text, numbers, and simple graphics. They are widely used in projects that need to present data or instructions.
- OLED Displays: Offer higher contrast and are more energy-efficient than LCDs, often used in portable and low-power applications.
- 7-Segment Displays: Used to display numbers, ideal for clocks, counters, and scoreboards.
- Relays: Relays are electrically operated switches that allow Arduino to control high-power devices like lights, fans, or appliances. By using a low voltage signal from the Arduino, a relay can switch a high voltage circuit on or off, providing isolation and safety.
- Wi-Fi and Bluetooth Modules: Modules like the ESP8266 (Wi-Fi) or HC-05 (Bluetooth) add wireless communication to your Arduino projects. These modules enable your projects to connect to the internet, control devices remotely, or communicate with other Bluetooth-enabled devices, expanding the possibilities for IoT and smart home applications.
Expanding Your Arduino Skills
As you become more comfortable with Arduino, you’ll want to explore more complex projects and expand your skills. Here are some tips to help you progress:
- Explore More Complex Projects: Start exploring projects that involve multiple components working together, such as building a temperature and humidity monitor, creating a simple robot, or designing a home automation system. These projects will help you understand how to integrate different sensors and actuators into a cohesive system.
- Learn to Use Shields: Shields are add-on boards that provide additional functionalities, like motor control, Ethernet, or GSM connectivity. Learning to use shields simplifies complex tasks, such as controlling multiple motors or connecting your Arduino to the internet, without needing to deal with complex wiring or programming.
- Dive Into Libraries: Libraries are powerful tools that simplify working with complex components. By diving deeper into libraries, you can explore advanced features of components like servos, displays, and sensors. Reading the library documentation and studying example codes will improve your understanding of how to use these resources effectively.
- Work with Serial Communication: Serial communication allows your Arduino to interact with other devices, such as computers, other microcontrollers, or external sensors. Learning how to use
Serial.print(),Serial.read(), and other functions helps you debug your projects and expand the range of devices Arduino can control. - Experiment with Data Logging: Use your Arduino to collect and log data from sensors, storing it on an SD card or sending it to a computer. Data logging is useful for monitoring environmental conditions, tracking performance, or developing interactive projects that respond to collected data.
- Join the Arduino Community: Engage with the Arduino community by joining forums, attending workshops, and participating in online groups. Sharing your projects, asking questions, and learning from others can provide valuable insights, inspire new ideas, and help you overcome challenges.
- Document Your Projects: Keeping track of your projects by documenting your code, circuit diagrams, and any challenges you face is an excellent habit. This documentation will help you when revisiting projects, troubleshooting, or sharing your work with others.
Arduino offers endless possibilities, limited only by your imagination and willingness to learn. With each project, you’ll gain a deeper understanding of electronics, programming, and the incredible potential of microcontrollers.
Advancing Your Arduino Skills and Exploring Real-World Applications
Advanced Arduino Concepts
As you grow more familiar with Arduino, exploring advanced concepts can significantly enhance your projects and open up new possibilities. Diving into these areas will help you build more sophisticated and responsive systems.
Using Interrupts
Interrupts are powerful tools in Arduino programming that allow your board to respond immediately to critical events, such as a button press or a sensor trigger, without constantly checking for these events in the main loop. By using interrupts, you can make your projects more efficient and responsive, especially when dealing with time-sensitive tasks.
Example: An interrupt can be used to stop a motor immediately when a safety button is pressed, even if the main program is busy executing other tasks. This is particularly useful in robotics, automation, and safety-critical applications.
Pulse Width Modulation (PWM)
PWM is a technique used to simulate analog output using digital signals, which is essential for controlling the brightness of LEDs, the speed of motors, or the position of servos. Understanding PWM helps you precisely control these components, enabling smoother and more refined operation.
Example: By using the analogWrite() function in Arduino, you can control the speed of a DC motor by varying the duty cycle of the PWM signal, making it easy to create variable speed control for fans, pumps, or wheels.
Working with Analog Sensors and ADC
Analog sensors, such as temperature sensors, light sensors, and potentiometers, provide analog signals that Arduino reads using its built-in Analog-to-Digital Converter (ADC). Learning how to interpret these analog readings allows you to work with real-world data and create interactive projects that respond to environmental changes.
Example: Reading values from a temperature sensor and using that data to activate a cooling fan or a heater based on the temperature threshold demonstrates how analog input can control real-world actions.
I2C and SPI Communication
I2C (Inter-Integrated Circuit) and SPI (Serial Peripheral Interface) are communication protocols used to connect multiple components, such as sensors, displays, and memory modules, to your Arduino. Learning these protocols enables you to connect multiple devices with minimal wiring, making your projects more organized and scalable.
Example: Using I2C, you can connect an Arduino to a temperature sensor, an LCD display, and a real-time clock (RTC) module, allowing you to build a weather station that shows temperature and time.
Reading and Writing to SD Cards
Data logging is a powerful feature that allows Arduino to store sensor data over time. By using SD card modules, you can save data for later analysis, making your projects more versatile and useful for applications like environmental monitoring, scientific experiments, or tracking device performance.
Example: A weather station project that logs temperature, humidity, and pressure data to an SD card every hour can help you analyze trends over days, weeks, or months.
Connecting to the Internet with Wi-Fi and Ethernet
Expanding your Arduino projects to include internet connectivity allows you to create IoT (Internet of Things) devices that can send and receive data online. By using Wi-Fi modules (like the ESP8266) or Ethernet shields, you can connect sensors, control devices remotely, or collect data from cloud services.
Example: A smart home system that allows you to control lights, monitor security cameras, and adjust the thermostat remotely from your smartphone exemplifies the power of connecting Arduino to the internet.
Real-World Applications of Arduino
Arduino’s versatility makes it suitable for countless real-world applications, from simple DIY projects to professional-grade systems. Here are some popular uses of Arduino across various fields:
Home Automation
Arduino can be used to automate tasks around the home, such as controlling lights, appliances, heating, and security systems. With sensors, relays, and internet connectivity, you can create a smart home setup that responds to your needs.
Example: A motion-activated lighting system that turns on when someone enters a room and automatically turns off when the room is vacant, saving energy and enhancing convenience.
Robotics
Arduino is widely used in robotics due to its ability to control motors, read sensors, and process inputs quickly. From simple line-following robots to complex humanoid robots, Arduino provides a flexible platform for robotic control.
Example: A robot car that uses ultrasonic sensors to detect and avoid obstacles, navigates autonomously, and can be controlled via a smartphone app demonstrates how Arduino can be used in autonomous navigation.
Environmental Monitoring
Arduino can collect data from environmental sensors, making it ideal for weather stations, air quality monitors, and other data-logging applications. By connecting Arduino to cloud platforms, you can visualize and analyze data remotely.
Example: A DIY weather station that measures temperature, humidity, and barometric pressure, displaying real-time data on an LCD screen and uploading it to an online dashboard.
Wearable Technology
Arduino-compatible microcontrollers like the LilyPad and Arduino Nano are designed for wearable electronics, allowing you to create interactive clothing and accessories that respond to movement, light, or other stimuli.
Example: An Arduino-powered fitness tracker that monitors your heart rate, steps, and calories burned, syncing data to a smartphone app for personal health tracking.
Education and Prototyping
Arduino is a powerful tool for teaching electronics, programming, and engineering concepts. Its ease of use makes it a favorite in classrooms, workshops, and maker spaces, where students can learn by building real, functioning projects.
Example: A classroom project where students build simple circuits to understand how sensors work, using Arduino to read sensor data and display it, helping them grasp practical applications of theoretical concepts.
Art and Interactive Installations
Artists and designers use Arduino to add interactivity to their works, incorporating light, sound, and motion. From kinetic sculptures to interactive light displays, Arduino allows creative expression through electronics.
Example: An interactive art installation that changes color based on the presence and movement of viewers, creating an immersive experience that reacts to audience interaction.
Agricultural Automation
In agriculture, Arduino can automate watering systems, monitor soil moisture, control greenhouse environments, and even manage livestock feeding. These applications improve efficiency, reduce labor, and optimize resource use.
Example: An automated greenhouse system that controls temperature, humidity, and light levels to maintain optimal growing conditions for plants, increasing yield and reducing manual intervention.
Music and Sound Projects
Musicians and audio enthusiasts use Arduino to create electronic instruments, effects, and sound-responsive projects. By integrating sensors, potentiometers, and other inputs, Arduino can be used to manipulate sound in creative ways.
Example: A MIDI controller built with Arduino that allows musicians to control digital audio workstations (DAWs) with custom buttons, sliders, and knobs, offering a personalized interface for music production.
Continuing Your Arduino Journey
Arduino is just the beginning of your electronics journey. As you build more projects, you’ll gain confidence and discover new areas to explore. Here are some ways to continue learning and expanding your skills:
- Experiment with New Components: Try working with components you haven’t used before, like RFID readers, GPS modules, or new types of sensors. Each new component adds to your toolkit and opens up new possibilities for your projects.
- Learn About Other Microcontrollers: Once you’re comfortable with Arduino, consider exploring other microcontroller platforms like the ESP32, STM32, or Raspberry Pi Pico. These boards offer more processing power, additional features, and can be a step up for more demanding projects.
- Explore Advanced Programming Techniques: Delve into advanced programming topics like state machines, finite state machines (FSMs), and object-oriented programming (OOP) to make your code more efficient and easier to manage. This will be especially helpful as your projects grow in complexity.
- Incorporate Machine Learning and AI: Arduino is increasingly being used in conjunction with AI and machine learning platforms to create intelligent systems that can learn and adapt. Tools like TensorFlow Lite can run on Arduino-compatible boards, enabling projects that recognize voice commands, identify objects, or make predictions based on data.
- Design Your Own PCBs: As you move beyond prototyping on a breadboard, designing custom Printed Circuit Boards (PCBs) can help you make more polished and durable projects. Tools like KiCad or Eagle allow you to create your own PCBs based on your Arduino designs, which can then be manufactured for professional-grade projects.
- Share Your Projects: Contributing to the Arduino community by sharing your projects, tutorials, or even open-source code libraries helps others learn and inspires new ideas. Platforms like GitHub, Instructables, and the Arduino Project Hub are excellent places to showcase your work and connect with other enthusiasts.
- Stay Inspired and Keep Learning: Arduino is a gateway to the broader world of electronics and embedded systems. Keep exploring, stay curious, and continue learning new skills. Whether you’re building for fun, education, or professional development, Arduino offers endless opportunities to innovate and create.
Conclusion
Arduino is an accessible and powerful platform that opens the doors to the exciting world of electronics and programming. By learning how to use Arduino, you can create projects that interact with the physical world, automate tasks, and bring your ideas to life. From simple experiments to complex systems, Arduino provides a hands-on way to learn, explore, and innovate.
As you continue your journey with Arduino, you’ll find that each project not only improves your technical skills but also fosters creativity and problem-solving abilities. With a supportive community, extensive resources, and a growing ecosystem of hardware and software, Arduino is the perfect tool for beginners and experts alike. Whether you’re an aspiring engineer, an artist, or simply curious, Arduino empowers you to make your mark on the world of technology.