A calibration cube is a small, precisely dimensioned test print — typically a 20mm cube — used to verify and fine-tune your 3D printer’s accuracy, dimensional correctness, and overall performance. Printing a calibration cube is the universally recommended first print for any new or reconfigured 3D printer because it reveals critical issues with extrusion, steps-per-millimeter settings, and print quality before you commit to longer, more complex projects.
Introduction: Why Your First Print Matters More Than You Think
There’s something magical about watching your 3D printer spring to life for the very first time. The motors whir, the hotend heats up, and layer by layer, a physical object emerges from nothing but a spool of plastic filament and a set of digital instructions. It’s genuinely thrilling.
But here’s what experienced makers know that beginners often learn the hard way: what you choose to print first matters enormously.
Many beginners are tempted to download something impressive — a detailed miniature, a complex mechanical assembly, or an elaborate decorative piece — and attempt it as their very first print. This almost always ends in frustration. Without first verifying that your printer is correctly configured, you have no reliable way to know whether a failed print is due to a bad model, a problem with your slicer settings, or a fundamental hardware issue with your machine.
This is exactly why the 3D printing community has long embraced a humble but extraordinarily powerful first print: the calibration cube.
The calibration cube is the benchmark. It’s the foundation. It’s the print that tells you the truth about your machine’s current state before you invest hours printing something more ambitious. In this guide, you’ll learn everything you need to know about calibration cubes — what they are, why they matter, how to choose the right one, how to print it successfully, and most importantly, how to read the results to understand what your printer is telling you.
By the end, you’ll approach your first print not with guesswork, but with genuine understanding. Let’s dive in.
What Is a Calibration Cube? Understanding the Basics
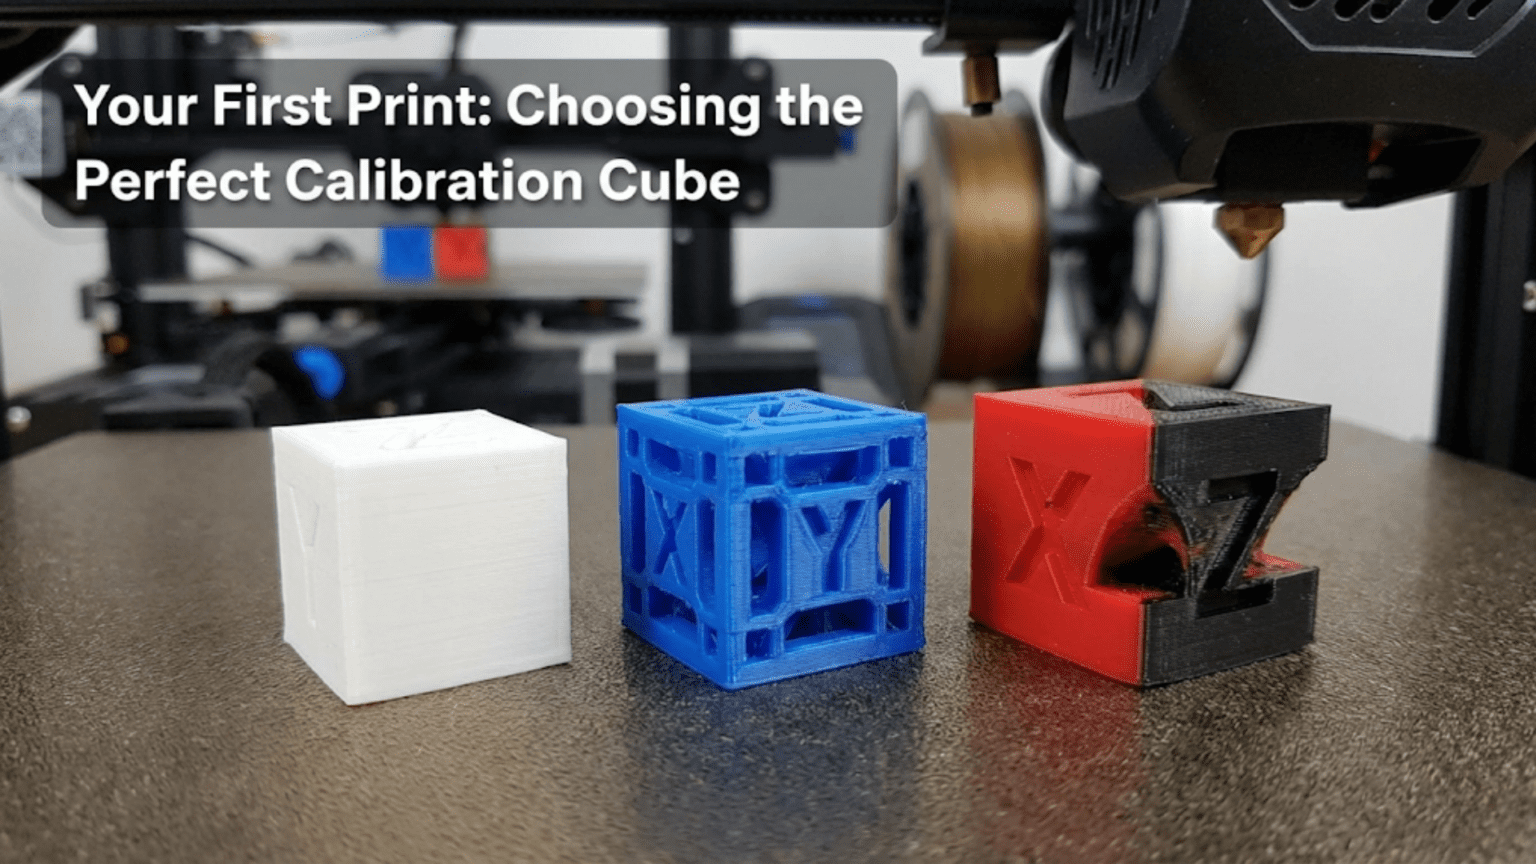
At its most fundamental level, a calibration cube is a test object with known, precise dimensions. The most common variant is a 20x20x20mm cube — about the size of a large sugar cube — though variations exist in different sizes and with different features.
The reason a cube is used rather than some other shape comes down to geometry. A cube tests three critical axes simultaneously: the X axis (left-right movement), the Y axis (front-back movement), and the Z axis (up-down movement, which corresponds to layer height). If your printer is producing accurate dimensions on all three axes, you can be confident the basic motion system is correctly calibrated.
Most calibration cubes also include letters on each face — typically “X,” “Y,” and “Z” — which serve two purposes. First, they make it easy to identify which face corresponds to which axis when measuring. Second, the quality of the embossed or debossed lettering gives you visual feedback about your printer’s detail reproduction capability.
The XYZ Calibration Cube: The Community Standard
The most widely used calibration cube in the 3D printing community is the “XYZ 20mm Calibration Cube” originally designed by iDig3Dprinting and available on Thingiverse (Thing:1278865). This specific model has become something of a universal standard for several good reasons:
It is exactly 20x20x20mm in design, making measurements straightforward with a basic digital caliper. The tolerance for a well-calibrated printer should be within ±0.2mm of these dimensions, with excellent printers achieving ±0.1mm or better. Each face is clearly labeled with the corresponding axis letter, the walls are thin enough to print quickly but substantial enough to measure reliably, and the design is simple enough that it prints in 30-60 minutes with typical settings.
Why 20mm? The Mathematics of Calibration
You might wonder why 20mm became the standard rather than, say, 10mm or 50mm. The choice is deliberate and mathematically sound.
At 10mm, minor inaccuracies in your printer become proportionally larger in terms of percentage error, making it harder to distinguish between calibration issues and normal variation. At 50mm or larger, print time increases significantly, and thermal effects like warping can introduce measurement errors that aren’t related to calibration at all.
At 20mm, you get a size that prints relatively quickly (under an hour for most printers), is large enough for accurate measurement with consumer calipers, and is small enough that thermal warping is rarely a confounding factor. It’s the sweet spot, which is why the 3D printing community converged on it.
Choosing the Right Calibration Cube for Your Situation
Not all calibration cubes are created equal, and the “perfect” calibration cube for your first print depends on your specific printer, goals, and what you want to learn from the exercise.
Option 1: The Standard XYZ 20mm Cube
Best for: Absolute beginners, verifying dimensional accuracy, initial setup
What it tests: X/Y/Z dimensional accuracy, basic layer adhesion, extrusion consistency
Limitations: Doesn’t specifically test overhangs, bridges, or fine detail
The standard 20mm cube is the right choice for most beginners as their very first calibration print. It’s simple, it’s fast, it’s widely documented, and there’s an enormous community of makers online who can help you interpret the results because they’ve all printed this same object.
Option 2: The All-in-One Calibration Print
Best for: Users who want to test multiple capabilities at once
What it tests: Dimensional accuracy plus overhangs, bridges, stringing, fine features, and more
Limitations: Takes longer to print, more complex to interpret
All-in-one calibration prints exist that test multiple printer capabilities simultaneously. These include features like overhang test sections (angled walls at increasing angles), bridging sections (horizontal spans across gaps), stringing towers (to test retraction settings), and fine detail features. Examples include the “Teaching Tech Calibration” series and similar comprehensive test prints.
For your very first print, these are generally not the best choice. When something goes wrong (and something often does on a first print), having multiple test features makes it harder to isolate which specific setting or hardware issue caused the problem. Start simple with a plain cube, then graduate to these more comprehensive tests.
Option 3: Hollow Cube Variants
Some calibration cubes are hollow rather than solid (or have specified infill percentages). Hollow cubes have thinner walls, which print faster and use less material, but they can be structurally fragile and harder to measure accurately. Solid or high-infill cubes give more reliable measurements.
For calibration purposes, printing with 3-4 perimeters and 20-40% infill gives you a cube that measures accurately while still being reasonably fast to print.
Option 4: The Ender Calibration Square or Manufacturer-Specific Tests
Some 3D printer manufacturers include their own calibration files on the SD card that ships with the printer. These manufacturer-specific test prints are often optimized for the printer’s specific print volume, speed capabilities, and default settings. If your printer came with one, it’s worth using it alongside or before the standard XYZ cube.
Option 5: Temperature and Flow Test Towers
Temperature towers and flow test towers are technically calibration prints rather than calibration cubes, but they serve a related purpose: finding your optimal settings for a specific filament. These are covered in more detail later in this guide under “Beyond the Calibration Cube,” but it’s worth knowing they exist.
What You Need Before You Print
Before you send your calibration cube to the printer, there are several prerequisites to check. Skipping these steps is one of the most common reasons first prints fail.
Physical Setup Checklist
1. Bed Leveling This is the single most important factor in successful first prints. Your print bed must be level (or, more precisely, at a consistent distance from your nozzle across its entire surface) before you print anything.
Most beginner printers like the Creality Ender 3 and its variants use manual bed leveling with adjustment knobs at each corner. This process involves moving the print head to each corner and adjusting the distance between the nozzle and the bed using a piece of paper as a feeler gauge. You should be able to slide the paper under the nozzle with slight resistance.
More advanced printers use automatic bed leveling (ABL) with probes like the BLTouch or CR Touch. Even with ABL, you still need to set your Z-offset correctly, which determines the distance between the probe trigger point and the actual nozzle tip.
2. Extruder Calibration (E-Steps) Your printer needs to know how many steps of the extruder motor correspond to exactly 1mm of filament movement. This is called the E-steps or steps-per-millimeter setting. If this is wrong, your printer will either over-extrude (push out too much plastic, leading to blobs and dimension inaccuracy) or under-extrude (not push enough, leading to gaps and weak prints).
Calibrating E-steps is a straightforward process involving marking a specific length on your filament, commanding the printer to extrude a set amount, and measuring how much was actually extruded. If there’s a discrepancy, you adjust the E-steps value in your firmware or slicer accordingly.
3. Filament Loading Make sure your filament is properly loaded, the nozzle has been purged of any previous filament, and there are no tangles in the spool that could cause a jam mid-print.
4. Slicer Software Installation You’ll need slicing software to convert the calibration cube STL file into G-code that your printer can understand. The most popular free options for beginners are Cura (by Ultimaker) and PrusaSlicer. Both are excellent choices, and both come with pre-configured profiles for many popular printers.
Recommended First-Print Slicer Settings
| Setting | Recommended Value for Calibration | Notes |
|---|---|---|
| Layer Height | 0.2mm | Standard for most beginners |
| Print Speed | 40-50 mm/s | Slower than max for reliability |
| Infill | 20% Grid or Lines | Fast but adequate structure |
| Perimeters/Walls | 3 | Good for measuring wall dimensions |
| Top/Bottom Layers | 4 | Good surface quality |
| Support | None | Cube doesn’t need supports |
| Bed Adhesion | Brim (3-5mm) | Helps with first layer adhesion |
| Print Temperature | Per filament recommendation | Usually 200-210°C for PLA |
| Bed Temperature | Per filament recommendation | Usually 55-65°C for PLA |
| Cooling | 100% after first layer | Standard for PLA |
Step-by-Step: Downloading and Preparing Your Calibration Cube
Step 1: Download the Model
Navigate to Thingiverse.com and search for “XYZ 20mm Calibration Cube” or go directly to Thing:1278865. Download the STL file to your computer. You can also find this file on other 3D model repositories like Printables.com, MyMiniFactory, or Cults3D.
Step 2: Open in Your Slicer
Open your slicer software (Cura or PrusaSlicer recommended). Import the STL file by dragging it into the slicer window or using File > Import.
The cube should appear on your virtual build plate. In most slicers, it will automatically be positioned at the center of the plate and oriented correctly (flat on the bed). If it’s not, use the slicer’s placement and rotation tools to correct this.
Step 3: Select Your Printer Profile
In your slicer, make sure you have the correct printer profile selected. This profile tells the slicer the build volume of your printer, the maximum temperature of the hotend, and other machine-specific parameters. Most popular printers have pre-built profiles available in Cura and PrusaSlicer — you may just need to select yours from a list.
Step 4: Apply Your Settings
Apply the recommended settings from the table above. For a calibration cube, you generally want to use relatively conservative settings (not maximum speed, not minimum layer height) to get a reliable, representative baseline.
Step 5: Slice and Preview
Click “Slice” in your slicer. The slicer will process the model and generate G-code. Before saving this G-code to your SD card or sending it to your printer, use the layer preview feature to visually inspect the print layer by layer.
Look for any obvious problems: Are the walls being printed correctly? Is the infill pattern regular? Are the top and bottom surfaces fully closed? The layer preview is an invaluable tool for catching slicer setting problems before they become wasted print time.
Step 6: Print
Save the G-code to your SD card or USB drive (or send it directly to your printer via USB/WiFi if supported), then start the print from your printer’s control panel.
Watch the first layer closely. This is the most critical moment of the print. The first layer should be slightly squished against the bed, with filament lines touching each other without gaps or excessive overlap. If the first layer looks wrong, it’s better to stop and re-level your bed than to let the print continue.
Reading Your Calibration Cube: What the Results Tell You
Once your calibration cube has finished printing and cooled down, the real diagnostic work begins. This is where the calibration cube pays for itself many times over.
The Essential Tool: Digital Calipers
To properly analyze your calibration cube, you need digital calipers. Inexpensive digital calipers from brands like Neiko or Rexbeti are available for under $20 and are accurate to 0.01mm — more than adequate for calibration purposes. If you’re serious about 3D printing, this is an essential investment.
Measure each dimension of your cube: the X dimension (left to right), the Y dimension (front to back), and the Z dimension (height). Take multiple measurements at different points and average them.
Interpreting Your Measurements
Scenario 1: All measurements are within ±0.2mm of 20mm
Congratulations! Your printer is very well calibrated. This is excellent performance for a consumer FDM printer. You can proceed to printing more ambitious projects with confidence.
Scenario 2: X and Y are accurate, but Z is off
If your cube is the right size in X and Y but too short or too tall in the Z direction, this is usually a layer height issue. Check your slicer’s layer height setting and make sure it matches what you intended. If the layer height setting is correct but Z is still off, you may need to adjust your Z steps-per-millimeter setting in your firmware.
Scenario 3: X and Y are off by similar amounts, Z is accurate
If your X and Y dimensions are consistently smaller or larger than 20mm, this points to your E-steps calibration being off, or potentially your X/Y steps-per-millimeter values being incorrect. Over-extrusion will make walls thicker and therefore make the cube appear smaller when measured on the outside (because extra material is being pushed into the space). Under-extrusion will make walls thinner and the cube will appear larger.
Scenario 4: X is accurate but Y is off (or vice versa)
If your X and Y measurements are noticeably different from each other (not just from the target 20mm), this suggests an asymmetry in your motion system. Possible causes include belt tension being different between the X and Y axes, different motion system wear, or different steps-per-millimeter values for the X and Y stepper motors.
Scenario 5: All measurements are consistently smaller or larger than 20mm
This typically points to an E-steps calibration issue or a systematic error in your steps-per-millimeter settings across all axes.
Visual Inspection: What to Look For
Beyond dimensional accuracy, visually inspect your calibration cube for the following:
Stringing: Fine wisps of plastic spanning between the cube’s features. Indicates retraction settings need adjustment. Increase retraction distance and/or retraction speed.
Layer Lines Visible on Top Surface: The top of the cube should be smooth, not showing individual layer lines. If you can see the infill pattern through the top, you need more top layers (increase to 5-6) or your flow rate is too low.
Corner Bulging/Elephant Foot: If the bottom layers flare out wider than the rest of the cube, this is “elephant foot” caused by the first layer being over-squished. Increase the Z-offset slightly (moving the nozzle slightly higher) or reduce the first layer flow rate in your slicer.
Gaps Between Perimeters: If you can see gaps between the walls of your cube (visible on the top surface where perimeters meet), your flow rate is too low or your extrusion multiplier needs to be increased.
Warping/Lifting Corners: If the corners of your cube have lifted off the bed during printing, you have adhesion issues. Increase bed temperature, use a brim, or try applying adhesion aids like glue stick, hairspray, or specialized bed adhesive products.
Surface Roughness and Rippling (Ringing): Horizontal ripple patterns on the vertical faces of your cube, especially visible near the letters, indicates ringing or ghosting. This is caused by printer vibration and is addressed by reducing print speed, tightening belts, or enabling input shaping if your printer supports it.
Z-Banding: Horizontal lines at regular intervals on the vertical faces, creating a banding pattern. This is caused by issues with your Z-axis: uneven lead screw, poor lead screw coupling, or vibrations in the Z-axis system.
Common First-Print Problems and Solutions
Even with the best preparation, first prints don’t always go perfectly. Here’s a troubleshooting guide for the most common issues beginners encounter:
The Print Won’t Stick to the Bed
Symptoms: The first layer is not adhering to the bed surface; filament curls up as it’s deposited; the print detaches mid-print.
Solutions:
- Re-level the bed more carefully. The nozzle may be too high.
- Clean the bed surface with isopropyl alcohol (IPA) to remove oils and fingerprints.
- Increase the bed temperature by 5°C increments.
- Apply a thin layer of glue stick or specialized bed adhesive.
- Reduce the first layer print speed (try 20-25 mm/s).
- Check that your Z-offset is correct if using automatic bed leveling.
The Nozzle Is Dragging Through Previous Layers
Symptoms: You hear clicking or scraping sounds as the nozzle moves; the print is being knocked off or deformed.
Solutions:
- Check your bed leveling — the nozzle may be too close to the bed.
- Check your Z-offset.
- Verify your layer height isn’t set to zero or an absurdly small value.
There Are Gaps or Missing Lines in the Print Walls
Symptoms: You can see through the walls of your cube; the walls look dotted or discontinuous.
Solutions:
- This is under-extrusion. Check that your filament diameter setting in the slicer matches the actual filament diameter (typically 1.75mm or 2.85mm).
- Calibrate your E-steps.
- Increase the print temperature by 5°C to improve filament flow.
- Check for a partial clog in your nozzle — a cold pull may help.
- Check that your filament path is clear and filament is feeding smoothly.
The Print Has a Lot of Stringy Cobwebs
Symptoms: Thin strings of plastic span across open areas, creating a “cobweb” effect.
Solutions:
- Enable or increase retraction in your slicer.
- Reduce print temperature by 5°C.
- Increase travel speed (the speed at which the nozzle moves without extruding).
- Enable “combing” in your slicer to keep travel moves within the perimeter of the print.
The Print Has Blobs or Zits on the Surface
Symptoms: Small raised bumps or blobs appear on the surface of your print.
Solutions:
- Enable “wipe on retract” and “retract at layer change” in your slicer.
- Adjust seam position settings in your slicer — “random” placement distributes these more evenly.
- Slightly reduce flow rate (try 95-98%).
- Reduce print temperature.
The Top Surface Looks Rough or Porous
Symptoms: The top of your cube looks rough, has holes, or shows the infill underneath.
Solutions:
- Increase the number of top layers (try 5-6).
- Increase print speed for top surface (or more accurately, try reducing speed to allow layers to bond better).
- Increase flow rate slightly.
- Ensure your cooling fan is working — inadequate cooling can cause poor top surfaces.
Beyond Dimensional Accuracy: What Else Your First Print Teaches You
The calibration cube isn’t just about measuring millimeters. The process of printing your first calibration cube teaches you a great deal about your printer and your workflow:
Understanding Filament Behavior
As you watch your calibration cube print, you’re observing how your specific filament behaves at your chosen temperature settings. PLA, PETG, ABS, and other materials all behave differently. PLA is the recommended starting filament for beginners — it’s forgiving, prints well without an enclosure, and requires minimal bed adhesion treatment on most surfaces.
Developing an Eye for Quality
With each calibration cube you print, you develop an increasingly refined eye for what “good” looks like versus “acceptable” versus “problematic.” This visual literacy is something you can only develop through experience, and calibration cubes give you a fast, cheap, and low-risk way to build it.
Learning Your Slicer
Preparing your calibration cube forces you to navigate your slicer software: finding settings, understanding what they do, and making deliberate choices. This hands-on experience is invaluable preparation for when you move to more complex models.
Building Troubleshooting Instincts
When your calibration cube has an issue, troubleshooting it in isolation (without the complexity of a fancy model) teaches you the diagnostic thinking that experienced makers use. Every time you identify a problem and trace it back to a specific cause, you’re building the instincts that will save you hours of frustration in the future.
Calibration Cube Variants Worth Knowing About
As your skills develop, you may want to explore more sophisticated calibration tools. Here are some notable variants and what they test:
Benchy (3DBenchy)
The 3DBenchy — officially “3DBenchy, the jolly 3D printing torture-test” — is the other iconic calibration print in the 3D printing world. It looks like a small tugboat and is designed specifically to test a comprehensive set of challenging printing scenarios: overhangs, bridges, curved surfaces, enclosed spaces, fine text details, and more.
The Benchy is not typically recommended as an absolute first print because it’s more complex to diagnose when things go wrong. However, after your calibration cube is successful, printing a Benchy is an excellent next step and a beloved community tradition. Printing your first Benchy is something of a rite of passage in the 3D printing community.
Temperature Tower
A temperature tower is a test print designed to be printed at multiple temperatures — with each “floor” of the tower printed at a different temperature, typically in 5°C increments. This helps you find the optimal printing temperature for a specific filament spool.
This is particularly useful because different brands and even different colors of the same material can have different optimal temperatures. A temperature tower takes the guesswork out of finding the right temperature for any new filament you try.
Retraction Test Tower
Similar to a temperature tower, a retraction test tower tests multiple retraction settings simultaneously. Each section of the tower is printed with different retraction distance or speed settings, making it easy to visually identify which setting produces the least stringing.
Flow Rate Calibration Print
A single-wall cube or hollow box printed at specific settings allows you to measure your actual flow rate by checking the wall thickness with calipers. If the wall is thicker than one nozzle width (typically 0.4mm for a standard nozzle), your flow rate is too high. If it’s thinner, flow rate is too low.
Bed Level Test
Various bed level test prints consist of large flat patches or lines printed at the corners and center of the build plate, making it easy to visually confirm even bed leveling and first layer consistency across the entire surface.
Building a Calibration Workflow: Printing Multiple Cubes
Experienced makers don’t just print one calibration cube — they develop a systematic calibration workflow that involves printing multiple cubes (or a grid of mini-cubes) in a specific sequence to methodically dial in every aspect of printer performance.
A practical beginner calibration workflow looks like this:
Step 1: Print a standard 20mm cube with default settings. Measure and record results.
Step 2: If dimensional accuracy is off, calibrate E-steps and steps-per-millimeter. Print another cube to verify.
Step 3: If surface quality is poor, address the specific issue identified (stringing, blobs, rough surfaces, etc.) through targeted setting adjustments. Print another cube to verify each change.
Step 4: Once your basic cube is printing well, print a temperature tower with your current filament to confirm your temperature setting is optimal.
Step 5: Print a Benchy. This will reveal any remaining issues with challenging geometry.
Step 6: You’re calibrated! Save your slicer profile for this filament and printer combination.
This systematic approach saves enormous time and frustration compared to trying to diagnose multiple variables simultaneously.
The Importance of Material: Which Filament to Use for Your First Print
Your choice of filament for your calibration cube matters more than you might expect.
PLA: The Recommended Choice for Beginners
Polylactic Acid (PLA) is universally recommended as the starter filament for beginners, and this applies to calibration cubes as well. PLA has several characteristics that make it ideal for learning:
It prints at relatively low temperatures (190-220°C for the hotend, 55-65°C for the bed), which means less waiting for the printer to heat up and less risk of heat-related issues. It’s forgiving of minor temperature variations. It doesn’t warp significantly, so you don’t need an enclosure. It adheres well to most build surfaces. It’s available in a wide variety of colors and is one of the least expensive filaments available.
For your very first calibration cube, use a basic, reliable PLA from a reputable brand. Save the exotic materials (flexible TPU, engineering-grade PETG, high-temperature ASA) for after you’re comfortable with the basics.
PETG: The Second Step
PETG (Polyethylene Terephthalate Glycol) is often the second material beginners explore. It’s more durable than PLA, has better heat resistance, and is more flexible. However, it’s also more prone to stringing than PLA, which means a PETG calibration cube will often highlight stringing issues that weren’t apparent with PLA. When you’re ready to try PETG, printing a calibration cube with it is an excellent way to dial in your PETG settings.
Saving Your Results: Building a Calibration Log
One of the best habits you can develop as a new 3D printer owner is keeping a calibration log. This is simply a record of your printer’s state at any given time, including:
- Date of calibration
- Printer model and current firmware version
- Filament brand, type, and color
- Hotend temperature used
- Bed temperature used
- Print speed used
- E-steps value
- Z-offset value
- Results (cube dimensions, visual quality notes)
- Any settings changes made
This log becomes invaluable when you make modifications to your printer (new nozzle, new bed surface, firmware update) and need to recalibrate from a known good baseline. It’s also useful if something starts going wrong — you can compare your current settings to a time when things were working well.
A simple spreadsheet or even a paper notebook works perfectly for this purpose.
The Philosophical Value of the Calibration Cube
It’s worth stepping back and appreciating what the calibration cube represents beyond its technical function.
The 3D printing community is built on a culture of shared knowledge, iterative improvement, and the willingness to learn from failure. The calibration cube embodies all of these values. It’s a shared reference point that connects a complete beginner with their very first printer to an expert maker with a print farm of dozens of machines — both of them measuring the same 20mm cube, using the same measurement techniques, discussing the same diagnostic criteria.
When you post a photo of your first calibration cube in a 3D printing forum or community, experienced makers immediately understand what they’re looking at. They can give you specific, actionable advice because the calibration cube is a universal language in the 3D printing world.
More broadly, the calibration cube teaches you one of the most important lessons in making: measure twice, cut once. Or in 3D printing terms: calibrate first, print second. The discipline of verifying your equipment before trusting it with important work is a principle that extends far beyond 3D printing into engineering, manufacturing, woodworking, cooking, and almost every other craft and technical discipline.
When you print your calibration cube, you’re not just checking your printer. You’re learning to think like a maker.
Summary: Your Calibration Cube Action Plan
Here’s a quick reference summary of everything covered in this guide:
Choose your cube: For beginners, the standard XYZ 20mm Calibration Cube (Thingiverse Thing:1278865) is the right choice.
Prepare your printer: Level your bed, calibrate your E-steps, load filament, install slicer software, and select the correct printer profile.
Set your slicer: Use 0.2mm layer height, 40-50 mm/s print speed, 20% infill, 3 perimeters, and settings appropriate for your filament (typically PLA).
Print and watch: Monitor the first layer closely. Be ready to stop and re-level if it’s not sticking well.
Measure and inspect: Use digital calipers to measure all three dimensions. Visually inspect for stringing, blobs, rough surfaces, warping, and other quality indicators.
Diagnose and adjust: Use the results to identify and address specific calibration issues.
Document: Record your settings and results in a calibration log.
Iterate: Print more cubes as you make adjustments until you’re consistently achieving good results.
Graduate: Once your cube is printing well, try a Benchy, then a temperature tower with your filament, then your first real project.
The calibration cube is humble in size but enormous in value. Print it with patience and attention, read it with care, and it will give you the confidence and knowledge to tackle everything that comes next in your 3D printing journey.
Conclusion
Your first 3D print doesn’t have to be spectacular to be meaningful. The calibration cube — a simple 20mm box labeled with three letters — is one of the most important things you will ever print on your machine. It tells you the truth about where you stand, gives you a path forward, and connects you to a global community of makers who have all started in the same place.
Print it. Measure it. Learn from it. And then use what you’ve learned to print everything else.
Welcome to 3D printing.