Introduction: The Problem of Unwanted Plastic
When you watch a 3D printer in action, you notice that the print head moves constantly, following complex paths as it builds your object layer by layer. Some of these movements deposit material, the print head traces perimeters and fills areas while extruding plastic to form the actual object. Other movements are simply travel moves where the print head needs to get from one location to another without leaving plastic behind. These travel moves present a fundamental problem that every FDM printer must address: how to prevent molten plastic from continuing to ooze out of the nozzle during these non-printing movements.
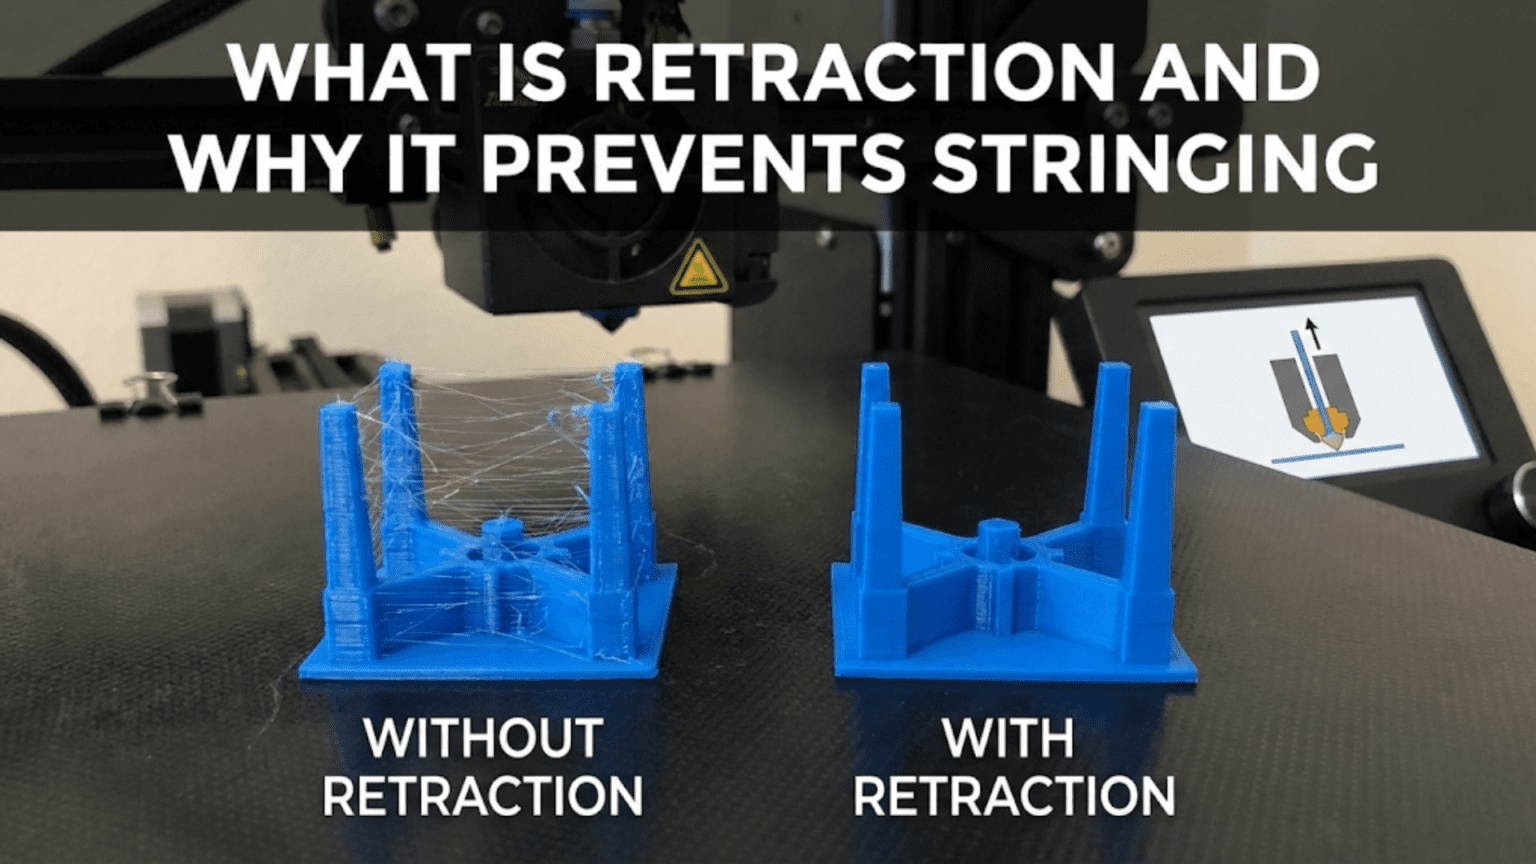
If the printer did nothing to address this issue, you would see thin strands of plastic stretched between different parts of your print wherever the nozzle traveled through open air. These unwanted strings create a cobweb-like appearance on finished prints, particularly noticeable on models with multiple separate features or complex geometries with lots of gaps and voids. Beyond just being unsightly, excessive stringing can interfere with print quality, the thin strands might get caught by the moving nozzle and dragged through wet layers, creating surface defects or even causing print failures. Solving the stringing problem is essential for producing clean, professional-looking prints.
The solution that the 3D printing community developed is called retraction, and it represents one of the most important features in modern slicing software and printer firmware. Retraction is deceptively simple in concept: before the nozzle travels through open space, the printer briefly reverses the extruder motor, pulling filament backward up into the hotend. This backward movement creates a slight vacuum effect that pulls molten plastic away from the nozzle tip, preventing it from dripping or oozing during the travel move. When the nozzle reaches its destination and is ready to resume printing, the extruder motor rotates forward again, pushing plastic back down to the nozzle tip so extrusion can continue normally.
While the basic concept sounds straightforward, implementing retraction effectively requires balancing multiple competing factors. Retract too little and stringing persists. Retract too much and you risk creating new problems like clogs, grinding, or gaps in your prints. The optimal retraction settings depend on your printer’s specific hardware configuration, the material you’re printing, the temperature settings you’re using, and even the characteristics of individual prints. Understanding how retraction works at a deeper level, what factors influence optimal settings, and how to diagnose and fix retraction-related problems transforms this feature from a mysterious checkbox in your slicer to a powerful tool for achieving clean, high-quality prints.
The physics underlying retraction involves understanding pressure dynamics inside the hotend, material properties of different filaments, mechanical characteristics of various extruder designs, and thermal considerations about how plastic behaves at printing temperatures. These interconnected factors mean that retraction tuning is part science, part experimentation, and part accumulated experience. The good news is that once you understand the principles and develop systematic approaches to finding optimal settings, retraction becomes manageable rather than mysterious.
This article explores retraction comprehensively, starting with the fundamental mechanics of how it works and why it’s necessary. We’ll examine the key retraction settings and how each one affects print quality, discuss how different extruder configurations require different retraction approaches, investigate material-specific considerations that influence optimal retraction, and develop strategies for systematically tuning retraction to achieve the best possible results. Whether you’re a complete beginner struggling with stringy prints or an intermediate user looking to refine your understanding and settings, this deep dive into retraction will provide the knowledge you need to produce cleaner, better prints consistently.
The Mechanics of Retraction: What Actually Happens
To truly understand retraction, you need to visualize what’s happening inside the hotend and extruder during the retraction process. Let’s walk through a typical printing scenario where retraction comes into play, examining each step in detail to build a complete mental model of the mechanics involved.
Imagine your printer is currently extruding plastic to form a perimeter wall. The extruder motor is rotating forward, pushing filament down through the hotend where it melts and is forced out the nozzle. There’s a column of molten plastic extending from the melt zone down through the nozzle to the tip, and additional pressure exists throughout the system as filament continues being pushed from above. The plastic exiting the nozzle immediately contacts the print bed or previous layer and begins cooling and solidifying. This is normal printing operation, with everything working as intended to deposit material where needed.
Now the printer’s toolpath requires moving the nozzle to a different location to start printing another feature. Perhaps the print has two towers and the nozzle just finished one tower’s layer and needs to travel across to the second tower. If nothing changes, the hot nozzle with its molten plastic will travel through the air between the towers, and several things encourage unwanted plastic to leak out during this travel. First, there’s residual pressure in the melt zone from the recent extrusion that continues trying to push plastic out. Second, gravity pulls on the molten plastic at the nozzle tip. Third, the plastic’s own heat and low viscosity at printing temperature mean it flows easily. The result is that plastic oozes or drips from the nozzle during travel, leaving a thin strand connecting the two towers.
Retraction interrupts this process before the travel move begins. As soon as the slicer’s toolpath indicates the nozzle needs to travel without extruding, it commands the extruder motor to briefly reverse direction. The motor spins backward, typically for a fraction of a second, pulling filament up and away from the nozzle. This backward movement has several effects that work together to prevent stringing.
The most direct effect is that pulling filament upward physically removes some of the molten plastic from the very tip of the nozzle, drawing it back up into the slightly cooler regions of the nozzle and heat break. With less plastic sitting right at the exit point, there’s simply less material available to ooze out during travel. Think of it like pulling the last drops of coffee back up into a coffee pot spout to prevent drips, the same principle applies here with molten plastic.
The backward movement also relieves pressure inside the melt zone. Remember that during active extrusion, the continuous pushing of filament from above creates pressure that forces plastic through the narrow nozzle opening. When you reverse the extruder motor and pull filament backward, you’re essentially depressurizing the system. The pressure drop means plastic is no longer being actively forced toward the nozzle opening, reducing the driving force behind oozing. Some describe this as creating a slight vacuum, though that’s not technically accurate since no actual vacuum forms, rather the pressure simply drops below what it was during extrusion.
Once the extruder motor stops its backward motion, the filament remains in this slightly retracted position while the nozzle travels. The travel move happens at high speed to minimize the time spent in motion without extruding. During this brief travel period, the reduced pressure and pulled-back plastic position minimize oozing. Some oozing might still occur because the plastic is hot and some residual pressure remains, but it’s dramatically less than would happen without retraction.
When the nozzle reaches its destination and is ready to resume extruding, the extruder motor reverses its previous reverse, moving forward again to push filament back down to the nozzle tip. This is sometimes called priming or unretraction, though many people simply consider it part of the retraction process. The forward movement needs to push filament far enough down that plastic is ready to extrude immediately when printing resumes, but not so far that it over-extrudes and creates a blob at the restart point. Most slicers handle this balance automatically, matching the unretraction distance to the retraction distance so the system returns to its pre-retraction state.
The actual distances involved in retraction are surprisingly small, typically measured in just a few millimeters. A common retraction distance might be only five millimeters for a Bowden extruder or one millimeter for a direct drive system. These tiny movements are sufficient because the plastic being retracted is molten and the pressure relief and position change don’t require moving large amounts of material. The goal isn’t to pull filament all the way back up through the entire hotend, just to relieve pressure and pull the molten plastic away from the exit point.
The speed of retraction also matters significantly. The extruder motor might spin at a retraction speed of thirty to fifty millimeters per second or even faster, which is quite rapid over the short distances involved. Fast retraction creates a more pronounced pressure relief and pulls plastic back more effectively. However, extremely fast retraction can cause the extruder gear to slip on the filament or even grind it, particularly if the filament is soft or if friction in the system is high. Finding the right retraction speed involves balancing effectiveness against the mechanical limitations of your extruder.
Understanding this mechanical process helps you appreciate why retraction settings need tuning. If retraction distance is too short, not enough plastic gets pulled back and insufficient pressure relief occurs, leaving you with stringing. If retraction distance is too long, you might create other problems that we’ll explore later. If retraction speed is too slow, the pressure relief happens gradually and some oozing occurs before the travel move completes. If retraction speed is too fast, mechanical problems arise. The optimal settings thread the needle between these various considerations.
Key Retraction Settings and What They Control
Modern slicing software provides several retraction-related settings that give you precise control over how the retraction process works. Understanding each setting, what it does, and how it interacts with other settings empowers you to tune retraction systematically rather than randomly trying different values and hoping for improvement. Let’s examine each major retraction setting in detail.
Retraction distance represents the most fundamental retraction setting, specifying how far the filament pulls back up from its printing position. This is measured in millimeters and represents the length of filament that the extruder motor pulls backward. As mentioned earlier, typical values range from about half a millimeter to ten millimeters depending on extruder type, with direct drive systems using shorter distances and Bowden systems requiring longer distances. The retraction distance directly determines how much pressure relief occurs and how far molten plastic pulls back from the nozzle tip. Increasing retraction distance generally reduces stringing up to a point, beyond which you encounter diminishing returns and increasing risk of side effects.
Retraction speed controls how quickly the extruder motor spins backward during retraction. This is measured in millimeters per second and typically ranges from twenty to eighty millimeters per second or even higher. Faster retraction speeds create more rapid pressure relief and can be more effective at preventing oozing, particularly during very short travel moves. However, the maximum achievable retraction speed is limited by your extruder’s mechanical capabilities and by friction in the filament path. If you set retraction speed too high, the extruder gear may skip or grind against the filament rather than moving it smoothly. Most users find that moderately fast retraction speeds in the forty to sixty millimeters per second range work well, though optimal speeds vary by setup.
Minimum extrusion distance before retraction determines how far the nozzle must extrude material before a retraction is allowed to occur. This prevents excessive retractions during short extrusion moves where the time and mechanical wear from retracting might cause more problems than simply allowing minimal oozing. For example, if you’re printing small perimeter segments close together, retracting between every tiny segment might cause accumulating errors or grinding. Setting a minimum extrusion distance of one or two millimeters means retractions only happen when they’re actually necessary. This setting helps reduce total retraction count while still preventing stringing during significant travel moves.
Maximum retraction count limits how many times filament can retract within a specified length of filament. This is a safety feature that prevents problems that can occur when a section of filament gets retracted repeatedly. Each retraction cycle slightly deforms the filament where the extruder gear grips it, and after many retractions at the same location, the filament surface can become ground or deformed enough to cause feeding problems. By limiting maximum retraction count to something like ten retractions per three millimeters of filament, the slicer forces some extrusion between retractions to advance filament through the extruder and bring fresh filament into the gear’s grip. This prevents a single section from being retracted into oblivion.
Retraction extra prime amount allows you to push slightly more or less filament forward when resuming extrusion after retraction. This is typically a small value, perhaps negative zero point five millimeters to positive zero point five millimeters, that compensates for any mismatch between what retraction pulls back and what needs to be pushed forward for clean restart. A small negative value means you push slightly less filament forward than you pulled back during retraction, which can help prevent blobs at restart points if you’re seeing over-extrusion after travel moves. A small positive value means you push slightly more filament forward, which can help if you’re seeing under-extrusion or gaps where printing resumes after retraction.
Z-hop or Z-lift is a related feature often grouped with retraction settings. When enabled, Z-hop causes the nozzle to lift slightly in the vertical direction during travel moves, typically by two tenths to five tenths of a millimeter. This prevents the nozzle from dragging across previously printed features during travel, which is particularly valuable on prints with many small pillars or complex geometries where travel paths necessarily cross over printed areas. Z-hop works synergistically with retraction, the retraction prevents stringing while the Z-hop prevents collisions. However, Z-hop adds time to prints because of the extra vertical movements and can sometimes cause surface artifacts if not implemented smoothly. Many users enable Z-hop only for problematic prints rather than using it universally.
Wipe or coast settings control what happens in the moments just before and after retraction. Wiping causes the nozzle to make a small move along the perimeter or surface while retracting, essentially wiping the nozzle tip clean as the filament pulls back. This can reduce the formation of tiny blobs at retraction points and help ensure clean starts after travel. Coasting stops extrusion slightly before the end of a perimeter or feature, allowing residual pressure to naturally push out the remaining plastic needed to complete the line without active extrusion. This prevents pressure buildup that would otherwise contribute to stringing. Both features can improve results but add complexity to toolpath planning and aren’t necessary for all prints.
The interaction between these settings creates a multidimensional tuning space where changing one parameter affects how others should be set. For example, if you increase retraction distance, you might be able to use slower retraction speed and still get good results. If you enable Z-hop, you might get away with slightly less retraction distance because the nozzle isn’t in contact with previously printed features during travel. Learning to think about these settings as an interconnected system rather than independent knobs helps you tune more effectively.
Bowden vs Direct Drive: Why Extruder Type Fundamentally Changes Retraction
One of the most important factors determining optimal retraction settings is the type of extruder system your printer uses. The two main configurations are Bowden extruders and direct drive extruders, and they have fundamentally different characteristics that necessitate dramatically different retraction approaches. Understanding these differences is crucial for setting appropriate initial values and for understanding why retraction advice you see online might not apply directly to your specific setup.
In a Bowden extruder system, the extruder motor that pushes filament is mounted on the printer’s frame away from the hotend. Filament travels from the extruder motor through a long PTFE tube, sometimes called a Bowden tube, before entering the hotend. This tube might be three hundred to six hundred millimeters long or even longer. The primary advantage of Bowden systems is that keeping the heavy extruder motor off the print head reduces the moving mass, allowing faster printing speeds and more precise motion control. The print head itself only needs to carry the lighter hotend assembly.
The major disadvantage of Bowden systems from a retraction perspective is the long, flexible filament path between the extruder motor and the hotend. When you command a retraction, the extruder motor pulls filament backward, but this motion must travel through the entire length of the Bowden tube before it affects pressure at the nozzle. The tube has some flex and the filament itself has some springiness, so there’s slop in the system. Much of the backward motion simply compresses the filament and relieves spring tension in the system rather than immediately pulling molten plastic back from the nozzle.
This means Bowden systems require longer retraction distances to achieve the same pressure relief that direct drive systems achieve with shorter retractions. A typical Bowden setup might need five to seven millimeters of retraction or even more, compared to only one to two millimeters for direct drive. These longer retractions carry increased risks including the possibility of pulling molten plastic far enough back that it enters the cooler zones of the heat break and partially solidifies in an expanded state, potentially causing clogs. Bowden systems also respond more slowly to retraction commands because of the mechanical lag through the tube, making retraction speed and timing more critical.
Direct drive extruders mount the extruder motor directly on the print head assembly, with filament traveling only a very short distance, perhaps thirty to fifty millimeters, from the motor’s drive gear into the hotend. This eliminates the long flexible path and most of the system slop that Bowden tubes introduce. When the extruder motor reverses in a direct drive system, that motion almost immediately affects the filament at the hotend because there’s minimal distance and flex between the motor and the melt zone.
The short, rigid filament path in direct drive systems means much shorter retraction distances work effectively, typically in the range of half a millimeter to two millimeters. These short retractions are sufficient because the mechanical connection between motor and hotend is tight, meaning small movements translate directly into pressure changes at the nozzle. The shorter retractions reduce the risk of problems from over-retraction and allow faster printing because retraction and unretraction cycles complete more quickly.
Direct drive systems generally require more careful tuning of retraction speed because the tight mechanical coupling means that aggressive speed settings can more easily cause grinding or skipping. The same aggressive retraction speed that a Bowden system might need to overcome tube friction could cause a direct drive extruder to grind filament. However, once properly tuned, direct drive systems typically provide better retraction performance and more consistent results.
The difference in optimal retraction settings between Bowden and direct drive is so significant that generic retraction advice often doesn’t transfer between the two systems. If you read online that someone uses six millimeter retraction and try applying that to your direct drive printer, you’ll likely experience clogs and print failures because six millimeters is excessive for direct drive. Conversely, if you use one millimeter retraction suitable for direct drive on a Bowden printer, you’ll see terrible stringing because one millimeter barely starts to compress the Bowden tube slack.
This is why knowing your extruder type is essential before adjusting retraction settings. If you’re not sure whether your printer is Bowden or direct drive, look at whether the extruder motor sits on the print head carriage moving with the hotend or whether it’s mounted elsewhere on the frame with a tube running to the hotend. This simple observation tells you whether to start with short retraction distances around one millimeter or long distances around five to six millimeters.
Some printer designs attempt hybrid approaches or use special extruder configurations that don’t fit neatly into Bowden or direct drive categories. For example, some printers use very short Bowden tubes, perhaps one hundred millimeters long, which fall between typical Bowden and direct drive in their characteristics and optimal retraction settings. These systems might need retraction distances around two to four millimeters, splitting the difference between the two extremes. If you have an unusual extruder configuration, you’ll need to experiment more to find optimal settings since standard recommendations won’t apply directly.
Understanding the mechanical reasons why extruder type affects retraction so profoundly helps you make informed decisions when tuning settings. You’re not randomly adjusting numbers but rather accounting for the actual physical characteristics of your printer’s filament path and the mechanical coupling between your extruder motor and your hotend. This mechanical understanding makes retraction less mysterious and more predictable.
Material Properties: How Different Filaments Need Different Retraction
While extruder type is the primary factor determining baseline retraction settings, the material you’re printing also significantly influences optimal retraction parameters. Different plastics have different thermal properties, viscosity characteristics, and sensitivities to temperature changes, all of which affect how they behave during retraction cycles. Understanding these material-specific factors helps you develop appropriate retraction settings for each filament type you use.
PLA, being the most common 3D printing material, serves as a good baseline for discussing material effects on retraction. PLA has relatively low melt viscosity at typical printing temperatures, meaning it flows fairly easily when molten. This tendency to flow readily makes PLA prone to stringing if retraction is inadequate, but it also means PLA responds well to retraction because the low viscosity plastic easily pulls back from the nozzle. PLA’s moderate printing temperature, usually one hundred ninety to two hundred twenty degrees Celsius, means less thermal energy is present in the system compared to higher-temperature materials, which can help reduce oozing since there’s less heat keeping the plastic highly fluid.
PETG presents more challenges for retraction than PLA because PETG is inherently stringy and tends to ooze more readily. PETG has a different viscosity profile than PLA and tends to form long thin strands more easily when any oozing occurs. Many users find that PETG requires either slightly longer retraction distances or lower printing temperatures compared to PLA to achieve comparable string-free results. However, PETG is also more sensitive to over-retraction, pulling PETG back too far can create difficulties when resuming extrusion because the material doesn’t always flow back down smoothly. This means PETG retraction tuning requires careful balance, you need enough retraction to control stringing but not so much that you create flow problems.
ABS and similar styrene-based materials generally handle retraction well once you have appropriate settings. ABS prints at higher temperatures than PLA, typically two hundred thirty to two hundred fifty degrees Celsius, which means the plastic is more fluid and potentially more prone to oozing. However, ABS also tolerates longer retractions better than some materials and typically doesn’t suffer as severely from over-retraction problems. The main retraction challenge with ABS is that the higher printing temperature means more thermal energy in the system that promotes oozing, so slightly more aggressive retraction or lower temperatures within the printable range can help control stringing.
TPU and other flexible filaments represent a special case for retraction. These materials are soft and compressible, which creates unique challenges. When you try to retract flexible filament, particularly through a long Bowden tube, the filament can compress rather than moving as a rigid column. This compression absorbs the retraction motion without actually pulling material back from the nozzle, making retraction less effective. Many users printing flexible filaments on Bowden printers either use very short retraction distances, sometimes under two millimeters even on systems that normally need six millimeters, or disable retraction entirely and accept some stringing as inevitable. Direct drive systems handle flexible filaments much better because the short rigid path prevents compression, allowing normal retraction to work.
Nylon presents retraction challenges primarily because of its high printing temperature and its tendency to absorb moisture from air. Dry nylon at appropriate temperatures can retract reasonably well, but if the material has absorbed moisture, the water content causes micro-steam bubbles during melting that can create pressure fluctuations and inconsistent flow. These inconsistencies make retraction less predictable, sometimes seemingly working fine and other times producing stringing or blobs despite identical settings. Ensuring nylon is properly dried before printing helps address these issues more than retraction tuning alone can.
Wood-filled, metal-filled, and other composite filaments often need modified retraction settings because of their increased viscosity and abrasive properties. The particles in these filaments increase viscosity, making the material flow less easily and sometimes requiring slightly reduced retraction to prevent flow problems when resuming extrusion. However, the same increased viscosity can actually reduce stringing tendency because the material is less likely to ooze freely. The abrasive nature of these filaments means excessive retraction cycles can accelerate extruder gear wear, making it particularly important to use only as much retraction as necessary rather than defaulting to aggressive settings.
Temperature settings interact critically with retraction effectiveness across all materials. Higher temperatures make materials flow more easily, which generally increases stringing tendency and requires more aggressive retraction to control. However, higher temperatures also mean material flows more reliably when resuming extrusion after retraction, reducing the risk of gaps or under-extrusion at restart points. Lower temperatures reduce oozing and stringing but can make flow less consistent and increase the risk of clogs during retraction. Finding the optimal temperature for each material often involves balancing printability against stringing tendency, with retraction settings then optimized for whatever temperature you’ve chosen.
The practical implication of these material differences is that you should maintain separate retraction settings for each material type you regularly print, typically embedded in material-specific profiles in your slicer. Trying to use PLA retraction settings for PETG will likely result in poor performance in one direction or the other. Developing a library of proven retraction settings for each material you use, along with notes about any special considerations for that material, accelerates your printing workflow and reduces troubleshooting time when switching between materials.
The Retraction Tuning Process: Finding Your Optimal Settings
With an understanding of what retraction does, what settings control it, and how extruder type and material affect requirements, you’re ready to systematically tune retraction for your specific setup. This process involves methodical testing, careful observation, and incremental adjustments rather than wild guesses or blindly copying numbers from internet forums. Following a structured tuning process produces reliable, repeatable results and builds your understanding of how retraction works on your particular printer.
Start by identifying reasonable baseline values based on your extruder type and material. For Bowden extruders with PLA, you might start with retraction distance of five millimeters and retraction speed of forty-five millimeters per second. For direct drive with PLA, begin with one millimeter distance and forty millimeters per second speed. These starting points aren’t necessarily optimal but they’re safe, unlikely to cause immediate problems, and give you a reasonable foundation for testing. If you’re working with a different material, adjust these baselines based on the material considerations discussed earlier.
Print a retraction test model, ideally one specifically designed to reveal stringing issues. Many repositories offer retraction towers or stringing tests that consist of multiple thin vertical features with gaps between them, forcing the printer to make many travel moves where stringing would be visible. These test prints show very clearly whether your retraction is adequate. An alternative is a simple two-tower test where each tower is tall and thin, with the nozzle traveling between them on every layer. The gaps between towers reveal any stringing issues very obviously.
Examine your test print carefully under good lighting. Minor stringing appears as fine, almost invisible threads connecting features, while severe stringing creates obvious cobweb-like masses of plastic. Small amounts of very fine stringing are often acceptable for many prints, particularly functional parts where appearance is secondary to mechanical properties. However, if you see thick strings, large amounts of fine strings, or strings that are affecting the next layer’s quality by getting caught in the nozzle, you need to improve retraction.
If you’re seeing stringing, your first adjustment should typically be increasing retraction distance by half a millimeter to one millimeter. Make this single change, keeping retraction speed and all other settings constant, and print another test. Compare the results to your previous test. Did stringing decrease? If yes, continue increasing retraction distance in small increments until stringing reaches an acceptable level. If no, or if stringing actually increased, you might have other issues beyond simple retraction that we’ll discuss in the troubleshooting section.
Be cautious about increasing retraction distance too far. For direct drive systems, going beyond two to three millimeters typically doesn’t help further and risks creating problems. For Bowden systems, distances above eight to ten millimeters rarely provide additional benefit and increase risks. If you reach these limits and still have significant stringing, retraction distance probably isn’t the root cause and you should investigate other factors like temperature or material issues.
Once you’ve found a retraction distance that produces acceptable string reduction, test whether adjusting retraction speed helps further. Try increasing speed by ten to twenty millimeters per second and print another test. Faster retraction might allow slightly shorter retraction distance while maintaining the same string prevention, or it might enable even better performance. However, watch for signs that you’re pushing speed too far, including grinding noises from the extruder, filament with visible grinding marks, or increased stringing despite higher speed, which indicates the extruder is skipping and not actually moving filament effectively.
If faster retraction speed helps, continue increasing incrementally until you stop seeing improvement or until you encounter mechanical limits. If faster retraction makes things worse, try decreasing speed below your baseline instead. Some setups, particularly those with higher friction in the filament path, work better with moderately slow but longer retractions rather than very fast short retractions.
Temperature adjustments can complement retraction tuning. If you’ve optimized retraction distance and speed but still see more stringing than desired, try reducing printing temperature by five or ten degrees. Lower temperature reduces the material’s tendency to ooze, potentially allowing shorter retraction distances or eliminating stringing that retraction alone couldn’t fully address. However, ensure temperature doesn’t drop so low that you experience poor layer adhesion or under-extrusion during normal printing.
Once you’ve found settings that produce clean test prints, validate them on actual printing projects rather than just test models. Test models provide controlled conditions for tuning but real prints may have different characteristics. A complex model with many thin features and travel moves might reveal stringing issues that simpler tests missed. Conversely, a simple blocky print might show no stringing at all even with suboptimal retraction. Testing on varied real-world prints helps confirm your settings work broadly rather than just for specific test conditions.
Document your final settings in material-specific profiles in your slicer. Include not just the retraction distance and speed but also any temperature adjustments, Z-hop settings, or other related parameters you’ve tuned. Adding notes about which printer and which specific material brand and color you tuned for helps you remember context when you return to these settings later. Building this documentation library means you won’t have to retune from scratch every time you print.
Consider that retraction settings may need revisiting if you make changes to your printer. Installing a new hotend, switching from Bowden to direct drive, changing nozzle sizes, or even replacing worn extruder gears can all shift optimal retraction settings. Think of retraction tuning as an ongoing calibration task you perform whenever relevant hardware changes rather than a one-time setup you never revisit.
Common Retraction Problems and Their Solutions
Even with systematic tuning, retraction-related problems can arise. Understanding common issues, their symptoms, and their solutions helps you quickly diagnose and fix problems rather than spending hours in frustration wondering why prints suddenly stopped looking good. Let’s examine the most frequent retraction problems and how to address them.
Persistent stringing despite aggressive retraction suggests the problem isn’t primarily a retraction issue. If you’ve increased retraction distance well into the appropriate range for your extruder type and pushed retraction speed to reasonable limits but still see significant stringing, look elsewhere for the cause. Possible culprits include temperature being too high for the material, moisture contamination in hygroscopic materials like nylon or PETG, a partially clogged nozzle that’s creating inconsistent flow and pressure, or even a specific filament that’s simply stringier than others. Try reducing temperature first, then verify your nozzle is clean, and consider testing with different filament from a fresh spool.
Gaps or under-extrusion at the start of perimeters after retraction indicates that filament isn’t returning to its printing position quickly enough when extrusion resumes. You might see thin sections or actual gaps right where perimeters begin after travel moves. This can happen if retraction distance is too long and not enough priming occurs when resuming, or if there’s excessive friction in the filament path that impedes the forward motion after retraction. Solutions include slightly reducing retraction distance, increasing the retraction extra prime amount to push more filament forward when resuming, or checking for mechanical issues causing friction in the filament path.
Blobs or zits on the print surface where perimeters start after travel moves suggest over-extrusion when printing resumes after retraction. This happens when too much pressure builds up before the nozzle starts moving, or when the extra prime amount pushes more plastic than necessary. Reduce the retraction extra prime amount, try reducing retraction distance slightly, or enable coasting to stop extrusion slightly before the end of moves so less pressure builds up. In some cases, simply moving the Z-seam to a less visible location hides the blobs without actually fixing the underlying issue.
Grinding or clicking from the extruder during retraction cycles indicates the extruder gear is slipping on the filament rather than moving it smoothly. This typically means retraction speed is too high for your setup, friction in the filament path is creating too much resistance, or the extruder tension is too high causing the gear to bite too aggressively into the filament. Reduce retraction speed as the first step, then check that filament can move freely through the entire path from spool to hotend. If using a Bowden tube, ensure it’s not kinked or creating excessive friction. Check extruder tension and reduce it if it’s crushing the filament.
Heat creep and clogs that develop during long prints can result from excessive retraction pulling molten plastic into the heat break where it partially solidifies and eventually creates a blockage. This manifests as prints that start fine but gradually develop under-extrusion or complete stoppages after printing for an hour or more. The solution involves ensuring your heat sink fan is working properly and cooling the cold end adequately, reducing retraction distance so you’re not pulling plastic so far back, and potentially upgrading your heat sink or improving its cooling if the problem persists. All-metal hotends are particularly sensitive to this issue and typically require shorter retraction distances than PTFE-lined hotends.
Inconsistent results where prints sometimes show stringing and sometimes don’t despite using identical settings point to environmental or material variability rather than incorrect settings. Temperature fluctuations from room climate control, differences between spools of nominally identical filament, or inconsistent moisture content in hygroscopic materials can all cause this inconsistency. Address it by controlling the printing environment more carefully, testing different spools to identify whether specific ones are problematic, and ensuring hygroscopic materials are properly dried and stored.
Excessive print time increases from too many retractions suggest your minimum extrusion distance before retraction is too low or you’re retracting for very short travel moves that don’t actually need it. Every retraction takes time to complete, and if you’re retracting hundreds or thousands of times per print unnecessarily, this adds significant time. Increase the minimum extrusion distance setting, adjust the minimum travel distance before retraction, or modify your model to reduce the number of small features that force many travel moves. Some slicers offer combing modes that route travel moves through infill rather than open spaces, reducing retraction needs.
Filament with visible wear marks or grinding damage throughout its length indicates you’ve exceeded the maximum retraction count and the extruder is grinding the same section of filament repeatedly. This shouldn’t happen if your slicer’s maximum retraction count is set appropriately, but if you see it, verify that setting is enabled and set to reasonable limits, perhaps ten retractions per three to five millimeters of filament. If the problem persists, your print might have geometry that forces excessive retractions in a small area, and modifying the model or using different orientation might help.
Advanced Retraction Features and Strategies
Beyond basic retraction tuning, several advanced features and strategies can further refine print quality and reduce stringing in challenging situations. Understanding these options helps you squeeze additional performance from retraction when standard settings aren’t quite enough or when you’re tackling particularly difficult prints.
Firmware retraction represents a different approach to implementing retraction where retraction parameters are stored in the printer’s firmware rather than embedded in the G-code by the slicer. When using firmware retraction, the slicer simply inserts commands telling the printer to retract, and the firmware executes retraction using its stored settings. This allows changing retraction settings without reslicing, which can be valuable when tuning on the fly during a print. However, it also means you need to manage retraction settings both in your slicer and in your printer firmware, adding complexity. Most users stick with slicer-controlled retraction unless they have specific reasons to use firmware retraction.
Variable retraction based on travel distance is a feature some slicers offer where retraction distance varies depending on how far the nozzle will travel. Short travel moves might use minimal or no retraction since there’s less time for oozing to occur, while long travel moves use full retraction distance. This reduces total retraction count and associated mechanical wear while still providing adequate string prevention. If your slicer offers this feature, experimenting with it can sometimes improve results, particularly on prints with many small features close together.
Layer-based retraction adjustments allow changing retraction settings at specific layer heights, useful for models where different parts have different stringing sensitivity. You might use aggressive retraction for layers with many thin features spread across the build area, then reduce retraction for solid layers with minimal travel moves. This optimization requires more manual intervention but can be worthwhile for problem prints or production runs where efficiency matters.
Combining retraction with temperature changes represents another advanced strategy. Some users implement temperature towers that not only vary temperature but also adjust retraction at each temperature step, finding the optimal combination of both parameters simultaneously. This comprehensive approach can reveal that you can achieve better results with slightly higher temperature and less aggressive retraction than with lower temperature and maximum retraction, or vice versa. The interaction between these parameters means testing them together sometimes reveals solutions that testing them independently misses.
Dynamic retraction adjustments based on print speed could theoretically help but most slicers don’t implement this directly. The concept is that faster print moves generate more pressure that requires more retraction to relieve, while slower moves generate less pressure and might need less retraction. Advanced users could implement this through custom G-code scripts but it’s generally not worth the complexity for most applications.
Infill-aware retraction strategies involve disabling or reducing retraction during infill printing since minor stringing inside infill doesn’t affect visible quality and reducing retractions during infill saves time and mechanical wear. Some slicers allow setting different retraction parameters for infill versus perimeters, and enabling this option provides performance improvements without quality sacrifice.
Model design considerations to minimize retraction needs represent perhaps the most effective advanced strategy. If you’re designing models for 3D printing, consider how your design choices affect travel moves and retraction requirements. Connecting separate features with thin bridges or supports designed into the model allows the nozzle to print continuously without travel, eliminating retraction needs. Orienting models to minimize the number of separate features per layer reduces retraction cycles. These design optimizations work better than trying to perfectly tune retraction for poorly designed models that force excessive travel moves.
Post-processing to remove strings represents the accept-and-address strategy where you use reasonable retraction settings that prevent most stringing but accept that some fine strings may remain, then remove them after printing with a heat gun, lighter, or careful scraping. For many applications, spending thirty seconds cleaning up minor stringing with a heat gun is more efficient than spending hours trying to achieve absolutely perfect retraction that eliminates every single thread. This practical approach recognizes that perfection isn’t always necessary or economical.
Conclusion: Mastering Retraction for Consistently Clean Prints
Retraction represents one of the most important technologies enabling practical FDM 3D printing, transforming what would be cobweb-covered prints full of strings into clean, professional-looking objects. The elegance of the solution, briefly pulling filament backward to relieve pressure and prevent oozing, belies the complexity involved in tuning retraction optimally for specific hardware, materials, and applications. Understanding retraction at a deep level transforms it from a mysterious setting you adjust randomly into a predictable tool you wield with confidence and precision.
The fundamentals of retraction mechanics, understanding that you’re pulling molten plastic back from the nozzle tip while relieving pressure in the system, provide the mental framework for all retraction tuning. This understanding helps you recognize why certain problems occur and what adjustments will address them. When you see stringing, you know it means either insufficient retraction distance, inadequate retraction speed, excessive temperature, or issues unrelated to retraction itself. This diagnostic capability comes from understanding the underlying physics rather than just memorizing settings.
The profound difference between Bowden and direct drive extruders in their retraction requirements emphasizes why generic advice often fails and why understanding your own printer’s specific configuration is essential. A direct drive user telling you to use one millimeter retraction distance is giving genuinely good advice for their setup but disastrously inadequate guidance for your Bowden printer. Recognizing these fundamental differences helps you filter advice you encounter online, taking inspiration from others while adapting recommendations to your specific situation.
Material-specific considerations add another dimension to retraction tuning, reminding us that 3D printing involves working with diverse materials with different physical and thermal properties. The retraction settings that work beautifully for PLA may need significant adjustment for PETG or flexible filaments. Building a library of material-specific profiles with proven retraction settings for each filament type you regularly use accelerates your workflow and improves consistency. This library represents accumulated knowledge that makes you progressively more efficient over time.
The systematic tuning process, starting from reasonable baseline values and making incremental adjustments while testing methodically, provides a path to optimization that reliably produces good results without requiring luck or guesswork. Following this process builds both optimal settings and deeper understanding of how your printer responds to adjustments. The time invested in careful tuning pays dividends in every subsequent print through reduced stringing, fewer failures, and less time spent on post-processing to remove strings.
Troubleshooting retraction problems requires distinguishing between actual retraction issues and problems that superficially resemble retraction issues but have different root causes. Not all stringing comes from inadequate retraction, sometimes temperature, material quality, or mechanical problems are to blame. Developing diagnostic skills that let you quickly identify the actual source of problems saves enormous time and frustration. Understanding common failure modes and their characteristic symptoms guides you toward correct solutions rather than endlessly tweaking retraction in futile attempts to fix problems that lie elsewhere.
Advanced features and strategies provide tools for further refinement when basic tuning produces good but not perfect results. However, these advanced approaches aren’t necessary for everyone or for every print. Knowing they exist and understanding when they might help allows you to reach for additional capabilities when they’re beneficial while avoiding unnecessary complexity when simple approaches work fine. This judgment about when additional complexity is worthwhile versus when simpler solutions suffice develops with experience.
Looking forward, retraction will continue being a critical aspect of FDM printing even as technology evolves. Newer printer designs with improved mechanical precision, better hotend thermal management, and smarter firmware may reduce retraction sensitivity and make tuning easier, but the fundamental physics of needing to prevent oozing during travel moves remains. Understanding retraction principles ensures you can work effectively with current equipment and adapt to future advances as they emerge.
The ultimate goal of mastering retraction isn’t achieving perfectly string-free prints in every situation, which may not always be possible or necessary. Rather, it’s understanding retraction well enough that you can quickly achieve results appropriate for your specific needs. Sometimes that means absolutely no visible strings for display pieces or products destined for customers. Sometimes it means accepting minor stringing that’s quickly cleaned up because the time investment in perfect tuning isn’t justified for functional prototypes. Having the knowledge and skills to achieve either outcome depending on requirements represents true mastery.
Retraction exemplifies how 3D printing success comes from understanding the interplay between mechanical systems, material properties, thermal dynamics, and software control. No single aspect works in isolation, and optimal results come from considering how all these factors interact. This holistic understanding, where you see retraction as one element in a complex system rather than an isolated setting to adjust, represents the mindset that separates beginners endlessly troubleshooting from experienced practitioners who consistently produce excellent prints because they understand their tools deeply.