Introduction: The Invisible Box That Defines Your Possibilities
Every 3D printer comes with an invisible constraint that shapes what you can create with it. This constraint is the build volume, the three-dimensional space within which your printer can deposit material to create objects. While this might seem like a simple specification—a printer either has enough room to print something or it doesn’t—understanding build volume more deeply reveals nuances that affect everything from what models you can print to how you approach design, from purchase decisions when buying a printer to creative problem-solving when you need to print something that seems too large.
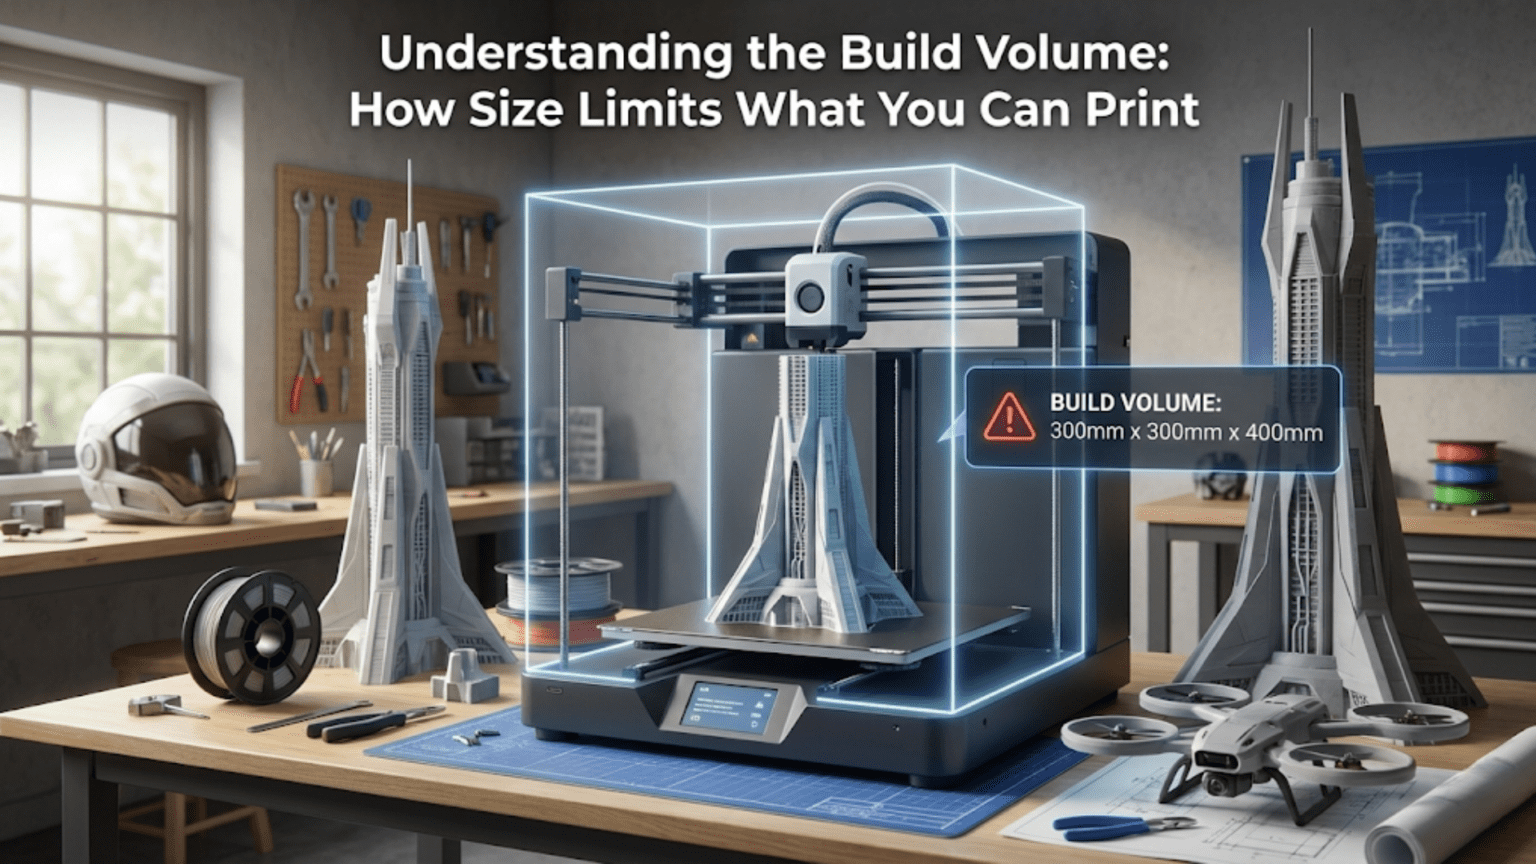
The build volume is typically specified as three dimensions measured in millimeters or centimeters: width, depth, and height, often written as something like two hundred twenty millimeters by two hundred twenty millimeters by two hundred fifty millimeters. These numbers represent the maximum extents in each direction that the print head can reach while depositing material. A model that fits within these dimensions can be printed in a single piece. A model that exceeds any of these dimensions presents challenges that require creative solutions like splitting the model into multiple parts, scaling it down, or finding a printer with a larger build volume.
For beginners, build volume often doesn’t seem important until the moment it becomes critically important. You might print small calibration cubes, test pieces, and household items without ever approaching your printer’s size limits. Then one day you discover a model you really want to print, or you design something specific for your needs, only to find it’s too large for your printer’s capabilities. Suddenly, build volume transforms from an abstract specification into a concrete limitation that forces you to either compromise your vision or develop new strategies for working around the constraint.
Understanding build volume involves more than just knowing the dimensions. It means appreciating how those dimensions translate to real-world capabilities, recognizing that the usable build volume might be slightly smaller than the advertised specifications, understanding when size really matters versus when it’s less critical, and developing strategies for maximizing the utility of whatever build volume you have. It means thinking about build volume not as a fixed limitation but as a design parameter that influences how you approach projects.
The relationship between build volume and the types of projects you can undertake is direct but not always obvious. Larger build volumes enable single-piece prints of bigger objects, reduce the need for assembly when creating large items, and provide flexibility in how you orient models on the build plate. Smaller build volumes require more planning, more frequent use of multi-part strategies, and more careful consideration of model orientation, but they come with benefits like faster bed heating, easier bed leveling, and more compact printers that fit in smaller workspaces. Understanding these trade-offs helps you make informed decisions about what printer to buy and how to use whatever printer you have effectively.
This article explores build volume from multiple angles. We’ll examine what the dimensions actually mean in practical terms, discuss how to measure and verify your actual usable build volume, explore strategies for maximizing the utility of limited space, investigate techniques for printing objects larger than your build volume, and consider when and why build volume matters more or less depending on your specific printing goals. Whether you’re trying to decide what size printer to purchase or working to get the most from a printer you already own, a thorough understanding of build volume will serve you well.
What Build Volume Dimensions Actually Mean
When you see a printer’s build volume specified as two hundred twenty millimeters by two hundred twenty millimeters by two hundred fifty millimeters, these numbers might seem straightforward, but they deserve careful interpretation. The first two dimensions, in this case both two hundred twenty millimeters, represent the horizontal plane, typically called the XY plane. This is the surface of the build plate where your objects sit during printing. Think of this as the floor space available for your print’s footprint.
The XY dimensions define a rectangular area, though some printers have square build plates where the X and Y dimensions are equal while others have rectangular plates where one dimension is larger than the other. The shape of this area affects how you can arrange models on the plate. A square build area provides equal space in all horizontal directions, which can be advantageous for circular or irregularly shaped objects that don’t naturally fit better in one orientation. A rectangular build area provides more space in one direction, which can be beneficial for long, narrow objects but might leave space unused when printing compact objects.
The third dimension, in our example two hundred fifty millimeters, represents the vertical height, the Z dimension. This determines how tall a single print can be. The Z dimension is often the most generous dimension on many printers because adding vertical travel range is mechanically simpler and less expensive than increasing the horizontal build area. Tall build volumes allow you to print objects standing upright, which can be important for certain strength or surface quality considerations as we discussed in the orientation article, but tall prints also take longer to complete because they require more layers.
These advertised dimensions represent the theoretical maximum travel range of the print head or build plate in each direction. However, the actual usable build volume is typically slightly smaller. Several factors reduce the practical size of objects you can print. First, the print head itself has physical dimensions and may not be able to reach all the way to the extreme edges of the build plate without some component of the head assembly extending beyond the plate. Most slicing software accounts for this by defining a slightly smaller printable area than the hardware’s maximum travel range.
Second, many printers benefit from leaving a small margin around the edges of the build plate unused. Bed leveling is often less precise at the extreme edges compared to the center of the plate, and temperature distribution across the bed may be less uniform at the edges. Staying slightly away from the edges, perhaps ten to twenty millimeters on each side, can improve print reliability. For a printer with a two hundred twenty millimeter square build plate, you might find that prints larger than about one hundred eighty to two hundred millimeters square start showing adhesion or quality problems even though they theoretically fit.
Third, support structures, brims, or rafts that your slicer adds to improve print success consume build area. A model that barely fits within your build volume might not fit once the slicer adds a fifteen millimeter brim all around it or generates support structures that extend beyond the model’s footprint. You need to account for these additions when determining whether a model will fit.
The Z dimension has its own practical considerations. The maximum height specification assumes the nozzle can travel all the way to the top of the Z range and still have clearance. However, some print head assemblies are quite tall, and the combination of the assembly’s height plus the object being printed might approach the physical limits of the printer’s frame or enclosure before reaching the maximum Z coordinate. Additionally, extremely tall prints near the maximum Z height can become mechanically unstable, particularly if they have small base footprints, making them more prone to failure even if they technically fit.
Understanding the actual usable dimensions of your printer comes from experience and testing. Many users print large test objects that approach their printer’s limits early on, learning where the practical boundaries lie. This knowledge helps you make realistic assessments of whether models will print successfully rather than relying solely on whether the dimensions technically fit within the specifications. The difference between advertised and usable build volume might only be five to ten percent, but that difference can be the deciding factor for borderline cases.
Some printers feature non-Cartesian kinematics like delta or polar coordinate systems, and their build volumes take different shapes. Delta printers typically have a circular build area rather than rectangular, with a diameter specification instead of width and depth. The usable build area is a cylinder, and rectangular objects must fit within that circular footprint, sometimes leaving significant unused space in the corners of what would be a square build plate. Understanding your printer’s specific build volume geometry helps you arrange models efficiently and recognize when certain objects are or aren’t suitable for your printer’s configuration.
How Build Volume Affects Different Types of Prints
The importance of build volume varies dramatically depending on what you’re trying to print. Understanding how different categories of prints interact with size constraints helps you assess whether a particular printer’s build volume will meet your needs or whether size limitations will frequently frustrate your printing goals.
Functional replacement parts represent one category where size constraints frequently matter. When you’re printing a replacement bracket for a kitchen appliance or a knob for a drawer, the part must be actual size to function properly. You cannot arbitrarily scale these objects down to fit your printer because the scaled part won’t perform its intended function. If you frequently need to print replacement parts for household items, furniture, or equipment, you need a build volume large enough to accommodate typical parts in their real-world sizes. Many common replacement parts fall in the fifty to one hundred fifty millimeter size range, which most desktop printers handle comfortably, but larger parts like mounting brackets or structural components may require larger build volumes.
Decorative objects and display models offer more flexibility regarding size. If you’re printing a decorative vase or a figurine for display, you can often scale the model to fit your available build volume without compromising its purpose. A scale model dragon can be impressive at one hundred millimeters tall or two hundred millimeters tall, the choice depends on your preferences and available space rather than functional requirements. This flexibility means that smaller printers remain quite useful for decorative printing even though their size limitations would be more restrictive for functional parts.
Miniatures for tabletop gaming represent a specific case where build volume is rarely limiting. Gaming miniatures typically range from twenty-five to forty millimeters in height, with even large monsters or vehicles rarely exceeding one hundred millimeters. Almost any 3D printer has more than adequate build volume for individual miniatures. The more relevant question for miniature printing is often print resolution and detail capability rather than size. You can fit dozens of miniatures on a typical build plate simultaneously, making build volume a non-issue for this application.
Large cosplay props, costumes, and wearable items frequently exceed typical printer build volumes. A full-size helmet, chest plate, or prop weapon often measures three hundred to five hundred millimeters or more in at least one dimension. These projects essentially require either very large format printers or, more commonly, splitting the design into multiple printable sections that are assembled after printing. For cosplay enthusiasts, understanding techniques for splitting and assembling large models becomes essential, and build volume limitations drive creative problem-solving rather than preventing the projects entirely.
Architectural models and dioramas can be size-constrained but often work well with smaller prints. A model of a house or building can be printed at whatever scale makes sense, from a small representative model that fits in your hand to a large detailed model that requires splitting into sections. The choice of scale depends more on the level of detail you want to capture and how much time you’re willing to invest than on absolute size requirements. Smaller build volumes might mean you need to use smaller scales or split buildings into multiple prints, but they don’t prevent architectural modeling.
Tool holders, organizers, and workshop accessories often push size limits because they’re designed to fit specific spaces or hold specific quantities of items. A socket organizer designed to hold thirty sockets must be long enough to accommodate all thirty, and a parts organizer for a workshop drawer must match the drawer’s dimensions. These functional constraints mean you cannot arbitrarily scale these prints down. Workshop and organizational prints benefit significantly from larger build volumes that accommodate full-size organizational solutions in single prints rather than requiring multi-part assembly.
Prototype parts for product development have variable size requirements. Early conceptual prototypes might be printed at reduced scale to save time and material, needing only to demonstrate form and general proportions. Later functional prototypes often need to be full scale to allow proper testing of fit, mechanical properties, and user interaction. If you’re using 3D printing for product development, your build volume needs align with your typical product sizes. Small consumer electronics prototypes might fit comfortably on small printers while furniture components or larger products demand bigger build volumes.
Artistic sculptures and creative pieces vary enormously in their size requirements. Some artists work at miniature scales where a fifty millimeter cube contains intricate worlds, while others create large installations that require splitting even moderate-sized sculptures into many printable pieces. Build volume certainly influences artistic 3D printing, but artists often adapt their creative vision to work within available constraints or deliberately choose to work in multi-part assembly as an aesthetic or conceptual choice rather than purely a technical necessity.
Maximizing Your Build Volume: Layout and Arrangement Strategies
Even with a fixed build volume, you can dramatically increase the efficiency and utility of that space through smart arrangement of models on the build plate. The difference between haphazard placement and optimized layout can mean fitting three items on a plate instead of two or orienting an object so it barely fits rather than declaring it too large. Developing these layout optimization skills helps you get maximum value from whatever build volume you have.
The most basic consideration is orientation, which we covered extensively in the orientation article, but it’s worth emphasizing how orientation choices interact with build volume constraints. A tall, narrow object might fit when oriented vertically but exceed the Z limit when laid on its side. A long, thin object might fit horizontally but be too tall when stood upright. Sometimes the optimal orientation for strength or surface quality puts the object’s longest dimension in a direction where your build volume is most generous, while other times the optimal orientation conflicts with size constraints and you must decide which priority wins.
When printing multiple copies of the same object, arrangement strategy significantly affects how many copies fit on the plate. Random placement usually wastes substantial space, while systematic arrangement maximizes density. For identical objects, try arranging them in a regular grid pattern with consistent spacing. The spacing between objects needs to be sufficient that the print head can travel between them without collision, typically around five to ten millimeters minimum, but no more spacing than necessary. Some objects pack more efficiently when rotated relative to each other, nesting together to reduce wasted space between them.
For multiple different objects printed simultaneously, the arrangement puzzle becomes more complex. You’re essentially playing Tetris with three-dimensional objects, trying to arrange irregular shapes to maximize space utilization. Many slicing programs include automatic arrangement features that use algorithms to pack multiple objects efficiently, though manual adjustment often achieves better results when you understand the specific geometry you’re working with. The goal is maximizing build plate utilization while ensuring adequate spacing and considering how the objects will be removed from the plate after printing.
Print order matters when printing multiple objects. Most slicers default to printing all objects simultaneously, completing one layer across all objects before moving to the next layer. This approach minimizes the chance that a failed object will waste an entire print job because each object grows gradually and problems become apparent early. However, it increases the chance that the nozzle will knock over a tall, unstable print when traveling between objects. The alternative, printing objects sequentially one complete object at a time, requires careful arrangement to ensure the print head can reach each object’s full height without colliding with previously completed objects. This typically means spacing objects farther apart and may reduce how many fit on the plate.
Vertical stacking, where one object is printed directly on top of another, is occasionally useful for maximizing Z-axis utilization though it comes with challenges. The lower object must have a flat top surface that can serve as a build plate for the upper object. Adhesion between the two objects is typically strong since they’re printed as a single job, and you may need to design separation features if you want them to come apart easily. This technique works well for printing multiple instances of flat objects like coins, medallions, or tiles by stacking them with thin separation layers between them.
Some advanced users design custom supports or scaffolding that allows printing multiple objects at different Z heights on a single build plate, essentially creating a temporary multi-level print platform. This maximizes Z-axis utilization but requires careful design work and may be more trouble than it’s worth for most applications. It’s mentioned here to illustrate the creative approaches users develop to maximize build volume utilization when size constraints are tight.
Accounting for thermal effects in layout matters for some materials. Objects placed too close together may affect each other’s cooling, potentially causing quality issues. This is particularly relevant for materials like ABS that are prone to warping, where having multiple large objects close together can create localized temperature variations that increase warping risk. Spacing objects farther apart than minimum physical clearance might improve success rates for thermally sensitive materials, even though it reduces the number of objects that fit on the plate.
The center of the build plate often provides the most reliable results due to more uniform bed leveling and temperature distribution, so placing your most critical or difficult prints near the center while relegating easier prints to the edges can improve overall success rates. For very large prints that approach build volume limits, centering them on the build plate often produces better results than placing them off to one side.
Techniques for Printing Objects Larger Than Your Build Volume
When you encounter a model that exceeds your printer’s build volume, you’re not necessarily out of options. Several techniques allow printing objects larger than your theoretical size limits, though they all involve trade-offs between added complexity, assembly work, and final part characteristics. Understanding these techniques expands the range of projects you can tackle without upgrading to a larger printer.
Splitting models into multiple parts is the most common approach for oversized objects. Most CAD and modeling software includes tools for cutting models into sections with various cutting plane geometries. The simplest approach uses flat cutting planes that divide the model into pieces, each small enough to fit your build volume. After printing each section separately, you join them using adhesives, mechanical fasteners, or designed-in joining features. The art of splitting models effectively involves choosing cut locations that minimize visible seam lines, provide adequate surface area for strong joints, and result in pieces that are easy to align during assembly.
When splitting models, consider placing cuts at natural seam locations that are less visually prominent or that align with panel lines or features in the model. A cut through a smooth curved surface will be much more visible than a cut that follows an existing edge or detail line. For mechanical parts, consider whether the split affects structural performance and whether you can orient the split to minimize stress concentration at the joint. For display pieces, think about viewing angles and which surfaces are most visible, placing splits on less-critical surfaces when possible.
Designing split models with built-in alignment and joining features dramatically improves assembly quality. This might include interlocking tabs and slots that help parts self-align, recessed channels for inserting alignment pins or dowels, or designed snap-fit features that hold parts together without additional fasteners or adhesives. These features do require some CAD knowledge to add to existing models but they transform crude butt joints into professional-looking, well-aligned assemblies. Many large models available in online repositories already include thoughtful splitting with built-in alignment features, demonstrating best practices you can emulate.
Keying or indexing features prevent parts from being assembled incorrectly. If your model splits into four identical-looking quarters, adding unique features to each joint ensures each piece can only fit in its correct location. This is particularly valuable for complex models where visual inspection alone might not make the correct assembly orientation obvious. Simple approaches include making each joint slightly different in length, adding pins of different diameters, or incorporating asymmetric features that only allow assembly one way.
Scaling models down to fit available build volume is the simplest solution when functional size isn’t critical. Most slicing software allows easy scaling of models, and reducing a model by ten or twenty percent often brings an oversized print within bounds while maintaining visual fidelity. The question is whether the smaller size still serves your purpose. For display models, prototypes, or aesthetic pieces, modest scaling is often acceptable. For functional parts, replacement components, or anything that must interact with real-world objects at specific dimensions, scaling may not be viable.
Selective compression involves scaling a model differently in different axes to preserve critical dimensions while reducing less-important ones. You might scale a tall vase to seventy percent in height while keeping its diameter at full scale, resulting in a slightly squatter but still attractive piece that fits your Z limit. You might compress a long part along its length while maintaining its width and thickness at full scale if those dimensions are critical for mechanical fit. This selective scaling requires more thought than uniform scaling but can preserve functionality or critical proportions while achieving necessary size reduction.
Mosaic or tile printing breaks large flat or gently curved surfaces into regular tiles that are printed separately and assembled into the full surface. This technique works well for large signs, decorative panels, or artistic pieces where the surface can be divided into a regular pattern of tiles. The tiles might include interlocking features or might simply butt together with the seams becoming part of the aesthetic. Large curved surfaces are more challenging but can be approximated with slightly bent flat tiles or by designing tiles with the appropriate curvature built in.
Printing hollow shells separately and assembling them is useful for large enclosed objects. The shell is designed in two or more pieces, each fitting within build volume limits, with flanges or other features that allow the pieces to bolt or snap together. This technique is common for helmets, masks, or costume armor where the interior isn’t visible and the hollow construction is acceptable or even beneficial for weight reduction. The key is designing the shell pieces with adequate overlap area for strong joints and with features that ensure proper alignment.
Some creative approaches involve printing the same part repeatedly in smaller sections that overlap slightly, then removing the overlapping portions and joining the remaining pieces. This is essentially printing the object at full scale but in multiple passes with some material waste at the overlaps. It’s less elegant than properly splitting the model with designed joints but can work when you don’t have the CAD skills to modify the model or when you’re working with models that aren’t easily edited.
When Size Doesn’t Matter as Much as You Think
Despite the emphasis on build volume, there are many situations where it matters less than other factors in determining what you can successfully print. Understanding when size constraints are genuinely limiting versus when they’re secondary to other considerations helps you make better decisions about printer purchases, project planning, and where to focus your troubleshooting efforts when prints fail.
For highly detailed miniatures and small decorative objects, the printer’s resolution capabilities matter far more than build volume. A printer with a small build plate but excellent detail resolution will produce better results for miniature printing than a large-format printer with mediocre resolution. The finest details on a thirty millimeter gaming miniature require precise mechanical movement, appropriate nozzle size, and proper material flow control, all of which are independent of build volume. Many dedicated miniature printers actually have quite small build volumes, sometimes only one hundred millimeters square, because they optimize for detail rather than size.
Print quality and surface finish often depend more on mechanical stability, motion control precision, and proper calibration than on build volume. A smaller printer with a rigid frame and high-quality motion components may produce better surface quality than a larger printer with more flex and play in its mechanical systems. The engineering challenges of maintaining mechanical precision increase with build volume because larger moving masses create more inertia, longer spans between supports create more opportunity for flex, and larger beds require more sophisticated leveling systems. These aren’t insurmountable challenges, but they mean that build volume comes with trade-offs.
Speed and convenience sometimes favor smaller printers. A printer with a modest build volume often heats up faster because there’s less thermal mass to warm. Bed leveling is typically easier with smaller beds because there’s less surface area where deviations from flat can occur. The printer itself occupies less workspace, which matters if you’re working in a small apartment or crowded shop. First layer adhesion is often more reliable across smaller beds. These practical advantages mean that for many users, a well-executed small printer serves them better than a mediocre large one.
Material variety and advanced features may be more important than size for specialized applications. If you need to print high-temperature engineering materials, have a printer capable of reaching necessary temperatures and managing the printing challenges of those materials matters more than having a large build volume. If you need multi-material or multi-color printing, having a printer with proper multiple extrusion capability is more valuable than having extra inches of build space. For flexible materials, a properly designed direct drive extruder matters more than size. Matching printer capabilities to material requirements trumps size considerations when those requirements exist.
Reliability and consistency in producing successful prints matter tremendously for productivity. A smaller printer that succeeds on ninety-five percent of print jobs is more useful than a larger printer that fails forty percent of the time, even though the larger printer could theoretically handle bigger objects. Time spent troubleshooting, reprinting failed attempts, and dealing with inconsistent results costs more than the inconvenience of occasionally needing to split models into smaller pieces. Prioritizing reliability and print success over maximum size makes practical sense for most users.
The learning curve and ease of use vary between printers, and simpler machines are often smaller machines. If you’re a beginner, mastering 3D printing fundamentals on a straightforward, reliable, smaller printer sets you up for success better than struggling with a large, complex machine that has more adjustments and more potential failure modes. You can always upgrade to a larger printer later after you understand the basics, and many users keep their smaller first printers operational for quick jobs even after acquiring larger machines.
Cost considerations favor smaller printers significantly. Build volume is one of the primary factors driving printer cost, with large-format printers costing multiple times what similar-quality smaller printers cost. For hobbyists or casual users, the added expense of a large printer may not be justified by the occasional need to print large objects, particularly when splitting models provides a workable alternative. Investing the cost difference in better quality components, multiple smaller printers for parallel production, or material variety and upgrades often provides better value than maximizing build volume.
Large Format Printing: When You Actually Need the Extra Space
While size isn’t always critical, certain applications genuinely benefit from or require large build volumes. Understanding these use cases helps you recognize when investing in a large-format printer makes sense and when it’s an unnecessary expense for your needs. If your printing requirements regularly fall into these categories, the convenience and capabilities of large-format printing may justify the added complexity and cost.
Cosplay and wearable items represent one of the strongest use cases for large-format printing. Full-size helmets typically measure three hundred millimeters or more in their largest dimension, and printing them in a single piece produces superior results compared to assembling multiple sections. Chest plates, back plates, gauntlets, and leg armor similarly benefit from single-piece construction that eliminates visible seam lines and provides better structural integrity. Professional cosplayers and prop makers who regularly create wearable items often consider large-format printers essential tools.
Large functional parts for mechanical projects, furniture, or equipment often cannot be scaled down or easily split. If you’re printing tooling fixtures for a workshop, jigs and fixtures for manufacturing, or replacement components for industrial equipment, these parts must be full scale and often must be single pieces for structural or functional reasons. A build volume of three hundred millimeters cube or larger allows printing substantial functional parts that would be impractical to create through assembly of smaller sections. This capability makes 3D printing viable for applications that would otherwise require traditional fabrication methods.
Architectural models at meaningful scales benefit from larger build volumes. While small representative models can be printed on any printer, architectural models at scales that show useful detail, perhaps one to fifty or one to twenty-five scale, quickly become large physical objects. A house model at one to twenty-five scale might measure four hundred millimeters long, requiring either a large-format printer or splitting into sections. For architects, designers, or hobbyists who regularly create architectural models, large build volumes allow printing models at scales where meaningful details are visible without requiring excessive assembly work.
Product packaging prototypes, point-of-sale displays, and marketing materials often need to be printed at full size to properly evaluate their visual impact and functionality. A retail display designed to sit on a counter might be five hundred millimeters tall, and seeing it at actual size provides information that a scaled-down version cannot. For designers working on consumer packaging or retail environments, the ability to print full-size prototypes accelerates design iteration and improves decision-making compared to working from scaled models or renderings alone.
Large vases, planters, and decorative objects for indoor or outdoor use can be printed on standard printers at reduced scale, but there’s something satisfying about printing truly substantial objects at impressive sizes. A vase that’s four hundred millimeters tall makes a statement that a two hundred millimeter version cannot, and for users interested in producing decorative objects for sale or for their own spaces, large-format capability enables creations that stand out. This is more about maximizing impact than strict necessity, but it’s a valid consideration for artistic and decorative printing.
Manufacturing aids, assembly jigs, and industrial tooling frequently require sizes that exceed standard printer capabilities. A fixture designed to hold a part while welding might need to be three hundred millimeters square or larger to accommodate the part plus provide adequate structural support. Quality control fixtures and measurement tools may need to match the full size of parts they’re designed to check. For manufacturing and production environments, large-format 3D printing enables creating custom tooling that would be prohibitively expensive through traditional fabrication.
Terrain pieces and dioramas for tabletop gaming, model railroads, or display scenes can benefit tremendously from large build volumes. While smaller printers work fine for individual terrain pieces, large printers allow creating substantial terrain features, complete buildings, or dramatic centerpiece elements in single prints. Gaming enthusiasts who create elaborate battlefield terrain or model railroad builders who want to 3D print structures and landscape features find large build volumes open up creative possibilities that would be tedious to achieve through assembly of many small pieces.
Educational and demonstration models often need substantial size to be visible and effective in classroom or presentation settings. A molecular model used to teach chemistry, an anatomical model for medical education, or an engineering demonstration model all become more effective when they’re large enough for groups to see clearly. For educators and trainers who create custom teaching aids through 3D printing, larger build volumes directly enhance the educational impact of their materials.
The Hidden Costs and Challenges of Large Build Volumes
While large build volumes enable printing bigger objects, they introduce challenges and costs that aren’t immediately obvious from specifications alone. Understanding these factors helps set realistic expectations about what large-format printing actually entails and prevents disappointment when a large printer turns out to be more challenging to work with than anticipated.
Heating time increases substantially with bed size. A small two hundred millimeter square heated bed might reach printing temperature in three to five minutes, while a four hundred millimeter square bed could take fifteen to twenty minutes or longer. This doesn’t just mean waiting longer at the start of each print, it means the printer consumes significantly more energy and the waiting period between print jobs is more substantial. For rapid prototyping where you might be printing many iterations in a session, these longer heating times accumulate into significant time costs. Some large-format printers include bed segmentation that allows heating only the area actually being used, mitigating this problem but adding complexity.
Power requirements scale up with printer size. Heating a large bed requires significant electrical power, sometimes exceeding what a standard wall outlet can safely provide. Very large printers may require dedicated circuits with higher amperage capacity or even two hundred twenty volt service in markets where that’s not standard. This can complicate installation, require electrical work to provide adequate power, and result in higher operating costs. The power supply itself becomes more expensive and bulky as it must handle higher current draws.
Bed leveling becomes more challenging with larger beds. Any slight warp, sag, or deviation from perfect flatness becomes more significant across a larger span. While a tenth of a millimeter deviation might not matter across a small two hundred millimeter bed, across a four hundred millimeter bed it can be enough to cause adhesion problems at the edges. Large-format printers often require more sophisticated bed leveling systems with many probe points to accurately measure and compensate for surface variations. Manual leveling of large beds is particularly tedious because of the longer travel distances between leveling points and the greater precision required.
Mechanical stability and rigidity are harder to achieve in large-format printers. Longer spans between supports allow more flex and vibration, potentially degrading print quality. The printer’s frame must be proportionally beefier and more rigid to maintain the same dimensional accuracy and surface quality that smaller printers achieve more easily. This adds weight and cost to the printer, and even well-designed large-format machines may show more mechanical artifacts like ringing or layer shifts compared to smaller printers with shorter, stiffer mechanical spans.
Print times for large objects can become extremely long, sometimes running for days continuously. A small object might print in two hours, while filling a large build volume with the same part scaled up could take twenty or thirty hours or even longer. These long print times increase the probability of failures due to filament tangles, power interruptions, temperature variations, or any other issues that can interrupt printing. Babysitting a printer for a full day or more is impractical, so you must ensure your printer is reliable enough to run unattended overnight or over weekends, which itself requires careful setup and testing.
Material consumption scales with the cube of linear dimensions, meaning large prints consume tremendous amounts of filament. An object printed at double the linear scale uses roughly eight times the material. A print that would use one hundred grams of filament on a standard printer might consume eight hundred grams when scaled up for a large-format machine. This not only increases the material cost per print but also means you need to carefully monitor filament supply and have confidence that your spools are sufficient to complete jobs. Running out of filament two-thirds through a three-day print is frustrating and wasteful.
Printer cost increases significantly with build volume, not just because of the larger mechanical components but because of the engineering required to maintain quality at larger scales. A large-format printer from a reputable manufacturer might cost five to ten times what a small desktop printer costs, and that’s before considering accessories, enclosures, or the beefier infrastructure required to support operation. This substantial investment requires justification through regular use of the large capacity rather than occasionally needing to print something big.
Workspace requirements for large-format printers are considerable. The printer itself occupies substantial floor or bench space, and you need clearance around it for accessing controls, changing filament, and maintaining the machine. An enclosure, which becomes more important for large prints to control temperature and reduce warping, adds to the footprint. For home users with limited workshop space, finding room for a truly large-format printer can be challenging. The printer might need to live in a garage, basement, or dedicated room rather than fitting on a desk or workbench.
Noise can be more significant with large printers due to more powerful motors, larger cooling fans, and the longer movements that accumulate more acoustic energy. If noise concerns prevented you from running a small printer overnight in your apartment, a large printer will likely have similar or worse noise characteristics. This isn’t universal, some large printers are engineered for quiet operation, but it’s a consideration worth investigating before purchase.
Making the Build Volume Decision: What Size Do You Actually Need?
Deciding what build volume is appropriate for your needs involves honestly assessing what you’ll actually print rather than imagining hypothetical projects or preparing for edge cases that may never materialize. Many users buy printers with more capacity than they regularly use, while others discover their needs exceed their printer’s capabilities. Finding the right balance requires thoughtful consideration of several factors.
Start by surveying existing models and projects that interest you. Browse popular model repositories like Thingiverse, Printables, or MyMiniFactory and note the typical sizes of models in categories you care about. If you’re interested in tabletop miniatures, you’ll notice most are under fifty millimeters tall and easily fit on any printer. If you’re drawn to functional household items, you’ll see typical sizes in the one hundred to two hundred millimeter range. If cosplay props excite you, you’ll quickly discover that many exceed standard printer dimensions. This practical survey of actual models provides real-world data about size requirements for your interests.
Consider whether you’re comfortable with multi-part printing and assembly. If the idea of splitting models, printing sections, and gluing or bolting them together doesn’t bother you, you can tackle projects much larger than your build volume. Many users find this assembly process enjoyable, viewing it as part of the craft rather than an inconvenience. If you strongly prefer single-piece prints and find assembly tedious or if your typical projects don’t split well, you need build volume that accommodates whole objects. Your tolerance for assembly work significantly affects how constraining any particular build volume will be.
Think about your workspace and living situation. A large printer may enable bigger prints but if you don’t have space for it or if noise and operating time concerns make running it impractical, that capability goes unused. A printer that fits comfortably in your available space and that you can run frequently without disrupting your life will serve you better than a larger printer that’s too inconvenient to use regularly. Practical considerations about where the printer will live and how it fits into your daily routine matter as much as technical capabilities.
Budget constraints are real and shouldn’t be dismissed. You might want a large-format printer but if acquiring one means compromising on printer quality, having no money left for materials and accessories, or postponing the purchase for years while saving, a smaller but affordable printer that you can buy now provides value that a hypothetical future large printer doesn’t. Many successful 3D printing journeys begin with modest equipment that’s fully utilized, with upgrades coming later when experience justifies the investment.
Consider whether you’re likely to want multiple printers eventually. Many users discover that having two or three smaller printers running simultaneously provides more total capability than a single large printer. Multiple printers allow parallel production of different objects, provide redundancy if one needs maintenance, and let you dedicate machines to specific materials or quality levels. If you think you’ll eventually want multiple machines, starting with smaller, less expensive units and building a printer farm makes more sense than investing heavily in one large printer.
Growth potential and future needs deserve consideration, but don’t let hypothetical future uses dictate current decisions too strongly. You might eventually want to print large cosplay props, but if that’s years away and your current needs center on smaller functional parts, buying a large printer now means years of unused capacity. Better to buy for your current needs and upgrade later when your requirements actually change. Printer technology improves continuously, and the large-format printer you could buy in the future will likely be better and cheaper than today’s options anyway.
For most hobbyists and home users, a build volume in the two hundred to two hundred fifty millimeter range represents a practical sweet spot. This size handles the vast majority of hobbyist printing needs, accommodates typical household and functional parts comfortably, allows printing many decorative objects at satisfying sizes, and keeps printer cost, workspace requirements, and operating complexity reasonable. Specialized needs may justify larger or smaller printers, but this range serves the broadest spectrum of typical use cases effectively.
Conclusion: Building a Relationship with Your Build Volume
Understanding build volume transforms it from a simple specification you check when buying a printer into a design parameter you work with throughout your 3D printing journey. Rather than viewing it as a fixed limitation that constrains what you can do, successful 3D printing practitioners see build volume as one factor among many that influences how they approach projects. They develop strategies and skills for maximizing whatever space they have available while recognizing when projects genuinely require capabilities beyond their current equipment.
The relationship between build volume and printing success is more nuanced than bigger is better. Larger build volumes enable certain projects but come with challenges around heating time, bed leveling, mechanical stability, and print reliability that can actually make printing more difficult. Smaller build volumes constrain maximum print size but often provide more reliable, consistent results for typical printing. The key is matching build volume to your actual needs rather than accumulating capability you’ll rarely use or settling for constraints that frequently frustrate your projects.
Creative problem-solving around build volume limitations represents some of the most interesting work in 3D printing. Figuring out how to split a model intelligently, designing interlocking joints that hide seam lines, discovering that rotating an object forty-five degrees makes it barely fit, or realizing that a slight scale reduction preserves the essential character of a model while bringing it within bounds exercises design thinking and problem-solving skills. These challenges transform potential frustrations into opportunities for learning and creativity.
The skills you develop working within build volume constraints serve you well even if you eventually upgrade to a larger printer. Understanding how to arrange objects efficiently, when splitting models makes sense, how orientation affects what fits, and how to maximize use of available space remain valuable regardless of printer size. Users who master working with limited build volumes often produce better work on larger printers because they’ve developed spatial reasoning and planning habits that translate to better outcomes.
For those making printer purchase decisions, build volume deserves careful but not disproportionate consideration. It’s one specification among many including print quality, reliability, material compatibility, ease of use, and cost. Buying the largest printer you can afford without considering these other factors often leads to disappointment when the printer proves difficult to work with or produces poor quality despite its impressive size specifications. A balanced approach that considers your whole printing workflow and actual project requirements leads to better purchase decisions.
Recognizing when build volume matters and when it doesn’t helps you focus troubleshooting and improvement efforts appropriately. If your prints are failing due to bed adhesion issues, warping, or quality problems, increasing build volume won’t help. If your projects regularly require splitting into multiple pieces or you frequently encounter models you want to print but that don’t fit, build volume is genuinely limiting and upgrading makes sense. This distinction between real limitations and imagined ones prevents wasted investment in solutions that don’t address actual problems.
The 3D printing community’s collective knowledge includes extensive experience with working around build volume limitations. Online communities share splitting strategies, assembly techniques, and creative solutions for printing large objects on small printers. Model designers often create versions of popular models specifically split for various common printer sizes, and slicer plugins and CAD tools continue evolving to make size management easier. Leveraging this collective knowledge means you’re never alone in figuring out how to print something that initially seems too large.
Looking forward, printer technology continues evolving with improvements in large-format printing accessibility, better bed leveling systems that handle larger areas more reliably, and more sophisticated slicing software that helps optimize use of available space. These improvements will make both large and small printers more capable over time. However, the fundamental principles of understanding your needs, working creatively within constraints, and matching equipment capabilities to actual requirements will remain constant regardless of technological advances.
Your build volume, whatever it may be, represents the three-dimensional canvas you have to work with. Like any artist working with a defined canvas size, you can create remarkable things within those boundaries through skill, creativity, and understanding of the medium. Some projects naturally fit your canvas while others require adaptation, but the constraint itself often drives innovation and creative solutions you wouldn’t have discovered with unlimited space. Embracing your build volume as a creative parameter rather than lamenting it as a limitation shifts your relationship with your printer from frustration to collaboration, from being limited by your tools to being enabled by them to create exactly what you envision through thoughtful planning and execution.