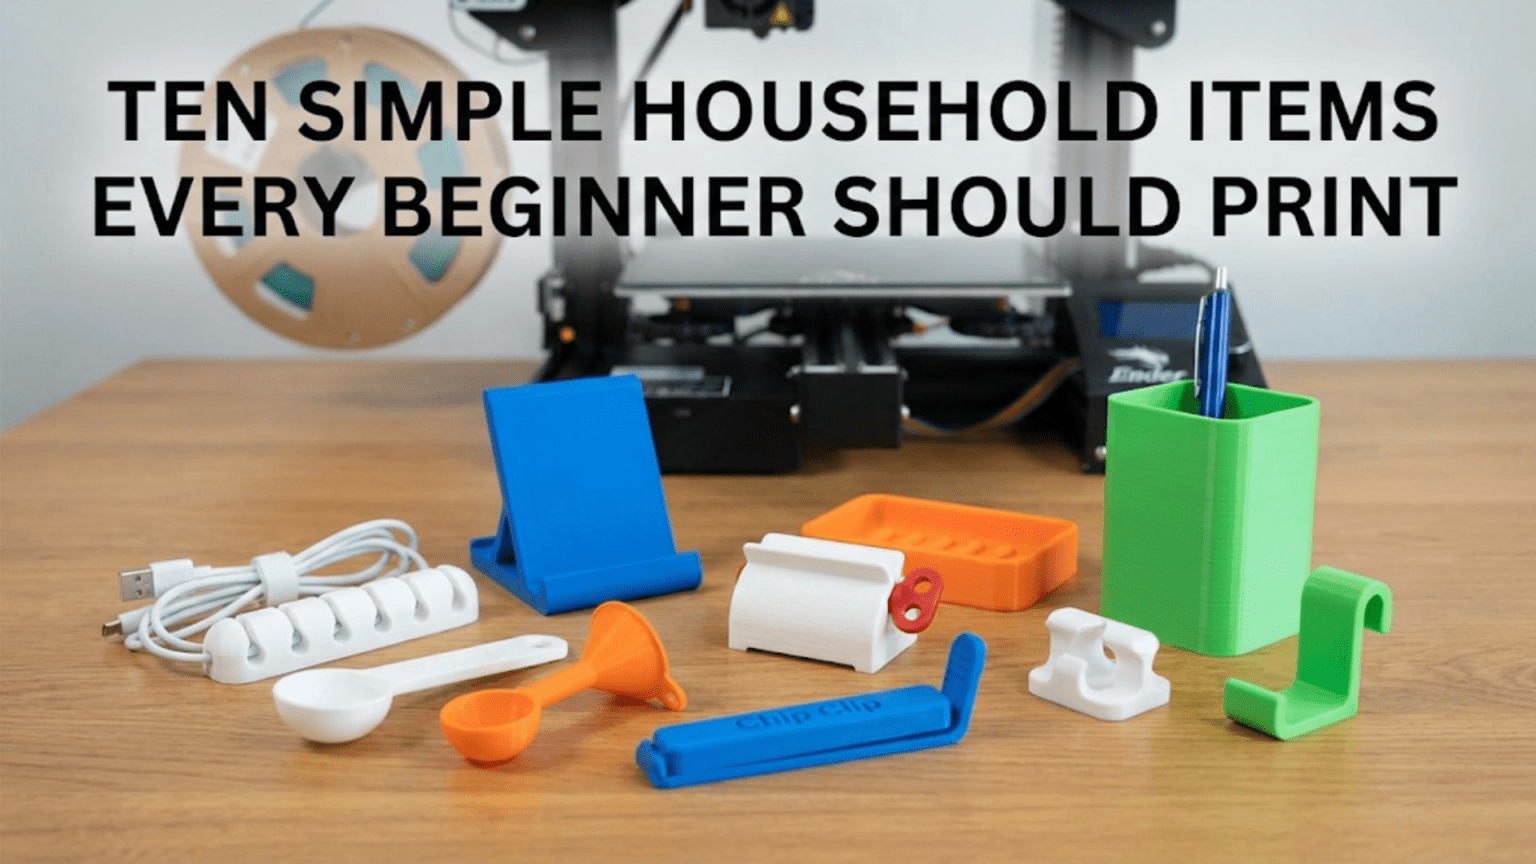
Printing simple, practical household items is the best way for beginners to build 3D printing skills while creating objects that have immediate, real-world value in everyday life. Items like cable clips, wall hooks, drawer organizers, and phone stands are ideal beginner projects because they are small, fast to print, require no supports, and teach fundamental skills like selecting the right material, dialing in slicer settings, and finishing printed parts.
Introduction: From Calibration to Creation
You’ve assembled your printer, leveled the bed, and printed your first calibration cube. The measurements came back within tolerance, the surface looks clean, and you’re feeling confident. Now comes the question that every new 3D printer owner asks: What should I actually print?
The internet will bombard you with answers. Miniature figurines. Detailed armor cosplay pieces. Complex mechanical assemblies. Decorative sculptures. And while all of those things are genuinely exciting, they’re not where most beginners should start. Detailed miniatures require dialing in settings that only come with experience. Complex assemblies require an understanding of tolerances and fit. Decorative sculptures require painting and post-processing skills.
What beginners need are projects that are:
- Fast to print — under two hours ideally, so you can iterate quickly
- Forgiving — where minor imperfections don’t ruin the final result
- Genuinely useful — so you stay motivated and see real value in every print
- Educational — each one teaching you something new about the printing process
Household items check every single one of these boxes. They’re objects you already understand and use. You know what they’re supposed to look like, how they’re supposed to function, and whether the final result works. That immediate feedback loop is extraordinarily valuable when you’re learning.
This guide walks you through ten of the best household items for beginner 3D printers — what they are, why they’re great learning projects, how to find or modify the files, recommended settings, and what each one teaches you about the craft of 3D printing. By the time you’ve worked through this list, you’ll have printed ten genuinely useful objects, developed a solid instinct for slicer settings, and have the confidence to tackle more ambitious projects.
Let’s get started.
Before You Begin: A Quick Settings Reference
All ten projects in this guide are designed to be printed in PLA unless otherwise noted. PLA is the recommended material for beginners — it’s forgiving, inexpensive, widely available, and prints reliably without an enclosure on almost every desktop FDM printer.
The table below gives you a general settings baseline to work from for all ten projects. Individual projects may call for specific adjustments, which will be noted in each section.
| Setting | Recommended Value | Reason |
|---|---|---|
| Filament | PLA (1.75mm) | Easiest to print, most forgiving |
| Layer Height | 0.2mm | Good balance of speed and quality |
| Print Speed | 40–55 mm/s | Reliable for most geometry |
| Infill | 15–25% | Adequate for most household items |
| Infill Pattern | Grid or Lines | Fast and structurally sound |
| Perimeters/Walls | 3 | Good strength for functional parts |
| Top/Bottom Layers | 4 | Clean surface appearance |
| Support | None (unless noted) | These projects are designed support-free |
| Bed Adhesion | Brim (3–5mm) | Helpful for small footprint parts |
| Hotend Temperature | 200–210°C | Standard PLA range |
| Bed Temperature | 55–65°C | Standard PLA range |
| Cooling | 100% after layer 2 | Helps bridging and overhangs |
Keep this table handy as a starting point. As you print each item, you’ll naturally begin to develop an intuition for when to deviate from these defaults — slower for complex geometry, more infill for load-bearing parts, higher temperatures for better layer adhesion in structural pieces.
1. Cable Clips and Cord Organizers
What They Are
Cable clips are small, open-looped clips that attach to desk edges, walls, or cable management channels to keep cords organized and routed neatly. They’re one of the most practical items you can print, and almost every household needs more of them than they have.
Why This Is a Great First Project
Cable clips are typically tiny — often just a few centimeters in any dimension — which means they print in under 30 minutes each. They’re structurally simple. They require no supports. They don’t need to be dimensionally perfect to function. And because they’re so fast to print, you can experiment with multiple variations in a single evening.
They also give you a great introduction to printing multiples simultaneously, since you can fill your entire build plate with 10–20 cable clips in a single print run. This teaches you about print time scaling, how multiple objects interact during printing, and the efficiency gains possible with batch printing.
Finding the Right File
Search Printables.com or Thingiverse for “cable clip,” “cable organizer clip,” or “cord holder.” You’ll find dozens of variations: clips designed for specific cable diameters, clips with adhesive pad mounts, clips that snap onto desk edges, and modular systems that link together. Choose a simple, clean design for your first attempt — one that’s described as “easy print” or “no supports.”
Recommended Settings Adjustments
For cable clips, push your infill up slightly to 30–40%. These are functional parts that will be bent during installation and will bear some lateral stress from the cables they hold. More infill means more strength. Also increase your perimeters to 4 for the same reason.
What This Teaches You
- Batch printing: Printing multiples at once and understanding how print time scales
- Functional part tolerances: If clips are too loose, you’ll learn about adjusting dimensions
- Infill and strength: You’ll see how infill level affects a part’s ability to handle stress
2. Wall Hooks and Over-Door Hangers
What They Are
3D printed wall hooks come in an enormous variety of styles: adhesive-mount hooks that stick to wall surfaces, screw-mount hooks for solid attachment, over-door hooks that hang over cabinet doors, and peg hooks for pegboard systems. They’re useful in kitchens, bathrooms, garages, offices — virtually anywhere in a home.
Why This Is a Great First Project
Wall hooks teach you one of the most important lessons in functional 3D printing: understanding load-bearing geometry. A hook that looks fine might snap the first time you hang something on it if the print orientation was wrong, the layer lines run perpendicular to the load direction, or the infill is too sparse.
Printing wall hooks and actually using them gives you immediate, concrete feedback about the structural integrity of your prints. If a hook snaps, you learn something. If it holds, you learn something different.
Finding the Right File
Search for “wall hook,” “adhesive hook,” “over door hook,” or “cabinet hook” on Printables or Thingiverse. For your first hook, look for designs with generous wall thickness and a clearly defined mounting surface. Avoid hooks with very thin cross-sections — these require more careful material and settings choices to work reliably.
Recommended Settings Adjustments
Wall hooks that will bear significant weight benefit from higher infill (40–60%) and more perimeters (4–5). If a hook is going to hold heavier items like keys, bags, or jackets, consider printing it in PETG rather than PLA for improved toughness and heat resistance (important if the hook is near a door that receives direct sunlight).
What This Teaches You
- Print orientation and strength: Hooks loaded perpendicular to layer lines are stronger than those loaded parallel to them
- Material selection for function: When PLA is adequate versus when a tougher material is warranted
- Practical tolerances: Over-door hooks need to fit a specific door thickness to work correctly
3. Drawer Dividers and Organizer Trays
What They Are
Drawer dividers and organizer trays are flat, box-like structures that divide drawer or shelf space into compartments for organizing small items: cutlery, stationery, tools, craft supplies, cosmetics, hardware, and more. They can be customized to fit any drawer size and any organizational need.
Why This Is a Great First Project
Drawer dividers are an excellent project because they scale in complexity. Your first attempt might be a simple rectangular tray with a few dividers — a completely flat bottom with vertical walls, no curves, no complex geometry, no supports needed. This is about as straightforward as 3D printing gets.
But as you gain confidence, you can graduate to custom-sized trays measured to fit your specific drawers, interlocking modular tray systems, trays with finger-cutouts for easy retrieval of items, and trays with textured or patterned bottoms. Each level of complexity introduces new skills while the basic concept remains familiar.
Finding the Right File
For your first organizer tray, look for a simple rectangular tray design on Printables or Thingiverse. Alternatively, and this is a great exercise, look for a customizable parametric tray generator like the popular “Gridfinity” system by Zack Freedman. Gridfinity is a standardized, modular drawer organization ecosystem with hundreds of compatible modules — it’s a rabbit hole that many 3D printing enthusiasts happily fall into.
Recommended Settings Adjustments
Organizer trays are largely aesthetic and lightly functional — they don’t need to bear significant loads. Standard settings from the baseline table work well. However, if your tray has a large flat bottom, you may want to add a brim in your slicer to prevent corner lifting, and consider using 5 bottom layers for a clean, solid floor.
What This Teaches You
- Printing large flat surfaces: Managing first-layer adhesion over a large area
- Understanding warping: Flat-bottomed parts are susceptible to corner warping
- Practical measurements: Measuring your drawer and scaling or customizing a design to fit
4. Phone Stand or Tablet Stand
What They Are
A phone stand is a small cradle or angled support that holds your smartphone upright at a readable angle. These range from simple angled wedges to adjustable designs with cable routing for charging, foldable designs for travel, and multi-angle stands for different viewing positions.
Why This Is a Great First Project
Phone stands are an excellent early project because almost every person has an immediate use for one, and because the geometry is just complex enough to be interesting without being overwhelming. Most phone stand designs involve some angled surfaces, which means you’ll encounter your first overhangs — surfaces that extend over open air — and see how your printer handles them.
A well-designed phone stand also introduces you to the concept of functional tolerances. If the slot that holds the phone is too narrow, the phone won’t fit. Too wide, and it won’t hold securely. Getting this right teaches you about how printed dimensions relate to real-world dimensions.
Finding the Right File
Search for “phone stand” or “smartphone holder” on Printables. Look for designs that specify which phone models they’re designed for, or look for universal designs with adjustable slots. Avoid designs with very thin fins or extremely narrow features as a beginner — these can be tricky to print cleanly.
Recommended Settings Adjustments
If your phone stand has any thin vertical features (like the back support arm), increase your perimeter count to 4–5 to ensure these features are solid and strong. Layer height can be reduced to 0.15mm if you want a cleaner surface appearance, though this will increase print time.
What This Teaches You
- Overhangs: How your printer handles surfaces that extend over open air
- Functional tolerances: The relationship between printed dimensions and real object dimensions
- Surface finish on angled faces: Stepped layers on angled surfaces and how layer height affects their appearance
5. Key Holder and Key Tags
What They Are
Key holders are wall-mounted panels with hooks or pegs for hanging keys. Key tags are small labels that attach to individual keys (via the keyring hole) to identify them — particularly useful for people who manage multiple similar keys.
Why This Is a Great First Project
Key holders and key tags are some of the smallest, fastest prints on this list. A key tag might take only 10–15 minutes to print. This makes them perfect for rapid iteration — if your first attempt doesn’t fit the keyring hole, you can adjust and reprint in less than 30 minutes.
Key tags with personalized text are also your first introduction to text in 3D models. You can find customizable key tag generators that let you input your text and download a ready-to-print STL. Seeing your own name or a label you chose emerge from the printer for the first time is genuinely satisfying.
Finding the Right File
For key tags, look for a customizable key tag on Printables or Thingiverse that lets you input custom text. Many of these are “OpenSCAD customizable” models — OpenSCAD is a scripting-based 3D modeling program that many designers use for parametric (customizable) models.
For key holders, search for “key holder wall mount” or “key rack.” Choose a design that matches your aesthetic — minimalist, rustic wood-look, fun shapes — there are hundreds of options.
Recommended Settings Adjustments
Key tags are tiny and need to be strong enough to survive the rough treatment keyrings typically receive. Print them with 4 perimeters and 40% infill. If you find the keyring hole is too small or the tag breaks at the hole, PETG is a better material choice than PLA for this application due to its greater flexibility and impact resistance.
What This Teaches You
- Tiny part printing: Managing small features and fine detail at small scales
- Customizable parametric models: Your first introduction to adjusting model parameters
- Material toughness: Understanding when PLA’s brittleness is a limitation
6. Cord Keeper / Earbud Winder
What They Are
A cord keeper (also called an earbud winder or cable winder) is a small spool-like device around which cables are wrapped for tidy storage. They prevent the tangled mess of headphone cables, charging cords, and other wires that accumulates in drawers and bags.
Why This Is a Great First Project
Cord keepers are typically flat and symmetrical, which makes them excellent printing projects. They often have spoke-like arms that the cord wraps around, giving you an introduction to printing thin, free-standing features. The small notch or slot that secures the cord end also introduces the concept of small functional features.
Many cord keeper designs also include a small clip or catch mechanism — a simple flexible tab that snaps over the wrapped cord to keep it from unraveling. This is your first introduction to printing snap-fit features and flexible elements in rigid material.
Finding the Right File
Search “cord keeper,” “earbud winder,” or “cable winder” on Printables or Thingiverse. Look for designs with generous spoke thickness (thin spokes can be fragile) and a secure cord-locking mechanism.
Recommended Settings Adjustments
Standard settings work well for cord keepers. If the design has any flexible snap-fit elements, avoid reducing infill below 15% in those areas — a minimum of 3–4 perimeters is also important for snap features to have the right balance of flexibility and strength in PLA.
What This Teaches You
- Printing flat, circular geometry: How your printer handles curves and circles
- Snap-fit features: The mechanics of printing simple functional mechanisms
- Scale considerations: How to choose the right size for the cables you use
7. Coaster
What They Are
Coasters are flat, round or square discs placed under cups and glasses to protect surfaces from moisture rings and heat. 3D printed coasters can be purely functional, or they can be decorated with patterns, logos, textures, and designs that make them genuinely attractive home accessories.
Why This Is a Great First Project
Coasters are excellent learning projects because they’re almost entirely about the top and bottom surfaces — which means they teach you a tremendous amount about how your printer handles large, flat areas, top surface infill, and the relationship between infill pattern and visual appearance when the infill shows through a thin top layer.
Coasters also introduce the concept of printing at various infill percentages to see the visual result. At very low infill (10–15%), the pattern of the infill structure is sometimes visible on the top surface, which can actually be an attractive design feature. At higher infill (40–50%), the top surface is more consistent. Experimenting with this on a simple, fast-printing object like a coaster teaches you a lot.
Finding the Right File
The options here are nearly infinite. Search for “coaster” on Printables and filter by “Most Downloaded” or “Trending” to find the most popular designs. Options range from simple blank discs (letting you experiment with settings) to intricate Celtic knotwork, mandala patterns, city map coasters, and hexagonal sets.
Recommended Settings Adjustments
For coasters, increase your top and bottom layers to 5–6 for a smooth, clean surface. If your coaster design has a complex pattern on the top, reduce layer height to 0.15mm for better detail reproduction. Use a brim to prevent corner lifting on square coasters.
If you plan to actually use the coasters with hot beverages, consider printing them in PETG rather than PLA. PLA softens at relatively low temperatures (around 60°C), which means a very hot mug can deform a PLA coaster over time. PETG has better heat resistance.
What This Teaches You
- Top surface quality: The major factors affecting how clean and smooth the top of a print looks
- Infill and visual appearance: How infill percentage and pattern affect surface appearance
- Heat resistance considerations: When PLA’s thermal limitations become a practical concern
8. Plant Pot or Planter Pot
What They Are
3D printed plant pots and planters are decorative containers for small houseplants, succulents, or herbs. They can be simple cylinders, geometric shapes, whimsical characters, or elaborate textured vessels. With the right settings, they can even be made semi-watertight for direct planting (though most people use a plastic nursery pot as a liner).
Why This Is a Great First Project
Plant pots are one of the most popular categories of beginner 3D prints for several reasons. They’re large enough to look impressive, they showcase decorative and textural printing capabilities, they’re practical objects that almost everyone wants, and they sit on a shelf or windowsill where people will see and admire them — providing ongoing satisfaction and motivation.
They also introduce the concept of vase mode (sometimes called “spiral mode” in slicer software), which is one of the most unique capabilities of FDM 3D printing. In vase mode, the slicer replaces the normal layer-by-layer printing with a continuous spiral that works its way up the model without ever stopping or retracting. The result is a perfectly seamless, single-wall vessel that’s often faster to print than a standard version and has no visible layer seams.
Finding the Right File
The variety of printable planter designs on Printables, Thingiverse, and MyMiniFactory is staggering — literally thousands of options. For your first pot, look for a design tagged as “vase mode” or “spiralize” to experience this unique printing mode. Geometric and low-poly designs tend to look particularly impressive in vase mode. If you want a sturdier pot for a real plant, look for solid-wall designs with drainage holes.
Recommended Settings Adjustments
For vase mode printing, enable “Spiralize Outer Contour” in Cura or “Spiral Vase” in PrusaSlicer. Note that vase mode only works with models that have a single, closed outer wall — it won’t work with all designs. In vase mode, wall thickness is controlled by your nozzle diameter and flow rate rather than a perimeter count setting.
For standard solid planters, increase your perimeter count to 4–5 for a thicker, more watertight wall.
What This Teaches You
- Vase mode: This unique and impressive printing technique
- Large print management: Handling a longer print job with greater confidence
- Watertightness: Understanding what makes a print hold liquid versus leak
9. Bathroom and Kitchen Accessories
What They Are
This category encompasses a wide range of small, practical items: toothbrush holders, soap dishes, toilet paper roll holders, spice jar labels, paper towel hooks, sponge holders, and more. These are the items that often cost surprisingly little to buy but come in only a handful of standard designs — and 3D printing lets you create exactly what you want.
Why This Is a Great First Project
Bathroom and kitchen accessories are great beginner projects because they have clear functional requirements that are easy to test: Does the toothbrush stand upright without falling? Do the soap dish drainage holes work? Does the spice label stay attached?
They also introduce the consideration of material safety for certain applications. If you’re printing anything that will come into contact with food or will hold water for extended periods, the choice of filament, slicer settings, and post-processing matters. This is an important real-world lesson about responsible 3D printing.
Finding the Right File
For toothbrush holders, search “toothbrush holder” on Printables and look for a clean, simple design with drainage holes. For a soap dish, search “soap dish” and look for a raised-bar or grid design that allows water to drain away from the soap. For spice labels, look for customizable label designs that fit your specific jars.
Recommended Settings Adjustments
For anything holding water (soap dishes, planters with water), increase your perimeters to 4–5 to reduce porosity. For kitchen items that contact food, use food-safe PLA (certified food-safe filaments are available from several manufacturers), and apply a food-safe sealant or coating to the finished print. Note that standard PLA is generally not considered food-safe without post-processing due to the micro-gaps between layers that can harbor bacteria.
What This Teaches You
- Material safety and responsibility: Understanding when material choice has health implications
- Drainage and functional design: How geometry decisions affect functional performance
- Post-processing basics: When and why prints benefit from sanding, sealing, or coating
10. Replacement Parts for Household Items
What They Are
Replacement parts are 3D printed copies or functional equivalents of broken, lost, or unavailable components from household items: a snapped plastic clip on a vacuum cleaner attachment, a missing knob from a piece of furniture, a broken peg from a dish rack, a cracked bracket inside an appliance cover, or a worn-out rubber foot replaced with a printed version.
Why This Is a Great First Project
Printing replacement parts is arguably the most genuinely transformative thing a 3D printer can do for your household. The moment you repair something that would otherwise be thrown away because a single plastic component broke, you understand in a visceral, immediate way why desktop 3D printing matters.
It’s also a more challenging project than the others on this list — but challenging in exactly the right way for someone who’s built up experience through the previous nine items. Finding or creating a suitable replacement part file requires some problem-solving, measurement skills, and occasionally some basic model modification. These are exactly the skills you should be developing at this stage.
Finding the Right File
Start with a thorough search on Printables and Thingiverse using the brand name and part description. The community has uploaded replacement parts for an enormous range of household items — IKEA furniture connectors, Dyson vacuum parts, KitchenAid mixer components, Ikea Lack table brackets, and thousands more.
If you can’t find an exact match, look for a similar part that might work with slight modification, or post in a 3D printing community forum — other makers are often happy to help design or find files for replacement parts.
If you want to design the part yourself, this is your introduction to 3D modeling software. Free tools like Tinkercad (browser-based and very beginner-friendly), Fusion 360 (free for hobbyists, much more powerful), or FreeCAD (open source) can get you started.
Recommended Settings Adjustments
Replacement parts that need to bear loads or survive repeated stress should be printed with higher infill (40–60%), more perimeters (4–5), and potentially in a tougher material like PETG or ABS if the part is in a high-temperature environment or needs to flex without breaking.
Match the print orientation to the direction of expected stress. If a tab will be bent upward, orient the print so that layer lines run parallel to the direction of bending — this gives the layers the best chance of staying together under stress.
What This Teaches You
- Practical problem-solving: Translating a real-world repair need into a 3D printing solution
- Measurement and modeling: Beginning to think in three dimensions for design purposes
- Material selection for function: Understanding the mechanical implications of material choice
- The real value of a 3D printer: This is the print that converts casual interest into genuine appreciation
Building on Each Project: The Learning Stack
One of the most valuable aspects of working through a list of beginner projects in sequence is what you might think of as the “learning stack” — the way each project builds on skills developed in the previous ones.
After printing all ten items on this list, here’s what you’ll have learned:
From cable clips: Batch printing, functional infill settings From wall hooks: Print orientation for strength, material selection basics From drawer dividers: Large flat surface management, warping prevention From phone stands: Overhang handling, functional tolerances From key tags: Small part printing, parametric customization From cord keepers: Circular geometry, snap-fit features From coasters: Top surface quality, infill visual effects, heat resistance From plant pots: Vase mode, large print management, watertightness From bathroom accessories: Material safety, post-processing concepts From replacement parts: Problem-solving, measurement, the full value of 3D printing
These ten skills form the foundation of everything that comes next in your 3D printing journey. With this foundation, you’re ready to approach more complex projects, custom designs, and advanced materials with genuine competence rather than guesswork.
Tips for Making Your Prints Look Better
Before we close, here are a few quick post-processing tips that can significantly improve the appearance of any of the ten items on this list:
Light Sanding
A light pass with 220-grit sandpaper followed by 400-grit can smooth visible layer lines on flat surfaces and curved areas. This is particularly effective on coasters, plant pots, and any item where surface appearance matters. Wet sanding (using sandpaper with water) gives even smoother results.
Isopropyl Alcohol Wipe
After printing, a quick wipe with isopropyl alcohol (IPA) removes any residue from the print bed and gives the surface a clean, matte appearance. This is especially visible on shiny or semi-glossy PLA filaments.
Priming and Painting
PLA accepts spray primer and acrylic paint very well. If you want your plant pot, coaster, or key holder to look like a professional product rather than a plastic print, a coat of filler primer followed by a few thin coats of spray paint makes a dramatic difference. Finish with a clear coat for protection.
Acetone Vapor Smoothing (ABS Only)
If you print any items in ABS (a less beginner-friendly material), acetone vapor smoothing can completely eliminate layer lines, leaving a glossy, injection-molded appearance. This technique requires careful safety precautions and is not applicable to PLA.
Where to Find Files: The Best Resources
All ten items in this guide can be found for free on the following platforms:
Printables.com — Run by Prusa Research, this is currently the most active and well-organized repository of free 3D printing files. Excellent search, filtering, and community features.
Thingiverse.com — The original large-scale 3D model repository, run by Makerbot/Stratasys. Enormous library, though the interface is aging. Still an invaluable resource.
MyMiniFactory.com — Higher quality curation than Thingiverse, with a mix of free and paid models. Particularly good for decorative and artistic prints.
Cults3D.com — A marketplace model repository with both free and premium designs. Good for finding more unique or professionally designed files.
Thangs.com — A newer platform with excellent 3D search functionality that lets you search by visual shape similarity.
For customizable parametric models, Thingiverse Customizer and MakerWorld both support OpenSCAD-based customizable designs that let you adjust dimensions and text through a simple web interface without any modeling software.
Conclusion: The Best Printer is a Used One
There’s a saying in the 3D printing community: “The best 3D printer is a used one.” The idea is that a printer sitting on a shelf, waiting for the perfect project, teaches you nothing. It’s the machine that gets turned on, that has filament loaded into it, that runs print after print after print — the printer that accumulates hours of real use — that makes its owner into a skilled maker.
The ten items in this guide are your invitation to start using your printer in earnest. They’re not glamorous. They won’t impress anyone at a glance the way an intricate sculpture or a complex mechanical assembly would. But they’re genuinely useful, they’re fast to print, and every single one will teach you something that makes your next print better.
Print the cable clips. Organize your cords. Hang a hook in your kitchen. Fix something that’s been broken for months with a replacement part you designed or found yourself. That’s 3D printing at its most satisfying — not the spectacle of complexity, but the quiet competence of making something real.
Your printer is ready. Your filament is loaded. Let’s make something useful.