3D printed key holders and key tags are among the fastest, most practical, and most personalizable organization projects a beginner can make. Key holders mount near your door to provide a dedicated home for every key in your household, while key tags attach directly to keyrings to label and identify individual keys — both solving one of the most common sources of daily friction in home life. These prints are typically small, quick to produce in under 30 minutes each, require no supports, and offer an ideal introduction to customizable parametric design and practical functional printing.
Introduction: Solving the Keys Problem Once and for All
The lost keys problem is so universal it has become a cliché. You’re already late, you’ve checked every surface in the kitchen, and your keys are nowhere. Or you’re standing at a door with a keyring holding eight nearly identical keys, trying each one in sequence because you still haven’t figured out which is which. Or you’re a landlord, property manager, or office administrator trying to manage dozens of keys for different locks, all of which look the same.
These are problems your 3D printer can solve — elegantly, inexpensively, and with a level of customization that commercial solutions simply can’t match.
The commercial key organization market is surprisingly large. Decorative key hooks sell for anywhere from five to fifty dollars. Commercial key tags come in plastic sets from dollar stores or in premium leather from boutique accessories companies. Key cabinets for property managers cost hundreds of dollars. And yet, all of these commercial products share the same limitation: they’re designed for a generic user, not for your specific entryway, your specific number of keys, your specific aesthetic preferences, or your specific labeling needs.
Your 3D printer produces key holders in exactly the right size for your wall space, with exactly the right number of hooks for your key collection, in exactly the right color for your entryway decor. It produces key tags labeled with whatever text you choose — “Front Door,” “Car,” “Storage Unit,” your neighbor’s name, your rental property address, anything at all. And it does this for a few cents of filament per piece.
Key holders and key tags are also excellent teaching projects for beginners in ways that go beyond what the finished products accomplish. Key tags introduce you to parametric customizable models — designs where you input your own text or dimensions and receive a ready-to-print file without any 3D modeling skills. Key holders teach you about wall mounting geometry, about designing for specific loads (a holder with 10 heavy keyrings full of keys needs different structural consideration than one holding a single spare), and about how print orientation affects the strength of small mounting features.
This guide covers everything you need to know: the types of key holders and key tags worth printing, how to customize text-bearing designs, design considerations for different key management scenarios, material selection, slicer settings, complete step-by-step workflows, and a range of creative variations that make key organization genuinely satisfying rather than merely functional.
Part One: Key Holders
What Makes a Great Key Holder
A key holder seems straightforward — it’s just a thing with hooks on it, mounted near the door. But the details of what makes a key holder work well versus poorly are worth understanding before you choose or design one.
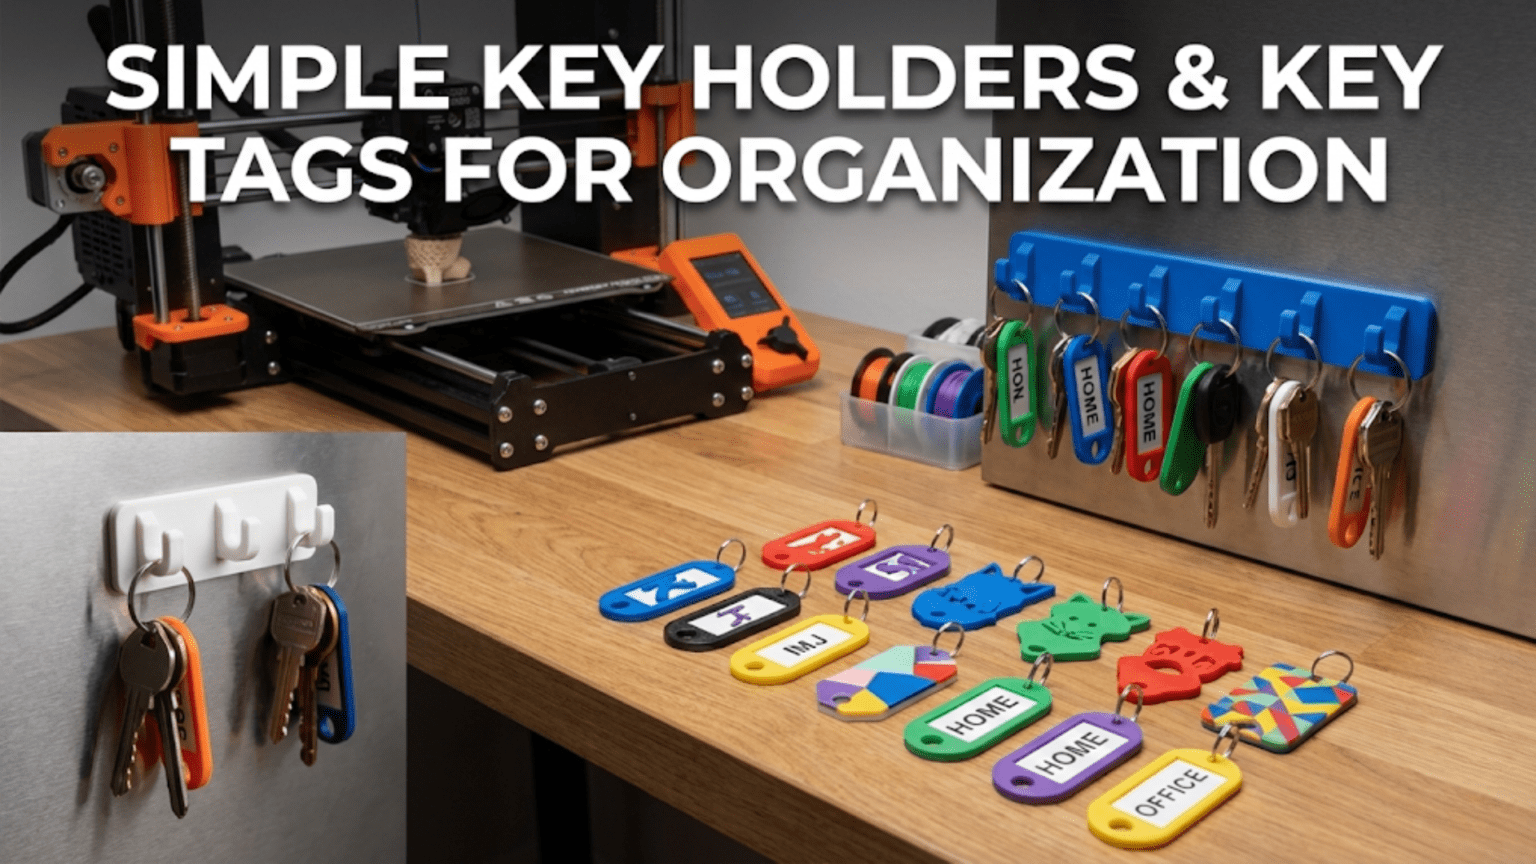
Number and spacing of hooks: Too few hooks and the holder can’t accommodate your full key collection. Too many and the holder becomes unwieldy. Most households need 4–8 hooks at minimum. Hooks should be spaced far enough apart that keyrings don’t tangle — 35–50mm center-to-center is a good general guideline, though this depends on how full your keyrings are.
Hook depth and opening: The hook needs a deep enough curve that a keyring won’t jump off accidentally, but an opening wide enough that adding and removing keyrings is quick and intuitive. For a ring that holds 2–4 standard keys, a hook with a 15–20mm depth and an 8–12mm opening is typically right. For larger, heavier keyrings, deeper hooks with wider openings are needed.
Mounting system: How the holder attaches to the wall determines how strong it is and how difficult installation is. The main options for printed holders are:
- Screw mounting through holes in the backing plate — the strongest option, permanent
- Adhesive mounting with Command strips or similar — repositionable, avoids wall damage
- Magnetic mounting — the holder has embedded magnets, allowing complete tool-free removal and repositioning
- Rail mounting — the holder slides onto a printed or purchased wall rail
Backing plate size and aesthetic: The backing plate is the visible face of the holder. Its size should be proportional to the number of hooks (too small a plate with many hooks looks crowded; too large looks sparse), and its design should complement the entryway where it’ll live.
Additional features: Many key holder designs incorporate secondary features alongside the hook functionality: a small shelf for loose change and wallet items, a slot for mail or cards, hooks for bags or coats at a different height, a charging ledge for phones, or an integrated notepad or whiteboard surface.
Key Holder Design Categories
1. Minimalist Wall Plate
A flat backing plate with simple hooks — either integrated hooks printed as part of the plate, or holes/slots that accept printed or commercial hooks. These are the simplest to design and print, the easiest to install, and the most flexible in terms of customization. A minimalist plate in a matching color to your wall can be nearly invisible, drawing the eye to the keys themselves rather than the holder.
Best for: Modern and minimalist interiors, renters who want low visual impact, small entryways where a large key holder would look cluttered.
Design considerations: Ensure the backing plate is thick enough (at least 4–5mm) to provide a solid anchor for the mounting screws or adhesive. Integrated hooks should be printed with the correct orientation for strength — see the orientation section below.
2. Decorative Themed Key Holder
Holders in decorative shapes: a house silhouette where hooks are positioned inside the windows, a tree form with hooks as branches, a key-shaped holder (a meta-joke that the 3D printing community loves), city skyline profiles, animal silhouettes, geometric art pieces. These holders function identically to simple plates but add aesthetic interest to the entryway.
Best for: Homes where the entryway is a showcase space, people who want their organizational tools to also function as decor, gifts for housewarming or moving occasions.
Design considerations: Decorative forms often have thinner sections at specific points (the narrow trunk of a tree design, for example) that need adequate wall thickness to survive the torque of heavy keyrings. Check thin points in your chosen design and ensure they’re at least 3mm thick.
3. Key Cabinet
A small wall-mounted cabinet with a door that conceals the keys inside. These are more complex to print (multiple parts, hinges, a latch mechanism) but provide security (keys aren’t visible to casual visitors) and protection (keys don’t accumulate dust and can be organized inside the cabinet).
Best for: Property managers, landlords, or anyone managing multiple sets of keys; households where key security is a consideration; environments where dust accumulation is an issue.
Design considerations: Key cabinets require printing multiple parts with functional tolerances — the door must swing on its hinges without binding, and the latch must hold reliably. These are intermediate-level prints. Start with simpler holders and return to cabinets once you’re comfortable with multi-part assemblies.
4. Magnetic Key Holder
A holder that uses embedded magnets to either mount to a steel surface (like a refrigerator or metal door frame) or to attract magnetic keys or keyrings. Magnetic holders allow keys to be placed quickly without needing to loop them onto a hook — you just press them to the magnetic surface.
Best for: High-traffic situations where speed of key retrieval is important, households with young children who find hook manipulation difficult, situations where keys frequently need to be grabbed in a hurry.
Design considerations: These require purchasing small neodymium magnets (widely available online in standard sizes like 10x2mm or 15x3mm) and embedding them during printing (pause the print at the correct layer, insert magnets, resume) or pressing them into printed recesses after printing. The magnet strength must be appropriate — strong enough to hold the keys but not so strong that removal is difficult.
5. Modular Rail System
A horizontal rail mounts to the wall and accepts interchangeable hook modules of different styles and sizes. This approach allows the holder to be reconfigured as your key collection changes — adding more hooks, changing hook styles, incorporating different accessories — without removing the wall-mounted rail.
Best for: People whose key collection changes frequently, property managers who need to adapt to different key configurations, makers who want a long-term, adaptable solution.
Design considerations: The rail and hook interface geometry must be precisely dimensioned for hooks to snap on securely without being excessively difficult to install. This requires attention to tolerances in the design — print a single hook test piece to verify fit before printing a full set.
Finding Key Holder Designs
Printables.com — Search “key holder” or “key rack.” The results range from simple minimal plates to elaborate themed decorative pieces. Filter by “Most Downloaded” for community-validated designs. The “Organization” category on Printables is also worth browsing.
Thingiverse.com — An enormous archive of key holder designs. Many of the most popular and extensively tested designs are here, with years of user comments providing detailed feedback on what works and what doesn’t.
Cults3D.com — Particularly good for aesthetically refined key holder designs, including many premium-looking pieces that would fit high-end interior design aesthetics.
MyMiniFactory.com — Good selection of creative and unusual key holder designs, particularly themed and decorative pieces.
Print Orientation for Key Holders: Critical for Strength
Just as with hooks (covered in Article 64), print orientation critically affects the strength of a key holder. The hooks must resist the downward pull of keyrings, which creates a bending moment at the hook’s root — where it meets the backing plate.
Correct orientation: Print the key holder with the backing plate face-down on the build plate and the hooks extending upward. In this orientation, the layer lines run horizontally through the hooks, which means the tensile stress at the hook root (the weakest direction for FDM) is parallel to the layer lines rather than perpendicular to them.
Incorrect orientation: Printing the holder flat (face up, hooks extending away from you in the horizontal plane) puts the layer lines running horizontally through the vertical dimension of the hooks, which means the downward pull of keyrings tries to peel layers apart. This produces hooks that look identical but are significantly weaker.
Most well-designed key holder files will auto-orient correctly when imported into your slicer, but always verify — and rotate if needed — before printing.
Slicer Settings for Key Holders
| Setting | Recommended Value | Notes |
|---|---|---|
| Layer Height | 0.2mm | Standard for good strength |
| Print Speed | 40–50 mm/s | Moderate for reliable walls |
| Perimeters/Walls | 4–5 | Higher wall count for hook strength |
| Infill | 30–40% | Grid or Gyroid |
| Top/Bottom Layers | 4 | Solid closure |
| Support | Only if design requires | Avoid designs needing supports |
| Bed Adhesion | Brim (5mm) | Especially if plate has thin edges |
| Hotend Temp (PLA) | 210°C | Slightly warm for better layer fusion |
| Hotend Temp (PETG) | 235°C | Standard PETG |
| Cooling | 100% PLA / 80% PETG | Standard for each material |
Part Two: Key Tags
Why Key Tags Matter
Key tags are deceptively important. Most people underestimate how much cognitive load is imposed by an unlabeled key collection until they label it. Once every key has a clear, permanent label, the “which key is this?” question disappears. The mental process of key selection goes from deliberate trial-and-error to instant pattern recognition.
For property managers, landlords, facilities managers, or anyone handling multiple sets of keys for different locks, this improvement is transformative. For ordinary households, it’s a small but persistent improvement in daily convenience.
Commercial key tags are inexpensive and widely available, but they have limitations: labels written in marker fade, adhesive labels peel, and commercial plastic tags come in a limited range of designs and can’t display truly custom text in a permanent, durable format.
3D printed key tags with embossed or debossed text solve all of these problems. The label is part of the plastic itself — it can’t be removed, can’t fade, and can’t peel. It’s readable as long as the tag itself survives.
Key Tag Anatomy
A key tag consists of three elements:
The body: The main flat section of the tag that carries the label. Typically 30–50mm long and 15–25mm wide for readability. The body should be thick enough to print reliably (at least 3–4mm) while not adding excessive weight to the keyring.
The keyring hole: A circular hole at one end of the tag through which the keyring passes. The hole must be large enough for the keyring to pass through when opened — standard keyrings require a hole of at least 5–6mm diameter. Consider that the ring opening (the gap you squeeze the ring through) is smaller than the ring’s internal diameter — a 30mm diameter keyring might only have a 4–5mm opening gap, so the hole must allow the ring body to pass through at an angle.
The label: Embossed (raised) or debossed (recessed) text or graphics on the body surface. Debossed text (recessed into the surface) is generally more readable than embossed (raised) text because the recesses catch shadow and create higher contrast. Both work, but debossed text is slightly more standard for key tags.
Understanding Embossed vs. Debossed Text
Embossed: Text rises above the surface of the tag. The letters are printed on top of the flat body surface, adding height. Works well in contrasting colors (print the body in one color, paint or highlight the raised letters in another).
Debossed: Text is recessed into the surface of the tag. The letters are cut into the flat body, creating a cavity. Works extremely well with a single-color print — shadows naturally fill the recesses, making text readable without any post-processing.
For a beginner’s first key tags, debossed text designs are easier to read without any painting or finishing, making them the simpler and more reliably successful approach.
Customizable Key Tag Designs: The Parametric Approach
This is where key tags become a gateway to understanding parametric design — one of the most powerful concepts in 3D printing.
A parametric design is one where specific dimensions, features, or content (like text) are defined as variables rather than fixed values. When you want a different size or different text, you change the variable rather than rebuilding the model from scratch.
For key tags, several excellent parametric designs exist that let you type your desired label text into a customizer interface and automatically generate a ready-to-print STL with your text built in — no 3D modeling skills required.
Thingiverse Customizer: Thingiverse hosts many key tag designs that work with their built-in Customizer tool. Search “customizable key tag” on Thingiverse and look for designs marked with the “Customizable” badge. Click “Open in Customizer,” type your text, set any dimension parameters you need, and download your custom STL.
Printables Customizable Designs: Printables similarly hosts parametric key tag designs. Search “parametric key tag” or “customizable key fob.”
OpenSCAD: For users who want full control, OpenSCAD is a free scripting-based 3D modeling program that excels at parametric design. Many key tag designs are shared as OpenSCAD source files, which you can edit directly by changing text strings and dimension values in a text editor.
Tinkercad Text Tool: Tinkercad allows you to create custom text objects and embed them in any design. Create a simple rectangular tag body, create a text object with your label, position it on the body surface, and use Tinkercad’s “Hole” function to deboss it into the surface. This workflow is accessible to complete beginners and produces clean, readable key tags in 15–20 minutes of design work.
Key Tag Label Content Ideas
The right content for your key tags depends entirely on your situation, but here are the categories most people need:
For home use:
- Room names: “Front Door,” “Back Door,” “Garage,” “Mailbox,” “Storage Room”
- Location names for spare keys: “Mom’s House,” “Office,” “Gym Locker”
- Vehicle identifiers: “Red Honda,” “Truck,” “Motorcycle”
- Numeric coding: “Key 1,” “Key 2” — useful when the verbal description is complicated
For rental property management:
- Unit numbers: “Unit 2A,” “203,” “Penthouse”
- Property addresses: compact format like “42 Oak St – 1F”
- System keys: “Master,” “Mailbox,” “Pool Gate,” “Elevator”
For offices or facilities:
- Room or area names: “Server Room,” “Conference Room A,” “Storage”
- Department names: “Maintenance,” “Security,” “Admin”
- Code identifiers: matching whatever code system your organization uses
For workshops or garages:
- Tool cabinet labels: “Hand Tools,” “Power Tools,” “Measuring”
- Vehicle keys: “Company Van,” “Forklift,” “Service Truck”
- Building sections: “Bay 1,” “Loading Dock,” “Break Room”
Key Tag Printing Considerations
Key tags are tiny — often the smallest functional prints beginners make. This introduces specific printing challenges worth understanding.
Layer height for text readability: For debossed text to be readable, the text features must print with adequate resolution. Text characters should be at least 3mm tall (in the vertical dimension of the printed surface) to be legible at 0.2mm layer height. Smaller text may need 0.15mm layer height for the fine strokes of letters to reproduce correctly.
Minimum text depth: Debossed text should be at least 0.6–0.8mm deep (at least 3 layers at 0.2mm) to create enough shadow contrast for readability. Text shallower than this is present but difficult to read without strong directional lighting.
Font selection: Bold, simple sans-serif fonts (like Arial, Helvetica, or similar) work far better for small key tag text than serif or decorative fonts. The fine strokes of serif fonts don’t reproduce well at small scales in FDM printing. When in doubt, use the thickest, boldest version of a simple font.
The keyring hole problem: As mentioned, printed holes are typically 0.2–0.4mm smaller than designed due to FDM dimensional characteristics. If a design specifies a 6mm keyring hole, it will likely print at 5.6–5.8mm. Test the hole with your actual keyring before printing a full set. If the hole is too small, scale the hole diameter up by 0.5mm in a parametric design, or use a small drill bit to enlarge it.
Slicer Settings for Key Tags
| Setting | Recommended Value | Notes |
|---|---|---|
| Layer Height | 0.15mm | Important for text detail at small scale |
| Print Speed | 30–40 mm/s | Slower for better small-feature quality |
| Perimeters/Walls | 4 | Tags are small but need durability |
| Infill | 40–50% | Higher infill for solid, heavy-duty tags |
| Top/Bottom Layers | 4–5 | Important for clean text surfaces |
| Support | None | Key tags should never need supports |
| Bed Adhesion | Brim (2–3mm) | Small tags need a little help |
| Minimum Layer Time | 8–10 seconds | Critical for tiny prints — prevents hot, wobbly features |
| Hotend Temp (PLA) | 205°C | Standard PLA |
| Hotend Temp (PETG) | 230°C | PETG for durability |
| Cooling | 100% | Essential for small parts |
Critical setting: Minimum layer time. For very small prints like key tags, each layer completes very quickly — sometimes in just 5–10 seconds. If the next layer is deposited before the previous one has cooled, you get a phenomenon called “heat buildup” where the upper portion of the tag gets soft and wobbly, producing poor surface quality and possible deformation. Setting minimum layer time (called “Minimum Layer Time” in Cura and “Slow down if layer print time is below” in PrusaSlicer) to 8–10 seconds forces the printer to slow down on small parts, allowing each layer to cool adequately before the next is applied.
Batch Printing Key Tags
Key tags are one of the best print categories for batch production. A plate of 12 key tags prints in about the same time as a plate of 4–5 due to the overhead time that travels between parts. Printing a full plate at once is efficient.
For batch printing:
- Arrange tags with 6–8mm spacing between them
- Keep all tags at the same Z height (same model) for even batch printing
- Enable “Print all at once” mode (default in most slicers, not “print one at a time”)
- Ensure minimum layer time applies to the total layer time of all tags on the plate, not individual parts
Material Selection for Key Holders and Tags
| Material | Key Holders | Key Tags | Notes |
|---|---|---|---|
| PLA | Good for indoor use | Good but brittle | Standard choice; avoid if tags will be heavily used or frequently dropped |
| PETG | Better than PLA for strength | Recommended for tags | Better impact resistance for tags that will be used daily and occasionally dropped |
| ASA | Outdoor holders | Not typically needed | For holders in garages, porches, or other outdoor/semi-outdoor locations |
| TPU | Not recommended for holders | Interesting novelty | Flexible tags are soft and rubbery; unique but less professional |
| Nylon | Overkill for most uses | Worth considering for high-use tags | Excellent toughness and impact resistance; more difficult to print |
The Case for PETG in Key Tags
Key tags live a hard life. They hang on keyrings, get dropped on hard floors, are stuffed into pockets and bags, and are handled multiple times per day. PLA, while easy to print and perfectly adequate for decorative or light-duty prints, is notably brittle. Drop a PLA key tag on a hard tile floor and it can crack or chip at the keyring hole.
PETG offers meaningfully better impact resistance and toughness for key tags, and it prints nearly as easily as PLA. For key tags that will see daily heavy use — on property management keyrings handled by multiple people, on children’s keyrings that will inevitably be dropped repeatedly, or on any keyring that spends time bouncing around in a bag — PETG is the right material.
The tradeoff is slightly more stringing in PETG (more visible on small prints), which you can manage with retraction tuning.
Personalization and Color Strategy
One of the underappreciated benefits of 3D-printed key tags is the ability to use color as an additional organizational dimension.
A system where each key or set of keys has its own color-coded tag makes identification even faster than reading text — before you’ve even registered the label text, the color tells you which set you’re grabbing. Combined with text labels for confirmation, color-coded tags create a fast, nearly error-proof key identification system.
Example color systems:
- Red tag: Home keys
- Blue tag: Car keys
- Green tag: Office keys
- Yellow tag: Spare keys
- Black tag: Locks that are rarely needed
For property management:
- Each floor or building section gets a color
- Different tag colors for different key types (unit keys, common area keys, master keys)
Filament switching for color-coded sets: Printing all tags of one color together as a batch, then changing filament for the next color batch, is the most practical approach. Alternatively, multi-color printers can produce tags with contrasting label and body colors for maximum readability.
Step-by-Step: A Complete Key Organization Project
Let’s walk through a complete key organization project from start to finish — designing and printing both a wall-mounted key holder and a set of matching labeled key tags.
Phase 1: Audit Your Keys
Before printing anything, spend 10 minutes cataloging your key collection. For each key or set of keys, note:
- What it accesses (front door, car, office, storage unit, etc.)
- Whether it’s used daily, occasionally, or rarely
- How many keys are on the ring
- Any special requirements (very heavy, must be quickly accessible, rarely used and can be stored out of easy reach)
This audit tells you how many hooks you need, what labels to create, and any special design requirements for your specific situation.
Phase 2: Choose Your Key Holder Design
Based on your audit, decide:
- How many hooks you need (typically your key count plus 2–3 extras for guests or additions)
- What mounting style fits your entryway (screw mount if you have a solid wall, adhesive if you’re renting)
- What aesthetic fits your home
Search Printables.com for a holder that matches these requirements. Download the STL.
Phase 3: Create Your Key Tag Labels
For each key or set of keys, create a label:
- Open the Thingiverse Customizer (or Tinkercad, or your parametric design tool of choice)
- Enter your label text for each tag
- Download or export the STL for each unique label
- Also batch-print any duplicates you need (spare copies of important keys)
Phase 4: Slice and Print Key Tags First
Print the key tags before the key holder for a simple reason: tags are fast (the batch prints in under an hour) and give you practice with the small-part printing settings before committing to the larger holder print.
Apply the key tag settings from the table above. Print your full set of tags in a single batch if they fit on your build plate.
Phase 5: Test Tags and Adjust
After printing, test each tag:
- Does the keyring hole accept your actual keyring easily?
- Is the text readable from a normal viewing distance?
- Are the tags the right size for your keyrings?
If adjustments are needed, make them now before printing any additional sets.
Phase 6: Print the Key Holder
With your tags validated, slice and print the key holder. Apply the holder-specific settings from the settings table, verify print orientation (backing plate face-down, hooks upward), and start the print.
Monitor the first few layers carefully — key holders with thin backing plates can be prone to warping if the bed isn’t well-calibrated.
Phase 7: Install and Populate
Mount the holder at your chosen location. If screw-mounting, use appropriate wall anchors for your wall type (drywall anchors for hollow walls, direct screws for solid wood or masonry with appropriate fasteners).
Attach your labeled key tags to each keyring. Hang the keyrings on the holder hooks.
Take a moment to appreciate what you’ve made: a completely custom key organization system, perfectly sized for your space, labeled with your specific text, in your chosen colors, installed in exactly the right location. That’s 3D printing delivering genuine everyday value.
Troubleshooting Common Issues
Key Tag Text Is Unreadable or Blurry
Cause: Layer height too high for the text size, font too thin or decorative, or text depth insufficient for shadow contrast.
Solution: Reduce layer height to 0.15mm. Ensure font is bold and sans-serif. Ensure text depth is at least 0.6mm (3 layers at 0.2mm). Increase text character height to at least 3–4mm. Repaint the recesses with a contrasting color ink marker and wipe off the excess (the ink stays in the recesses and dramatically improves readability).
Key Tag Is Cracking at the Keyring Hole
Cause: PLA brittleness under impact stress at the smallest cross-section of the tag.
Solution: Switch to PETG. Increase wall count to 5. Ensure there’s adequate material around the hole — the wall between the hole edge and the tag edge should be at least 2mm on all sides. If the design has inadequate material at this point, find or design a variant with a more generous margin.
Key Holder Hooks Are Bending Under Heavy Keyrings
Cause: Insufficient wall count, incorrect print orientation, or material creep under sustained load in PLA.
Solution: Reprint with 5 perimeters. Verify print orientation (backing plate face-down, hooks upward). Switch to PETG, which is more resistant to creep under sustained load than PLA. For very heavy keyrings, increase infill to 50%.
Adhesive-Mounted Key Holder Falls Off Wall
Cause: Adhesive bond insufficient for the combined weight of holder plus keys and keyrings, or surface not properly prepared.
Solution: Remove the holder, clean the wall surface with isopropyl alcohol, apply fresh Command strips rated for higher weight (use at least 2–3 strips rated to the total weight of your key collection), allow 72 hours cure time before loading with keys. For heavy key collections, switch to a screw-mounted design.
Batch of Key Tags Has Stringing Between Parts
Cause: Travel moves between tags during batch printing produce strings, especially with PETG.
Solution: Increase retraction distance by 0.5mm. Reduce print temperature by 5°C. Enable “Combing” mode in your slicer. Increase travel speed to reduce ooze time during travel. Clean strings off the finished tags with a quick pass of a heat gun (brief, careful, from a distance) or carefully with a hobby knife.
Creative Variations Worth Exploring
Combination Key and Mail Holder
A wall-mounted piece that combines key hooks at the bottom with a slim mail slot or tray above — incoming mail goes in the tray, keys hang below. Everything needed at the door in one organized location.
Smart Key Holder with NFC Tags
Key holders with embedded NFC tag recesses allow you to program NFC stickers (cheap and widely available online) placed in each hook’s corresponding recess. Tap your phone to the recess to see which key hangs there — particularly useful for large key collections.
Under-Cabinet Key Rail
A rail that mounts under a kitchen or entryway cabinet, keeping keys completely hidden when not in use. Particularly good for renters who don’t want key organization hardware visually prominent in their space.
Color-Coded Key Caps
Instead of (or in addition to) key tags, 3D-printed key caps slip over the key blade head itself, adding a colored identification cap directly to the key. Different colors for different uses make identification instant even when keys are on the same ring. These are extremely fast to print (under 15 minutes each) and very popular in the maker community.
Personalized Guest Key Tags
Custom-printed key tags made specifically for houseguests, Airbnb guests, or rental tenants — with property address, access instructions, or even Wi-Fi passwords on the reverse. These make a memorable, professional impression on guests.
Numbered Property Management System
For landlords or property managers, a complete printed system with matching numbered tags (Unit 1, Unit 2, etc.) and a key cabinet with matching numbered hooks — all in matching color and design. A completely custom solution that would cost hundreds of dollars commercially, produced for a few dollars of filament.
The Bigger Picture: Building a Complete Entry Organization System
Key holders and key tags are often the first components of a broader entry organization system that your printer can support. Once you’ve solved the key problem, you’ll notice adjacent organizational needs that printed accessories can address:
Mail organizer: A wall-mounted sorter for incoming mail, outgoing mail, and bills to pay.
Phone charging dock: A wall-mounted or shelf-mounted charging station near the door for the phone that always needs charging when you’re leaving.
Umbrella hook: A dedicated hook at the right height for an umbrella — you always know where it is when it’s raining.
Bag hooks: Larger, heavier-duty hooks at the right height for backpacks, bags, and lightweight jackets.
Small shelf or tray: A landing surface for wallets, sunglasses, and the daily pocket detritus that currently ends up scattered across whatever surface is nearest to the door.
Shoe storage hooks or rack: For apartments or small entryways where floor space is limited.
Each of these is a relatively simple print. Together, they create an entry zone that genuinely functions well — where every item that you need when leaving the house has a specific, dedicated place, and the cognitive overhead of getting out the door is substantially reduced.
That’s the deeper value of printed organization accessories: not the individual pieces, but the system they build toward.
Conclusion: Small Objects, Significant Impact
Key holders and key tags are not glamorous 3D prints. They won’t trend on social media or impress the technically sophisticated. But in terms of actual, measurable impact on daily life — the number of minutes saved hunting for keys, the number of stressful “which key is this?” moments eliminated, the number of times a clearly labeled spare key prevented a lockout — they may be among the highest-value objects your printer ever produces.
That’s worth something. In a world of impressive but non-functional prints, a simple labeled key tag that lives on a keyring and silently does its job every single day for years is a genuine success. Not because it’s technically remarkable, but because it’s genuinely useful, genuinely personalized, and genuinely yours.
Your printer made it possible in about 20 minutes. That’s the promise and the payoff of 3D printing applied to everyday life — not dramatic transformations, but a quiet accumulation of small improvements, each one making your daily environment a little more organized, a little more personal, and a little more exactly right for you.