3D printed cable clips and organizers are small, fast-to-print accessories that route, bundle, and secure cables across desks, walls, floors, and furniture — replacing expensive commercial cable management systems with custom solutions that cost just a few cents each in filament. Because they are tiny, geometrically simple, and require no supports, cable clips are among the fastest and most beginner-friendly prints available, typically completing in 15 to 45 minutes per clip or small batch.
Introduction: The Cable Problem Every Home Has
Look behind your desk. Look under your entertainment center. Look along the baseboard behind your couch. If you see a tangled mass of charging cables, HDMI cords, power strips, and miscellaneous wires that would require an archaeologist to untangle, you are not alone. Cable chaos is one of the most universal and persistently annoying problems in modern homes and offices, and the commercial market has been trying to solve it for decades with zip ties, cable sleeves, adhesive clips, velcro wraps, and wire management channels.
Most of these commercial solutions are either too generic, too expensive, too ugly, or too permanent. A pack of adhesive cable clips from a hardware store comes in one size and one color, costs more per clip than it should, and leaves a sticky residue when removed. Velcro cable ties work but need to be purchased in bulk. Wire management channels are effective but require commitment to a fixed cable routing path.
Your 3D printer solves all of these problems simultaneously. You can print cable clips in any size, in any color, with any mounting style, in quantities of one or one hundred. The total material cost for a typical cable clip is between two and ten cents. The design can be tweaked to fit any cable diameter, any desk thickness, any wall mounting configuration. And when your cable routing needs change — as they inevitably do when you rearrange your desk, upgrade your setup, or move — you simply print new clips.
This guide covers the complete world of 3D printed cable management: the types of clips and organizers worth printing, how to find and choose designs, the slicer settings that produce reliable results in fast print times, the materials best suited to different environments, practical installation tips, and a collection of creative cable management ideas that go well beyond simple clips.
Whether you want to tame a single cable or completely reorganize an entire room’s worth of cords, your 3D printer is ready to help — and you could have your first cable clips in your hands within the hour.
Why Cable Clips Are Perfect for Beginners
Before diving into the specific types and designs, it’s worth pausing to appreciate just how well-suited cable clips are as beginner prints from a technical perspective. Understanding why they’re ideal teaches you something about what makes any print beginner-friendly.
Small Size = Fast Iteration
A typical single-cable clip might be 20–30mm wide, 15–20mm tall, and 10mm deep. At this size, even with conservative settings, most clips print in 15–30 minutes. This means if your first clip comes out slightly wrong — the cable channel is too tight, the mounting method doesn’t work, the clip doesn’t snap onto the desk edge cleanly — you can adjust your settings or find a better design and reprint within the same hour.
Fast iteration is enormously valuable when you’re learning. It means mistakes are cheap in both time and material. A failed cable clip costs a few cents of filament and 20 minutes of print time. A failed large, complex print costs much more. Starting with small, fast prints lets you make many mistakes quickly, learn from each one, and build skill rapidly.
Geometric Simplicity = Reliable Prints
Cable clips are geometrically simple. They have flat surfaces, gentle curves, and functional channels — but almost no overhanging geometry that requires support, no intricate detail that demands high resolution, and no large flat areas prone to warping. Most cable clip designs print cleanly on the first attempt with standard settings, which is exactly the kind of reliable early success that keeps beginners motivated.
Functional Feedback = Immediate Learning
Unlike a decorative print that simply needs to look good, a cable clip either works or it doesn’t. Is the channel the right size for your cable? Does the clip snap onto the desk edge without excessive force? Does it stay in place under the weight of the cable? This immediate, binary feedback teaches you to think about 3D printing in terms of function and fit — a mindset that will serve you throughout your printing journey.
Volume Production = Batch Printing Practice
You’ll rarely need just one cable clip. A typical desk setup might need 10–20 clips to manage cables properly. Printing a plate full of clips — 12 or 15 at once — introduces you to batch printing, which is one of the most useful skills in practical 3D printing. It teaches you about print time scaling, how objects on the same plate interact during printing, and the enormous efficiency gains that come from printing multiples simultaneously.
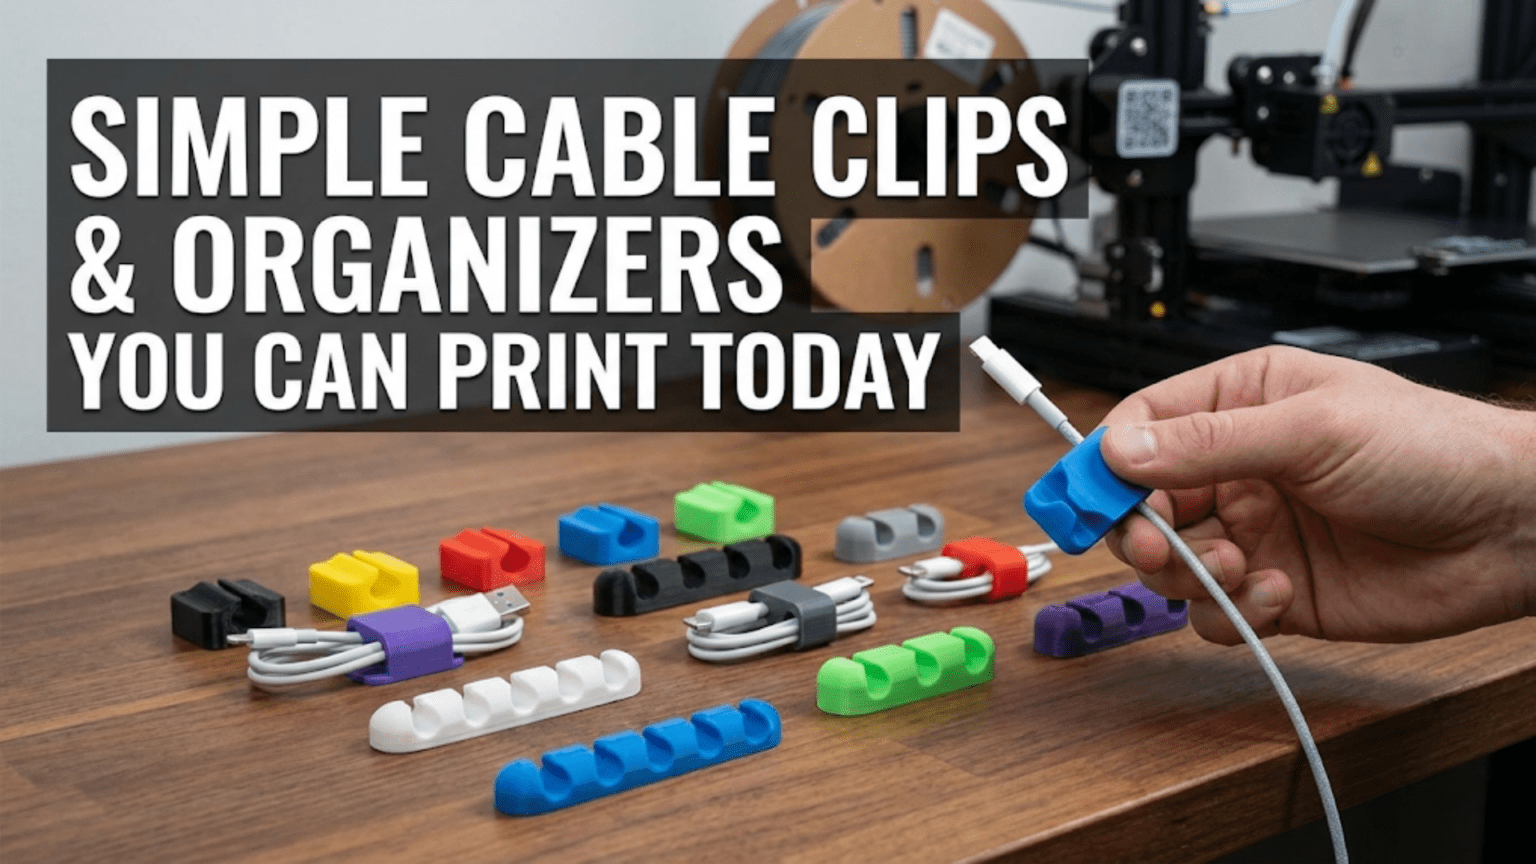
Types of Cable Clips and Organizers
The world of 3D printable cable management is richer than most beginners expect. Here are the main categories worth knowing about.
1. Single-Cable Adhesive Clips
The simplest and most commonly printed cable management piece is the single-cable adhesive clip: a small loop or channel that holds one cable, with a flat backing designed to accept a small adhesive pad or Command strip.
These clips are the direct replacement for commercial adhesive cable clips, but printable in any channel diameter to fit any cable precisely. A clip for a USB-C charging cable needs a different channel diameter than a clip for a thick power cable or an HDMI cord. By printing your own, you can create a matched set where every cable in your setup has a clip sized perfectly for it.
Best use cases: Routing charging cables along desk edges, securing a single monitor cable along a wall, keeping a bedside charging cable in place.
Design tip: Look for designs with a channel diameter 1–2mm larger than your cable’s actual diameter. Too tight and the cable won’t snap in; too loose and the cable falls out. Most cable clips are designed around standard cable diameters — measure your cable with calipers or check its specification for the outer diameter.
2. Multi-Cable Clips and Bundlers
Multi-cable clips hold two, three, four, or more cables simultaneously in parallel channels. These are ideal for situations where multiple cables run together in a bundle — along the back of a monitor arm, under a desk to a floor outlet, or along a wall from an entertainment center to a TV.
The efficiency gain over single-cable clips is significant. Instead of mounting 20 individual clips for a 5-cable bundle running 1 meter, you can use 4 multi-cable clips that hold all 5 cables together in a neat, organized bundle.
Best use cases: Managing the cable run from a desktop computer to a wall outlet, bundling HDMI, audio, and power cables behind a TV, routing multiple charging cables from a central hub to devices around a desk.
Design tip: When printing multi-cable clips, orient the clip so all cable channels are accessible from the same side for easy installation and removal. Look for designs with a slight taper at the channel entry to make cable insertion easier.
3. Desk Edge Clips
Desk edge clips snap onto the edge of a desk or shelf without any adhesive or fastener — they grip the edge purely through clamping force from the clip’s geometry. This makes them completely non-destructive and easily repositionable.
The critical dimension for desk edge clips is the jaw width — the gap between the upper and lower jaws that grips the desk edge. This dimension needs to closely match your desk thickness. Most desk edges are between 18mm and 25mm thick for standard furniture, but if you have a custom or non-standard desk, measuring and printing a perfectly fitted clip is one of the clearest demonstrations of 3D printing’s advantage over commercial alternatives.
Best use cases: Managing cables along the back edge of a standing desk, routing laptop charging cables along a desk without adhesives, securing cables on glass-topped or unusual-material desks where adhesives might be problematic.
Design tip: Measure your desk edge thickness and look for a parametric (customizable) clip design that lets you enter your exact measurement. Add 0.5–1mm of clearance to the jaw width for a secure but non-damaging grip. Print in PETG rather than PLA for desk edge clips that will experience repeated insertion and removal, since PETG’s greater flexibility prevents cracking.
4. Cable Drop Clips
Cable drop clips are small retaining loops that prevent a cable from falling behind a desk when you disconnect a device. Anyone who has ever disconnected a laptop or phone charger and watched the cable disappear over the back of the desk — forcing an awkward reach-behind retrieval — will immediately understand the appeal.
A cable drop clip mounts to the desk edge, desk surface, or monitor arm, and holds the cable end loosely enough that it can be picked up and plugged in easily, but securely enough that it doesn’t fall behind the desk when released.
Best use cases: Keeping charging cables available at the front of a desk, managing headphone cables when not in use, preventing any frequently connected/disconnected cable from disappearing.
Design tip: The loop opening of a cable drop clip should be large enough that the cable connector end (which is usually wider than the cable body) can be inserted and removed easily, but small enough that the cable body doesn’t fall through. For USB-C and lightning cables, a loop opening of about 8–10mm works well for the cable body with the connector trapped inside.
5. Cable Raceways and Wall Mounts
Beyond individual clips, 3D printing enables you to create entire cable management channels — open-sided or closed channels that mount to walls, baseboards, or desk legs and route multiple cables neatly along a defined path.
Printable cable raceways are typically modular: you print multiple sections that link together end-to-end to cover whatever run length you need. Each section might be 100–200mm long, with connector geometry at each end that allows sections to snap or slide together.
This kind of system is significantly more work to design and print than simple clips, but the result is genuinely professional-looking cable management that rivals (and in some ways surpasses) commercial wire management channel systems.
Best use cases: Routing cables along walls in a home office or entertainment area, managing cables along desk legs from a monitor arm to the floor, creating a clean cable path from a router or network switch to multiple rooms.
Design tip: For long cable raceway runs, design or find modular sections that are short enough to print quickly and print many of — 150mm sections that print in 30–45 minutes each are more practical than a single 600mm section that takes 3 hours. Ensure each section includes the correct connector geometry to join cleanly with adjacent sections.
6. Velcro Cable Tie Holders and Strap Organizers
Some cable management relies on velcro straps or cable ties rather than rigid clips. 3D printing can complement these approaches with printed holders, anchors, and organizing fixtures that work alongside velcro ties.
For example, a desk-mounted velcro strip holder provides a fixed anchor point from which velcro-bundled cables can hang neatly. A printed cable tie organizer holds a supply of cable ties where they’re always accessible. A printed loop that mounts to a desk leg provides a point where a velcro-bundled cable bundle can be attached and routed neatly downward.
7. Monitor and TV Cable Management
Cables behind monitors and televisions are particularly prone to creating ugly tangles because the cables must accommodate the display moving (for adjustable monitor arms) or must be routed from multiple sources to a single unit.
Printed cable management accessories for monitors include clips that attach to monitor arm poles and route cables neatly along the arm, cable guides that attach to TV stands and route cables to the floor neatly, and monitor foot cable channels that hide cables under the monitor’s base.
Finding and Choosing Cable Clip Designs
With such a wide variety of cable management options available, knowing how to find good designs is essential.
Best Sources for Cable Clip Files
Printables.com is the recommended starting point. The search term “cable clip” returns hundreds of results. Filter by “Most Downloaded” to find the most community-validated designs. Also try “cable organizer,” “cable management,” “cable holder,” and “desk cable clip” for different categories.
Thingiverse.com has an enormous archive of cable management designs, including many classic designs that have been widely tested and iterated over years of community use. The “Cable Management” category on Thingiverse is worth browsing directly.
Cults3D.com has some particularly well-designed cable management systems — both free and paid — including modular systems with multiple compatible component types.
For parametric (customizable) cable clips where you can enter your specific cable diameter and desk thickness, look for designs described as “OpenSCAD customizable” or “parametric” on any of these platforms. These allow you to generate a perfectly sized clip without any modeling knowledge.
What to Look for in a Cable Clip Design
Cable channel diameter: The design should specify what cable diameter or diameter range it accommodates. If it doesn’t, check the comments section for user feedback on fit.
Mounting method compatibility: Make sure the design’s mounting method works for your situation. Adhesive-backed clips need a smooth surface. Edge clips need the right jaw width for your desk. Screw-mount clips need appropriate hole placement.
Print-in-place vs. assembly: Some cable clip designs print as a single piece, while others consist of two parts (typically a base that mounts and a cap or lock that closes over the cable). Print-in-place single-piece designs are simpler to print and use. Two-piece designs may offer better cable retention.
No-support geometry: For a cable clip to be a good beginner print, it should print without supports. Most well-designed cable clips achieve this by keeping overhangs gentle and cable channels oriented to avoid unsupported spans. If a design requires supports, it’s either poorly designed or more complex than necessary for basic cable management.
User photos and comments: As with any functional print, user photos and comments are your best pre-purchase validation. If dozens of people have printed a clip successfully and commented positively, the design is reliable. If multiple users report that the clip is too flimsy, the channel too tight, or the mounting method inadequate, trust those reports.
Slicer Settings for Cable Clips
Cable clips have specific requirements that differ slightly from the general beginner baseline. Here are optimized settings for producing reliable, functional cable clips:
| Setting | Recommended Value | Rationale |
|---|---|---|
| Layer Height | 0.2mm | Good balance of speed and strength |
| Print Speed | 40–60 mm/s | Fast enough to be efficient, slow enough for quality |
| Perimeters/Walls | 3–4 | More than decorative minimum for functional strength |
| Infill | 20–30% | Adequate for cable clips; higher for heavy-duty clips |
| Infill Pattern | Grid or Gyroid | Uniform strength in all directions |
| Top/Bottom Layers | 3–4 | Clean closure of surfaces |
| Support | None | Choose designs that don’t require supports |
| Bed Adhesion | Skirt or light Brim | Cable clips have adequate footprint for adhesion |
| Hotend Temp (PLA) | 205–215°C | Slightly warm for good layer adhesion |
| Hotend Temp (PETG) | 230–240°C | Standard PETG range |
| Bed Temp (PLA) | 55–65°C | Standard PLA bed temp |
| Cooling | 100% after layer 2 | Important for small, fast-cooling clips |
Batch Printing Settings
When printing a full plate of cable clips simultaneously, a few additional settings considerations apply:
Enable “Print one at a time” only for small plates with wide spacing. For a dense plate of clips, printing all at once (the default) is faster and usually more reliable.
Slightly reduce print speed for batches — when printing many small objects at once, the nozzle moves frequently between objects, and lower speed reduces the chance of stringing between parts. Try 45 mm/s for batch prints.
Set minimum layer time to 5–8 seconds in your slicer’s cooling settings. This prevents the printer from moving so fast on small layers that the plastic doesn’t have time to cool and solidify before the next layer is deposited. Without this setting, tall, thin features on cable clips can get hot and wobbly during printing.
Material Selection for Cable Clips
PLA: The Standard Choice
PLA is perfectly adequate for the vast majority of indoor cable management applications. It’s easy to print, inexpensive, available in a wide range of colors, and plenty strong for holding cables. Most household cable clips experience very little mechanical stress — they just need to hold a cable in a channel or on a surface — and PLA handles this easily.
PLA’s limitations (heat sensitivity, moisture sensitivity, UV degradation) are rarely relevant for indoor cable management. If your cable clips are inside a climate-controlled home or office, PLA will serve reliably for years.
PETG: For Clips That Need to Flex
PETG’s advantage over PLA for cable clips is its greater flexibility and impact resistance. This matters specifically for clip designs that rely on a snap-fit or spring mechanism — the clip arms that flex open to accept a cable and then snap back to hold it. PLA can be brittle under repeated flex cycles, eventually cracking at the flex point. PETG handles repeated flexing much better.
If your cable clip design has a snap-fit mechanism — a spring arm that deflects to allow cable insertion — print it in PETG rather than PLA for longer service life.
TPU: For Gentle-Grip Flexible Clips
TPU (Thermoplastic Polyurethane) is a flexible filament that can produce genuinely rubbery cable clips. Flexible cable clips have some advantages: they grip cables gently without risk of crushing delicate cables, they accommodate a range of cable diameters with the same clip, and they can be installed and removed repeatedly without cracking.
TPU is more challenging to print than PLA or PETG — it requires slower print speeds, direct drive extruders handle it better than Bowden setups, and it can be prone to stringing — but for specific cable management applications, the flexibility is worth the additional effort.
Color Considerations
One of the underappreciated advantages of 3D-printed cable clips is color matching. Commercial cable clips come in black, white, and occasionally a few other colors. Your 3D printer can produce clips in any color of filament available — which includes hundreds of options from solid colors to transparent, metallic, wood-fill, and more.
For a clean desk setup, printing all cable clips in the same color as your desk surface (white clips for a white desk, black for a dark desk) makes the cable management nearly invisible. For workshop or garage applications where visibility is more important than aesthetics, high-visibility colors like orange or yellow make cables easy to spot.
Step-by-Step: Setting Up a Batch Print of Cable Clips
Let’s walk through a complete workflow for setting up and printing a batch of cable clips — 12 clips on a single build plate — from start to finish.
Step 1: Choose Your Design and Download
Navigate to Printables.com and search “cable clip.” Choose a design appropriate for your cables and mounting situation. Download the STL file.
Step 2: Open and Import in Slicer
Open Cura or PrusaSlicer and import the STL file. The clip should appear on the build plate.
Step 3: Arrange Multiple Instances
Right-click on the clip in Cura and select “Multiply Selected” — enter 11 additional copies for a total of 12. Use the “Arrange” function to automatically distribute all 12 clips evenly across the build plate. In PrusaSlicer, use Edit > Copy and Edit > Paste to create multiple instances, then use Arrange (keyboard shortcut A) to distribute them.
Leave at least 5–8mm of space between clips to prevent issues with the nozzle dragging across adjacent clips during travel moves.
Step 4: Apply Batch-Optimized Settings
Apply the settings from the cable clip settings table, with these batch-specific adjustments:
- Print speed: 45 mm/s (slightly slower for clean travel moves between parts)
- Cooling: 100% — critical for small parts in a batch
- Minimum layer time: 8 seconds — prevents hot, soft layers on small features
- Retraction: Ensure retraction is enabled to minimize stringing between parts
Step 5: Preview the Batch
Use the layer preview to check a few things specific to batch printing:
- Are travel moves (shown as blue lines in Cura’s preview) minimized? Good slicers route travel efficiently.
- Is there stringing shown between clips in the preview? If your slicer predicts stringing paths, they’re likely to appear in the print — adjust retraction if needed.
- Do all 12 clips have consistent layer structure? They should all look identical in the preview.
Step 6: Slice, Check Time, and Print
Slice the batch and review the estimated print time. A batch of 12 small cable clips should take 45–90 minutes. If the estimate is significantly longer, check whether your minimum layer time setting is dramatically slowing the print — adjust it slightly if the quality benefit isn’t worth the time cost.
Start the print and watch the first layer carefully. With 12 clips on the plate, you have 12 opportunities to spot first-layer issues — look for any clips that seem to be pulling away from the bed or have a first layer that’s too thick or too thin.
Step 7: Harvest and Test
Once printed, remove the clips from the build plate. With PLA on a smooth PEI surface, clips usually pop off easily when the bed has cooled to room temperature. Test each clip with your cable: snap it in, check the retention, verify the mounting method works as expected.
Installation Tips for Maximum Effect
Printing great cable clips is only half the job. Installing them effectively turns a pile of plastic pieces into a genuinely useful cable management system.
Plan Your Cable Routes First
Before mounting a single clip, trace out how you want each cable to run from source to destination. This planning step is often skipped by beginners, who mount clips ad hoc and end up with a cable route that’s circuitous, tangle-prone, or incompatible with future changes. Spend 10 minutes planning; save hours of frustration.
Clean the Mounting Surface Before Adhesive Clips
For adhesive-backed clips, cleaning the mounting surface with isopropyl alcohol immediately before application is essential. Surface oils, dust, and residue dramatically reduce adhesive bond strength. Clean, dry, smooth surfaces provide the strongest adhesive bonds.
Use Appropriate Adhesive Strength
Command strips and similar removable adhesives come in different strength ratings. For lightweight cable clips holding a single thin cable, small Command strips rated for light loads are appropriate. For multi-cable clips or clips in positions where cables experience some tension or movement, use medium-load strips. Over-engineering the adhesive is better than under-engineering it.
Allow Adequate Cure Time
Most adhesive products (including Command strips) achieve their full bond strength after 24–72 hours of cure time. Avoid loading clips with cables immediately after installation if possible. The few hours of waiting time pays off in a stronger, more reliable bond.
Test Before Finalizing Routes
Before routing all your cables through all your clips, run the full cable route with clips loosely positioned (not yet adhered) to verify the route works and all cables reach their destinations. It’s much easier to adjust at this stage than after everything is adhered and routed.
Creative Cable Management Ideas Beyond Basic Clips
Once you’ve mastered basic clips, the world of 3D-printed cable management opens up significantly. Here are some more creative and advanced ideas worth exploring:
Under-Desk Cable Spine
A modular “spine” system that mounts under a desk provides a central channel through which all desk cables are routed. Individual clip modules snap onto the spine at positions you choose, guiding each cable toward its destination. The result is a single, organized cable bundle running under the desk rather than a tangle of individual cables.
Cable Management Box
A printed cable management box is a lidded enclosure that hides a power strip and the excess cable lengths from multiple devices. Cables enter through molded openings sized to fit them snugly, and the entire cable mess is hidden inside the box. These are particularly popular for under-desk use, where the box can be mounted to the desk underside or floor.
Headphone Hook with Cable Keeper
A combination piece that serves as both a headphone hook and a cable management station — a hook for the headphones plus an integrated cable channel or clip that keeps the headphone cable neatly draped rather than tangled.
Cable Label Rings
Small printed rings that slip over cables and provide a flat face for a label (written or printed on adhesive paper). These make identifying cables in a multi-cable bundle dramatically faster and eliminate the frustration of tracing cables back to their source.
Monitor Arm Cable Guides
Clips designed to snap onto the pole of a monitor arm, holding cables neatly along the arm so they move with the monitor when its position is adjusted without dangling freely or getting pinched.
Keyboard and Mouse Cable Bungee
A small weighted base with a guide ring that sits on the desk surface and keeps a wired mouse or keyboard cable elevated off the desk surface, reducing friction and preventing the cable from catching on desk edges during movement.
Troubleshooting Common Cable Clip Issues
Clip Channel is Too Tight for Cable
Cause: FDM prints typically come out slightly smaller than designed due to dimensional shrinkage, and cable clips with tight tolerances amplify this effect.
Solution: Scale the model up by 2–5% in your slicer (using the scale tool, scale only the X and Y dimensions that affect the channel diameter, not the Z height). Alternatively, find a design with a stated “loose fit” or search for a version with a slightly larger channel diameter. A hobby knife can also carefully enlarge a channel that’s too tight, though this is less elegant.
Clip is Too Brittle and Snaps When Installing Cable
Cause: PLA is relatively brittle, and snap-fit clip arms can crack when deflected too far during installation, especially in cold environments.
Solution: Switch to PETG for this design. PETG’s greater flexibility means snap-fit arms can deflect through a larger range without cracking. Alternatively, if you must use PLA, warm the clip slightly (briefly warm air from a hairdryer or short time at room temperature if it’s cold) before installation to make the plastic slightly more flexible.
Adhesive Backing Keeps Falling Off the Wall
Cause: Either the printed surface is too rough for good adhesive contact, the wall surface is textured or dirty, or the adhesive load rating is insufficient for the weight being held.
Solution: Sand the clip’s mounting surface until smooth. Clean the wall surface with IPA. Use a higher-rated adhesive strip. Consider switching to a screw-mount design for this particular location.
Batch Print Has Strings Between Clips
Cause: Retraction is insufficient for the material and travel distance between clips, leaving strings during non-printing travel moves.
Solution: Increase retraction distance by 0.5mm and retest. Reduce print temperature by 5°C (helps with oozing). Enable “Combing” in your slicer to keep travel moves within clip boundaries where possible. Increase travel speed (faster travels mean less time for oozing).
Clips Keep Coming Off During Daily Use
Cause: The adhesive bond wasn’t strong enough for the combined weight of the cable and any tension it experiences during use.
Solution: Use a stronger adhesive pad. Ensure the mounting surface was thoroughly cleaned before application. Allow full cure time (24–72 hours) before loading clips with cables. For locations with persistent adhesive failures, switch to a screw-mount or edge-clip design that doesn’t rely on adhesive.
Building a Complete Cable Management System
The real power of 3D printing for cable management isn’t in any individual clip — it’s in the ability to build a complete, cohesive system where every element is designed to work together. Here’s how to approach a systematic cable management project for a desk or workspace:
Audit your cables first. List every cable in your workspace: what it is, where it starts, where it ends, what diameter it is, and whether it needs to be easily accessible (frequently plugged/unplugged) or can be fixed in place permanently.
Group cables into bundles. Cables running similar routes should be bundled together. Identify the primary cable runs in your workspace — the run from the desk to the wall outlet, the run across the back of the desk, the run along a specific wall — and determine how many cables each run carries.
Choose clip types for each situation. Use multi-cable clips for bundled runs, single-cable drop clips for frequently connected cables, desk edge clips where you don’t want adhesives, and wall-mounted clips or raceways for longer wall runs.
Print a prototype of each clip type first. Before printing 20 copies of a clip, print one and test it in its intended location. Verify fit, verify mounting, verify cable retention. Only then commit to a full batch.
Install systematically. Route cables in order, from the most permanent (power cables that never move) to the most temporary (device charging cables that change daily). The permanent cables form the backbone of your routing; the temporary cables slot into that backbone.
Label everything. Add cable label rings to every cable at both ends. This one investment of time and material will save you hours of cable-tracing frustration in the future.
The result of this systematic approach is a workspace where cables are invisible when you’re not thinking about them and immediately identifiable and accessible when you need them — exactly what good cable management should achieve.
Conclusion: Small Prints, Big Impact
Cable clips are small, humble prints. They won’t impress anyone at a maker faire, and they won’t trend on social media. But they might be the category of 3D print that you use more, and rely on more, than almost anything else you produce.
The ability to print exactly the right clip, in exactly the right size, in exactly the right color, in exactly the right quantity — and to do it in under an hour from decision to finished print — is a genuinely powerful capability. It’s one of the everyday demonstrations of what desktop 3D printing actually delivers for ordinary people: not impressive showpieces, but practical, customized solutions to the small irritations of daily life.
Tame your cables. Print your clips. And notice how much better your workspace feels when every cord knows exactly where it belongs.