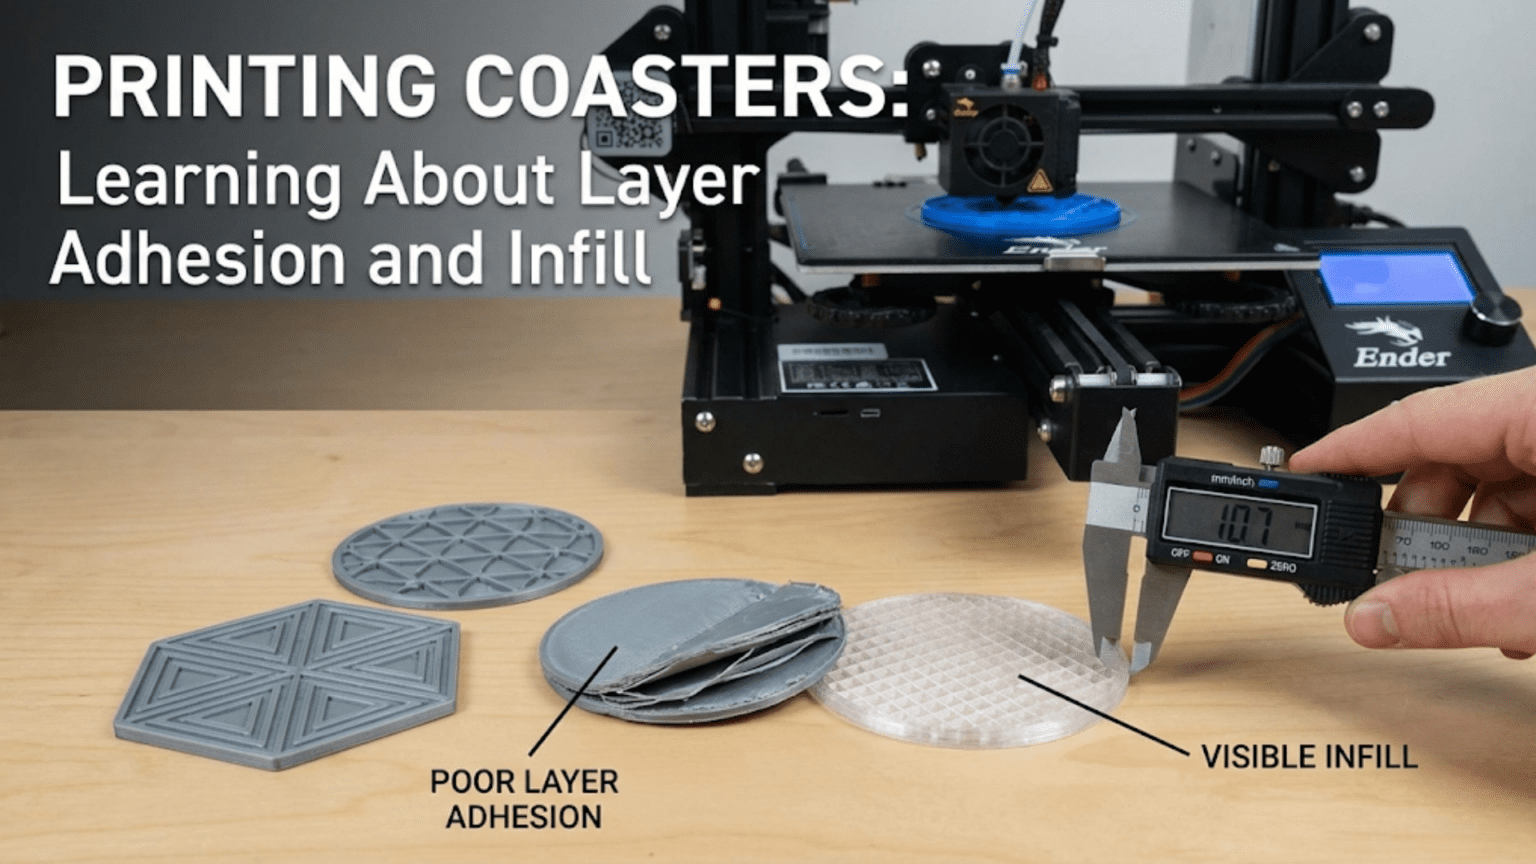
3D printed coasters are flat, round or square discs placed under cups and glasses to protect surfaces from heat and moisture rings. They are one of the most educational beginner projects available because their large, flat geometry puts both layer adhesion and infill settings directly on display — literally visible through the top surface — making them the perfect diagnostic tool for understanding how these fundamental print parameters affect surface quality, structural integrity, and the overall appearance of every print you’ll ever make.
Introduction: The Most Instructive Print You’ll Make All Week
There is a particular magic to prints that teach through their imperfections as clearly as through their successes. The coaster is one of these prints.
Print a coaster with too little infill and you’ll see the pattern ghosting through the top surface. Print one with too few top layers and the infill structure shows through completely. Print one with poor layer adhesion and the layers will separate under the modest stress of daily use. Print one with insufficient cooling and the top surface will be rough and uneven. Each of these failure modes is immediately, visually obvious on a flat surface that you look at directly — which is exactly what makes coasters such a powerful learning tool.
Most prints hide their internal structure. The walls of a phone stand, the body of a hook, the base of a plant pot — the critical internal decisions about infill percentage, perimeter count, and layer bonding are invisible once the print is complete. You only discover their inadequacy when the part fails under load.
A coaster shows you everything. The top surface is a direct visual record of every decision you made in your slicer about top layers, infill, flow rate, temperature, and cooling. If those decisions were right, you get a clean, smooth, beautiful surface. If they were wrong, the evidence is right there looking up at you from your coffee table.
This guide uses coasters as the vehicle for a thorough education in two of the most important concepts in FDM 3D printing: layer adhesion and infill. Along the way, you’ll learn how to choose coaster designs, how to optimize settings for the best surface quality, what materials work best for functional coasters (including the critical heat resistance question), how to add non-slip backing, and a range of creative coaster ideas that go well beyond simple colored discs.
By the time you’ve worked through this guide and printed a few coasters, you’ll understand layer adhesion and infill not as abstract slicer parameters but as physical realities you can see, feel, and test. That understanding will improve every print you make from this point forward.
Understanding Layer Adhesion: The Foundation of Print Strength
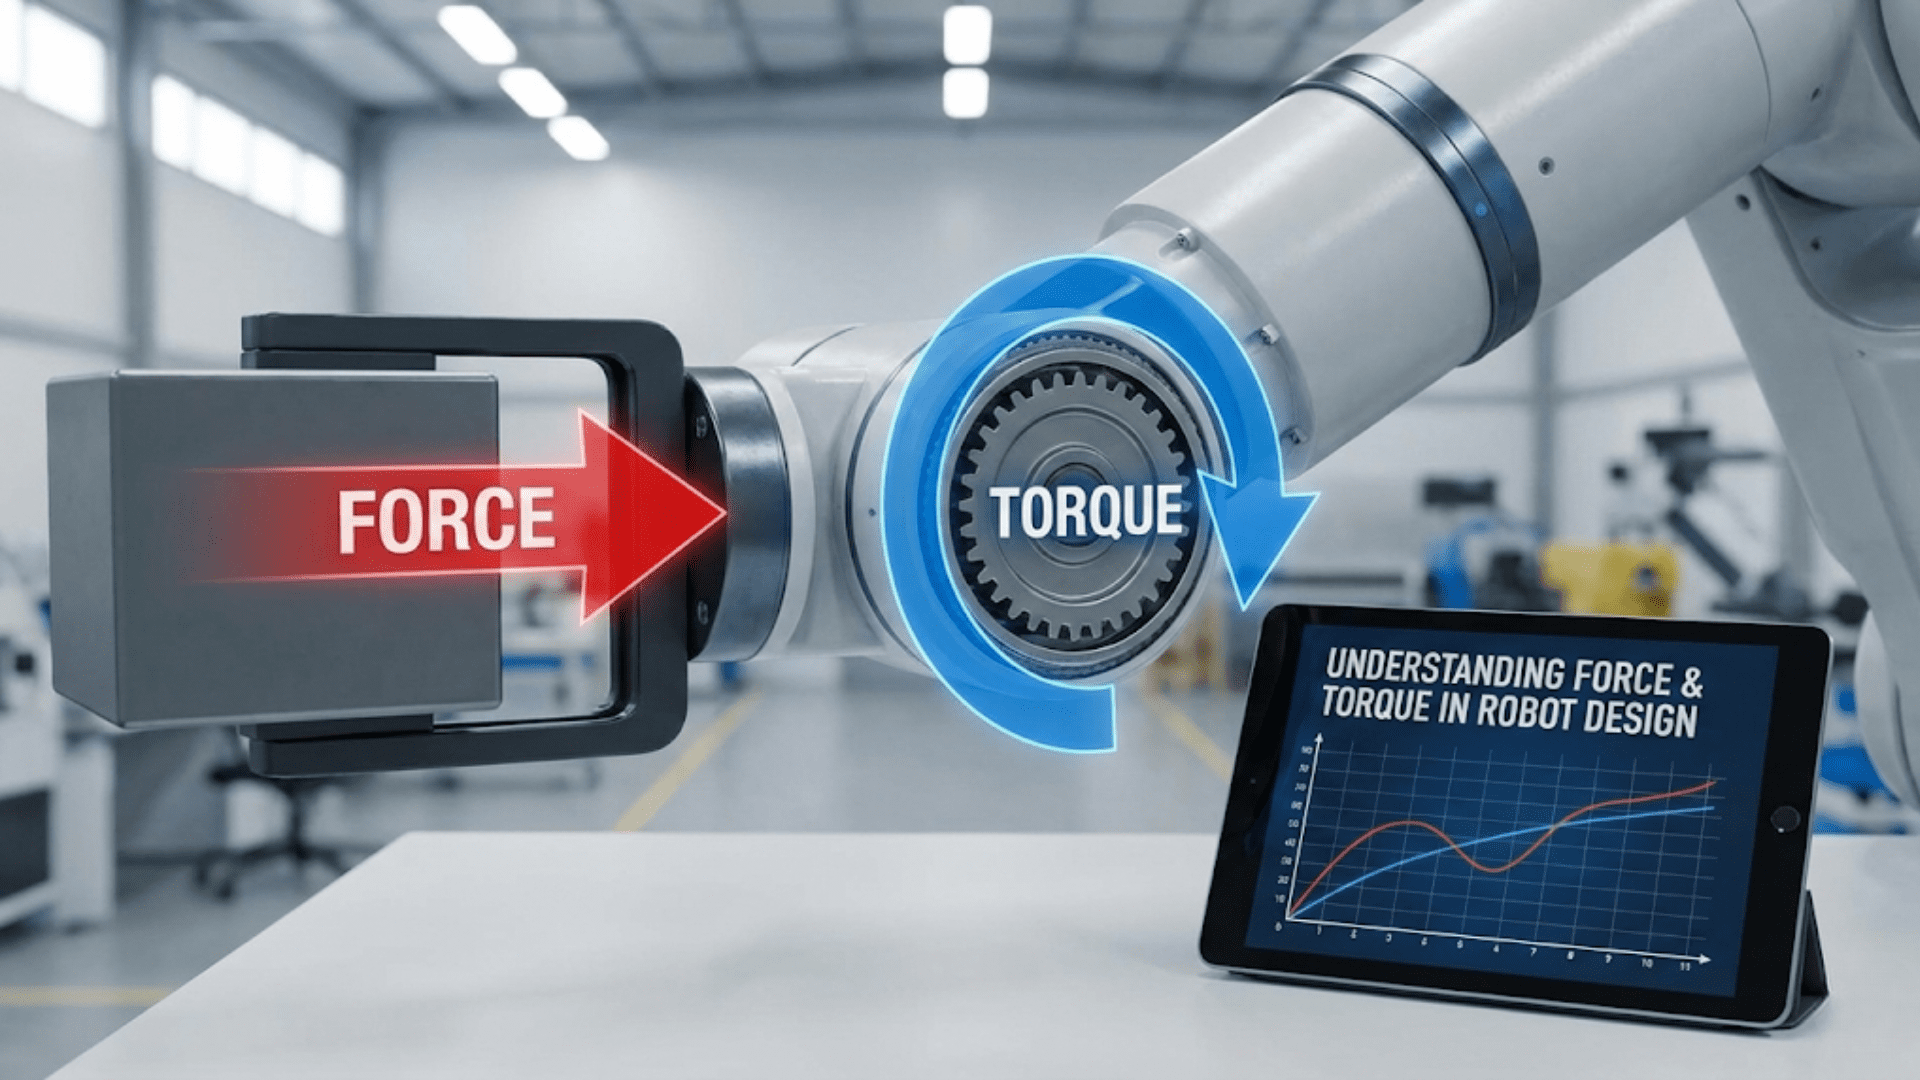
Layer adhesion — the strength of the bond between successive layers in an FDM print — is arguably the most important quality parameter in 3D printing. It determines how strong your prints are in the Z direction, how watertight they are, how well they survive thermal cycling, and how their surface appears.
How Layer Adhesion Works
In FDM printing, each layer is deposited on top of the previous one. As the new layer of molten plastic is laid down, it partially remelts the surface of the layer below. This partial remelting creates a fusion zone between layers — the mechanism by which successive layers bond together.
The strength of this bond depends on several factors that you directly control through your slicer settings and hardware configuration:
Print temperature: Higher temperatures produce more fluid plastic that flows better and penetrates the previous layer’s surface more deeply, creating stronger bonds. Lower temperatures produce stiffer plastic that sits more on the surface with less penetration. This is why temperature has such a profound effect on layer adhesion — it’s directly controlling the physical mechanism of bonding.
Print speed: Faster print speeds mean the nozzle spends less time over each point on the print, depositing slightly less heat per unit area. Very high speeds can reduce layer adhesion because the newly deposited material has less time to fuse with the layer below before moving on.
Layer height: Thinner layers create more surface area of contact between layers (because there are more layers over the same height), and each layer overlaps the layer below by a higher percentage of its total height. Both effects improve adhesion. However, the effect isn’t linear — extremely thin layers don’t continue to improve adhesion indefinitely, and the diminishing returns kick in relatively quickly.
Cooling: Cooling fans dramatically affect layer adhesion. Rapid cooling solidifies each layer quickly — great for dimensional accuracy and preventing warping, but it means the layer hardens before the next layer fully melts it and creates a strong bond. This is the fundamental tension in FDM cooling: more cooling improves dimensional accuracy and surface quality of overhangs, while less cooling improves layer bonding strength. For structural parts, less cooling (or no cooling) is often better. For surface quality, more cooling is better.
Material: Different materials have very different layer adhesion characteristics. ABS, PETG, and Nylon typically produce stronger interlaminar bonds than PLA because they flow more readily and have better adhesion characteristics. PLA can produce good bonding at appropriate temperatures but is more sensitive to temperature variation.
Seeing Layer Adhesion on a Coaster
A coaster is an ideal diagnostic object for layer adhesion because it’s a flat object you can flex, press, and examine closely.
Test 1: Flex test Hold the coaster between both hands near its edges and apply gentle bending force — try to flex it slightly. A well-bonded coaster will feel rigid and return to flat immediately. A poorly bonded coaster may feel slightly springy, or you may hear faint cracking sounds as adhesion-deficient layer boundaries separate microscopically. A very poorly bonded coaster will visibly separate into distinct layers under this flex.
Test 2: Edge inspection Look at the edge of the coaster. In a well-printed coaster, individual layer lines are visible but the layers appear fused — you can see the layer structure but there are no visible gaps between layers. In a poorly bonded coaster, you can see distinct separation between layers — the spaces between them are visible as thin lines or gaps.
Test 3: Drop test Drop the coaster from desk height onto a hard surface (this is admittedly destructive, but it’s informative). A well-bonded coaster survives with no damage. A poorly bonded coaster may delaminate or chip at the edges where layers are not well fused.
Optimizing Layer Adhesion for Coasters
For a coaster that will be used with hot beverages, layer adhesion is genuinely important — the thermal cycling from repeated hot and cold exposure can stress weak layer bonds over time.
To maximize layer adhesion in your coasters:
- Print at the warmer end of your filament’s recommended temperature range (for PLA: 210–215°C rather than 200–205°C)
- Reduce cooling to 60–80% rather than 100%
- Use a moderate print speed (40–50 mm/s) rather than maximum speed
- Use 4–5 perimeters so the outer walls have maximum fusion depth
- Use 5–6 top and bottom layers
The tradeoff you’re making is slightly reduced dimensional sharpness (warmer, less-cooled plastic flows a little more and produces slightly less crisp features) for stronger layer bonds. For a coaster, this tradeoff is almost always worth it — coasters are flat objects with no fine features that require dimensional precision.
Understanding Infill: The Hidden Architecture of Every Print
Infill is the internal structure printed inside the outer walls of an FDM object. It fills the space between the outer perimeters and the top and bottom solid layers, providing structural support and preventing the top surface from collapsing. Understanding infill deeply — not just as a percentage setting but as a physical structure with specific mechanical properties — is one of the most important things a 3D printing beginner can learn.
What Infill Is and Why It Exists
In theory, every 3D print could be printed completely solid — 100% infill everywhere. In practice, this would be extremely slow, use enormous amounts of material, and produce prints that are heavier and often not significantly stronger than well-designed partial-infill prints for most applications.
Infill was developed as a way to provide internal structural support using significantly less material than solid printing. By printing a geometric pattern of lines or structures inside the outer walls, the infill creates a lattice that:
- Supports the top solid layers so they don’t sag into the hollow interior
- Provides some structural strength in the Z direction
- Allows the printer to print faster and use less material than full solid printing
- Can be tuned to different strength and flexibility properties depending on the pattern and density
Infill Percentage: What It Really Means
Infill percentage is the ratio of solid material to empty space inside the print. 0% infill means completely hollow (just outer walls). 100% infill means completely solid. Most prints use somewhere between 15% and 40% infill for typical applications.
For a coaster, the infill percentage has two distinct effects that are worth understanding separately:
Structural effect: Higher infill makes the coaster more rigid and resistant to flexing. For a coaster, moderate infill (20–30%) is typically adequate for structural purposes — a coaster doesn’t bear significant loads.
Visual effect on top surface: This is where coasters become such an excellent infill teacher. The top surface of a coaster is supported by the infill structure below it. If the infill is too sparse (very low percentage) or if there aren’t enough top layers to “bridge” the infill structure completely, the infill pattern becomes visible as a subtle texture on the top surface.
At very low infill (5–10%), the top surface may show a clear imprint of the infill pattern — the lines or cells of the infill structure ghosting through the top layers. This happens because each top layer must bridge the gaps in the infill structure, and with very sparse infill, those gaps are too wide for clean bridging, leaving slight depressions where the top layer drooped between infill lines.
At moderate infill (20–25%), the top surface usually looks clean with adequate top layers (4–5) because the infill structure is dense enough to support the top layers without visible sagging between lines.
At high infill (40%+), the top surface looks even cleaner, but the benefit over moderate infill in terms of visual quality is usually minimal — the diminishing returns kick in.
Infill Patterns: A Visual Guide
Different infill patterns have different mechanical properties, print times, and visual characteristics. For coasters, the pattern choice primarily affects the visual appearance if it ghosts through the top surface (important at lower infill percentages) and the print time.
| Infill Pattern | Visual Character | Strength | Print Speed | Best For Coasters |
|---|---|---|---|---|
| Lines | Parallel straight lines | Good in one direction | Very fast | Good for fast prints, low visual ghost |
| Grid | Perpendicular crossing lines | Good in X and Y | Fast | Good general choice for coasters |
| Triangles | Triangular cells | Good isotropic | Moderate | Good structural choice |
| Honeycomb | Hexagonal cells | Excellent isotropic | Moderate | Beautiful if it ghosts through |
| Gyroid | 3D wave structure | Excellent all directions | Moderate-slow | Excellent quality, no directionality |
| Concentric | Follows outer contour | Good near walls | Fast | Interesting visual effect on top surface |
| Lightning | Minimal tree branches | Poor (decorative support only) | Very fast | Not recommended for coasters |
| Cross | Cross-linked pattern | Moderate | Moderate | Acceptable |
For coasters specifically: Grid and Gyroid are the recommended choices. Grid is fast and produces a predictable, clean top surface. Gyroid produces excellent structural integrity in all directions and, if it ghosts slightly through the top surface, creates an interesting subtle wave texture rather than an obvious grid pattern.
The Infill Ghost Effect: Making It Work For You
The infill ghost — the subtle impression of the infill pattern visible on the top surface — is usually considered a quality defect. But with the right approach, it can actually become a deliberate design element.
At low infill percentages (10–15%) with concentric or honeycomb infill, the pattern creates a visible geometric texture on the top surface that can look like an intentional design choice. This “ghost infill aesthetic” is actually quite attractive in coasters — the geometric pattern on the surface looks almost like a pressed or embossed design, reminiscent of artisanal ceramic coasters with surface texture.
To intentionally use the ghost effect:
- Set infill to 12–18%
- Use honeycomb or concentric infill
- Reduce top layers to 2–3 (just enough to close the surface but thin enough to transmit the ghost)
- Print at slightly lower temperature for crisper feature definition
- Use a flat, smooth top surface design (no embossed features) to let the infill pattern be the sole surface decoration
The result is a coaster that looks deliberately textured — not a failed solid surface, but an intended geometric texture — that can be genuinely attractive and unique.
Coaster Design Categories
Before diving into settings and materials, let’s survey the landscape of coaster design options. The variety is much richer than the basic flat disc implies.
1. Simple Geometric Designs
Flat round, square, or hexagonal coasters with no surface decoration. These are the baseline coaster — functional, neutral, and the ideal design for testing settings and material options because they eliminate design variables, leaving only print parameters to evaluate.
Best for: Learning experiments, printing in unusual colors or materials where the material itself is the aesthetic, and situations where a clean, neutral coaster fits the decor best.
2. Embossed Pattern Designs
Coasters with decorative geometric patterns raised from the surface — mandalas, Celtic knotwork, concentric geometric shapes, honeycomb grids, radial patterns, and similar designs. The raised pattern creates both visual interest and tactile texture.
Best for: Decorative display, gifts, dining table settings where the coasters are part of the table aesthetic.
Printing note: Embossed patterns require adequate top layers to cleanly support the base of the raised features. Use 5–6 top layers for best results.
3. City Map and Topographic Coasters
Coasters that use geographic data to create surface relief — city street grids as raised lines, topographic contour lines as relief layers, ocean depth charts. These are printable from publicly available geographic data converted to STL format through specialized tools.
Best for: Gifts for people with a connection to a specific place, conversation pieces, geography enthusiasts.
4. Logo and Image Coasters
Coasters with raised or recessed versions of logos, silhouettes, or other graphic images. For personal home use, coasters with favorite sports team logos, band logos, or personal emblems are popular. Be mindful of copyright when printing or distributing logo-based designs.
Best for: Fan communities, themed home bars, personalized gifts.
5. Text and Quote Coasters
Coasters with text — names, dates, quotes, or phrases — embossed or debossed into the surface. “No coasters, no coffee” is a classic example. Custom text coasters make meaningful personalized gifts and functional souvenirs.
Best for: Gifts, weddings and events (custom date coasters), home bar personalization.
6. Interlocking and Modular Coasters
Sets of coasters designed to interlock or nest together when stacked, or modular coasters made of smaller tiles that assemble into a larger surface. These require slightly more precision in printing (the interlocking features must fit correctly) but create satisfying tactile interactions and storage elegance.
Best for: Dining tables where a set of coasters is displayed together, people who appreciate modular design.
7. Cork-Base Coasters
While purely printed coasters work well, many makers combine a thin printed top layer with an adhesive cork backing (thin cork sheets are inexpensive and widely available online). The cork provides superior non-slip performance and insulation, while the printed top carries the decorative design. This combination often outperforms either material alone.
Best for: Any application where non-slip performance is important, situations where the coaster will hold very hot beverages (cork insulates better than plastic alone).
The Heat Resistance Question: Which Material for Coasters?
This is the most important material question for coasters, and it deserves a thorough answer because beginners often discover the answer the hard way — by watching their PLA coasters deform under a hot mug.
Why Heat Resistance Matters for Coasters
Coasters sit under cups and glasses. The relevant temperatures are:
- Cold drinks: Not a thermal concern for plastic coasters
- Room temperature drinks: Not a concern
- Hot coffee or tea in a ceramic mug: The base temperature of a freshly filled ceramic mug can reach 60–80°C depending on the beverage temperature and mug material
- Freshly boiled water: Up to 100°C at contact, though by the time it reaches a coaster through a mug, it’s usually 60–75°C
- Espresso cups: Small volume but very hot — the bottom of an espresso cup can reach 70–80°C
PLA’s Problem with Heat
PLA’s glass transition temperature — the temperature at which it begins to soften and lose rigidity — is approximately 60°C. This means that a very hot mug placed directly on a PLA coaster can potentially cause the coaster to:
- Soften slightly and deform over time
- Develop permanent impressions from repeated hot mug contact
- Warp and lose its flat shape
- In extreme cases, bond slightly to the mug base and pull free from the surface
For cold drinks, PLA works perfectly. For room-temperature drinks, PLA works fine. For regularly hot beverages, PLA is marginal — it might be acceptable, or it might deform gradually depending on how hot the drink is, how often the coaster is used, and the ambient temperature.
Better Material Options for Hot Beverage Coasters
| Material | Glass Transition Temp | Heat Resistance | Difficulty to Print |
|---|---|---|---|
| Standard PLA | ~60°C | Marginal for hot drinks | Easy |
| PLA+ | ~65°C | Marginally better than PLA | Easy |
| PETG | ~80°C | Good for most hot beverages | Moderate |
| ABS | ~105°C | Excellent | Difficult (needs enclosure) |
| ASA | ~100°C | Excellent | Moderate-difficult |
| PC (Polycarbonate) | ~150°C | Outstanding | Very difficult |
| High-Temp PLA | ~90–100°C | Very good | Easy-moderate |
The practical recommendation:
For cold drinks only: PLA is perfectly suitable and the easiest to print.
For a mix of hot and cold beverages: PETG is the right choice. It prints nearly as easily as PLA, has significantly better heat resistance (glass transition around 80°C — comfortably above the typical mug temperature), better moisture resistance (relevant because coasters get wet), and better toughness.
For consistently very hot beverages or maximum durability: ABS or ASA provide the best heat resistance among widely available filaments. Both require higher print temperatures and ABS specifically benefits from an enclosure to prevent warping during printing. For most home users, PETG provides sufficient heat resistance without these complications.
High-Temp PLA: Some manufacturers now offer “High Temp PLA” formulations with glass transition temperatures in the 90–100°C range. These print like standard PLA (similar temperature, no enclosure needed) but with significantly better heat resistance. If you want hot-drink-capable coasters with PLA-level printing ease, this is worth investigating.
Adding Non-Slip Backing
A coaster that slides around every time a glass is set on it or lifted is annoying. Adding non-slip backing to your printed coasters solves this problem simply and inexpensively.
Option 1: Adhesive Felt Pads
Self-adhesive felt pads (available in various sizes at hardware stores and online) are the simplest solution. Apply them to the corners or center-bottom of the coaster. They prevent sliding and also protect the surface the coaster sits on from scratches from the printed edge.
Best for: Smooth surfaces (glass tables, lacquered wood, countertops)
Option 2: Silicone Dots or Pads
Adhesive silicone bumper dots provide better grip than felt on most surfaces, especially when the coaster is wet. These are also widely available in small adhesive discs.
Best for: Situations where the coaster may be wet (near sinks, outdoor use), polished stone surfaces where felt doesn’t grip well
Option 3: Printed Silicone-Grip Insets
Some coaster designs include recesses on the bottom face into which small silicone pads can be pressed. This creates a more integrated solution than adhesive pads.
Option 4: TPU Bottom Layer (Multi-Material)
For printers with multi-material capability, printing the bottom layer or bottom section of the coaster in TPU (flexible filament) creates a built-in non-slip surface. The TPU grips surfaces naturally due to its rubber-like properties. This requires either a multi-material printer or manual filament change at the appropriate layer.
Option 5: Cork Backing
As mentioned in the design section, adhesive cork sheet (thin cork available in rolls) can be cut to shape and adhered to the bottom of the coaster. Cork provides excellent non-slip performance, good thermal insulation, and a natural aesthetic that complements many coaster designs.
Slicer Settings for Coasters
Coasters have specific requirements that make them an ideal settings workshop. Here are two settings approaches: one optimized for maximum surface quality, and one for the intentional infill ghost effect.
Settings for Maximum Surface Quality
| Setting | Recommended Value | Notes |
|---|---|---|
| Layer Height | 0.15mm | Finer layers = smoother top surface |
| Print Speed | 40–50 mm/s | Moderate for clean top surface |
| Top Surface Speed | 25–30 mm/s | Slower top surface for better quality |
| Perimeters/Walls | 4 | Good closure and rigidity |
| Infill | 20–25% | Grid or Gyroid pattern |
| Top Layers | 5–6 | Critical for hiding infill ghost |
| Bottom Layers | 4–5 | Solid clean base |
| Support | None | Flat coasters never need supports |
| Bed Adhesion | Brim (5mm) | Helps prevent corner lifting |
| Ironing | Enabled | Post-process top surface for smoothness |
| Hotend Temp (PLA) | 210°C | Slightly warm for layer adhesion |
| Hotend Temp (PETG) | 235°C | Standard PETG range |
| Cooling | 80% | Balance quality and layer adhesion |
| Seam Position | Sharpest Corner / Back | Hide seam on visible face |
Settings for Intentional Infill Ghost Effect
| Setting | Recommended Value | Notes |
|---|---|---|
| Layer Height | 0.2mm | Standard |
| Print Speed | 45 mm/s | Standard |
| Perimeters/Walls | 3 | Adequate for coaster strength |
| Infill | 12–18% | Low enough for ghost to appear |
| Infill Pattern | Honeycomb or Concentric | Patterns that look attractive as ghosts |
| Top Layers | 2–3 | Thin enough to transmit the ghost |
| Bottom Layers | 4 | Solid base |
| Cooling | 100% | Clean definition of infill lines |
Ironing: The Coaster Surface Revolution
Ironing (available in Cura and PrusaSlicer) is a post-processing step that dramatically improves the quality of flat top surfaces. After the last top layer is deposited normally, the nozzle makes an additional pass over the top surface with no extrusion (or minimal extrusion) at slightly reduced speed, essentially ironing out any surface irregularities with the heat of the nozzle tip.
The result is a top surface that’s noticeably smoother — almost polished — compared to a non-ironed surface. For coasters, where the top surface is the most visible and tactile part of the object, ironing can transform a good-looking coaster into a genuinely impressive one.
Ironing adds print time (typically 10–20% for flat objects like coasters) but for a decorative object that will be displayed and used daily, the time is worth it.
Ironing settings:
- Flow rate: 10–15% (minimal material deposition — you’re smoothing, not filling)
- Speed: 15–20 mm/s (slow pass for maximum smoothness)
- Line spacing: 0.1–0.15mm (fine spacing for thorough coverage)
Step-by-Step: Printing a Decorative Coaster Set
Let’s walk through printing a set of four matching decorative coasters — a practical project that uses everything covered in this guide.
Step 1: Choose Your Design
Navigate to Printables.com and search “coaster.” Filter by “Most Downloaded.” Look for:
- A design available as a set of 4 (many coaster designs come in sets)
- An attractive surface pattern (mandala, geometric, city map — whatever appeals to you)
- User photos showing the finished coasters in use
- A design with appropriate dimensions (90–100mm diameter or square is standard for drink coasters)
Download the STL files.
Step 2: Import and Arrange in Slicer
Import all four coasters into your slicer simultaneously. Arrange them on the build plate with 8–10mm spacing between them. Four standard-sized coasters should fit comfortably on most 220mm × 220mm build plates.
Step 3: Check Orientation
Coasters should print flat-face-down if the decorative pattern is on the top. In this orientation, the bottom of the coaster faces the bed, and the decorative top surface is printed last. This is the correct orientation for most designs. If the decorative surface is on the bottom (some designs have the pattern on the underside), you may need to flip the model.
Step 4: Apply Settings
Apply the maximum surface quality settings:
- Layer height: 0.15mm
- 4 perimeters
- 22% Gyroid infill
- 6 top layers, 5 bottom layers
- Enable ironing on top surfaces
- 5mm brim
- Temperature: 210°C hotend (for PLA) / 235°C (for PETG)
- Cooling: 80%
- Seam position: Sharpest corner
Step 5: Preview and Validate
In the layer preview, check:
- Top surface preview shows clean, complete coverage with no infill visible
- Ironing pass visible as additional fine lines on the last few layers
- Brim correctly applied around all four coasters
- No support structures incorrectly generated
Check the estimated print time. A set of four coasters at 0.15mm layer height with ironing typically takes 3–5 hours.
Step 6: Print and Monitor
Start the print and watch the first layer carefully across all four coasters. Each coaster should have an even, slightly squished first layer with no gaps or lifting.
As the print progresses, periodically check that the top surfaces are building up cleanly. At the transition to the solid top layers, the surface appearance should improve noticeably — any infill ghost should disappear under 5–6 solid layers.
Step 7: Post-Processing
Once printed and cooled, remove coasters and brims. Inspect the top surface — ironed surfaces should be noticeably smoother than non-ironed prints.
Apply your chosen non-slip backing (felt pads, silicone dots, or cork sheet cut to shape).
Optionally, sand any rough edges or brim remnants with 220-grit sandpaper for a refined edge finish.
Step 8: Test
Place a cold glass on one coaster and a hot mug on another. Verify that cold drinks don’t cause condensation to pool (a well-sealed surface sheds water rather than absorbing it). Verify that hot beverages don’t cause visible softening or deformation (particularly important if printing in PLA — if softening occurs, reprint in PETG).
What Your Coaster Reveals: Diagnostic Checklist
Use this checklist to diagnose what your printed coaster is telling you about your printer settings:
Top surface shows infill pattern clearly:
- Too few top layers — increase to 5–6
- Infill too sparse — increase to 20–25%
- Or intentionally using ghost effect at 12–18%
Top surface is rough or uneven:
- Reduce print speed for top layers (Cura: “Top/Bottom Speed”)
- Enable ironing
- Increase temperature slightly for better flow
- Increase cooling slightly for better layer solidification
Layers visible as distinct lines on edge:
- Normal FDM appearance — reduce layer height to 0.15mm for finer lines
- For smooth edge appearance, sand edge with 220–400 grit
Corner lifting or warping:
- Increase brim width to 8–10mm
- Increase bed temperature by 5°C
- Ensure bed surface is clean and properly prepared
- Print PETG (warps less than PLA in some conditions)
Coaster deforms under hot mug:
- Switch to PETG, High-Temp PLA, or ASA
- The coaster is in PLA which is too close to its glass transition temperature
Layers separating when coaster is flexed:
- Increase print temperature by 5–10°C
- Reduce cooling to 70–80%
- Reduce print speed slightly
- Check for moisture-absorbed filament (dry your spool before printing)
Seam visible on top surface:
- Adjust seam position to “Sharpest Corner” in slicer settings
- Enable ironing which partially smooths the seam area
Creative Coaster Projects Worth Exploring
Seasonal Coaster Sets
Print four-piece sets for different seasons or holidays — holiday snowflake patterns for winter, botanical leaf designs for spring, tropical motifs for summer, harvest themes for fall. Rotate them with the seasons for a constantly fresh table setting.
Photo-Topographic Coasters
Using free online tools like heightmap.skyscraper.city (for topographic data) or other terrain-to-STL converters, you can create coasters that are topographic representations of specific places — your hometown, a favorite hiking area, a mountain you’ve climbed. These make extraordinary personalized gifts.
Wedding and Event Coasters
Custom coasters for weddings, anniversaries, milestone birthdays, or corporate events. Print the event name, date, and a relevant motif. These make distinctive, memorable favors that are more substantial and lasting than typical paper coasters.
Color-Changing Filament Coasters
Thermochromic filament (available from specialty suppliers) changes color with temperature. A coaster in thermochromic filament that changes from blue to white when a cold drink is placed on it, or from yellow to orange when a hot mug lands on it, is genuinely magical and conversation-starting. Note that thermochromic filaments are typically PLA-based and have the same heat resistance limitations as standard PLA.
Glow-in-the-Dark Coasters
Glow-in-the-dark PLA produces coasters that absorb light during the day and emit a faint glow at night. Ideal for nightstand or bar cart coasters where you want to find your drink in a dark room.
Coaster Holder Stand
Print a matching coaster holder stand to store your set vertically when not in use. A common design is a small tower or tray that holds 4–6 coasters in a neat stack. This completes the set from functional object to complete desk or table accessory.
Conclusion: The Coaster as Teacher
The coaster is patient. It sits on your coffee table all day, receiving drinks and displaying its surface to anyone who cares to look. And if you’ve printed it thoughtfully — if you’ve chosen the right settings, the right material, the right design — it rewards that thoughtfulness by looking genuinely beautiful, performing reliably under hot and cold conditions, and lasting for years.
But the coaster also teaches. Its flat, open top surface is the most honest display in 3D printing of what your slicer settings actually do. The infill ghost tells you about top layer coverage. The surface texture tells you about temperature and cooling balance. The edge lines tell you about layer height. The seam tells you about seam placement settings. The flex strength tells you about layer adhesion.
Print coasters. Use them. Look at them carefully. Adjust your settings based on what you see. Print more. This iterative process — making, observing, adjusting, remaking — is not just how you learn to print coasters. It’s how you learn to print everything.
And when someone picks up their coffee cup from your custom-printed mandala coaster and asks where you got it, you’ll get to explain what 3D printing can do in the most concrete, tangible, beautiful possible terms.
That’s a good conversation to be able to have.