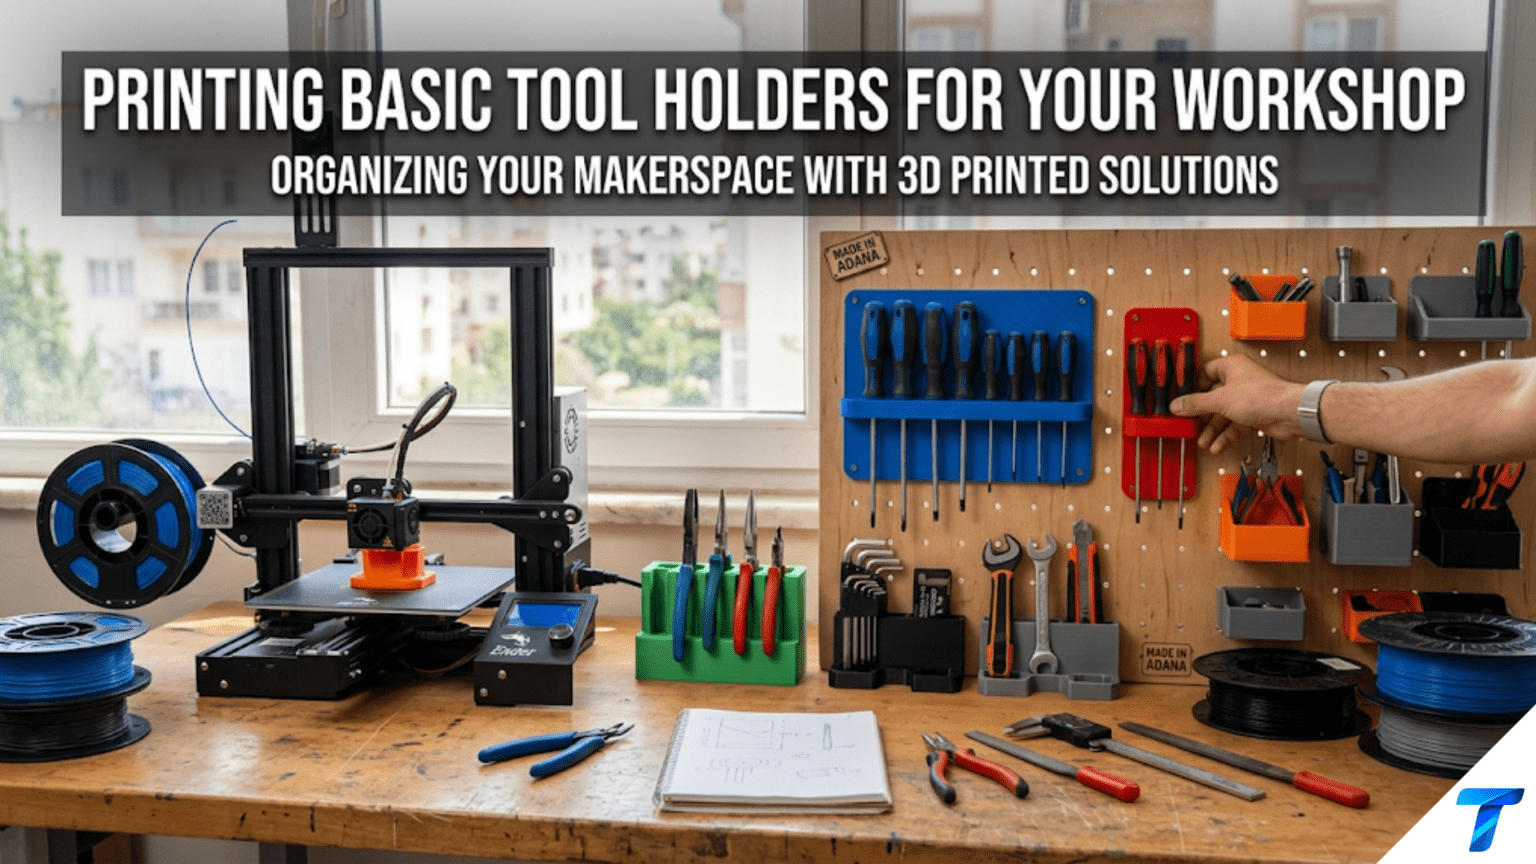
3D printed tool holders are custom-designed mounts, hooks, clips, and cradles that organize hand tools, power tool accessories, and workshop supplies on pegboards, walls, shelves, and workbenches. They are among the most genuinely transformative workshop projects a beginner can print because commercial tool storage solutions are designed for generic tools, while printed holders can be sized and shaped for your specific tools — eliminating wasted space, improving accessibility, and creating a workshop where every tool has a dedicated, immediately accessible home.
Introduction: The Workshop Organization Problem
Walk into an unorganized workshop and you’ll immediately feel the cognitive weight of disorder. Tools pile on the workbench because there’s nowhere specific to put them. The drill bit you need is somewhere in a pile of other bits. The screwdriver that fits this particular screw is on the wrong side of the bench, or possibly in a different room. The measuring tape is looped around a random nail.
This disorder has a real cost — not just in the frustration of searching for tools, but in the time it takes, the workflow interruptions it causes, and the quiet cognitive overhead of never quite knowing where anything is. Professional tradespeople and experienced hobbyists understand this viscerally, which is why the organization of tool storage is taken seriously in professional workshop culture.
3D printing offers a genuinely remarkable solution to the workshop organization problem — not because it does anything a commercial solution can’t do in principle, but because it does what commercial solutions can’t do in practice: fit perfectly.
Commercial tool holders, pegboard hooks, and wall mounts are designed for hypothetical average tools. Your screwdriver handle is a specific diameter. Your particular combination square has a specific width and profile. Your collection of hex keys has a specific range of sizes. Commercial solutions approximate these dimensions; printed solutions match them exactly.
A printed holder that grips a specific tool precisely, holds it at the exact angle for fastest retrieval, mounts where you actually need it on your specific pegboard layout, and accommodates the exact combination of tools you actually own — this is a fundamentally better storage solution than anything you can buy, and your printer can produce it.
This guide covers everything you need to know about printing workshop tool holders: the major categories of workshop storage problems and their printed solutions, design considerations specific to workshop environments, material selection for workshop conditions, slicer settings for strong functional parts, safety considerations for powered tool storage, and a comprehensive range of specific tool holder projects worth building.
The Workshop Environment: Special Considerations
Before designing or printing any workshop tool holder, it’s important to understand that the workshop environment presents specific challenges that distinguish it from household printing applications.
Temperature Extremes
Workshops — particularly uninsulated garages, garden sheds, and detached shop buildings — can experience significant temperature variation. In many climates, a garage workshop sees temperatures from below freezing in winter to over 40°C (104°F) in summer. Parked cars and direct sunlight can push interior temperatures even higher.
PLA’s problem: PLA begins to soften at approximately 60°C and loses structural integrity at temperatures approaching its glass transition temperature. In a closed garage on a hot summer day, surfaces in direct sunlight can exceed 60°C. PLA tool holders in these conditions can warp, lose grip, or drop tools.
The solution: Use PETG or ASA for any workshop tool holder that might experience elevated temperatures. PETG is resistant to temperatures up to approximately 80°C. ASA handles up to approximately 100°C and additionally resists UV degradation — important for workshop settings with exposure to sunlight through windows or open doors.
For fully climate-controlled workshops that never exceed 30–35°C, PLA is acceptable for most holders. When in doubt, use PETG — it prints nearly as easily as PLA and provides meaningful performance advantages in workshop conditions.
Vibration and Impact
Power tools create vibration, dropped tools create impact loads, and the general working environment of a shop involves more physical stress than a home office or kitchen. Tool holders need to resist:
- Vibration: Holders near operating machinery should resist loosening or rattling. Add a friction element (rubber pad, foam lining) or design snap-fit retention for tools in high-vibration areas.
- Impact: A hammer falling from a holder can exert significant impact force on the holder itself. Design holders with adequate cross-sectional area at stress points.
- Cyclic loading: Tools that are inserted and removed many times per day stress the holder’s elastic properties. PETG’s better fatigue resistance makes it preferable to PLA for high-cycle holders.
Oil, Solvents, and Chemicals
Workshops use lubricating oils, cutting fluids, paint thinner, acetone, and other chemicals. Some of these attack specific filaments:
- Acetone: Severely attacks ABS; leaves PLA and PETG largely unaffected
- Oils and lubricants: Generally compatible with both PLA and PETG
- Isopropyl alcohol: Compatible with PLA and PETG at normal concentrations
- Paint thinner and mineral spirits: Test before committing; generally compatible but prolonged exposure can cause surface degradation
For holders that will regularly contact chemicals, PETG is the more chemically resistant choice compared to PLA.
Load Requirements
Workshop tools are often heavier than household items. A set of socket wrenches, a collection of chisels, a row of hammers — these loads exceed what a bedside table organizer or desk pen holder experiences. Design accordingly:
- More perimeters (4–5) for all holders bearing significant loads
- Higher infill (30–50%) for load-bearing mounting sections
- Larger cross-sections at stress concentration points
- Secure mounting with multiple screws rather than single-point adhesive
Major Categories of Workshop Tool Holders
1. Pegboard Holders
Pegboard (also called perforated hardboard or peg board) is one of the most common workshop wall systems — a panel with regularly spaced holes (standard spacing is 25.4mm / 1 inch in North America) into which hooks and accessories insert.
The 3D printing community has embraced pegboard as the ideal framework for printed organization because:
- The standardized hole pattern creates a universal mounting interface
- Holders can be repositioned without tools by simply removing them from one location and inserting in another
- The community has produced thousands of pegboard-compatible designs for virtually every tool
Standard pegboard specifications:
- Hole diameter: approximately 6.35mm (¼ inch)
- Hole spacing: 25.4mm (1 inch) center-to-center
- Standard peg diameter for printed accessories: 5.8–6.0mm (allowing clearance in the hole)
- Peg length: 15–25mm (enough to pass through the board and provide adequate retention)
Types of pegboard holders worth printing:
Single tool hooks: A peg that inserts into the pegboard with a hook at the front for hanging a single tool. These are the simplest possible pegboard accessory — a printed version of the standard metal hook — but with the advantage of being the exact right size and shape for a specific tool.
Multi-peg holder platforms: A flat plate with multiple pegs that inserts into a grid of pegboard holes, providing a larger mounting surface for a more substantial holder. These platforms can support holders designed for specific tool collections — a set of pliers, a row of chisels, a collection of allen keys.
Tool-specific cradles: Holders designed for a single specific tool type — the exact profile of a specific hammer handle, a holder that grips a specific wrench size, a cradle dimensioned for a particular angle grinder. These require measuring your tool and designing or finding a holder that matches those measurements.
Bin and tray attachments: Small open bins that mount on pegboard and hold small items — drill bits, grinding discs, sanding pads, hardware, consumables. These convert pegboard from tool hanging to small item storage.
Design tip for pegboard pegs: Print a single-peg test piece before committing to a larger holder design. Verify the peg diameter slides smoothly into your specific pegboard’s holes — hole diameters can vary slightly between manufacturers, and a peg that’s 0.2mm too thick won’t insert without forcing. Test first; adjust if needed.
2. Wall-Mounted Direct Holders
Not every workshop has pegboard. Many workshops use direct wall mounting — holders that attach directly to wall studs, OSB panels, plywood sheets, or drywall (with appropriate anchors).
Advantages over pegboard: Stronger mounting (screws into studs or plywood are stronger than pegboard peg connections), better for heavy tools, more flexible positioning (not constrained to pegboard hole spacing).
Disadvantages: Less easily repositioned, requires more commitment to a specific layout.
Design specifications for wall-mounted holders:
- Mounting plate should be at least 5–6mm thick for adequate screw engagement
- Use at least 2 screws per holder for any holder bearing significant weight
- Screw holes should have at least 5mm of material between hole edge and holder edge
- Counter-sink holes are aesthetically cleaner — allow flat-head screws to sit flush
Common wall-mounted holder types:
- Horizontal rod or blade holders (for saws, levels, squares)
- Hammer row holders (angled slots that accept hammer handles)
- Screwdriver rack (row of cylindrical holders at different depths for different screwdriver lengths)
- Level and long tool rails (horizontal channels that support long tools along their length)
3. Workbench-Top Holders and Organizers
Holders that sit on the workbench surface rather than mounting to a wall. These are more flexible (no installation required) but consume bench space, so they should be reserved for tools used most frequently during active work.
Types worth printing:
- Tool caddy (multi-compartment holder for the tools most used on a current project)
- Drill bit stand (angled row of holes for drill bits, organized by size)
- Screwdriver stand (vertical or angled cylinder rows)
- Chisel roll alternative (block with individual slots for chisel blades)
- Clamp storage block (holder that keeps clamps upright and accessible)
- Small parts organizer (bins for the fasteners, inserts, and small hardware needed for the current project)
4. Power Tool Accessory Holders
Power tools come with enormous collections of small accessories — drill bits, router bits, oscillating tool accessories, jigsaw blades, saw blades, grinding discs, sanding pads. These accessories are expensive, easy to lose, and often difficult to identify when mixed together.
Printed holders for power tool accessories are among the most valuable workshop prints because they solve a specific, annoying problem that commercial solutions address poorly:
Drill bit holders: Rows of angled holes sized to accept drill bit shanks, organized by size from smallest to largest. The angled presentation (typically 20–30° from vertical) makes selecting the right size bit easy and fast. Most drill bit sets follow standard sizing, so community designs exist for common sets (1/16″ to 1/2″ by 1/32″ steps, or 1mm to 10mm by 0.5mm steps).
Router bit storage: Router bits are fragile and expensive — storing them in contact with each other quickly dulls their edges. Printed storage blocks with individual holes for each bit, sized to grip the shank diameter, protect bits and keep them identifiable.
Hex key/Allen wrench holders: A fan-shaped or linear holder with slots for each hex key size in your set. The angular display makes selecting the right size instant rather than requiring sequential testing. Available in metric and imperial variants.
Screwdriver bit holders: For large collections of power screwdriver bits, a printed holder with individual slots for each bit type (Phillips, flathead, Torx, hex, in multiple sizes) enables instant identification and retrieval.
5. Measuring and Layout Tool Storage
Measuring tools — tapes, squares, levels, calipers, marking gauges — require careful storage to protect their accuracy. A square that gets banged around a drawer loses its squareness. Calipers stored without protection get scratched and inaccurate. Layout tools are particularly worth protecting with dedicated, well-designed holders.
Key measuring tool holders:
- Tape measure holder: A wall-mounted or pegboard-mounted cradle that holds one or more tape measures clipped to the wall. Quick release for use, positive retention for storage.
- Square holder: A wall mount that holds try squares, combination squares, or speed squares flat against the wall, blade facing outward for visibility and accessibility.
- Level rack: Horizontal holders that support levels along their length — essential for keeping levels from developing a warp that ruins their accuracy.
- Caliper holder: A protective horizontal cradle with a slot sized for the caliper body, keeping the caliper jaws clean and protected from contact with other tools.
Design Principles for Workshop Tool Holders
Measure Your Tools First
This seems obvious but is frequently skipped: before designing or choosing a holder, measure the relevant dimensions of your specific tool with calipers. The most important measurements are:
- Handle diameter (for hanging tools like hammers, mallets, screwdrivers)
- Blade or body width (for tools stored flat against the wall)
- Grip point dimensions (the section of the tool that the holder will contact)
- Weight (to determine whether the holder needs reinforcement)
Commercial tools nominally come in standard sizes, but actual dimensions vary by brand and model. Your specific 16oz framing hammer handle may be 32mm diameter at the grip, while another brand’s same-weight hammer might be 28mm. Measuring your actual tool gives you the most accurate holder design.
Design for Retrieval Motion, Not Just Storage
The best tool holder design anticipates the specific motion of retrieval — how will you grab the tool when you need it? A holder that stores a tool perfectly but requires two hands to retrieve it is worse than one that allows single-handed, motion-efficient retrieval.
Design considerations:
- Single-handed access: Can the tool be grabbed and removed with one hand while the other hand is busy?
- No-look retrieval: Can an experienced user retrieve the tool without looking at the holder? This comes with familiarity, but well-designed holders with consistent, predictable positions for each tool make it possible.
- Non-dominant hand friendly: Right-handed users often have their dominant hand holding a workpiece — the left hand grabs the next tool. Ensure tools are accessible to either hand.
Positive Retention vs. Easy Access: Finding the Balance
Every tool holder must balance two competing requirements: positive retention (the tool should stay in place during normal use and not fall out when not being actively held) and easy access (the tool should be retrievable quickly without effort).
For lightweight tools (pencils, small screwdrivers), gravity alone provides adequate retention — a simple loop or slot holds the tool against gravity and the tool comes out easily when lifted.
For heavier tools (hammers, large wrenches, power drill), more positive retention is needed — the holder should grip the tool or use friction/snap-fit elements to prevent accidental dislodging.
For vibration environments (near operating machinery), even light tools need some positive retention — vibration can walk a tool off a simple hook over time.
Design your retention mechanism based on the tool’s weight, the environment, and the frequency of access.
Accounting for Handle Ergonomics
Most tool handles are designed with ergonomic shapes — contoured grips, flared ends, textured surfaces — that complicate the geometry of a holder. A cylindrical holder designed for the average diameter of a handle may not account for the flared base of the handle that prevents insertion to the desired depth.
When designing or evaluating a holder for a specific tool, consider:
- Whether the handle has any protrusions that would prevent full insertion
- Whether the tool needs to enter the holder at a specific angle to clear ergonomic features
- Whether the holder depth needs to be adjusted to accommodate handle features while still holding the tool at the right height
Material Comparison Table for Workshop Holders
| Material | Heat Resistance | Chemical Resistance | Impact Resistance | Workshop Suitability |
|---|---|---|---|---|
| PLA | Poor (60°C) | Fair | Low | Acceptable for climate-controlled shops only |
| PETG | Good (80°C) | Good | Good | Recommended for most workshop applications |
| ASA | Excellent (100°C) | Excellent | Good | Best for uninsulated garages and outdoor workshops |
| ABS | Good (105°C) | Fair (attacked by acetone) | Moderate | Good heat resistance but acetone sensitivity is a concern |
| Nylon (PA) | Good (85°C) | Excellent | Excellent | Premium choice for heavy-duty holders; harder to print |
| TPU | Good (80°C) | Good | Excellent | For tool grips, cushioning inserts, anti-vibration elements |
| PETG-CF (carbon fiber filled) | Good | Good | Very good | Stiffer than standard PETG; good for precision holders |
The PETG Recommendation
For most home workshops and garage setups, PETG is the single best material for tool holders. It provides:
- Sufficient heat resistance for all but the most extreme workshop conditions
- Better chemical resistance than PLA
- Superior impact resistance compared to PLA (won’t crack when a heavy tool falls against the holder)
- Better layer adhesion and fatigue resistance for holders used many times daily
- Print characteristics nearly as accessible as PLA
The only situations where PETG isn’t the right choice are extreme heat environments (use ASA) or situations requiring maximum flexibility or grip (use TPU for cushioning elements).
Slicer Settings for Workshop Tool Holders
Workshop holders need to prioritize strength over aesthetics. These settings reflect that priority.
| Setting | Recommended Value | Notes |
|---|---|---|
| Layer Height | 0.2mm | Standard; adequate strength and speed |
| Print Speed | 40–50 mm/s | Moderate for good layer fusion |
| Perimeters/Walls | 4–5 | Critical for load-bearing holders |
| Infill | 30–50% | Higher for heavily loaded holders |
| Infill Pattern | Gyroid or Grid | Gyroid for isotropic strength |
| Top/Bottom Layers | 4–5 | Solid closure |
| Support | Only if needed | Minimize support contact with functional surfaces |
| Bed Adhesion | Brim (5–8mm) | Standard |
| Hotend Temp (PLA) | 215°C | Slightly warm for better layer fusion |
| Hotend Temp (PETG) | 235–245°C | Upper range for better adhesion |
| Cooling | 70–80% | Reduced cooling for better layer bonding |
| Seam Position | Back or hidden | Functional parts — hide seam |
Why Reduced Cooling for Workshop Parts
Workshop tool holders are functional parts where strength matters more than fine surface detail. Reducing the cooling fan speed to 70–80% (rather than 100%) allows each layer more time to fuse with the layer below, creating stronger interlaminar bonds. The tradeoff is slightly reduced surface smoothness and potentially slightly reduced dimensional accuracy — both acceptable in workshop applications where function dominates over form.
This cooling reduction is particularly important for PETG, which generally benefits from less aggressive cooling than PLA. PETG printed with 100% cooling often shows poor layer adhesion compared to the same material at 60–80% cooling.
Step-by-Step: Building a Complete Pegboard Tool Organization System
Let’s walk through the complete workflow for organizing a typical home workshop pegboard from planning through installation.
Step 1: Survey Your Tools
List every hand tool you want to organize on the pegboard. For each tool note:
- Tool name and type
- Key dimensions (handle diameter, blade width, weight)
- How frequently you use it (daily, weekly, occasionally)
- Any special storage requirements (sharp edges, fragile parts)
A typical home workshop might have: 3–4 hammers, 8–10 screwdrivers, 3–4 pliers and grips, 2–3 wrenches, 1–2 levels, 2–3 squares, measuring tape, marking tools, 1–2 utility knives, various specialty tools.
Step 2: Plan Your Pegboard Layout
Sketch your pegboard on paper (or in a free pegboard planning tool — several exist online). Position tools based on:
- Frequency: Most-used tools in the easiest-to-reach zones (approximately shoulder height, centered)
- Logic: Related tools grouped together (all measuring tools in one zone, all driving tools in another)
- Safety: Sharp tools (chisels, saws) positioned where they won’t be at eye level or easily bumped
- Size: Larger tools (levels, saws) at the edges or ends of rows; smaller tools more centrally positioned
This layout plan becomes your design specification — it tells you exactly what holders you need and where.
Step 3: Find or Design Each Holder
For each tool on your list, search Printables for a pegboard holder that fits it:
- Search “[tool name] pegboard holder” (e.g., “hammer pegboard holder,” “square pegboard holder”)
- Check that holder dimensions match your specific tool
- Note whether the holder uses 1-inch or metric pegboard spacing (match your board)
For tools where you can’t find a suitable design, design your own in Tinkercad:
- Create the holding element (hook, slot, cradle) sized to your measured tool dimensions
- Add a pegboard mounting plate with pegs at the correct spacing
- Export and test-print a single copy before printing multiples
Step 4: Print Systematically
Print holders in groups organized by tool type and filament. If printing all holders in PETG:
- Batch 1: Screwdriver holders (all similar geometry, batch print efficiently)
- Batch 2: Plier holders
- Batch 3: Hammer and mallet holders (larger, print fewer at once)
- Batch 4: Measuring tool holders
Test each holder with its tool before printing multiples. Verify fit, check retention, test retrieval motion.
Step 5: Apply the Workshop Settings
For all workshop holders, use the settings from the settings table:
- 5 perimeters
- 40% infill
- Gyroid pattern
- Reduced cooling (75%)
- PETG at 240°C
- Elevated bed temperature (80°C for PETG)
Step 6: Install and Evaluate
Mount holders on the pegboard per your layout plan. Insert tools. Stand back and evaluate:
- Can you reach every tool comfortably?
- Is the retrieval motion natural and efficient?
- Are any tools too close together (risk of knocking one off when reaching for adjacent tool)?
- Are there unused zones where additional holders could go?
Use the workshop for one week before making any changes. Real use reveals inefficiencies that theoretical planning misses.
Specific Tool Holder Projects Worth Building
Hammer and Mallet Row
A horizontal row of hanging slots spaced for hammer handles, mounted at a consistent height on pegboard or directly on the wall. Each slot holds one hammer at an angle that presents the head forward for immediate visibility of the type and weight.
Design specifications: Slot width = hammer handle diameter + 3mm clearance; slot depth = 40–50mm; angle from vertical = 15–20° to present hammer head forward. Space slots 80–100mm center-to-center to prevent handle congestion.
Screwdriver Magnetic Strip Mount
A holder that mounts to pegboard or wall and presents screwdrivers with handles forward, organized by type (Phillips, flathead, Torx) and size. The simplest version is a row of cylindrical slots. A more sophisticated version uses embedded small neodymium magnets in the back of each slot to add positive retention while still allowing easy removal.
Allen Key / Hex Key Fan Display
A fan-shaped holder where each arm holds one hex key size, displayed at slightly different angles so each key is individually accessible. The fan format allows quick size identification by visual scanning rather than sequential testing.
Design specifications: Fan arc spanning approximately 90–120°; arm spacing of 5–8mm center-to-center; hole diameter = hex key handle diameter + 0.5mm clearance; hole depth = 20–25mm.
Socket Set Organizer
A rail-type holder with positive-retention pegs for socket sockets, organized by size from smallest to largest. Proper socket organization is one of the most commonly appreciated workshop improvements — finding the 13mm socket when you need it without sorting through a pile of other sizes saves significant time over a year of regular use.
Design specifications: Socket retention pegs sized to the square drive (¼”, 3/8″, or ½” standard sizes); peg diameter slightly smaller than drive hole diameter for friction fit; row spacing adequate for the socket outer diameter + clearance.
Measuring Tape Wall Dock
A wall-mounted or pegboard-mounted holder that accepts a specific measuring tape, presenting the hook end forward for immediate access. The holder should use a friction grip or gentle snap that keeps the tape from pulling free accidentally but releases easily when the tape is grabbed intentionally.
Level Horizontal Rail
A long horizontal wall mount with two support points that cradles a 24″ or 48″ level horizontally against the wall. The supports must be angled correctly so the level sits securely without the risk of sliding out, and they must be spaced to avoid blocking the level’s vials for quick condition checks without removing the level.
Safety Considerations for Workshop Tool Holders
Workshop tool storage involves safety considerations that desk and household organization does not.
Sharp Tool Storage
Chisels, saw blades, craft knives, and other sharp tools require holders that:
- Keep the cutting edge away from casual contact
- Prevent the tool from falling with the sharp edge downward
- Allow safe retrieval without risk of cutting the retrieving hand
For chisel and knife storage, holders that present the handle outward (with the blade or cutting edge facing away from the user) provide the safest retrieval geometry. Blade guards or slots that cover the sharp edge add an additional safety layer.
Heavy Tool Retention
Heavy tools that fall from holders represent a significant injury risk, particularly if falling onto feet or hands. Ensure holders for heavy tools:
- Have verified mounting strength (test by loading the holder to 2× its intended load before regular use)
- Use multiple mounting screws for wall-mounted versions
- Have positive retention elements (not just gravity) for tools that could be dislodged by vibration or accidental bumping
Electrical and Power Tool Safety
Holders for power tool accessories (drill bits, router bits, saw blades) should:
- Store accessories with any sharp edges protected or oriented away from casual contact
- Be positioned away from operating machinery where vibration could dislodge accessories
- Allow safe retrieval without reaching over or around operating tools
Inspection and Maintenance
Periodically inspect printed tool holders for:
- Cracks or delamination (especially in holders under sustained load)
- Deformation from heat exposure (PETG or ASA resistant; PLA more susceptible)
- Loosening of mounting hardware
- Wear at contact points where tools are inserted and removed repeatedly
Replace any holder showing signs of structural failure before it fails in use.
Building Your Workshop Organization System Over Time
A complete workshop organization system isn’t built in a day — it’s developed over weeks and months as you identify needs, design and print solutions, test them in real use, and iterate.
A productive approach:
Week 1: Print holders for the 5–10 tools you use most frequently. These produce the most immediate improvement in workshop efficiency.
Week 2–4: Print holders for secondary tool collections, identify gaps in your layout, and begin organizing accessories and consumables.
Month 2+: Develop specialty holders for specific tool collections, create storage for smaller items (fasteners, consumables, project-specific accessories), and refine the overall system based on actual use patterns.
The system improves continuously because:
- New tools can be immediately given a home
- Inefficient holder designs can be reprinted in improved versions
- The layout can be adjusted without any permanent changes
- The community regularly releases new holder designs for specific tools
Conclusion: The Workshop You Always Wanted
There’s a version of your workshop where every tool is exactly where you’d expect it, every hand reaches to the right place automatically, and the time between deciding to do something and having the right tool in your hand is measured in seconds rather than minutes.
That version of your workshop isn’t achieved by buying more storage systems from a hardware store. It’s achieved by having the right holder for each specific tool, positioned exactly where it makes sense for your specific workflow and your specific body.
Your 3D printer can build that version of your workshop, one holder at a time. Start with the tools you use most. Measure them, find or design holders that fit them perfectly, print them in PETG, and mount them where you reach automatically when you need them.
Then notice how different it feels to work in that space.
That difference — quiet, practical, enabling — is what good workshop organization actually delivers. And now you have the tool to create it.