Introduction
Among the many parameters that control how three-dimensional printers create objects, print speed stands as one of the most misunderstood and frequently mishandled settings. Beginners often assume faster is always better, pushing speeds as high as their printers will attempt in hopes of reducing the hours required for prints to complete. This approach inevitably leads to disappointment when quality suffers, prints fail, or the supposed time savings fail to materialize because problems force reprinting at more conservative settings. Understanding print speed requires recognizing it as one element in a complex system of interrelated factors rather than a simple dial that trades quality for time.
Print speed measured in millimeters per second describes how quickly the print head or laser moves during the building process. A setting of fifty millimeters per second means the nozzle travels fifty millimeters in one second while depositing material or the laser scans fifty millimeters of powder surface per second while fusing it. These speeds sound modest compared to the rapid movements of CNC machine tools or the instantaneous nature of injection molding, yet they represent practical limits imposed by the physics of melting plastic, solidifying resin, or sintering powder particles. Pushing beyond these limits risks quality degradation or outright failure.
The relationship between print speed and total print time proves less direct than intuition suggests. Doubling the speed setting does not halve the print time because significant portions of printing occur at fixed speeds regardless of the nominal setting. First layers typically print slowly for reliability. Fine details might print slowly for accuracy. Acceleration and deceleration limits mean the print head spends time ramping up to and down from maximum speed. Travel moves between printed regions often happen at different speeds than actual printing moves. The cumulative effect is that aggressive speed increases yield diminishing returns, with each additional ten millimeters per second saving progressively less time.
The quality implications of print speed extend beyond obvious defects like under-extrusion or poor layer bonding to subtle effects that accumulate across long prints. Mechanical vibrations induced by rapid direction changes create surface artifacts. Insufficient cooling time for deposited plastic causes sagging. The thermal dynamics of repeated rapid passes affect layer adhesion. Understanding these quality mechanisms enables making informed decisions about when speed increases are acceptable and when they compromise results unacceptably for specific applications.
This comprehensive exploration will examine what print speed actually controls and what it does not affect, how speed limitations arise from mechanical, thermal, and material constraints, what quality defects appear when printing too quickly, how to determine optimal speeds for specific materials and geometries, what strategies allow faster printing without quality loss, and how speed interacts with other critical parameters. Whether seeking to minimize time for functional prototypes or maximize quality for display pieces, understanding print speed fundamentals enables intelligent optimization that achieves project goals efficiently.
What Print Speed Actually Controls
Understanding what print speed settings affect and what they leave untouched helps clarify how this parameter fits into the larger system of factors determining print time and quality. The terminology itself can mislead because “print speed” encompasses multiple distinct speeds for different operations rather than a single unified velocity.
The primary print speed or default speed sets the baseline velocity for most printing moves where material is being deposited. This speed applies to infill, inner perimeters, and other features that do not have specific overriding speed settings. Slicing software uses this baseline as the reference from which other speeds calculate as percentages or absolute values. A primary speed of sixty millimeters per second with outer walls set to fifty percent would print outer perimeters at thirty millimeters per second.
Outer perimeter speed deserves special attention because it directly affects surface quality visible on finished prints. Most slicing software allows setting outer wall speed independently from inner walls and infill, recognizing that outer surfaces benefit from slower more controlled deposition while internal structure can print faster without visible consequence. Typical outer perimeter speeds range from twenty to forty millimeters per second for good surface quality, even when printing inner structures much faster.
Infill speed controls how quickly the internal honeycomb or grid structure prints. Since infill remains hidden inside the part, appearance matters less than structural adequacy and time efficiency. Infill commonly prints faster than perimeters, sometimes at seventy to one hundred millimeters per second or higher, because the regular geometric patterns of infill tolerate faster printing without the precision demands of external surfaces. The time savings from fast infill can be substantial for parts with significant internal volume.
First layer speed represents a critical exception where printing intentionally slows dramatically compared to other layers. The first layer establishes adhesion to the build surface and creates the foundation for all subsequent layers, making reliability more important than speed. Typical first layer speeds run twenty to thirty millimeters per second, sometimes only twenty to forty percent of normal print speeds. This slower speed gives deposited plastic more time to spread and adhere before the nozzle moves away, improving success rates at the cost of a few extra minutes at print start.
Travel speed controls non-printing movements when the print head moves between different regions without extruding material. These travel moves can happen much faster than printing moves because no material deposition constrains the speed. Travel speeds of one hundred to two hundred millimeters per second or higher reduce the time spent on unproductive air moves. However, very high travel speeds increase mechanical stress and may cause ringing artifacts if the printer’s frame resonates.
Small perimeter speed modifications help with tiny features that complete their perimeter in only seconds. Very small circles or intricate details benefit from reduced speed that allows more precise control and gives the just-deposited plastic more time to cool before the nozzle comes back around for another pass. Some slicers automatically reduce speed for features below certain size thresholds, preventing problems that would occur from rapid repeated passes over tiny areas.
Bridge speed affects overhanging features that span gaps without support beneath them. Bridges require careful speed balance—too slow and gravity pulls the molten plastic downward before it cools, too fast and the nozzle may drag through the previous pass or fail to deposit enough material. Bridge speeds often need optimization through testing for specific materials and span lengths.
Support structure speed determines how quickly temporary supports print. Since supports remove after printing and do not affect the final part’s appearance, they can often print faster than the model itself. However, supports must provide adequate structural stability during the build, so speeds cannot increase arbitrarily without risking support failure that leads to print collapse.
Physical Limits: Why You Cannot Print Infinitely Fast
Understanding why print speed cannot increase indefinitely reveals the fundamental constraints that determine practical speed ranges. These limits arise from physics and materials rather than arbitrary software restrictions, meaning no amount of tuning or upgraded hardware completely eliminates them.
Volumetric flow rate represents perhaps the most fundamental limit on FDM printing speed. Material must melt and flow through the nozzle at sufficient rate to deposit the required volume per unit time. The volume flow rate equals the cross-sectional area of the deposited line times the linear speed of nozzle movement. A nozzle printing 0.4 millimeter wide lines at 0.2 millimeter layer height and moving at fifty millimeters per second must flow four cubic millimeters of material per second. Doubling speed requires doubling flow rate.
Hotend heating capacity limits how much plastic can melt per second. The heating block has finite thermal mass and the heater provides finite power. When flow rate demands exceed what the hotend can melt, the material cannot fully melt before extrusion, causing under-extrusion where insufficient material deposits. Standard hotends typically max out around ten to fifteen cubic millimeters per second. High-flow hotends with larger heating blocks and more powerful heaters might achieve twenty-five to thirty-five cubic millimeters per second. Calculating the required flow rate for intended speed and layer settings indicates whether the hotend can sustain it.
Mechanical acceleration limitations prevent instant speed changes when the print head needs to slow for corners or speed up for straight runs. The motors, belts, and frame cannot change velocity instantaneously without infinite force. Acceleration settings measured in millimeters per second squared control how quickly speed changes. Conservative acceleration of 500 millimeters per second squared takes two tenths of a second to accelerate from zero to one hundred millimeters per second. Aggressive acceleration of 3000 allows reaching the same speed in one thirtieth of a second. Higher acceleration reduces time spent ramping speeds but increases mechanical stress and vibration.
Frame rigidity affects how fast the printer can move without inducing vibrations that cause quality defects. When the print head changes direction or accelerates, inertial forces act on the frame. If the frame flexes or resonates, these vibrations transfer to the nozzle position, creating artifacts in the print. Sturdier frames with greater mass and better bracing resist vibration better, allowing higher speeds. Lighter frames or printers with long unsupported spans limit practical speeds regardless of what motor capabilities might theoretically allow.
Stepper motor torque limits how much force can be applied to accelerate the print head and overcome friction and inertia. At low speeds, stepper motors provide ample torque. At higher speeds, available torque decreases according to motor performance curves. Attempting to accelerate too aggressively or maintain excessive speeds can cause motors to skip steps, losing position and ruining prints. This typically manifests as layer shifting where subsequent layers misalign from previous ones.
Material cooling requirements constrain speed from the opposite direction. Deposited plastic must cool and solidify sufficiently before the nozzle returns for another pass or before the next layer deposits on top. Printing too quickly gives insufficient cooling time, causing newly deposited material to sag, deform, or fail to hold its shape. Part cooling fans help by actively removing heat, but their effectiveness has limits. Materials like PLA benefit from aggressive cooling and tolerate faster speeds, while ABS requires minimal cooling and demands slower speeds to prevent layer adhesion problems.
Thermal bonding between layers requires sufficient heat transfer from new layers to previous ones to enable molecular diffusion. When layers deposit too quickly, the previous layer may cool too much before the next layer arrives, reducing the heat available for bonding. This creates weak layer adhesion that makes parts fragile and prone to delamination. Slower speeds maintain better layer temperatures and allow more complete thermal bonding, creating stronger parts.
Precision and accuracy suffer when moving too quickly because mechanical systems have finite bandwidth. The commanded path represents an idealized trajectory that real mechanical systems approximate with various errors. At low speeds, these tracking errors remain negligible. At high speeds, the actual path may deviate noticeably from the intended path, creating dimensional inaccuracies and shape distortions. Features like sharp corners become rounded as the print head’s momentum carries it past the intended turn point.
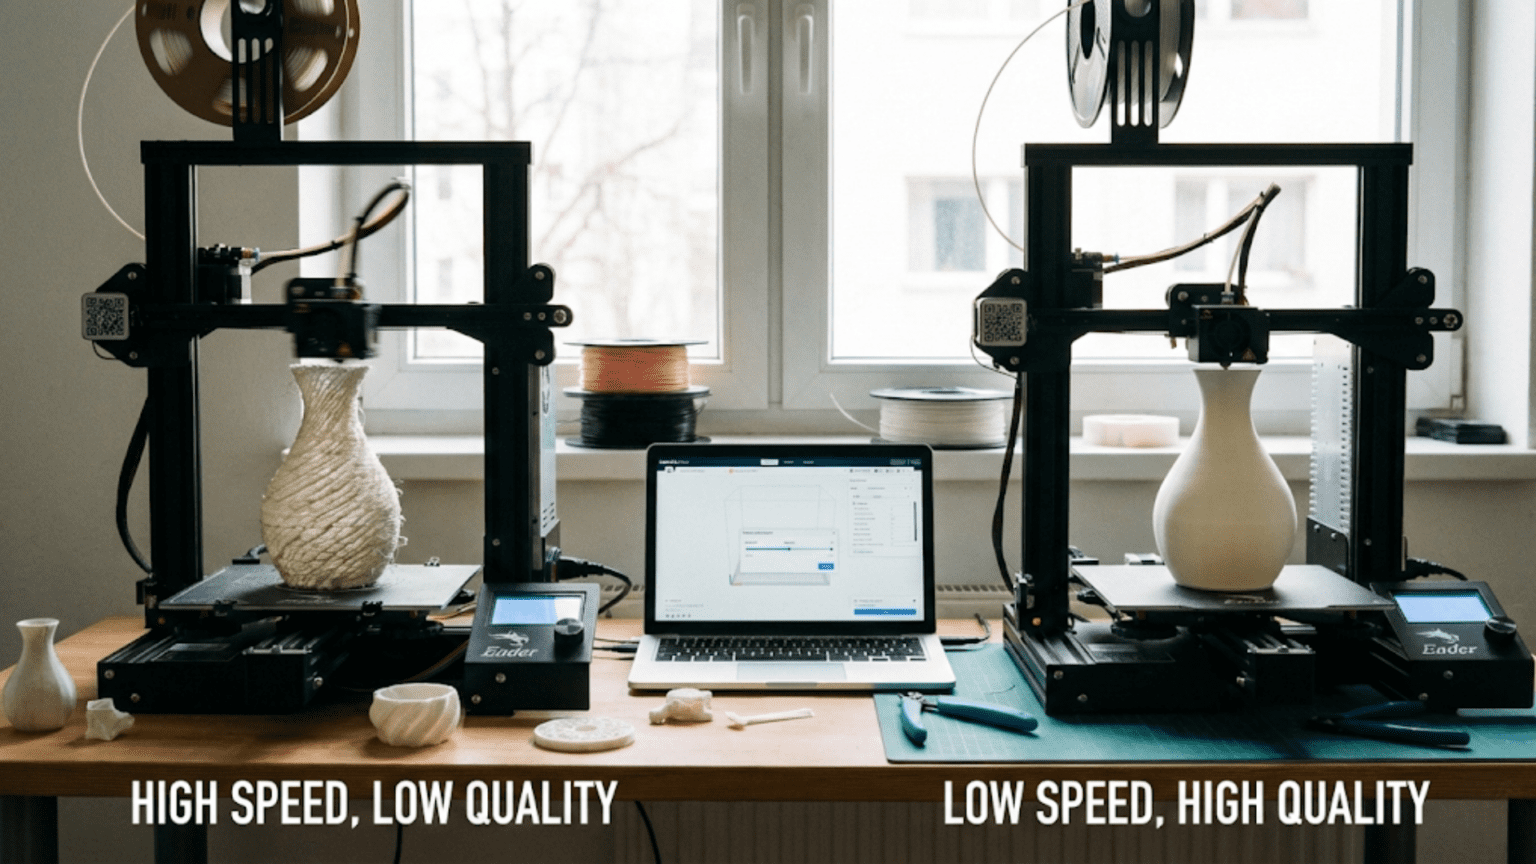
Quality Defects from Excessive Print Speed
When print speed pushes too hard against physical limitations, specific characteristic defects appear that experienced users learn to recognize as speed-related problems. Understanding these defects enables diagnosing that speed settings are too aggressive and need reduction.
Under-extrusion manifests as gaps, thin spots, or missing material where solid surfaces should exist. When print speed exceeds the hotend’s volumetric flow capacity, insufficient plastic flows to fill the commanded volume. The resulting prints show incomplete walls with gaps between perimeter lines, sparse top surfaces with visible infill showing through, or general weakness throughout. Under-extrusion from excessive speed typically worsens during faster portions of prints like infill while improving during slower portions like outer perimeters.
Stringing and oozing increase with print speed because rapid movements give retraction less time to work effectively. When the print head must travel quickly between printed regions, the brief retraction before travel may not fully clear the nozzle. Pressure in the hotend causes plastic to ooze out during travel, creating thin strings between parts. While stringing has multiple causes, excessive travel speed exacerbates the problem by reducing the effectiveness of retraction and reducing time for string-prone plastic to cool in the nozzle.
Ringing or ghosting appears as ripple patterns on surfaces after sharp corners or rapid direction changes. These artifacts result from mechanical vibrations excited when the print head accelerates or decelerates abruptly. The vibration causes the nozzle to oscillate slightly, creating waves in the surface that gradually damp out after the initial disturbance. Reducing print speed, acceleration, or jerk settings decreases ringing by reducing the forces that excite vibrations. Improving frame rigidity helps by resisting vibration more effectively.
Corner bulging occurs when the nozzle slows for corners but material flow does not reduce proportionally quickly. The excess material deposited while decelerating creates bulges or blobs at corners. This happens because the pressure in the hotend cannot dissipate instantly when speed decreases. Advanced firmware features like linear advance attempt to compensate by adjusting flow preemptively, but even with compensation, very aggressive speeds can overwhelm the correction and cause visible artifacts.
Sagging and poor overhangs result when material deposits too quickly for adequate cooling before the nozzle makes another pass. Overhanging features that extend beyond the layer below need time to cool and solidify before subsequent layers build on top. Rapid printing does not allow sufficient cooling time, causing plastic to droop or sag rather than maintaining intended geometry. Aggressive part cooling helps but cannot completely compensate for extremely fast speeds on challenging overhangs.
Layer adhesion weakness develops when layers print so fast that thermal bonding suffers. The previous layer cools too much before the next layer deposits, reducing the heat available for molecular interdiffusion between layers. Parts may appear fine initially but delaminate easily under stress, splitting along layer boundaries. This problem particularly affects materials like ABS that require good thermal conditions for strong layer bonds. Testing parts by trying to separate layers reveals whether adhesion is adequate.
Dimensional inaccuracy appears when the mechanical system cannot follow the commanded path precisely at high speeds. The actual deposited path deviates from the intended path, making printed dimensions differ from model dimensions. Holes may print smaller than designed, walls may bow or wave, and overall dimensions may be consistently off. These errors accumulate from the mechanical system’s limited bandwidth and finite following error at high speeds.
Surface quality degradation shows as rough, inconsistent textures compared to slow prints of the same model. The combination of mechanical vibration, imprecise path following, pressure variations in the hotend, and cooling inconsistencies creates surfaces that lack the smooth uniform appearance of carefully printed parts. While individual defects may be subtle, their cumulative effect noticeably degrades appearance.
Determining Optimal Speeds for Your Setup
Finding the right print speeds for specific combinations of printer, material, and geometry requires systematic testing rather than guessing or using default profiles blindly. The optimal speed balances time efficiency against quality requirements for each project.
Starting points from material manufacturers provide initial guidance but require tuning for specific equipment. Filament suppliers often suggest speed ranges like forty to sixty millimeters per second for their materials. These recommendations assume reasonable quality equipment with typical configurations. Very capable printers might exceed the upper end while budget equipment might need to stay toward the lower end. The manufacturer suggestions establish a safe range for initial testing rather than definitive values.
Calibration prints specifically designed to reveal speed-related defects help identify maximum reliable speeds. These test prints include features like overhangs, bridges, fine details, and long straight walls that show characteristic problems when speed is too high. Printing the same calibration model at progressively higher speeds until problems appear indicates the practical speed limit for that material and printer combination. This empirical testing reveals limits more accurately than theoretical calculations or manufacturer recommendations.
Temperature interaction affects optimal speed because higher temperatures reduce material viscosity, allowing faster flow through the nozzle. A material that under-extrudes at sixty millimeters per second and 210 degrees might print successfully at that speed when temperature increases to 220 degrees. However, higher temperatures create other issues like stringing and reduced dimensional accuracy. Finding the optimal temperature-speed combination requires testing multiple combinations to identify settings that provide required flow without undesirable side effects.
Geometry-specific speed adjustments recognize that different features tolerate different speeds. Large simple parts with minimal detail may print successfully at high speeds. Complex detailed parts with many small features benefit from reduced speeds that allow precise execution. Parts with extensive overhangs need slower speeds for adequate cooling. Adjusting speed based on what the specific geometry demands rather than using universal settings produces better results.
Incremental testing prevents wasting time on prints that fail catastrophically. Rather than immediately jumping to very high speeds, increasing speed gradually in increments of ten to twenty millimeters per second allows finding the limit without excessive failed prints. When problems appear, reducing speed slightly from the failure point establishes a reliable setting with some safety margin. This systematic approach identifies optimal speeds more efficiently than trial and error with random settings.
Quality tolerance determines acceptable speeds for specific projects. Display models or presentation prototypes demand better quality that requires conservative speeds. Functional prototypes or internal fixtures tolerate rougher quality that allows aggressive speeds. Understanding minimum acceptable quality for each project prevents wasting time on unnecessarily slow prints while ensuring visible parts meet appearance requirements.
Material-specific characteristics strongly influence optimal speeds. PLA tolerates faster printing than many other materials due to its low melting temperature and good cooling characteristics. PETG prints moderately fast but slower than PLA. ABS requires slow printing to prevent warping and layer adhesion issues. Nylon and other engineering materials often demand quite conservative speeds. Flexible materials like TPU require very slow speeds to prevent buckling in the filament feed path. Learning the speed characteristics of different materials allows setting appropriate expectations and initial speed ranges.
Strategies for Faster Printing Without Quality Loss
When time pressure demands faster printing but quality cannot be compromised, several strategies allow increasing throughput without accepting the defects that excessive speed typically causes. These approaches optimize the overall system rather than simply turning up speed dials.
Larger nozzles enable much faster printing while maintaining quality because they deposit more material per pass. Switching from 0.4 millimeter to 0.6 or 0.8 millimeter nozzles allows doubling line width, potentially reducing print time by thirty to fifty percent while maintaining or even improving mechanical properties through thicker features. The tradeoff is reduced ability to print fine details and thin features. For large simple parts where detail does not matter, larger nozzles provide dramatic time savings with minimal quality impact.
Thicker layer heights reduce the number of layers needed to build any given height, cutting print time proportionally. Using 0.3 millimeter layers instead of 0.2 millimeters reduces layer count by one third, potentially saving similar percentages of print time. The visible surface texture becomes coarser, making this appropriate for internal parts, functional prototypes, or any application where appearance is secondary. Combining larger nozzles with thicker layers multiplies time savings while maintaining acceptable quality for appropriate applications.
Infill optimization reduces unnecessary material deposition that consumes time without contributing to part requirements. Reducing infill from thirty percent to fifteen percent can save twenty to thirty percent of print time for parts where lower infill provides adequate strength. Using faster infill patterns like rectilinear or lines instead of slower patterns like honeycomb saves time without affecting structural properties significantly. Eliminating infill entirely for hollow parts that do not require internal structure maximizes time savings.
Adaptive layer height allows using thicker faster layers on flat or gently curved surfaces while automatically switching to thinner slower layers only where geometry requires fine resolution for detail. This provides a compromise between the speed of thick uniform layers and the quality of thin uniform layers. The software analyzes surface angles to determine where different layer heights make sense, optimizing time without sacrificing critical details.
Print orientation affects time by determining height which directly correlates with layer count. Orienting parts to minimize vertical dimension reduces the number of layers required. A box printed standing tall requires more layers than the same box laid on its side. When appearance constraints do not dictate orientation, choosing low-height orientations saves time. However, this must balance against mechanical property considerations since layer orientation affects strength.
Sequential printing of multiple parts completes one part fully before starting the next rather than interleaving layers across all parts simultaneously. This eliminates time wasted on travel moves between parts and reduces oozing from excessive travels. The time saving becomes substantial when printing many small parts that would otherwise require extensive travel. The limitation is that taller parts earlier in the sequence may interfere with the print head reaching later parts, constraining what arrangements work.
Firmware optimization features like junction deviation and linear advance improve print quality at higher speeds by intelligently managing acceleration and material flow. These advanced features require printer firmware support and careful calibration but can enable speed increases without quality penalty by compensating for mechanical and thermal limitations more effectively than simple speed reduction accomplishes.
Material selection influences achievable speeds because some materials simply print faster than others. If project requirements allow material flexibility, choosing a fast-printing material like PLA over slower materials like ABS or nylon provides time savings with no quality compromise. Understanding material characteristics helps select appropriate materials when speed matters.
How Print Speed Interacts With Other Parameters
Print speed does not exist in isolation but interacts with numerous other settings that collectively determine print success and quality. Understanding these interactions prevents problems from unexpected side effects when adjusting speeds.
Temperature and speed interact because material viscosity depends on temperature, affecting how easily plastic flows through the nozzle. Increasing speed may require increasing temperature to maintain adequate flow. However, higher temperature increases stringing and may reduce dimensional accuracy. Finding optimal temperature-speed combinations requires considering both flow requirements and quality implications of temperature changes.
Acceleration and jerk settings limit how quickly speed changes when the print head turns corners or switches between features. Increasing print speed without adjusting acceleration leaves more time spent ramping to speed and less time actually at maximum velocity, reducing the benefit of higher speed settings. Aggressive acceleration enables actually reaching high speeds but increases mechanical stress and vibration. Balancing speed, acceleration, and jerk settings optimizes actual performance rather than just nominal speed values.
Cooling fan speed must increase with print speed to remove heat faster from more rapidly deposited material. Inadequate cooling at high speeds causes overhangs to sag and small features to deform. However, excessive cooling creates layer adhesion problems and warping. Different portions of prints may need different cooling—perimeters benefit from active cooling while bridges and overhangs demand maximum airflow. Speed changes may require corresponding cooling adjustments.
Retraction settings become more critical at higher speeds because less time exists for retraction to work between rapid travel moves. Insufficient retraction distance or speed at high travel velocities creates excessive stringing. However, excessive retraction risks jamming or creating air gaps that cause under-extrusion when printing resumes. Tuning retraction for high-speed printing requires more careful optimization than slower printing that tolerates less precise retraction.
Layer height and speed combine to determine volumetric flow rate requirements. A given speed at 0.2 millimeter layers requires twice the volumetric flow as the same speed at 0.1 millimeter layers. This means maximum achievable speed depends on chosen layer height, with thinner layers allowing faster speeds before hitting flow limits. Understanding this relationship prevents attempting impossible combinations that exceed hotend capacity.
Infill density affects how much time speed increases actually save. Sparse infill with low density means less material to deposit, so speed matters less to total time. Dense infill or solid parts spend more time depositing material, making speed more influential. This suggests that speed optimization provides greater benefit for solid or high-infill parts than for hollow or low-infill models.
Part geometry determines whether speed matters. Small parts with many details and frequent direction changes spend little time at maximum speed regardless of settings because constant acceleration and deceleration dominate. Large simple parts with long straight features benefit more from speed increases because they actually sustain maximum velocity for significant periods. Understanding geometry characteristics helps predict whether speed changes will produce meaningful time savings.
Conclusion
Print speed represents one of the most important yet most misunderstood parameters in three-dimensional printing. While faster printing clearly seems desirable for reducing the hours required to complete objects, the relationship between speed settings and actual print time proves complex, with diminishing returns as speeds increase and significant quality implications when speeds exceed practical limits. Understanding these dynamics enables making informed decisions about when speed increases provide genuine benefit and when they create more problems than they solve.
The physical limits on print speed arise from material flow capacity, mechanical acceleration limits, thermal requirements for bonding and cooling, and precision constraints at high velocities. These fundamental constraints mean that no amount of parameter tuning allows arbitrarily fast printing without quality consequences. Recognizing these limits helps set realistic expectations and prevents wasting time pursuing speed increases that physics prohibits.
Quality defects from excessive speed include under-extrusion, stringing, ringing, poor overhangs, weak layer adhesion, dimensional inaccuracy, and degraded surface finish. Learning to recognize these characteristic problems enables diagnosing when speed settings exceed what the printer-material combination can reliably handle. Systematic testing through calibration prints reveals practical speed limits more accurately than guessing or blindly copying others’ settings.
Strategies for faster printing without quality loss focus on systemic optimization rather than simply increasing speed values. Larger nozzles, thicker layers, reduced infill, adaptive layer heights, and intelligent material selection provide substantial time savings while avoiding speed-related defects. These approaches recognize that multiple paths exist toward reducing print time, with speed increases representing only one option that must balance against quality requirements.
The interactions between speed and other parameters including temperature, acceleration, cooling, retraction, and layer height mean that optimization requires holistic understanding rather than isolated parameter adjustment. Changes to speed ripple through the system affecting multiple aspects of print behavior. Successful speed optimization accounts for these interactions and adjusts related parameters appropriately rather than changing speed alone and expecting good results.
Ultimately, optimal print speed depends entirely on specific project requirements, with no universal “best” speed existing across all applications. Display models demand conservative speeds for maximum quality. Functional prototypes tolerate aggressive speeds for minimum time. Understanding this context-dependent nature of speed optimization allows matching settings to actual needs rather than seeking mythical perfect speeds that work universally. Mastering print speed means knowing when to print fast, when to print slow, and how to find the right balance for any specific situation.